Notification Manager
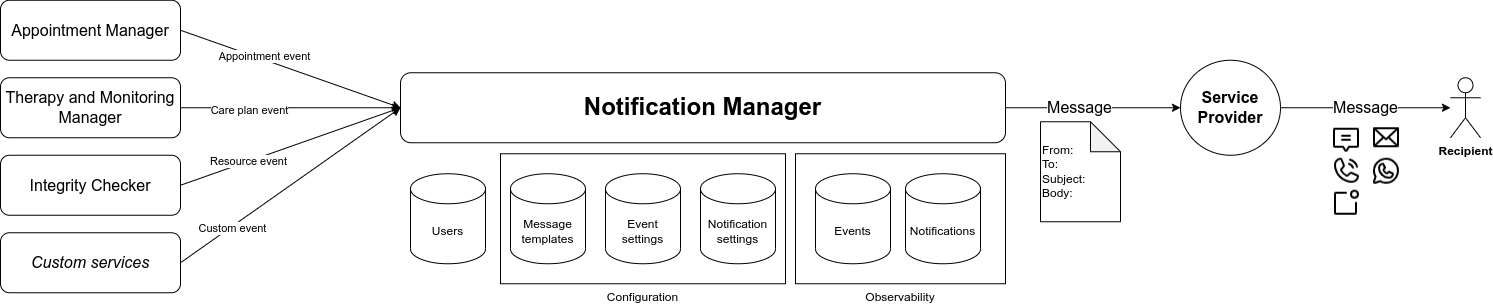
The Notification Manager provides an HTTP interface to send notifications to users through various channels, namely email, SMS, push notification, voice and whatsapp.
The following image provides an overview of the system architecture:
You can send notifications in three different ways:
- manually, sending a request to the
POST /sendendpoint, passing the channels, recipients, template, … in the request body;
- manually, sending a Flow Manager command to the
POST /saga/sendendpoint (see the configuration section for more information);
- automatically, when specific events occur: configure one or more notification settings telling the Notification Manager which notifications to send when a certain event occurs and notify when an event occurs by calling
POST /notification-events/.
In order to send a message through a particular channel, you need to deploy the corresponding plugin. This is not needed for the whatsapp and voice channels, for which there is a direct interaction with Kaleyra APIs.
When using the HTTP interface, the request headers are not forwarded to the external services, including the four plugins mentioned above and the CRUD Service. If you need to customize the requests sent to the external services, you should write a custom handler, as explained in the Configuration sections.
Providers
| Provider | SMS | Push Notifications | Voice calls | WhatsApp messages | |
|---|---|---|---|---|---|
| Amazon SES | ✓ | ||||
| Firebase | ✓ | ||||
| Kaleyra | ✓ | ✓ | ✓ | ||
| Twilio | ✓ |
Channels
Each channel has external dependencies, including other Mia-Platform plugins, service providers accounts and specific fields on the message templates and users CRUD collections.
Email
To send emails, you need to configure the SES Mail Notification Service and set the MAIL_SERVICE_URL environment variable with its internal URL.
If you are going to send attachments, you also need to configure the Files Service and set the FILE_SERVICE_URL environment variable with its internal URL.
In the service configuration, you must set the following fields:
activeChannelsmust include theemailvalue;sender.emailmust provide the email address that will appear as the sender of emails;userFields.emailAddressshould specify the custom name of theemailAddressfield of the users CRUD collection.
Message templates need the following fields in the templates CRUD collection:
emailTitle: the email subject;emailMessageoremailHtmlMessage: the content of the email (as HTML or plain text, HTML is used by default if both are set);emailAttachments(only if you send attachments): list of files to send as attachments.
Email recipients need the following fields in the users CRUD collection:
emailAddress: if the field has a different name in your collection, remember to set the custom name in the service configurationuserFields.emailAddressfield.
SMS
To send SMS messages, you need to configure the SMS Service and set the SMS_SERVICE_URL environment variable with its internal URL.
In the service configuration, you must set the following fields:
activeChannelsmust include thesmsvalue;sender.smsmust provide the phone number or alphanumeric ID that will appear as the sender of SMS messages;userFields.phoneNumbershould specify the custom name of thephoneNumberfield of the users CRUD collection.
Message templates need the following fields in the templates CRUD collection:
smsMessage: the body of the SMS message.
SMS message recipients need the following fields in the users CRUD collection:
phoneNumber: if the field has a different name in your collection, remember to set the custom name in the service configurationuserFields.phoneNumberfield.
Push notifications
v2.5.0
Since version 2.5.0 you can use different Firebase credentials to send push notifications to different mobile applications.
This feature is currently available only on custom handlers and is supported by the sendMessages custom handler API.
v2.2.0
Since version 2.2.0 you can send push notifications without needing Kafka. We recommend using Kafka when you need high reliability or performance, for example when handling an high volume of notifications.
To send push notifications, you can do one of the following:
- send the notifications directly to Firebase by setting the
GOOGLE_APPLICATION_CREDENTIALSenvironment variable (requires version 2.2.0 or later); - configure the Kafka cluster and the Kafka2Firebase Service and set all the
KAFKA_*environment variables accordingly.
In the service configuration, you must set the following fields:
activeChannelsmust include thepushvalue;push.providermust specify if the push notifications are sent to Firebase (firebase) or Kafka (kafka), default iskafkafor backwards compatibility;userFields.deviceTokenmust specify the custom name of thedeviceTokenfield of the users CRUD collection.
Message templates need the following fields in the templates CRUD collection:
pushTitle: the notification title;pushSubtitle: the notification subtitle;pushMessage: the notification message;
or, as an alternative, just one:
pushData: the full notification payload, which overrides thepushTitle,pushSubtitleandpushMessagefields.
Push notification recipients need the following fields in the users CRUD collection:
deviceToken: if the field has a different name in your collection, remember to set the custom name in the service configurationuserFields.deviceTokenfield.
Voice calls
To send voice calls, you need to create a Kaleyra account and set the KALEYRA_API_BASE_URL, KALEYRA_API_KEY and KALEYRA_API_SID environment variables with the Kaleyra base URL, API key and SID respectively.
In the service configuration, you must set the following fields:
activeChannelsmust include thevoicevalue;sender.voice: the phone number of the caller registered in the Kaleyra console;userFields.phoneNumber: the custom name of thephoneNumberfield of the users CRUD collection;voice.retryCount: the number of call attempts that will be tried if the user doesn't pick up;voice.speechSpeed: the speed of the text-to-speech;voice.speechLanguage: the language of the text-to-speech.
Message templates need the following fields in the templates CRUD collection:
voiceMessage: the voice message.
The recipients need the following fields in the users CRUD collection:
phoneNumber: if the field has a different name in your collection, remember to set the custom name in the service configurationuserFields.phoneNumberfield.
WhatsApp messages
To send voice calls, you need a Kaleyra account, enable the WhatsApp channel and set the KALEYRA_API_BASE_URL, KALEYRA_API_KEY and KALEYRA_API_SID environment variables with the Kaleyra base URL, API key and SID respectively.
In addition, you need to create a separate WhatsApp Business account, linked to your Kaleyra account, and a valid WhatsApp phone number.
In the service configuration, you must set the following fields:
activeChannelsmust include thewhatsappvalue;sender.whatsappPhoneNumberId: the WhatsApp phone number;userFields.phoneNumber: the custom name of thephoneNumberfield of the users CRUD collection;
Message templates need the following fields in the templates CRUD collection:
whatsappTemplateName: the name of the WhatsApp template;whatsappTemplateParameters: the parameters of the WhatsApp template.
The recipients need the following fields in the users CRUD collection:
phoneNumber: if the field has a different name in your collection, remember to set the custom name in the service configurationuserFields.phoneNumberfield.
Reminders
To schedule reminders, you need to configure the Timer Service and set the TIMER_SERVICE_URL environment variable with its internal URL.
Send messages
If you simply need to send notifications, you can use the POST /send endpoint, which has the exact same interface and behavior as in the Messaging Service and provides a low-level API, which leaves to the client the responsability and ownership of the notification business logic.
So, to send an email to a couple of recipients you can send a request with a body like this:
{
  "channels": ["email"],
  "recipients": ["auth0|mark.greene", "jean.white"],
  "templateId": "6589e6e5-e919-4146-88ea-fb15eea69780",
  "data": {
    "startDate": "2024-01-15T09:30:00Z",
    "endDate": "2024-01-15T10:00:00Z"
  }
}
The POST /send endpoint still requires the template ID, while you can reference a template by name only in the notification settings, which are used when processing an event sent to the POST /notification-events/ endpoint.
Clients
v2.5.0. The features described in this section are available since version 2.5.0.
If you need to setup the service in a multitenant environment, you can override the global configuration to provide client-specific settings.
Each client is identified by an ID and you can specify its configuration in the clients section of the service configuration.
To apply the client configurations in your custom handler, you simply have to enrich your message with an additional field - called clientId - containing the client ID - and send it with the sendMessage API.
Events
The Notification Manager allows you to send notifications in response to an event generated by another microservice and according to settings applying to one or more users according to their properties (ID, roles, groups and clusters).
Any microservice can notify the Notification Manager that an event occurred by calling the POST /notification-events/ passing the event details in the request body.
An event should have the following properties:
- an
id, which uniquely identifies the event in the system (can be generated by the client or by the Notification Manager itself); - a
key, which identifies the main resource associated to the event (for example an order ID); - a
name, which identifies the type of the event (for exampleACME/OrderCreated/v1) and enables the routing to the appropriate event handler; - a
payload, which contains the actual details about the event (for example the order details); - additional
metadata, which carry additional information for the event handler to process the events.
{
  "id": "06efe38d-0e46-4863-9bb4-4c11ff63c912",
  "key": "order-12345",
  "name": "ACME/OrderCreated/v1",
  "metadata": {},
  "payload": {
    "orderId": "order12345",
    "customerId": "2023-02-01T09:30:00Z",
    "products": ["product-1", "product-2"],
    "amount": 123.45,
    "status": "PROCESSING",
    "billingAddress": "...",
    "shippingAddress": "..."
  }
}
If the Notification Manager receives an unknown event, i.e. an event for which there is no handler registered to process it, an error will be returned if you sent an HTTP request to POST /notification-events/ and the error details are saved into the events CRUD.
Default events
The Notification Manager provides out-of-the-box support for the following events:
AM/AppointmentCreated/v1: a new appointment is created in the Appointment Manager;AM/AppointmentDeleted/v1: an appointment is deleted in the Appointment Manager;AM/AppointmentUpdated/v1: an appointment is updated in the Appointment Manager;AM/AppointmentReminder/v1: an appointment reminder is expired;IC/ResourceForbiddenEvent/v1: a resource integrity violation has been detected by the Integrity Checker;TMM/MonitoringCreated/v1: a new monitoring is created in the Therapy and Monitoring Manager;TMM/MonitoringDeleted/v1: a monitoring is deleted in the Therapy and Monitoring Manager;TMM/MonitoringUpdated/v1: a monitoring is updated in the Therapy and Monitoring Manager;TMM/MonitoringReminder/v1: a patient reminder to perform the tasks assigned by the doctor in the monitoring plan;TMM/TherapyCreated/v1: a new therapy is created in the Therapy and Monitoring Manager;TMM/TherapyDeleted/v1: a therapy is deleted in the Therapy and Monitoring Manager;TMM/TherapyUpdated/v1: a therapy is updated in the Therapy and Monitoring Manager;TMM/TherapyReminder/v1: a patient reminder to perform the tasks assigned by the doctor in the therapy plan;TMM/ThresholdExceeded/v1: a detection submitted by a patient in the Therapy and Monitoring Manager exceeds one or more thresholds.
For additional information about the behavior of the default event handlers, take a look at the Usage section.
If you register a custom handler for one of the events listed above, this handler will override the default one, since there always must be one handler for each event. The custom handler can implement any custom business logic, for example to infer the participants from the event payload or metadata.
Custom events
If you need to manage arbitrary events generated by custom systems or process default events in a different way, for example to include additional recipients, you can use custom handlers.
A custom handler is a JavaScript module with a well defined API, that you can register to handle events and is loaded into the service routing table at bootstrap.
You can find more details on how to register a custom handler in the Configuration section.
Notification settings
If you want the Notification Manager to automatically send notifications when a certain event occurs, you must configure one or more notification settings.
Each notification setting should provide the following information:
- the event that triggers the sending of the notifications;
- the emitters that trigger the sending of the notifications;
- the user, group, cluster or role that can receive the notification messages;
- the time frames when the Notification Manager can send notifications to the recipients;
- the channels over which the messages can be sent;
- the name of the template to use for creating messages.
Each notification setting is uniquely identified by the event and the participants. You can configure multiple notification settings for the same event, as long as they target different recipients. A participant is identified by a combination of user, role, group and/or cluster.
Consequently, you can define broader notification settings for groups or clusters and then each user can personalize his or her notification preferences, for example enabling or disabling channels or changing the time frame.
The Notification Manager sorts recursively the notification settings for a given user according to the following criteria:
- settings targeting a role have precedence over settings targeting groups;
- settings targeting a cluster have precedence over settings targeting roles;
- settings targeting a user have precedence over settings targeting clusters;
So, if you have four notification settings targeting respectively:
- a single doctor (
user); - all doctors (
group); - all personnel from an hospital (
cluster); - all people who can sign a discharge (
role).
They would be sorted as follows:
- a single doctor (
user); - all personnel from an hospital (
cluster); - all people who can sign a discharge (
role); - all doctors (
group).
Let's see an example and imagine we have some notification settings targeting:
- a single doctor (
user); - a single doctor (
user) from a hospital (cluster); - all doctors (
group) from a hospital (cluster); - all doctors (
group) that can sign patient's discharge (role); - all doctors (
group).
They would be sorted as follows:
- a single doctor (
user) in a hospital (cluster); - a single doctor (
user); - all doctors (
group) in a hospital (cluster); - all doctors (
group) that can sign patient's discharge (role); - all doctors (
group).
As you can see, the rules targeting a user are sorted looking at the precedence based on the other fields, so the rules targeting a cluster is more specific and therefore has a higher precedence than the rule simply targeting a user. In this context, you can think of precedence as a synonym for specificity.
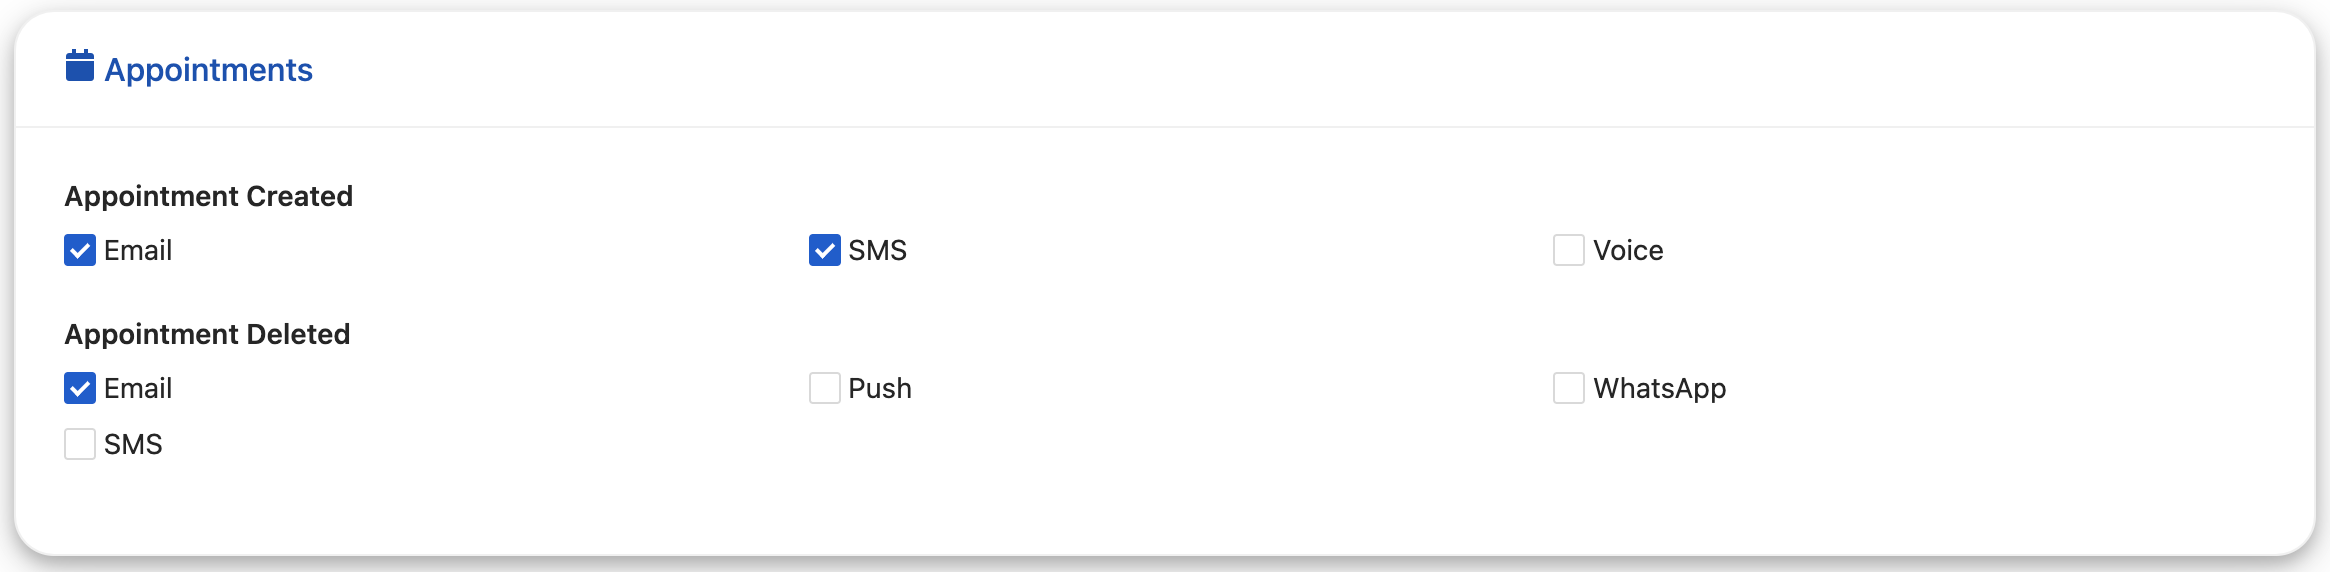
Notification settings UI
The Notification Setting Cards component allows for the configuration of notification settings. By giving the list of required topics, it is possible to set up a notification setting card. Every list has the ability to contain several clusters, with the ability to include necessary events on each cluster.
The notification setting card web component is used to select desirable notification between the available channel.
Notifications
The Notification Manager stores information about every notification sent across all channels so that administrators can easily monitor the current or past behavior of the system and detect and investigate anomalies, like errors sending notifications on specific channels or to certain recipients.
For more details about the information stored about the user notifications, please take a look at the CRUD notifications schema.
Users and recipients
In order to send messages to one or more users, the service supports different levels of users clustering:
- user: a single user;
- cluster: a custom set of users (for example doctors working in a certain ward or hospital);
- role: a role assigned to users;
- group: a group of users (for example
administratorsordoctors).
Each user in your users CRUD may belong to one or more groups and clusters and have one or more roles, saved in different properties of the CRUD, for example groups, clusters and roles; the properties can be named however you want, as explained in the dedicated section.
If you are sending the messages manually, by calling the POST /send endpoint, you can set the clusters and groups parameters to specify the clusters and groups that should receive the messages. The service will send notifications to all the users that belongs to at least one of those clusters. In addition, you can provide a list of recipients that will receive the messages regardless of the clusters and groups they belong to.
If you are sending the messages automatically based on events, you need to configure the configuration setting to specify the user, cluster, role and/or group that should receive the notifications. If the notification event specifies any recipient, the Notification Manager will filter the settings matching those recipients. Custom handlers can implement arbitrary business logic to determine the participants to send notifications to, according to the event metadata and payload.
When sending messages manually, if a user belongs to a cluster listed in the clusters parameter and its identifier is listed in the recipients, he/she will receive the messages only one time.
When sending messages automatically on events, a user may receive more than one notifications if there are different notification settings targeting two or more groups or clusters the user belongs to. For example, if for an event we have two notification settings, targeting doctors and admins groups, and a recipient belongs to both groups, he/she will receive two separate notifications, each one potentially sending multiple messages over different channels.
Messages templates
To standardize the messages you send to your users, you can create and save a template on the CRUD messages templates.
These are pre-defined messages for the various channels that can be referenced using:
- the
templateIdparameter in the body of thePOST /sendorPOST /saga/send; - the
templateNamefield in the notification settings.
Templates supports message interpolation.
Whatsapp
When using whatsapp instant messages, to standardize the messages you send to your users, you can manually create messages template from the WhatsApp channel management section on Kaleyra platform. Once you have created your template you can submit it for approval. It can take up to 24 hours for an approval decision to be made. Once a template has been approved, you can use the template saving its name on an appropriate CRUD messages templates, and referencing the template using:
- the
templateIdparameter in the body of thePOST /send; - the
templateNamefield in the notification settings.
Messages via whatsapp can only be sent via template, hence a template must be provided.
WhatsApp supports templates localization, meaning that every template can have messages in different languages. Since the Notification Manager does not currently allow clients to specify a language in the request, we only support the en language code. If you need to handle localization, you have to create different templates on Whatsapp channel management section on Kaleyra platform. This may change in the future.
Messages interpolation
Whether you use a template or you provide a message in the body of the send request, you can use interpolation to insert in the text some dynamic information.
The syntax to be used is the Handlebars. A Handlebars expression is an expression enclosed by double or triple curly brackets, like {{ user.firstName }} or {{{ appointment.notes }}}. They only difference is that HTML characters are escaped automatically only when using double curly brackets, which are safer and recommended to use unless you need to preserve text formatting.
Be very careful sanitizing your input when using triple curly brackets, otherwise your users may be exposed to code injection attacks.
When the text is compiled, these expressions are replaced with values from an input object. The input objects that can be used in the Notification Manager are:
-
the user object (i.e., the data of the user to which you are sending the message)
-
the data object of the body of the send request
In addition, you can use the following custom helpers:
(dateNow): return the current date/time as ISO string
{{ dateNow }} // e.g. 2023-10-15T09:30:00.123Z
dateFormat: format a date/time value in a given time zone (default: UTC)
{{ dateFormat data.startDate format='DD/MM/YYYY' tz='Europe/Rome' }} // e.g. 15/10/2023
| Property | Type | Values | Default |
|---|---|---|---|
| format | string | Any format supported by Dayjs | ISO8601 format |
| tz | string | Any timezone supported by ECMAScript2020 section 6.4 | UTC |
toLocale(available since version2.3.0): return a string representing a value in a given locale, if the value is undefined an empty string is returned instead
{{ toLocale data.amount }} // Use default locale -- e.g. 1.234.567,89
{{ toLocale data.amount locale='it-IT' }} // e.g. 1.234.567,89
| Property | Type | Values | Default |
|---|---|---|---|
| locale | string | A BCP 47 language tag | DEFAULT_LOCALE |
For example, given the following user object
{
  "name": "Mario",
  "surname": "Rossi",
}
and the following data object in the body of the send request
{
  "appointmentDate": "01/01/2021",
  "serviceAmount": 1234567.89
}
this message
'Hello, {{user.name}}! You have a new appointment on {{data.appointmentDate}} and you are going to pay ${{toLocale data.serviceAmount "en-US"}}'
will be compiled in
'Hello, Mario! You have a new appointment on 01/01/2021 and you are going to pay $1,234,567.89'
Handlebars helpers
v1.3.0. Advanced interpolation is available only since version 1.3.0.
You can use the functions provided by the handlebars-helpers library to perform advanced interpolation of the messages.
In the following example, firstName and lastName are fields of the data object that are displayed only if the type field is set to patients.
{{#if (eq data.type "patients")}}{{data.firstName}} {{data.lastName}}{{/if}}
In this case the eq function is provided by the handlebars-helpers library.
Functional test
A collection of tests for the POST /notification-events endpoint has been implemented in Postman. The test suite and its environment variables can be downloaded from the following links: test suite, environment.
Configuration
In order to run the whole test suite sequentially without rate limit errors, and without adding a delay, the following variables values must be set in the Sms-service:
- RATE_LIMIT_MAX_REQUESTS = 30;
- RATE_LIMIT_TIME_WINDOW = 1 minute;
The users targeted by these tests all share the same phone number, and therefore the exponential delay security measure is triggered when sending consecutive messages in the tests. Updating the users phone numbers it is possible to mitigate the effect on the test suite running time (must be valid and real phone numbers).