Single View Creator Plugin
Single View Creator plugin can be used in two modes:
- Low Code: it allows you to perform aggregation through JSON files without writing any Javascript code. If you need a custom behavior on a piece of aggregation you can still write your own code.
- Manual: it allows you to perform aggregation by writing your own Javascript code.
We recommend using the Low Code mode since it allows you to be faster and safer when aggregating your data. You will just need to think about the data and not the code for doing so.
The Manual mode is supposed to be used only for cases where Low Code cannot be used, but this should rarely happen, since it is possible to write custom Javascript functions for specific pieces of aggregation also when using Low Code.
Getting started
Go to the Marketplace and create a Single View Creator or Single View Creator - Low Code plugin.
Go to the microservice page of the newly created Single View Creator and set the correct values to the environment variables containing a placeholder.
Attaching a Service to a Single View
To simplify the configuration of the Single View Creator service, you can attach a service previously created from the marketplace to a Single View.
Here's how you can do it:
- In the Microservices section, create your Single View Creator Low Code service.
- Create your Single View and update it with all the required configurations.
- Attach the Single View Creator Service to the Single View from the dedicated configuration page located within the Single View Creators tab.
You can attach more than one Single View Creator Service to a Single View, and each service will have its own configuration and operate independently.
You can attach as many services as you need, but remember that you can attach one service to only one Single View.
After selecting a Single View Creator Service, you can access the configuration page and set up the following:
- The ER Schema
- The Aggregation
- Add a Validator file
- The Upsert/Delete Strategy;
- The Single View Key (from the Settings tab)
- The Single View Trigger Generator (more information in the related page)
Any updates to these configurations will be reflected in the service's configuration maps once you save the changes.
When a Single View Trigger Generator is attached to a Single View, the ER Schema, Aggregation, Single View Key, and the Validator (if present) will become "read-only."
If you prefer to manually configure these services, you can detach the service in the Single View Creator tab by clicking the detach icon in the Single View Creators table.
Single View Key
The Single View Key is the Single View Creator part which identifies the Single View document that needs to be updated as consequence of the event that the service has consumed.
To have more information on how to configure the Single View Key, please visit the related section.
ER Schema
The ER Schema defines the relationship between projections. On the dedicated page in the Config Map section, you can find a deep explanation of how ER Schema configuration works and how to configure it.
Selecting an ER Schema with the No Code
Your project might have enabled the possibility to configure ER Schemas with a No Code feature. In that case, the configuration section (where you usually would write the ER Schema) will show a drop-down menu where you can select one of the ER Schemas already configured on the ER Schemas page.
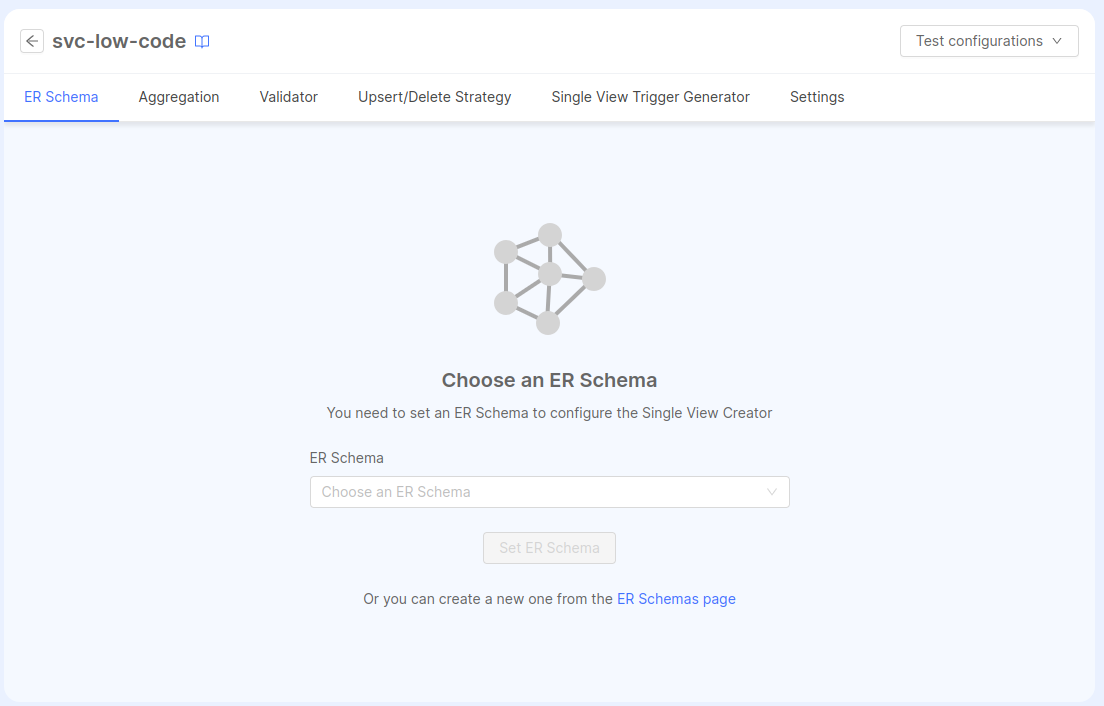
After selecting an ER Schema, a canvas showing a read-only version of the selected ER Schema will replace the selection page and the next configuration save will generate the Config Map of the ER Schema JSON taken from the selection. From now on, whenever the ER Schema is updated, the Config Map in the Single View Creator will be updated as well.
In case you need to change the ER Schema, you can do that from the Settings tab, inside the General card. This method can be used also to select it for the first time.
Please remember that changing the ER Schema will cause the reset of the Aggregation configuration.
Aggregation
The Aggregation is the Single View Creator part which aggregates Projections data and generates the Single View that is going to be updated.
To have more information on how to configure the Aggregation, please visit the related section.
Since version v5.0.0 of the Single View Creator service and v12.0.0 of the @mia-platform-internal/single-view-creator-lib, returning a Single View with the __STATE__ field set from the aggregation will update the Single View to that state (among the other changes).
This means, for instance, that if you set the __STATE__ value to DRAFT in the aggregation.json in Low Code mode (or in the pipeline.js in Manual mode), the Single View updated will have the __STATE__ field set to DRAFT.
Previously, the __STATE__ field you returned was ignored, and the Single View would always have the __STATE__ value set to PUBLIC.
Automatic generation of the Aggregation
The Aggregation Configuration can be automatically generated started from an already existing ER Schema. This feature is accessible inside the page of the Single View Creator attached to your Single View (from the Single View section select the Single View and, from the Single View Creators tab select the service attached with the Aggregation to edit), by clicking on the dedicated button as you can see in the picture below.
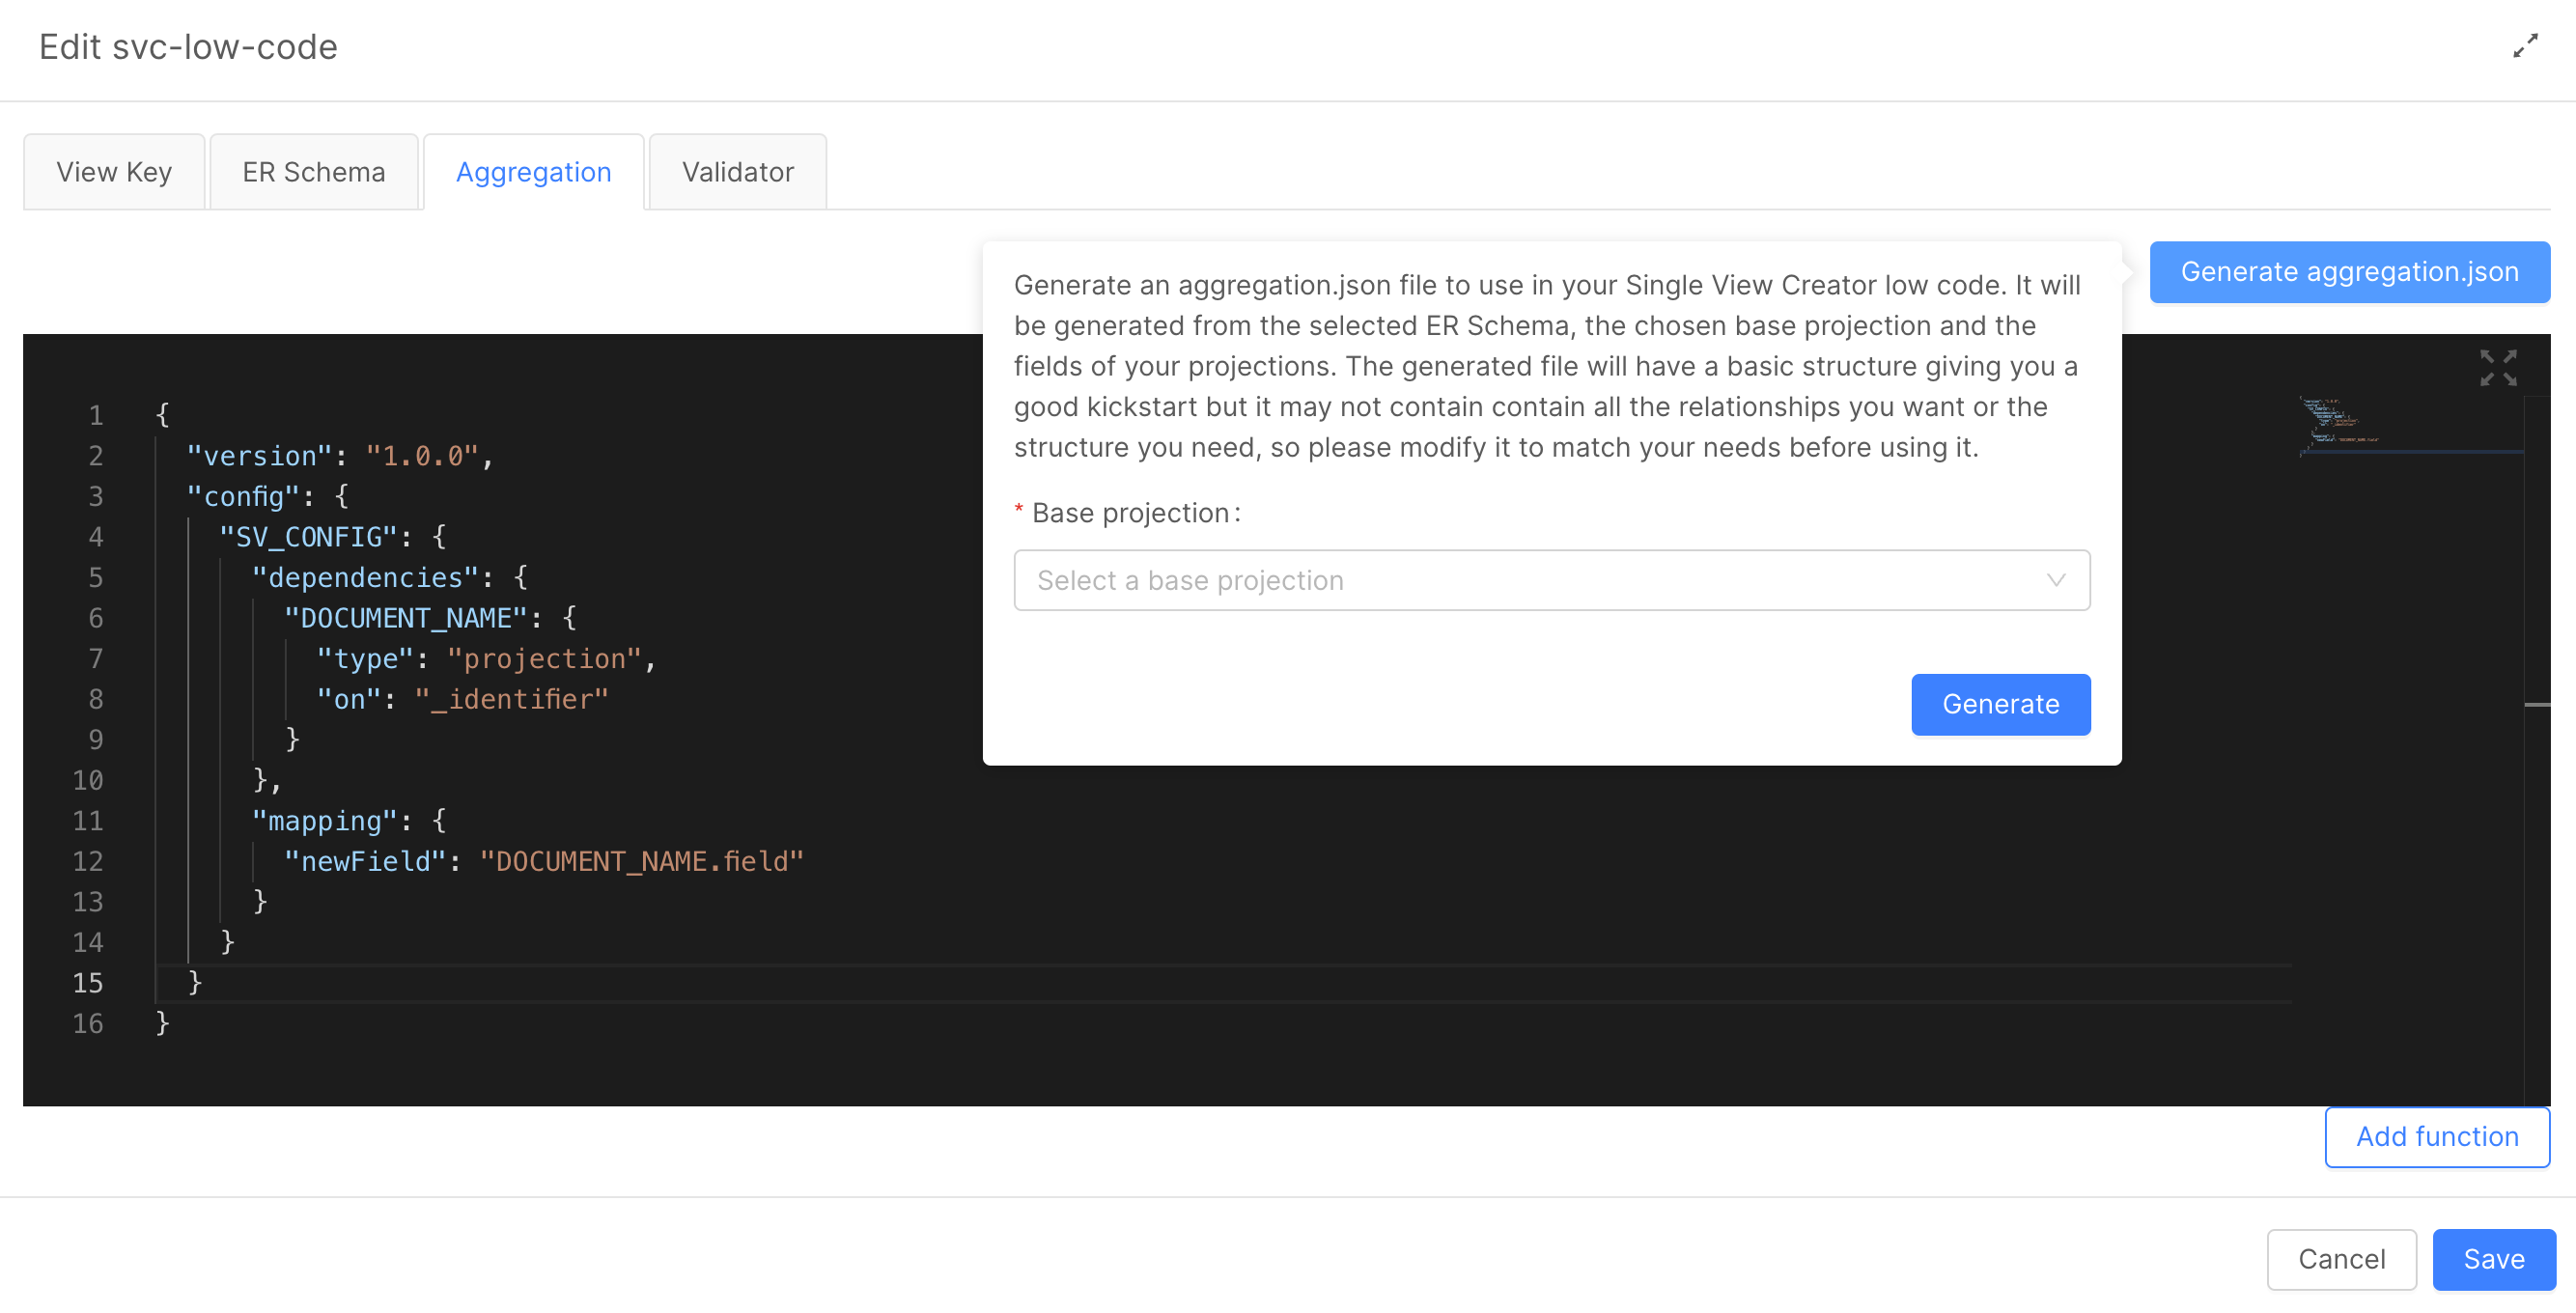
It is necessary to specify the base Projection from which the aggregation shall be generated. The base Projection is a projection that contains the fields that are going to be used as the identifiers for the Single View.
In case your project might have enabled the No Code Aggregation: in this case the Automatic generation feature is included in the Settings tab of the Single View Creator page.
The generated file will have a basic structure but it may not contain all the relationships needed or the desired structure, so please modify it to match the desired needs before using it.
Validator
If no validation function has been defined, all aggregation outcomes will be stored to the output collection.
The validation is an additional check operation that can be added to determine if the current Single View should be handled with either upsert or delete functions.
When the update of an existing Single View is triggered and the validation has a negative outcome, the Single View won't be updated, and instead it will be deleted.
It is possible to enable and modify the validation in your Single View Creator configuration accessing to the Validator tab of the Single View Creator attached to a Single View: it will show an editor where it will be possible to modify the validator.
If the function does not exist yet, a placeholder will allow you to create a new validator function that will include a function that will always return true, ready to be modified according to your needs.
In any case, the function should follow this structure:
module.exports = function validator(logger, singleView) {
  // ... custom validation logic on singleView
  // returns a boolean
  return customValidationResult
}
Upsert and Delete Strategies
It is possible to configure the upsert strategy and the delete strategy on the related tab inside the configuration page of the Single View Creator attached to the Single View.
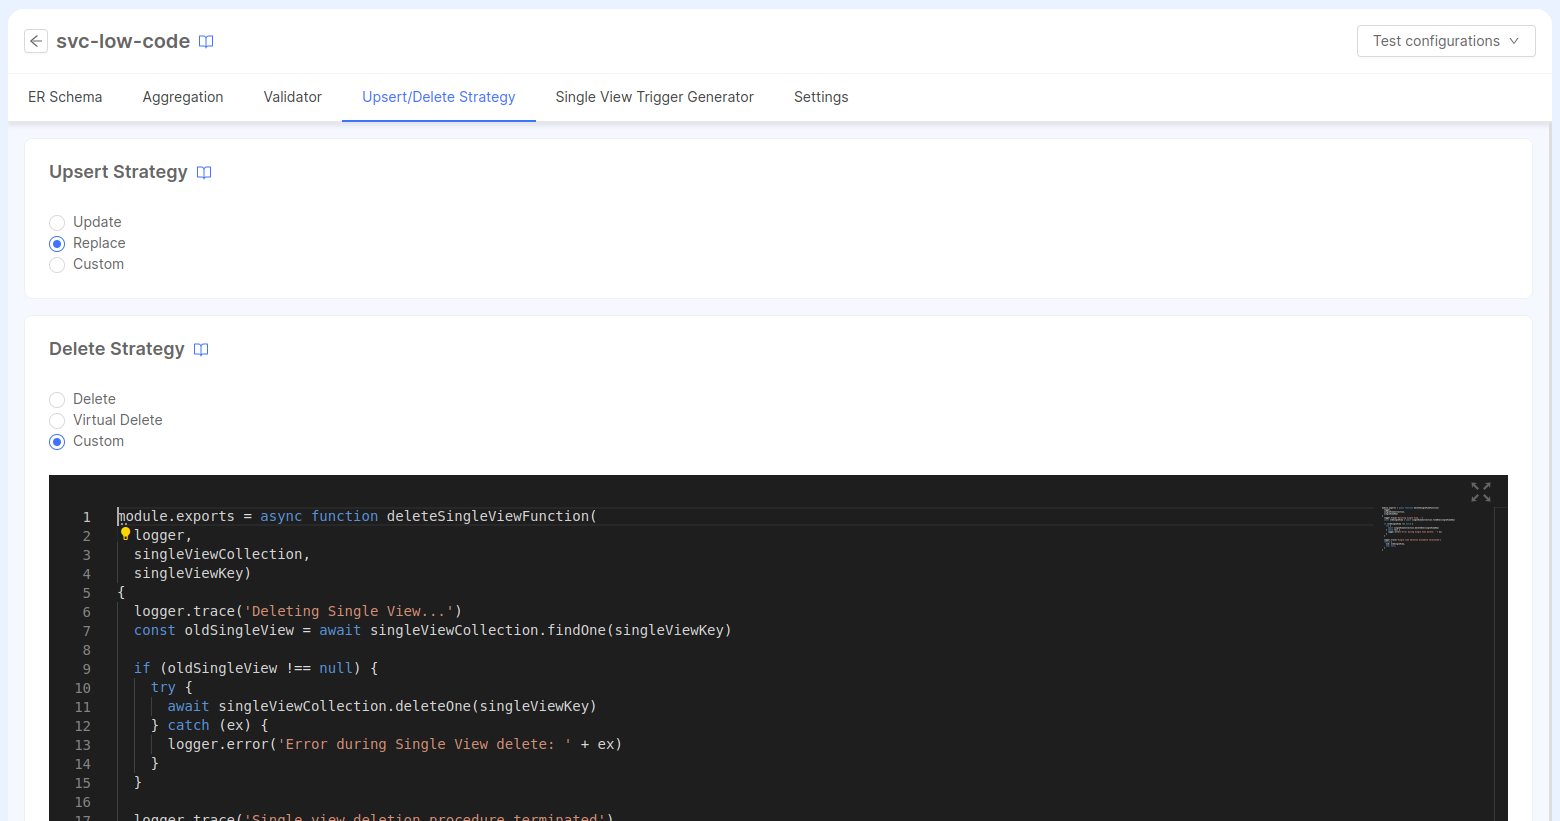
You can select between the three available options for the upsert strategy (Update, Replace or Custom) and for the delete strategy (Delete, Virtual Delete or Custom).
In case the Custom options is selected for the upsert and/or the delete strategy, an editor will appear just below with the existing configuration (if there's one) or a template code.
After saving the configuration, the selected strategies will be applied to the related environment variables UPSERT_STRATEGY and DELETE_STRATEGY. The eventually needed custom functions will be automatically included in a config map.
Read from multiple databases
The plugin is instructed to read projections from one database.
If you need to read data from multiple databases, you need to leverage on custom function from the mapping configuration.
First of all, you need to create a custom function to handle the connection to the second database.
const { MongoClient } = require('mongodb')

module.exports = () => {
  const dbConnection = {
    secondMongoClient: null, /** @param {MongoClient} */
    secondMongoDb: null /** @param {mongodb.Db} */
  }
  const {MONGODB_URL_2, MONGODB_NAME_2} = process.env

  const callback = async(logger) => {
    if (!dbConnection.secondMongoClient) {
      logger.info('starting connection to second db')
      dbConnection.secondMongoClient = new MongoClient(MONGODB_URL_2)
      await dbConnection.secondMongoClient.connect()
      dbConnection.secondMongoDb = dbConnection.secondMongoClient.db(MONGODB_NAME_2)
    }

    return dbConnection
  }

  return callback
}
The above module uses the database driver and exports a function to retrieve the connected client.
This module works like a singleton: indeed the client is created once and the state, e.g. the dbConnection variable, lives for the entire duration of the Node.js process (remember that require a module is always evaluated once by Node.js).
Remember to set the process variables MONGODB_URL_2 and MONGODB_NAME_2 up in the environment variables section.
Then, in a custom file linked to a field, you can use the second connection to read data:
const secondMongoDB = require('./secondMongoDB.js')
const getSecondMongoDB = secondMongoDB()

module.exports = async function (logger, db, dependenciesMap){
    const { secondMongoClient, secondMongoDb } = await getSecondMongoDB(logger)
    try {
      return secondMongoDb.collection('my-collection').findOne({/** */})
    } catch(err) {
      logger.error(err, 'something wrong happened with mongo db. closing connection...')
      await secondMongoClient.close()
      throw error
    }

}
If some unexpected error happens during the execution of your custom function, remember to properly manage the closing of the second db connection, to avoid leaving open connections to the MongoDB instance.
Final Configuration When you have to apply the second database connection to the aggregation file, you need to define just the custom field function.
{
   "version":"1.1.0",
   "config":{
      "SV_CONFIG":{
         "dependencies":{
            "PEOPLE":{
               "type":"projection",
               "on":"_identifier"
            },
            "MARRIAGE":{
               "type":"projection",
               "on":"PEOPLE_TO_MARRIAGE"
            },
            "PEOPLE":{
               "type":"projection",
               "on":"MARRIAGE_b_TO_PEOPLE"
            }
         },
         "mapping":{
            "name":"PEOPLE.name",
            "marriedWith":"PEOPLE.name",
            "fieldFromSecondDB":"__fromFile__[fieldFromSecondDB.js]"
         }
      }
   }
}