Integrate an external Identity Provider but manage session and user groups within your project
This scenario is a slight modification of Scenario 2. You still have an external Identity Provider (IdP) but the token used by the client is produced within your project so that you can manage the user groups within your project using a dedicated CRUD collection. Therefore, in this scenario, you will use the external IdP only to validate the users credentials.
This version is more complex than the one defined in the Scenario 2, and it is only useful if you really need to handle within your project both the token generation and users data.
Definition
This architecture uses the Authentication Service plugin. Note that, this time, it is a Mia-Platform plugin rather than a custom microservice as in Scenario 2. This imposes a limitations on the presented architecture: your external Identity Provider must be supported by the Authentication Service plugin (see the list of supported IdPs) otherwise this scenario is not applicable.
The involved microservices of the flow are:
API Gateway: Mia-Platform plugin available in Nginx or EnvoyLogin Site: Mia-Platform pluginAuthorization Service: Mia-Platform pluginAuthentication Service: Mia-Platform pluginCRUD Service: Mia-Platform plugin
While in Scenario 2 the client gets the token directly on the IdP, this time the process of obtaining the token goes through the Authentication Service.
The token is generated by the Authentication Service after merging the user info obtained from the IdP and the ones saved on a dedicated CRUD collection. In particular, the only user attributes that are inherited from the IdP are id, name and email; all the other attributes (groups included) must be added on the dedicated CRUD collection.
Once, your client has obtained the token following the above flow, the authentication and authorization of the API calls made with that token is similar to Scenario 2 but not identical.
Indeed, as you can notice from the picture above, the token resolution is performed directly from the Authentication Service rather than the Identity Provider.
Tutorial steps
To setup this flow you need to:
- configure some Mia-Platform plugins from the Marketplace
- add some endpoints to your project
In the following, we present both a manual way of doing it and a faster procedure using the Secure API Gateway application.
Manual configuration
We suppose that you have already created an API Gateway in your project and you already have some endpoints you want to secure.
-
Create the
CRUD Serviceplugin from the Marketplace:- Click on
Microservices - Click on
Create a Microserviceand selectFrom Markeplace - Select
CRUD Service - Click on
Create - Create a
CRUD collectionin the dedicated section of the Mia-Platform Console following this guide
- Click on
-
Create the
Authentication Serviceplugin from Marketplace- Click on
Microservices - Click on
Create a Microserviceand selectFrom Markeplace - Select
Authentication Service - Click on
Create - Set the environment variables following the documentation of the plugin
- remember to set all the required variables
- the
USERS_CRUD_BASE_URLmust be the API of the crud-service created in the previous step, likehttp://crud-service/users
- Set the configmap with the IdP specifications following the documentation of the plugin to set the correct values.
For a correct configuration, it is important to notice the following:redirectUrlmust behttps://<MY-HOST>/web-login/oauth/callback. This relative path will be used to handle the callback from the IdP during the Oauth2 login flow, and there we will expose the logic to complete the authentication flow.- If you are using Auth0 as IdP and so
auth0-clientas your service, the path you need to set ishttps://<MY-HOST>/web-login/callback. The difference lies in the way the web page requests the token: with/oauthin the path will pass the info via the body of the request, without it will pass the info via the query parameters.
- If you are using Auth0 as IdP and so
isWebsiteAppmust betrueif using the authentication for a web application, since it will make the Authentication Service return the session as a cookie.
- Click on
This is an example of a configuration (using keycloak as an example of IdP):
  {
    "apps": {
      "<app>": {
        "providers": {
          "<provider>": {
            "type": "keycloak",
            "clientId": "<client-id>",
            "clientSecret": "",
            "authUrl": "https://{{KEYCLOAK_URL}}/auth/realms/<realm>/protocol/openid-connect/auth",
            "tokenUrl": "https://{{KEYCLOAK_URL}}/auth/realms/<realm>/protocol/openid-connect/token",
            "userInfoUrl": "https://{{KEYCLOAK_URL}}/auth/realms/<realm>/protocol/openid-connect/userinfo",
            "logoutUrl": "https://{{KEYCLOAK_URL}}/auth/realms/<realm>/protocol/openid-connect/logout",
            "baseUrl": "https://{{KEYCLOAK_URL}}/auth/realms/<realm>/",
            "scope": [
              "openid"
            ],
            "order": 10,
            "userSettingsURL": "https://{{KEYCLOAK_URL}}/auth/realms/<realm>/account/"
          }
        },
        "redirectUrl": "https://<MY-HOST>/web-login/oauth/callback",
        "isWebsiteApp": true,
        "realm": "<realm>",
        "issuer": "<the signer of the jwt>",
        "defaultGroups": []
      }
    }
  }
-
Create the
Authorization Serviceplugin from Marketplace-
Click on
Microservices -
Click on
Create a Microserviceand selectFrom Markeplace -
Search
authorizationin the search bar -
Select
Authorization Service -
Click on
Create -
Update the values of the following environment variables:
Variable Value USERINFO_URL http://authentication-service/userinfo CUSTOM_USER_ID_KEY userID HEADERS_TO_PROXY <header of the client's request containing the token>(e.g.Authorization)AUTHORIZATION_HEADERS_TO_PROXY <header of the client's request containing the token>(e.g.Authorization)USER_PROPERTIES_TO_PROXY userID,groups
-
-
Create the
Login Siteplugin from Marketplace -
Create the following endpoints in your project:
Endpoint Authenticaton Required Target Microservice /web-loginfalse login site/authorizefalse authentication-service/oauth/tokenfalse authentication-service/logouttrue authentication-service
Configuration with the Secure API Gateway application
To speed up the process, you can use the Secure API Gateway application, modifying it a little after the creation.
This is because the application uses Auth0 as a default IdP, so:
- if you want to use Auth0, then the application is ready to use, you don't need to do anything else.
- if you want to use another Oauth2 compliant IdP:
- start by creating the
crud-serviceand theauthentication-serviceas in the manual configuration - install the application, modifying the
auth0-clientwith theauthentication-servicein the wizard - change the environment variables of the
authorization-serviceas described in Scenario 2 - remove the unnecessary environment variables specific of Auth0
- the application will take care of creating:
- api-gateway
- authorization-service
- login-site
- all the endpoints
- start by creating the
How does it work?
You can divide the authentication flow in 3 step from the user point of view:
- the user is redirected to the IdP page
- the user inserts their credentials and the IdP will generate a unique code
- the server will use the code to verify the user through the IdP, creating a token for the user's session
- the user uses the token to make an authorized call
This flow follows the OAuth2 standard: you can read more about its specifications here, or more specific here.
Step 1: Redirect to IdP page
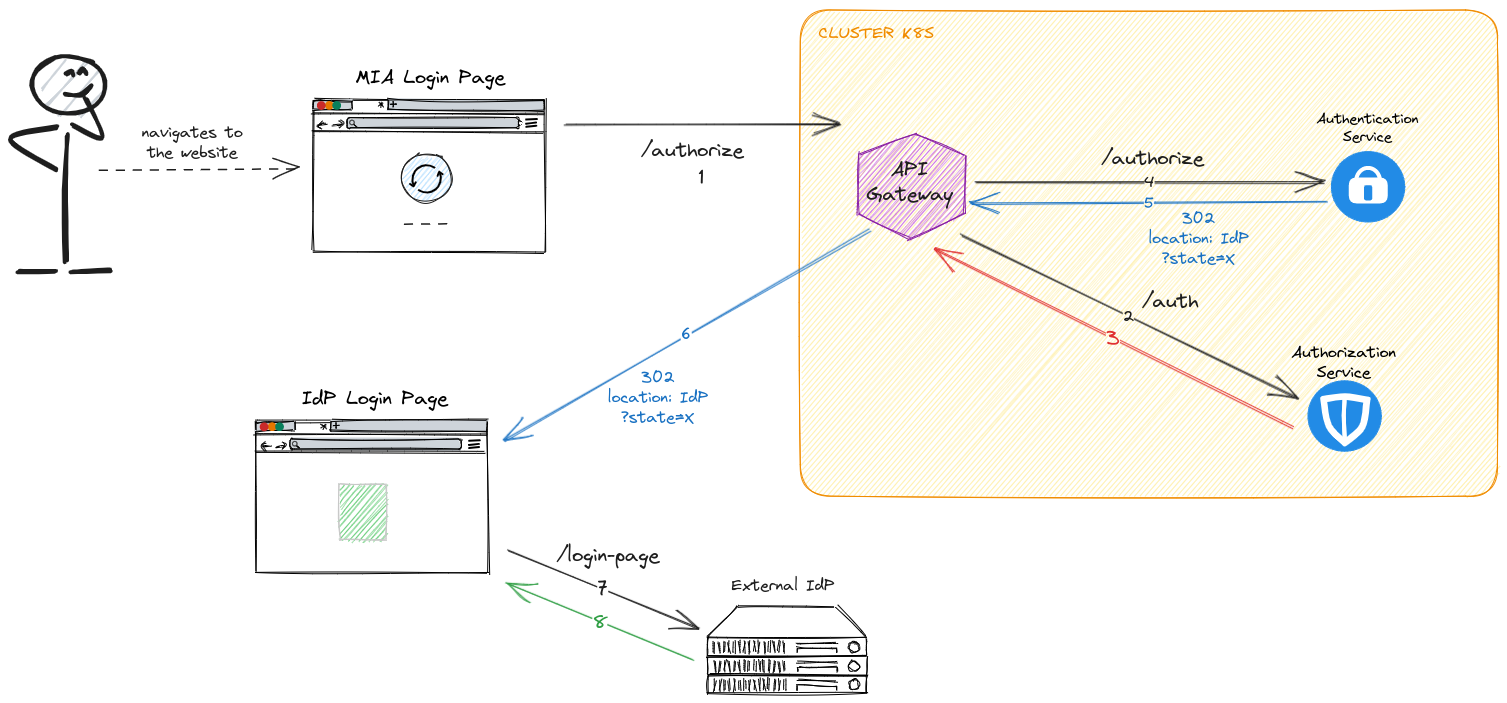
The client web application must redirect the user to this URL:
https://<MY-HOST>/authorize?appId=<app>&providerId=<provider>&redirect=/
where:
appIdis the one defined in theauthentication-serviceconfigmapproviderIdis the one defined in theauthentication-serviceconfigmapredirectis the path to witch you want to be redirected to after the successful flow
The client must pass all of the above query parameters to make the flow complete successfully.
You can let your client application do it or you can use a script of the API Gateway that will redirect your user to this location every time it encounters a 401 error.
To do so, please follow this guide.
The result of the /authorize request will be an HTTP 302 with the location of your IdP, passing a generated state as a query parameter.
Step 2: Creation of the session
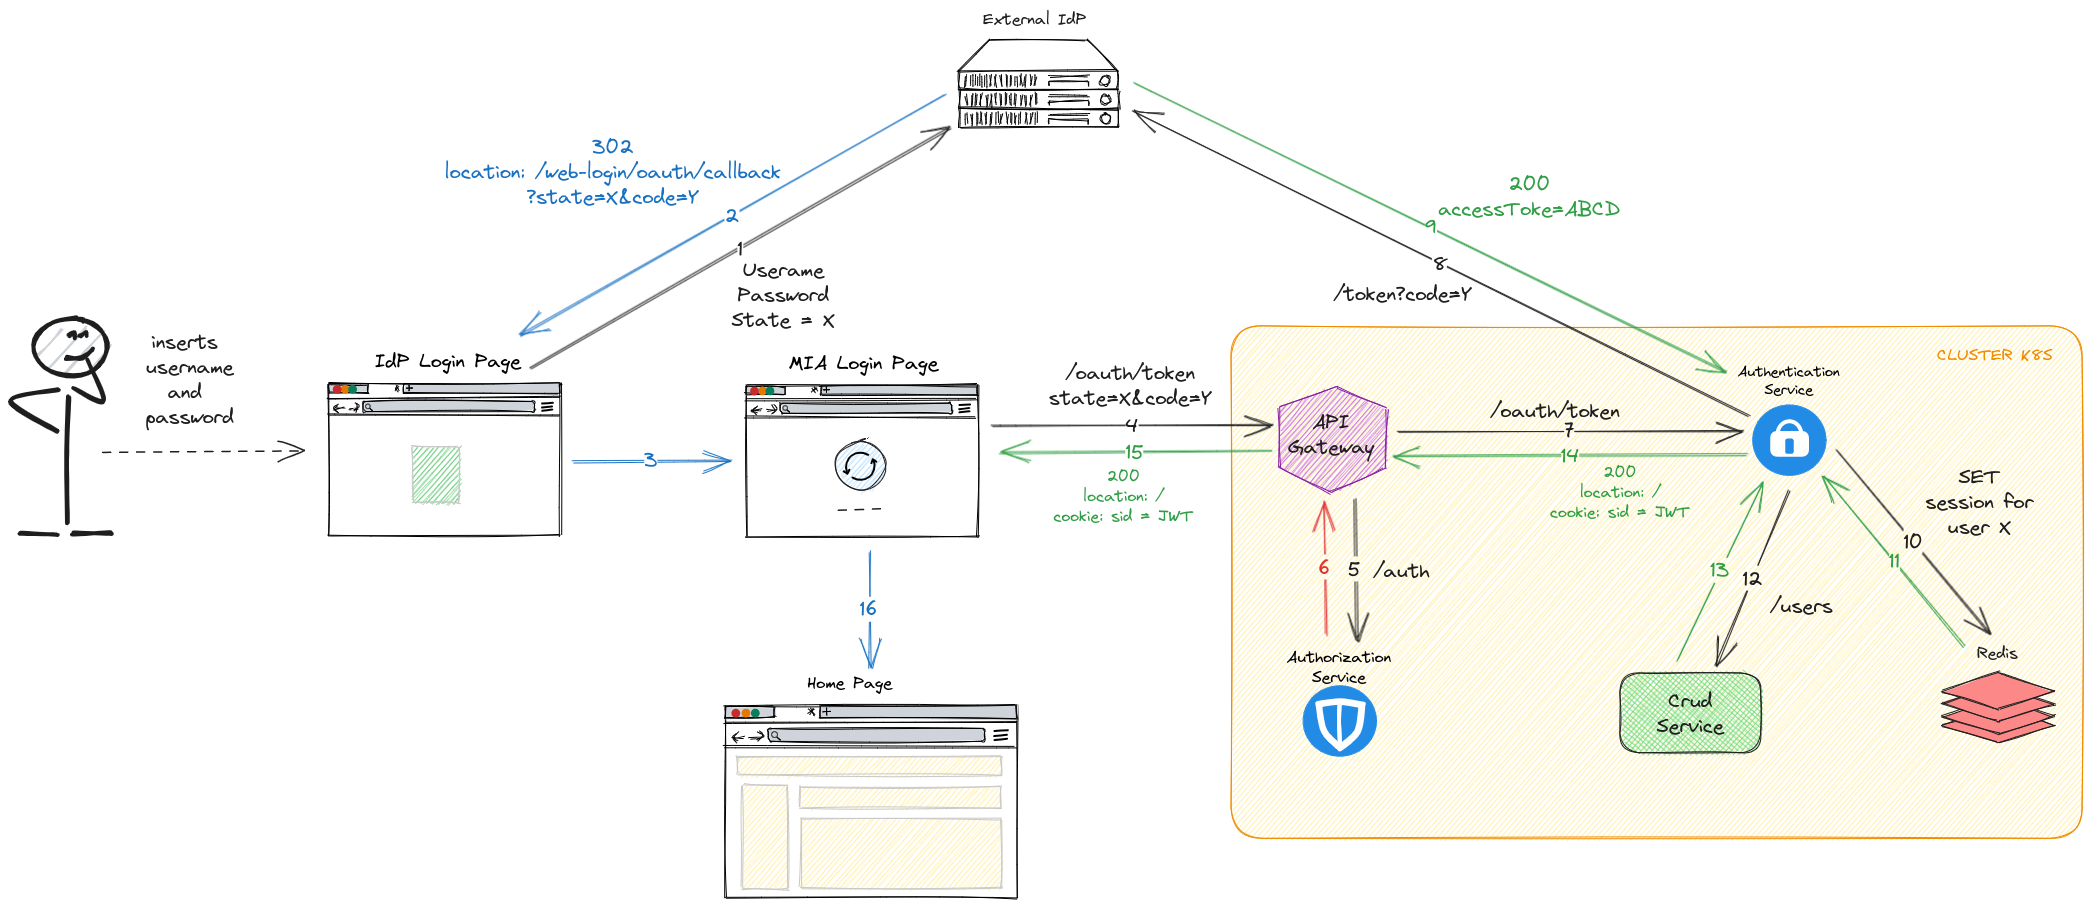
Using the IdP login page, the user will submit their credentials and, after the successful sign in, the IdP will redirect the user's browser to this URL:
https://<MY-HOST>/web-login/oauth/callback?state=X&code=Y
where:
stateis the value previously passed to the IdPcodeis a new value created by the IdP representing the user
This endpoints points to the Login Site plugin and returns an HTML page that will perform an HTTP POST request to the following URL passing the state and the code in the request body.
https://<MY-HOST>/oauth/token
The authentication-service handles this request by checking the state and by using the code to verify the user through the IdP. The token session returned by the IdP is saved on Redis and MongoDB.
After this operation, the authentication-service will create a session cookie (hence the isWebsiteApp: true set before) as a JWT with the following claims:
id,nameandemailtaken from the IdP- all the other attributes (
groupsincluded) from the CRUD collection. If you need to include custom attributes in the user claim, check this documentation to understand how to congigure both the CRUD collection and theAuthorization Service
The JWT is finally signed and returned to the user via the /oauth/token response, that will have:
- status code: 200
locationheader equals to the one defined in the/authorizerequest- cookie:
sid=<JWT>
As a last step, the browser will redirect to the location specified by the client web application during Step 1 in the redirect query parameter (e.g. the homepage).
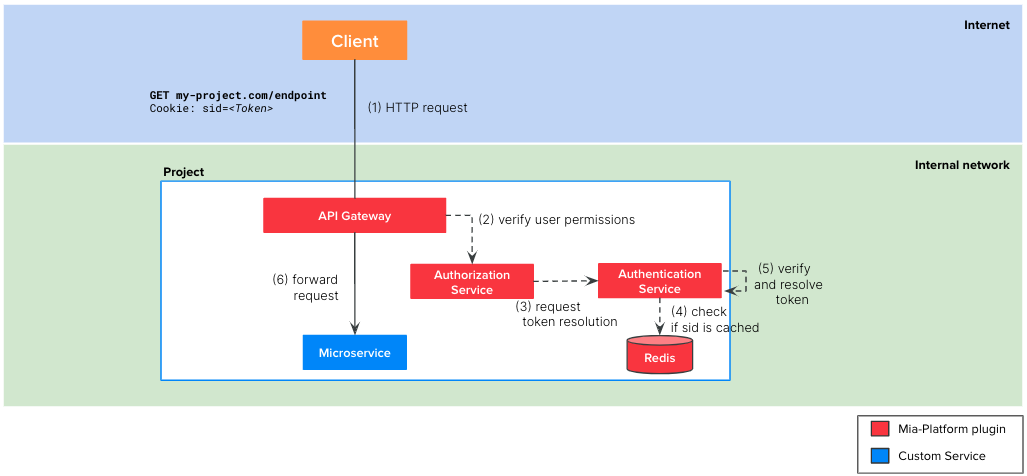
Step 3: API usage as logged-in user
With the cookie sid the user can be authenticated and authorized to access the other APIs you are protecting (have a look here to know how to protect your APIs).
The request is paused by API Gateways, that will request if the user is authenticated to access the resource to the authorization-service.
The authorization-service will call the /userinfo API of the authentication-service, who will reply with the claims of the sid token (if is valid and not expired).
As you can see here, no more calls are made to authenticate the user: if the JWT is valid (by looking at its signature) then the user is the one defined by the claims.
After checking the reply of the /userinfo, the authorization-service will validate the user.
The API Gateway can now forward the request correctly to the backend, with the benefit of having custom headers containing the user information.