Flow Manager
In this tutorial we will see how to create and expose a Flow Manager service. The Flow Manager is a saga orchestrator, capable to manage flows structured by leveraging the Architectural pattern named Saga Pattern using, in particular, the Command/Orchestration approach.
Since it can help you to govern the interaction to complete various tasks and to guarantee data consistency, Flow Manager can simplify your work when you want to model complex flows involving the interaction of several services.
What We Will Build
In this tutorial, you will configure a system handling the workflow of a reservation process orchestrated by the Flow Manager service using Kafka message broker for communication. In particular, you will:
- Define a finite state machine representing a simple saga;
- Define business states and business events;
- Define commands and events;
- Configure Flow Manager to use a Kafka broker for communication;
- Configure a CRUD service for persistency;
- Interact with the Flow Manager service.
Prerequisites
Before starting this tutorial, you need to be familiar with the concepts of Command/Orchestration approach and Kafka (including producers and consumers). For the technical part of this tutorial, an up-and-running Kafka cluster is required. Also Javascript and Mia-Platform dev libraries knowledge is needed if you want to implement external services interacting with Flow Manager using the Mia-Platform Flow Manager Client.
You can apply the configurations in this tutorial in a new branch on the Console. To see how to create a new branch please see here.
The project you want to use to reproduce the steps includes a swagger-aggregator, an api-portal, an api-gateway and a crud-service
Create Flow Manager Microservice
To create a Flow Manager microservice follow these steps:
- Open the Design section of the Console.
- On the left panel, in the Workload group, click on Microservices section.
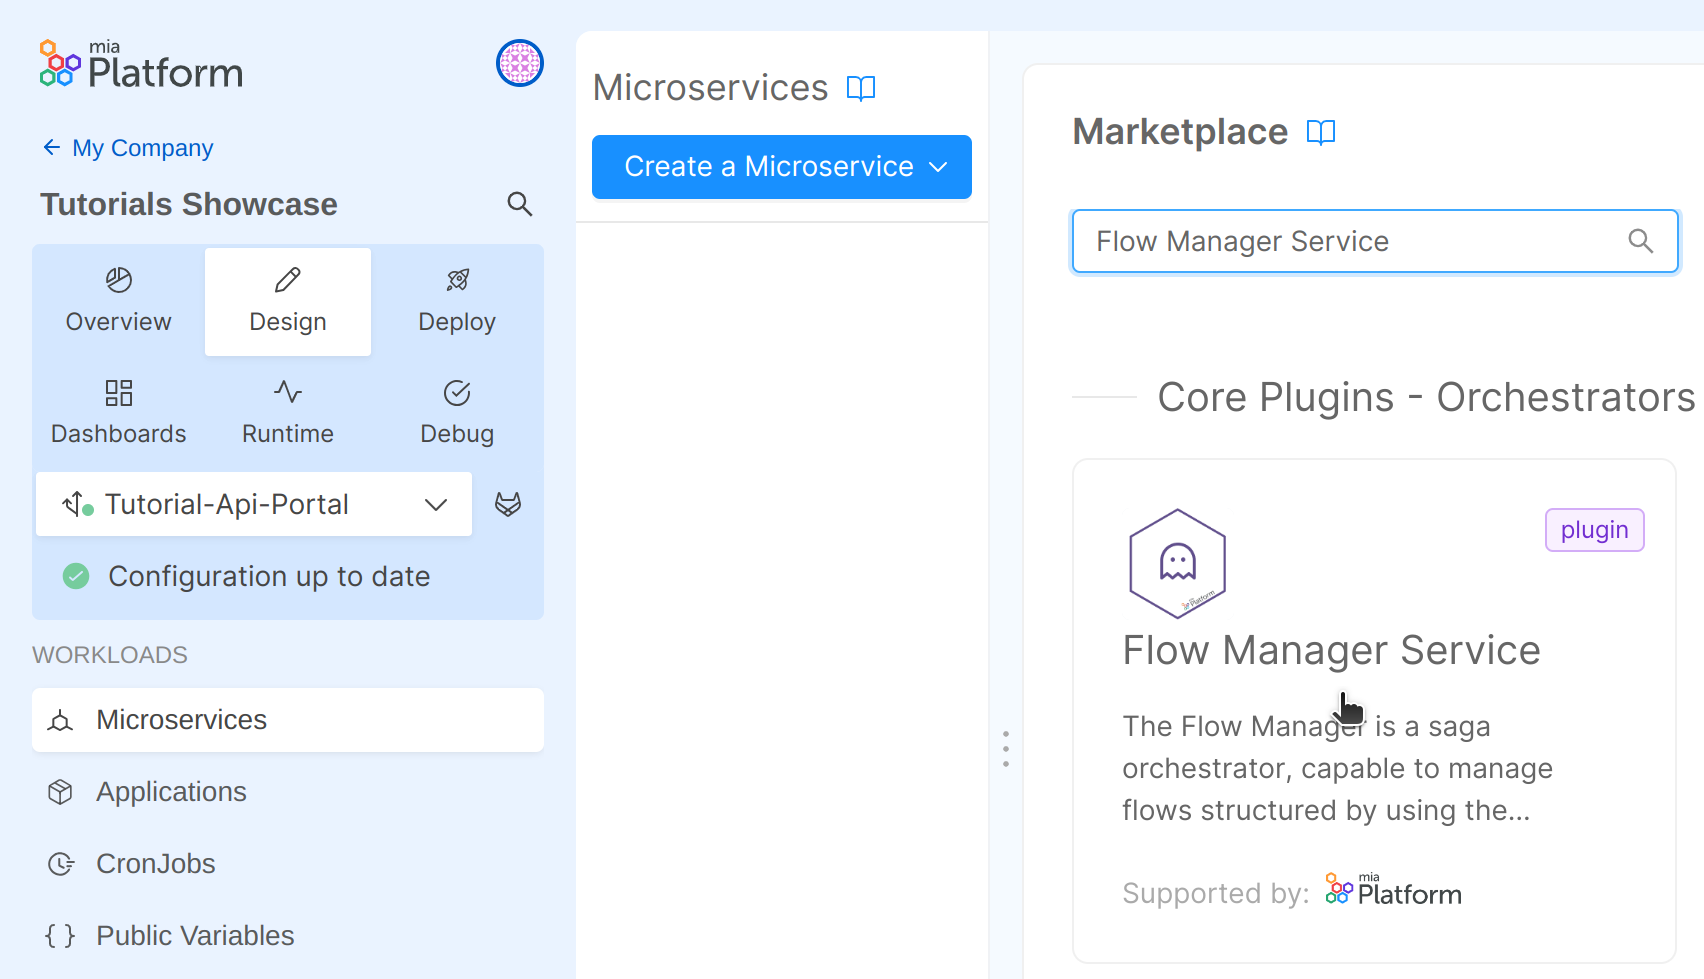
- Click on Create a Microservice and then click on From Marketplace.
- In the Marketplace view search Flow Manager Service and click on the Flow Manager Service plugin.
- In General Details enter:
- Name:
flow-manager-service - Description: You can choose a description or leave the default.
- Configuration Name:
flow-configuration
- Name:
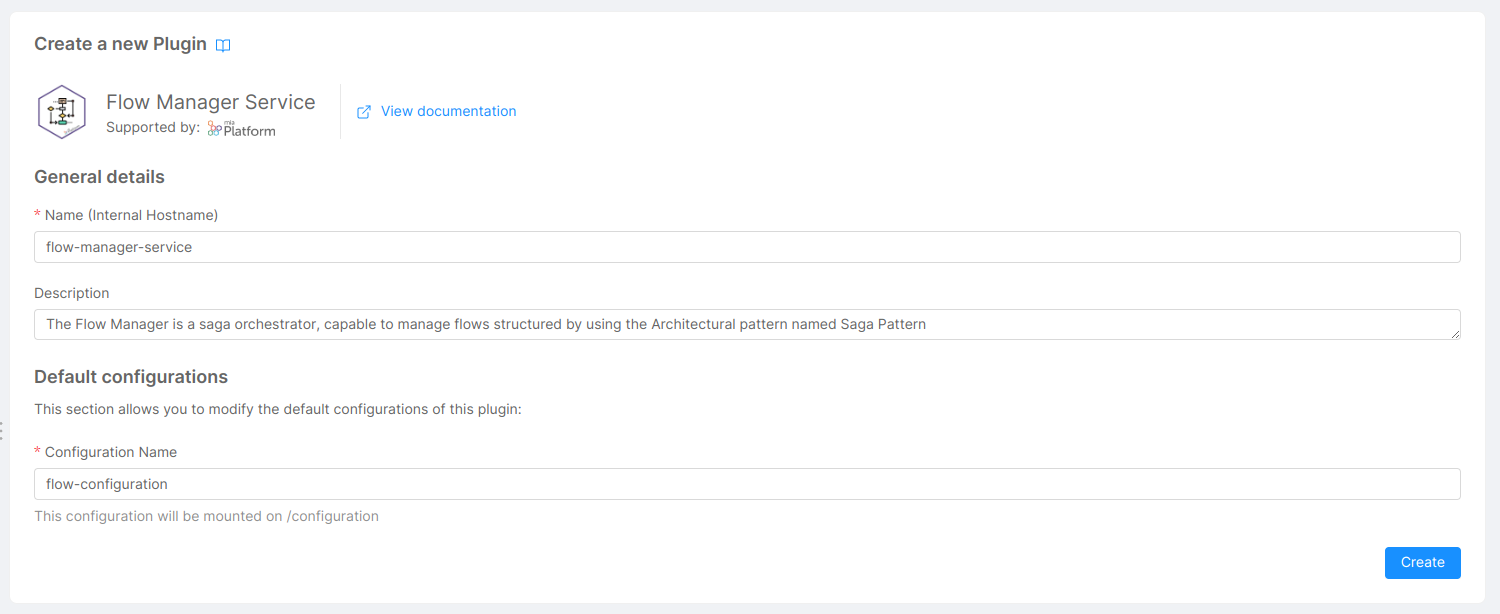
- Click Create. The Flow Manager microservice will be created.
Edit Environment Variables
We need to update some Environment Variables of the Flow Manager microservice.
-
In the Microservices section click on the flow-manager-service microservice.
-
Click on Environment Variables on top.
-
In Environment variable configuration edit the following environment variables with the specified values:
- CONFIGURATIONS_FILE_PATH:
/flow-configuration/saga.json - SAGA_ID_PREFIX:
flow-service
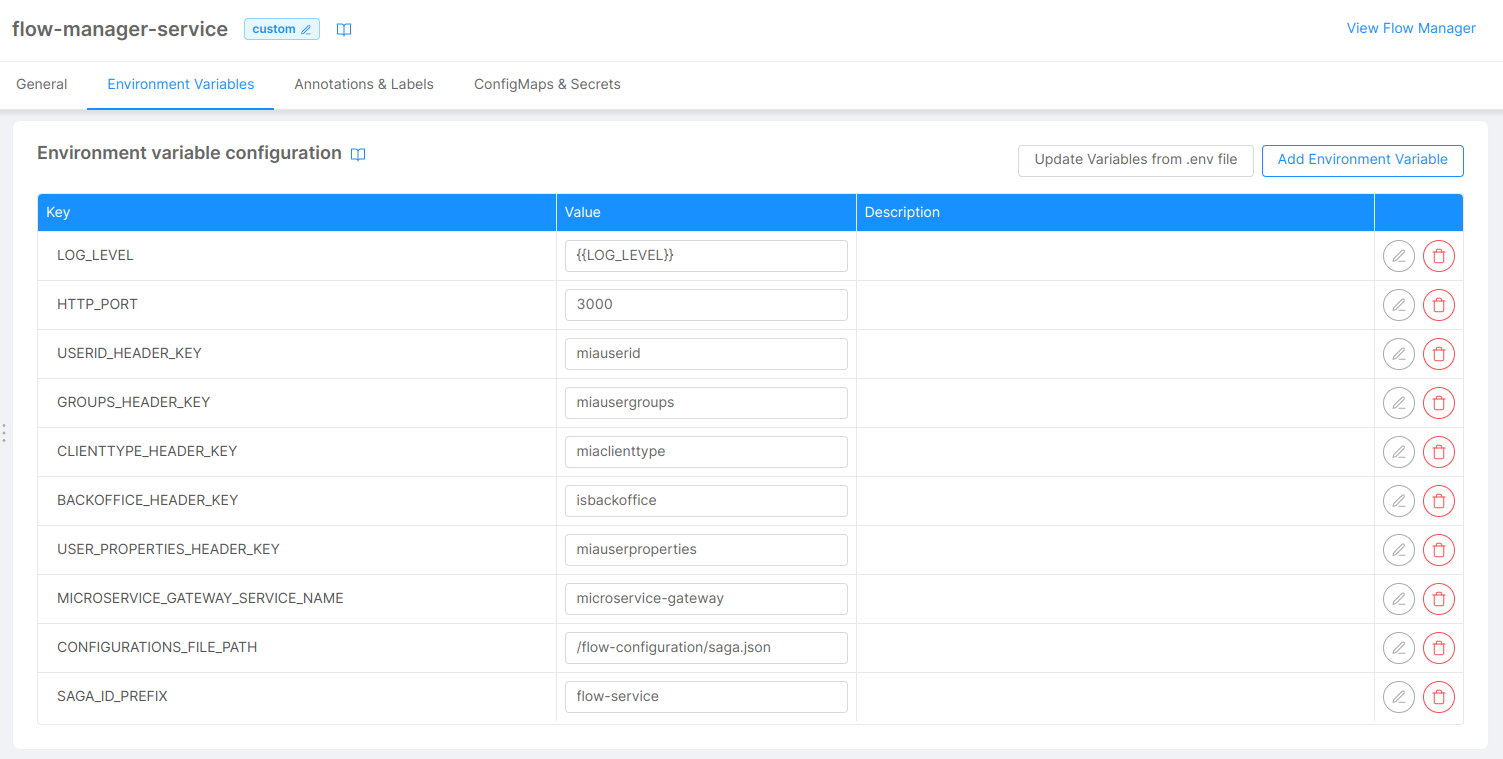
- CONFIGURATIONS_FILE_PATH:
-
In the Microservices section click on the flow-manager-service microservice.
-
Click on ConfigMaps & Secrets on top.
-
Set
/flow-configurationas Mount path.
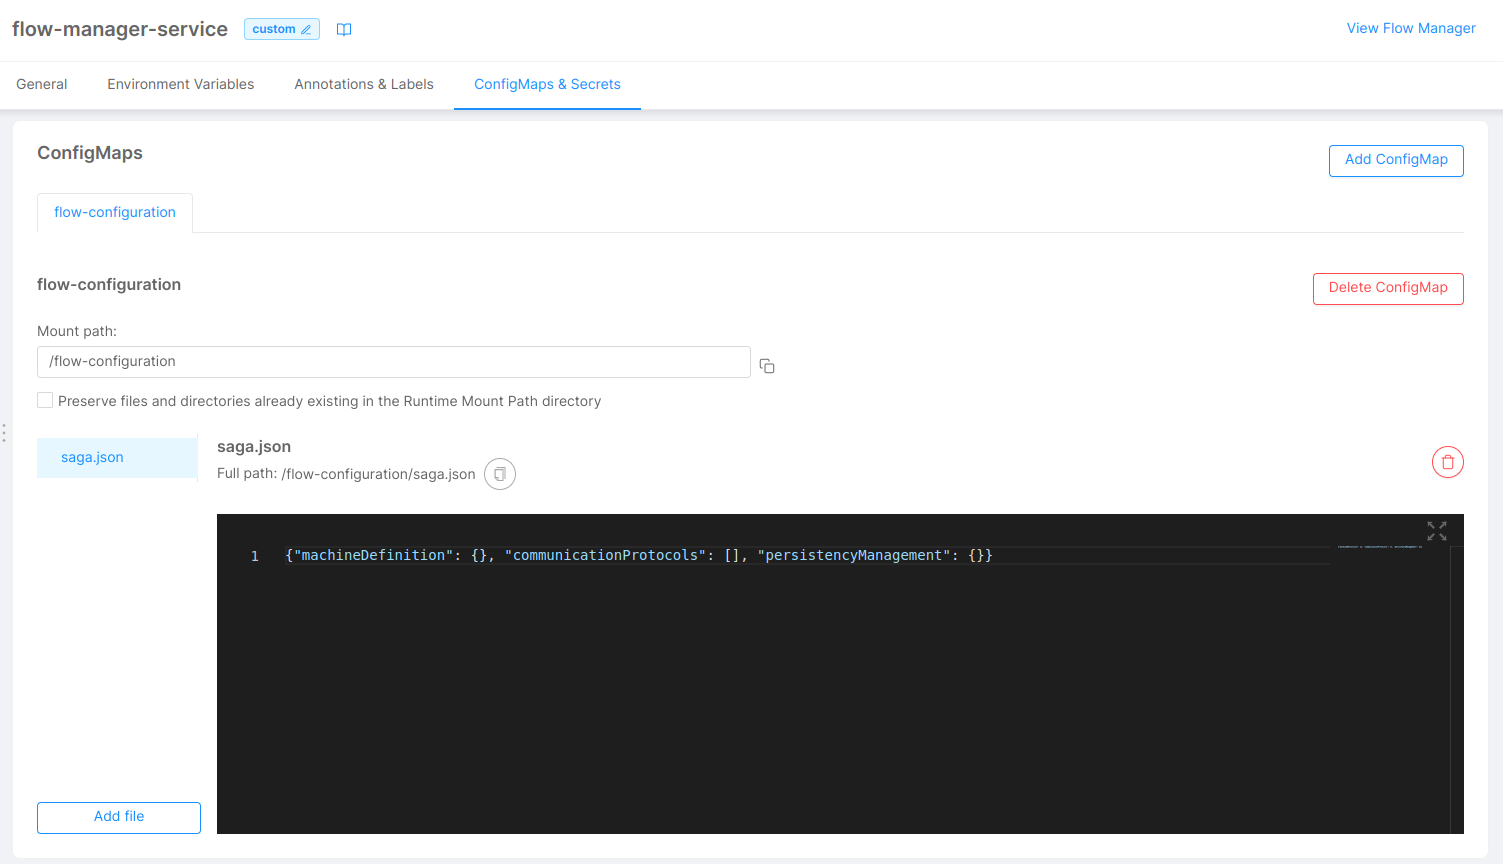
In the flow configuration ConfigMap, we can see the saga.json file that is provided to the service. It containts three properties (machineDefinition, communicationProtocols and persistencyManagement), that are, at the moment, set as empty object. We are going to modify their values using the Flow Manager Configurator in order to configure our flow manager.
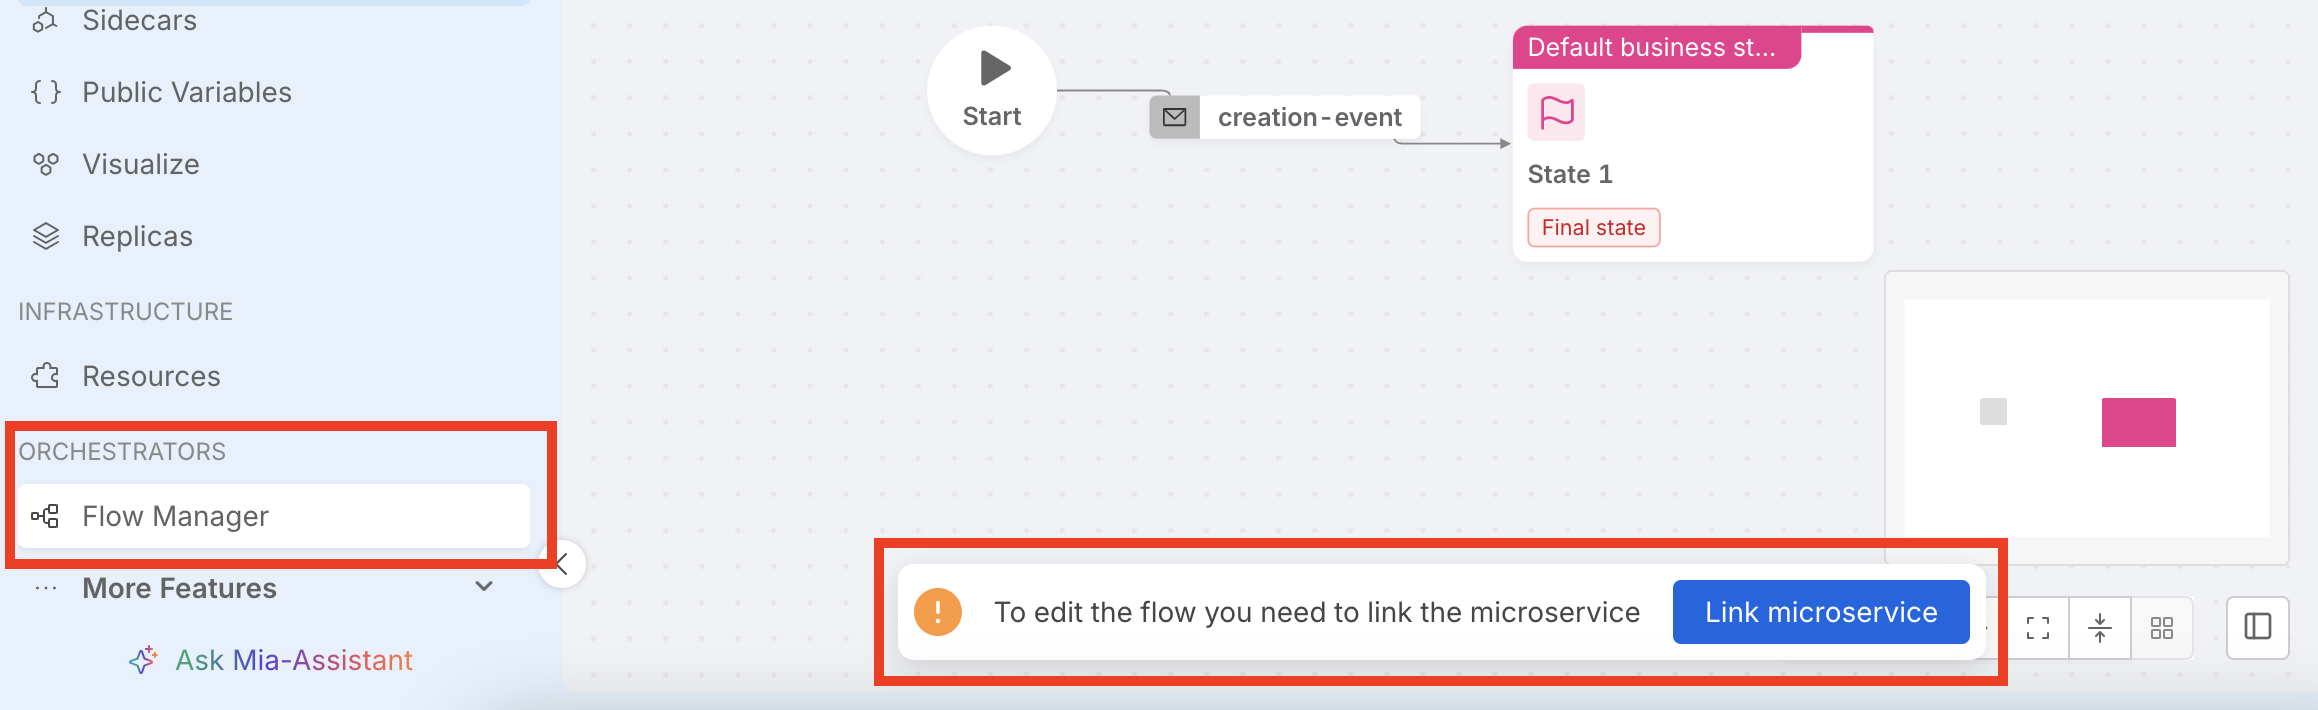
To configure these properties move to the Flow Manager menu in the Orchestrators section, then click on the Link microservice button in the bottom of the page.
Alternatively it's also possible to click on Flow Manager Configurator directly at the top right of the microservice section.
Define a Finite State Machine
We can start modelling our saga as a finite state machine, by configuring the machineDefinition property. This property contains the list of possible states and events that compose the saga.
Define states
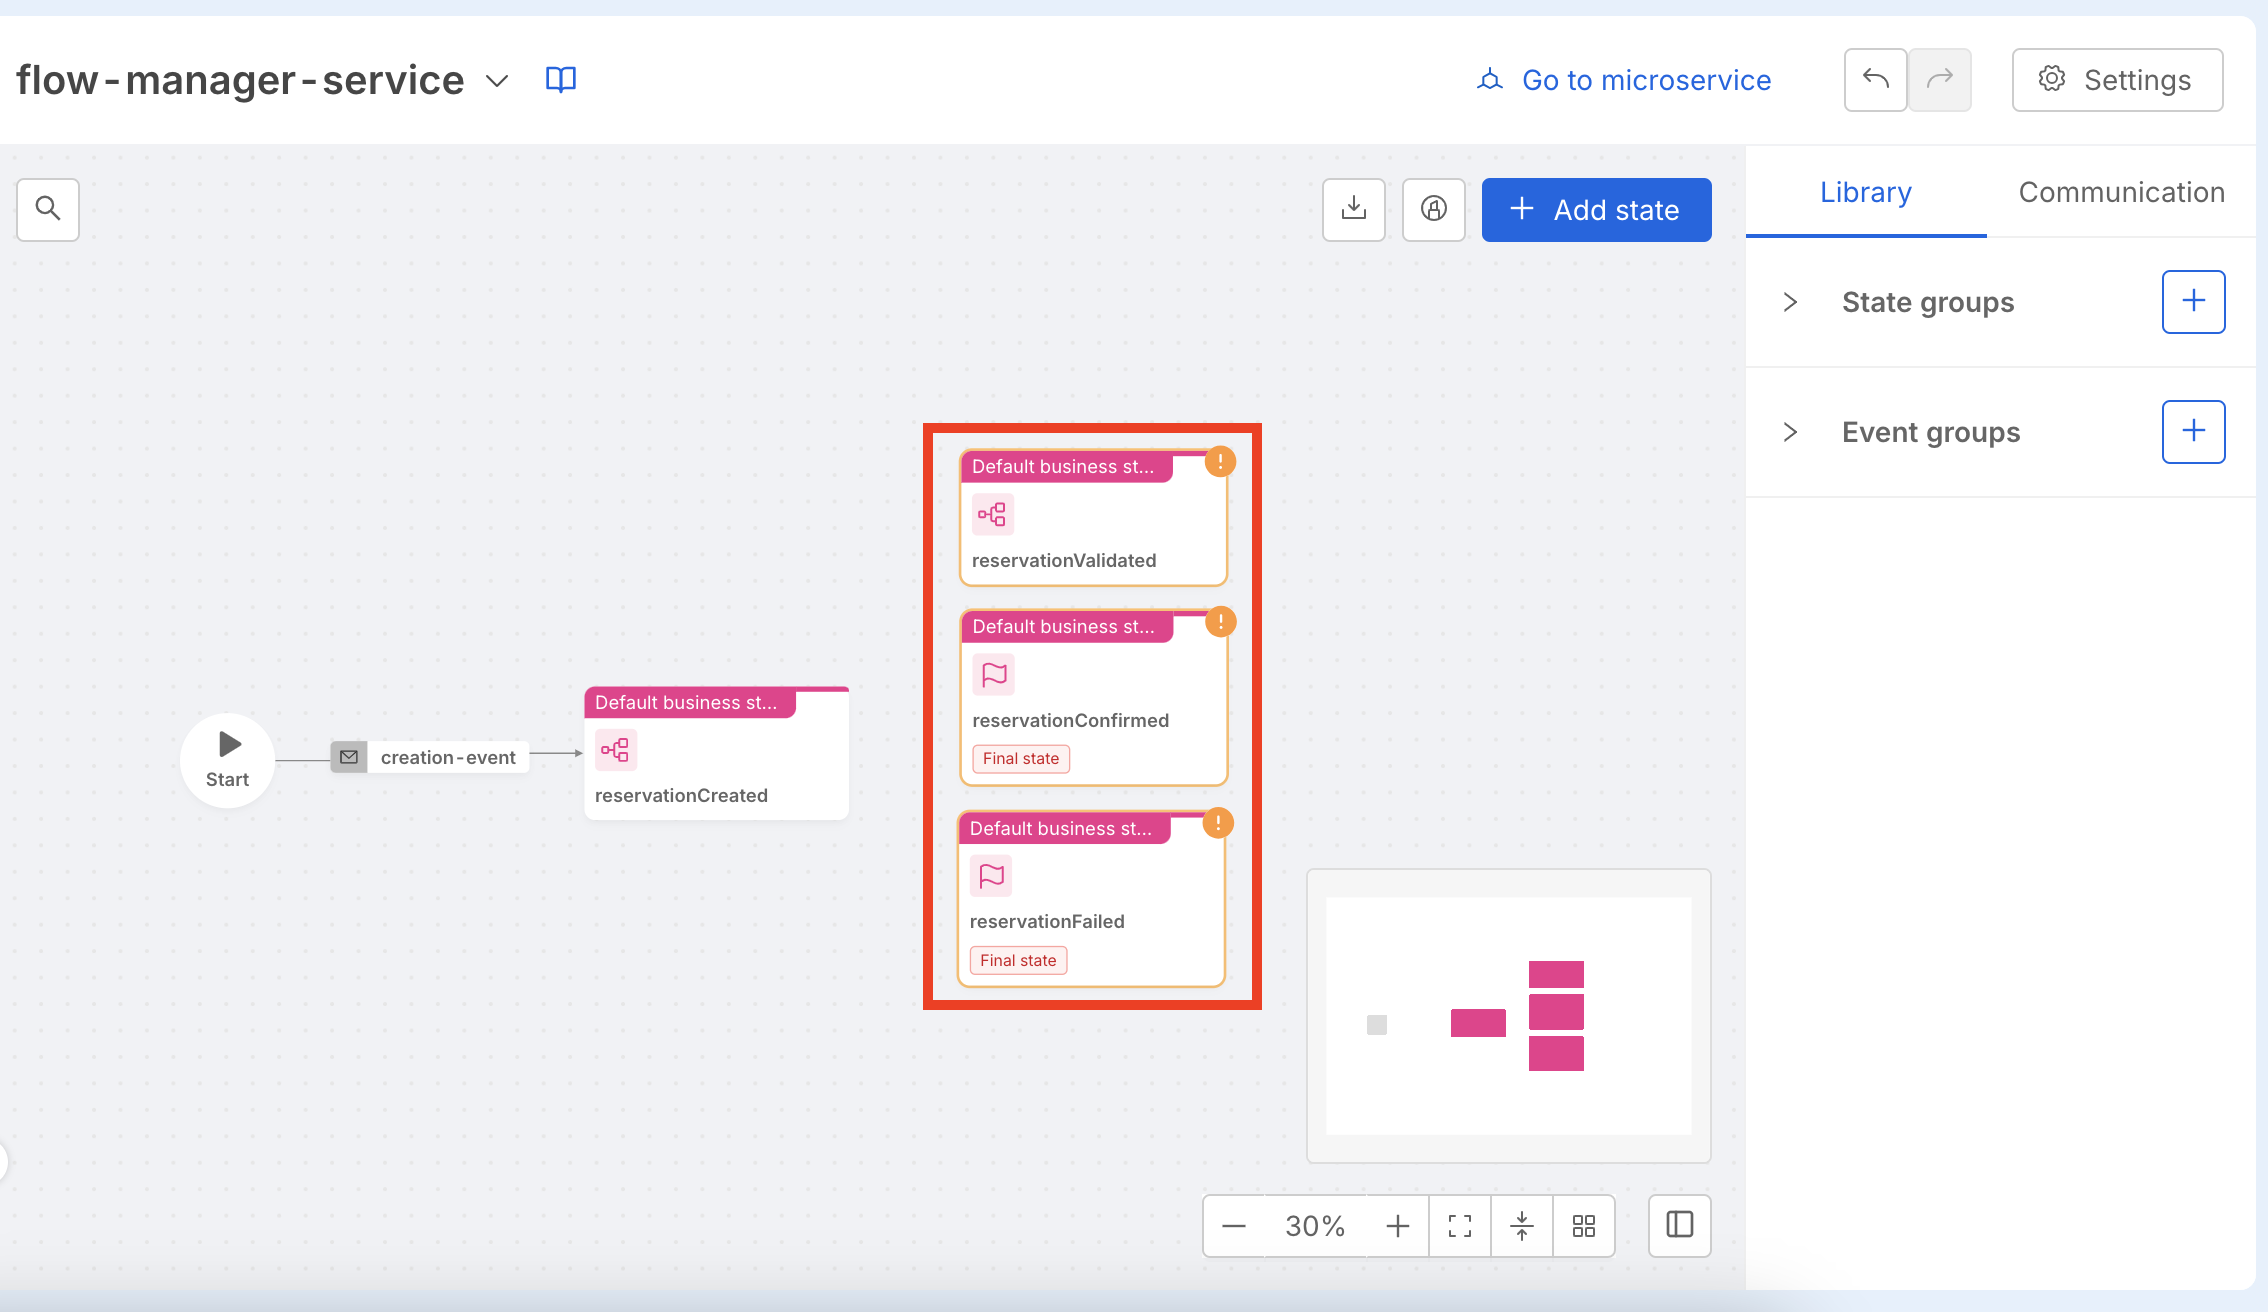
This property contains the list of possible states that form the saga. We will define a different state for each possible status of a general reservation application. A reservation can be created by users, it should be validated and finally it can be confirmed or rejected depending on constraints. Our example flow is composed of four states:
- reservationCreated: a state representing that a reservation request has been placed on our application. This state will be the starting point of our flow.
- reservationValidated: a state representing that a reservation request has been validated.
- reservationConfirmed: a state representing a successful reservation. This state will be one of the final states of our flow.
- reservationFailed: a state representing a failed reservation. This state will be one of the final states of our flow.
You will need to edit these configurations from the Flow Manager menu in the Orchestrators using the No-Code canvas.
First of all edit the default created event by editing the Name field and the Description field.
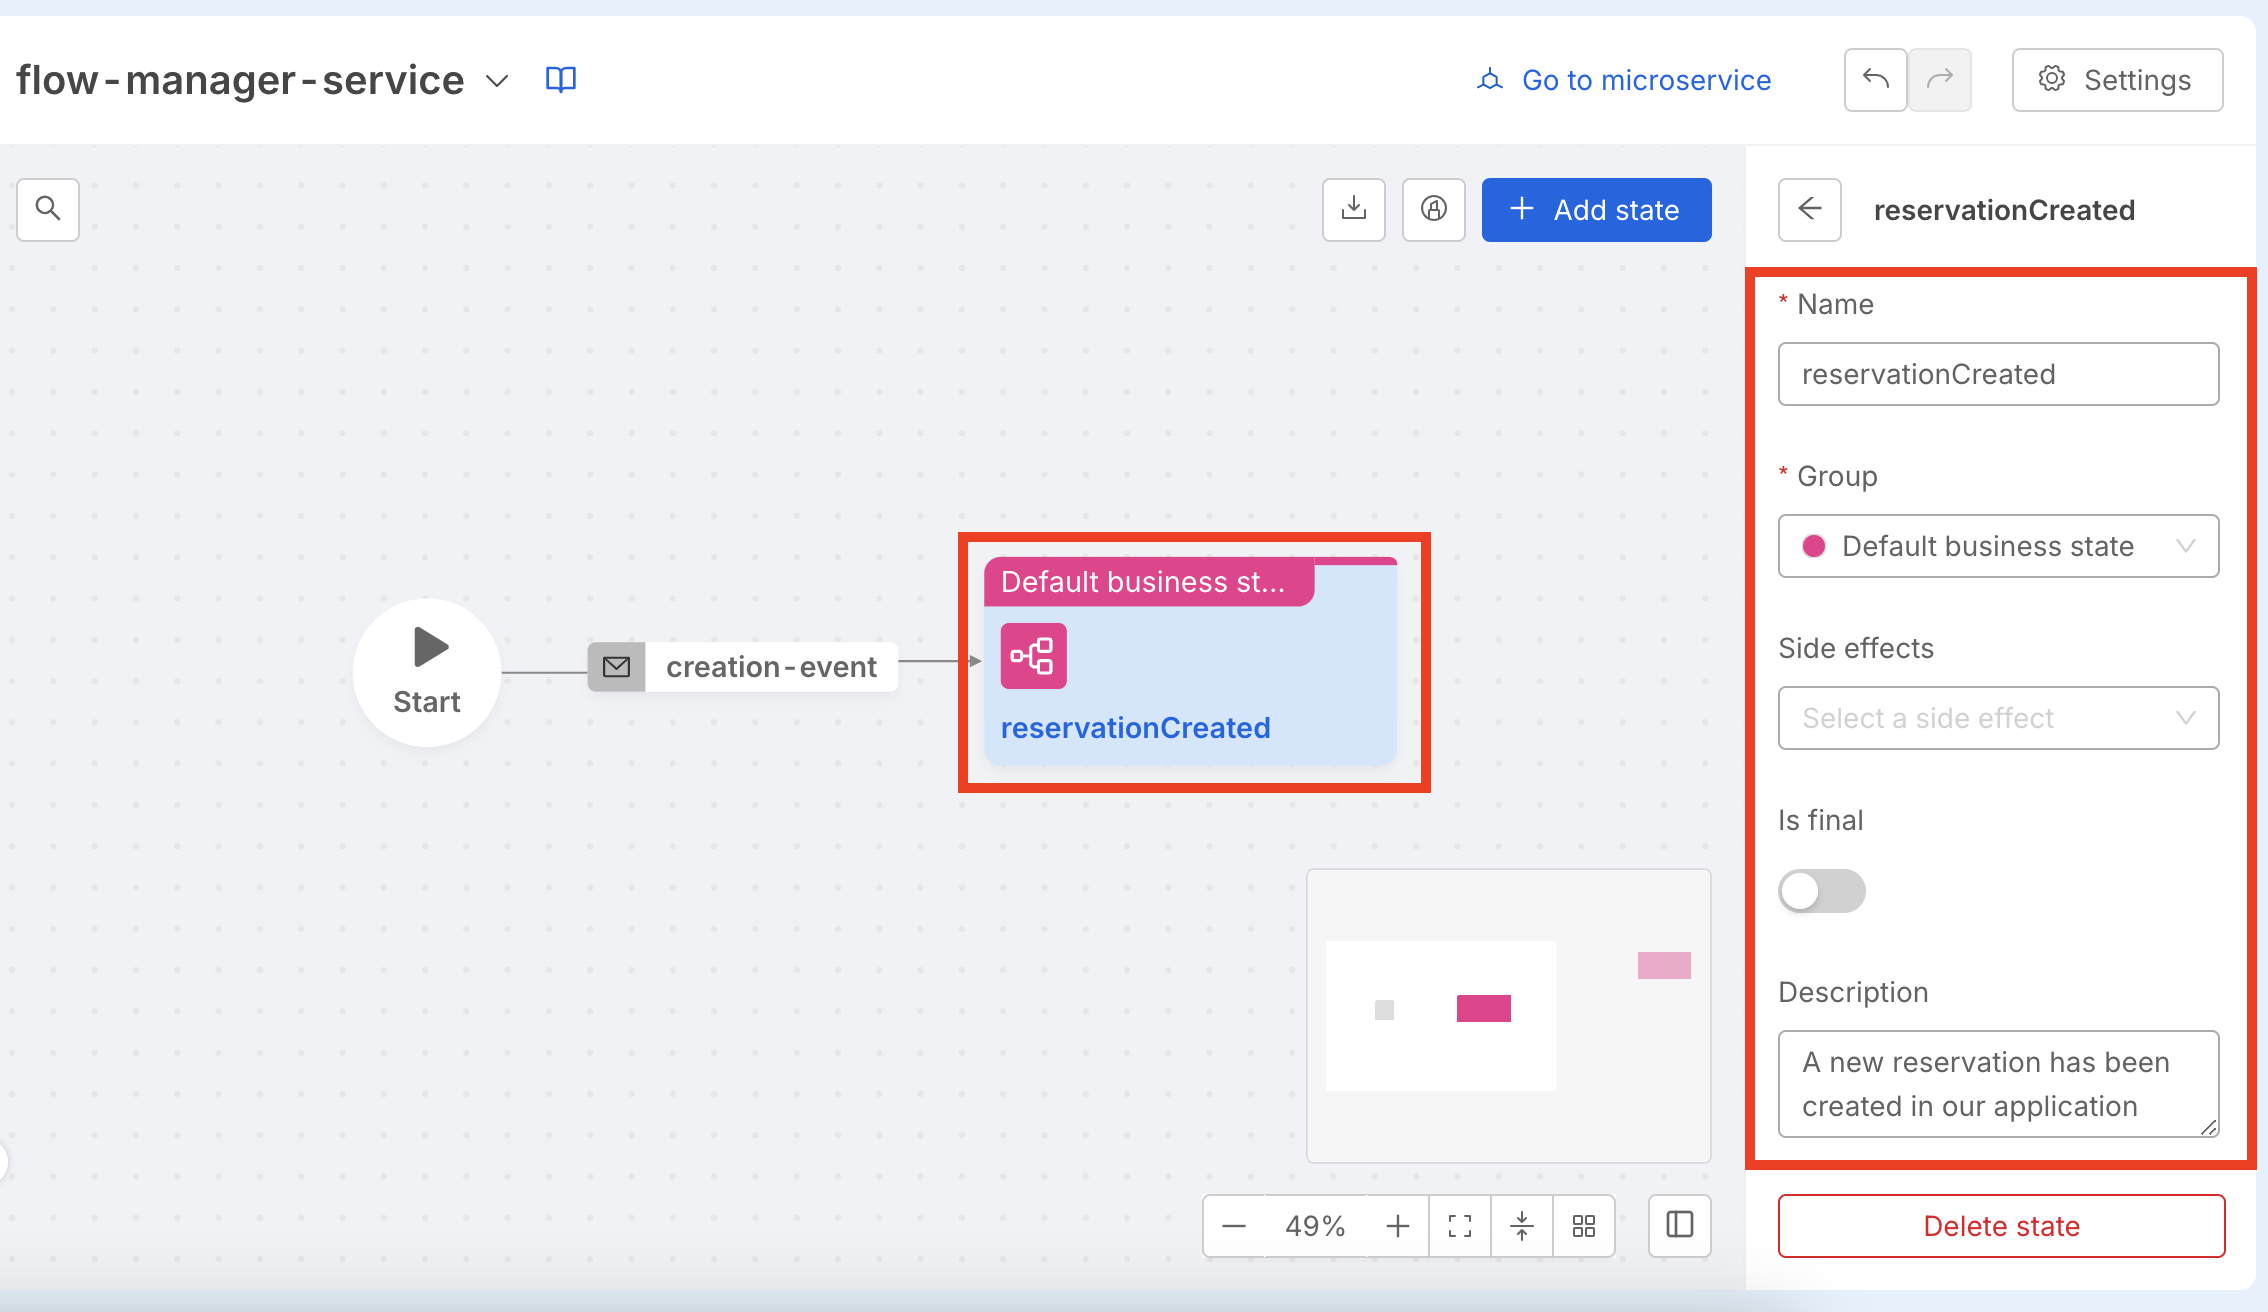
Then configure the remaining three machine states making sure that the reservationConfirmed and the reservationFailed are marked as Final State by flagging the Is Final toggle.
At this point you have configured all the needed machine states but the Flow Manager Configurator give you a warning error because the 3 machine states you created before are still not linked to the related events. We will create them later in this guide.
You can find more details about these properties in the configuration chapter of the Flow Manager dedicated page.
Define events
In this step we continue extending the Flow Manager configurations by adding events.
We can define events to represent state transitions in our saga. We need events that link each states in a way that is meaningful for the saga. For example, a newly created reservation may either be moved forward in the flow or be rejected depending on validation constraints, either case is a valid change of state of the flow.
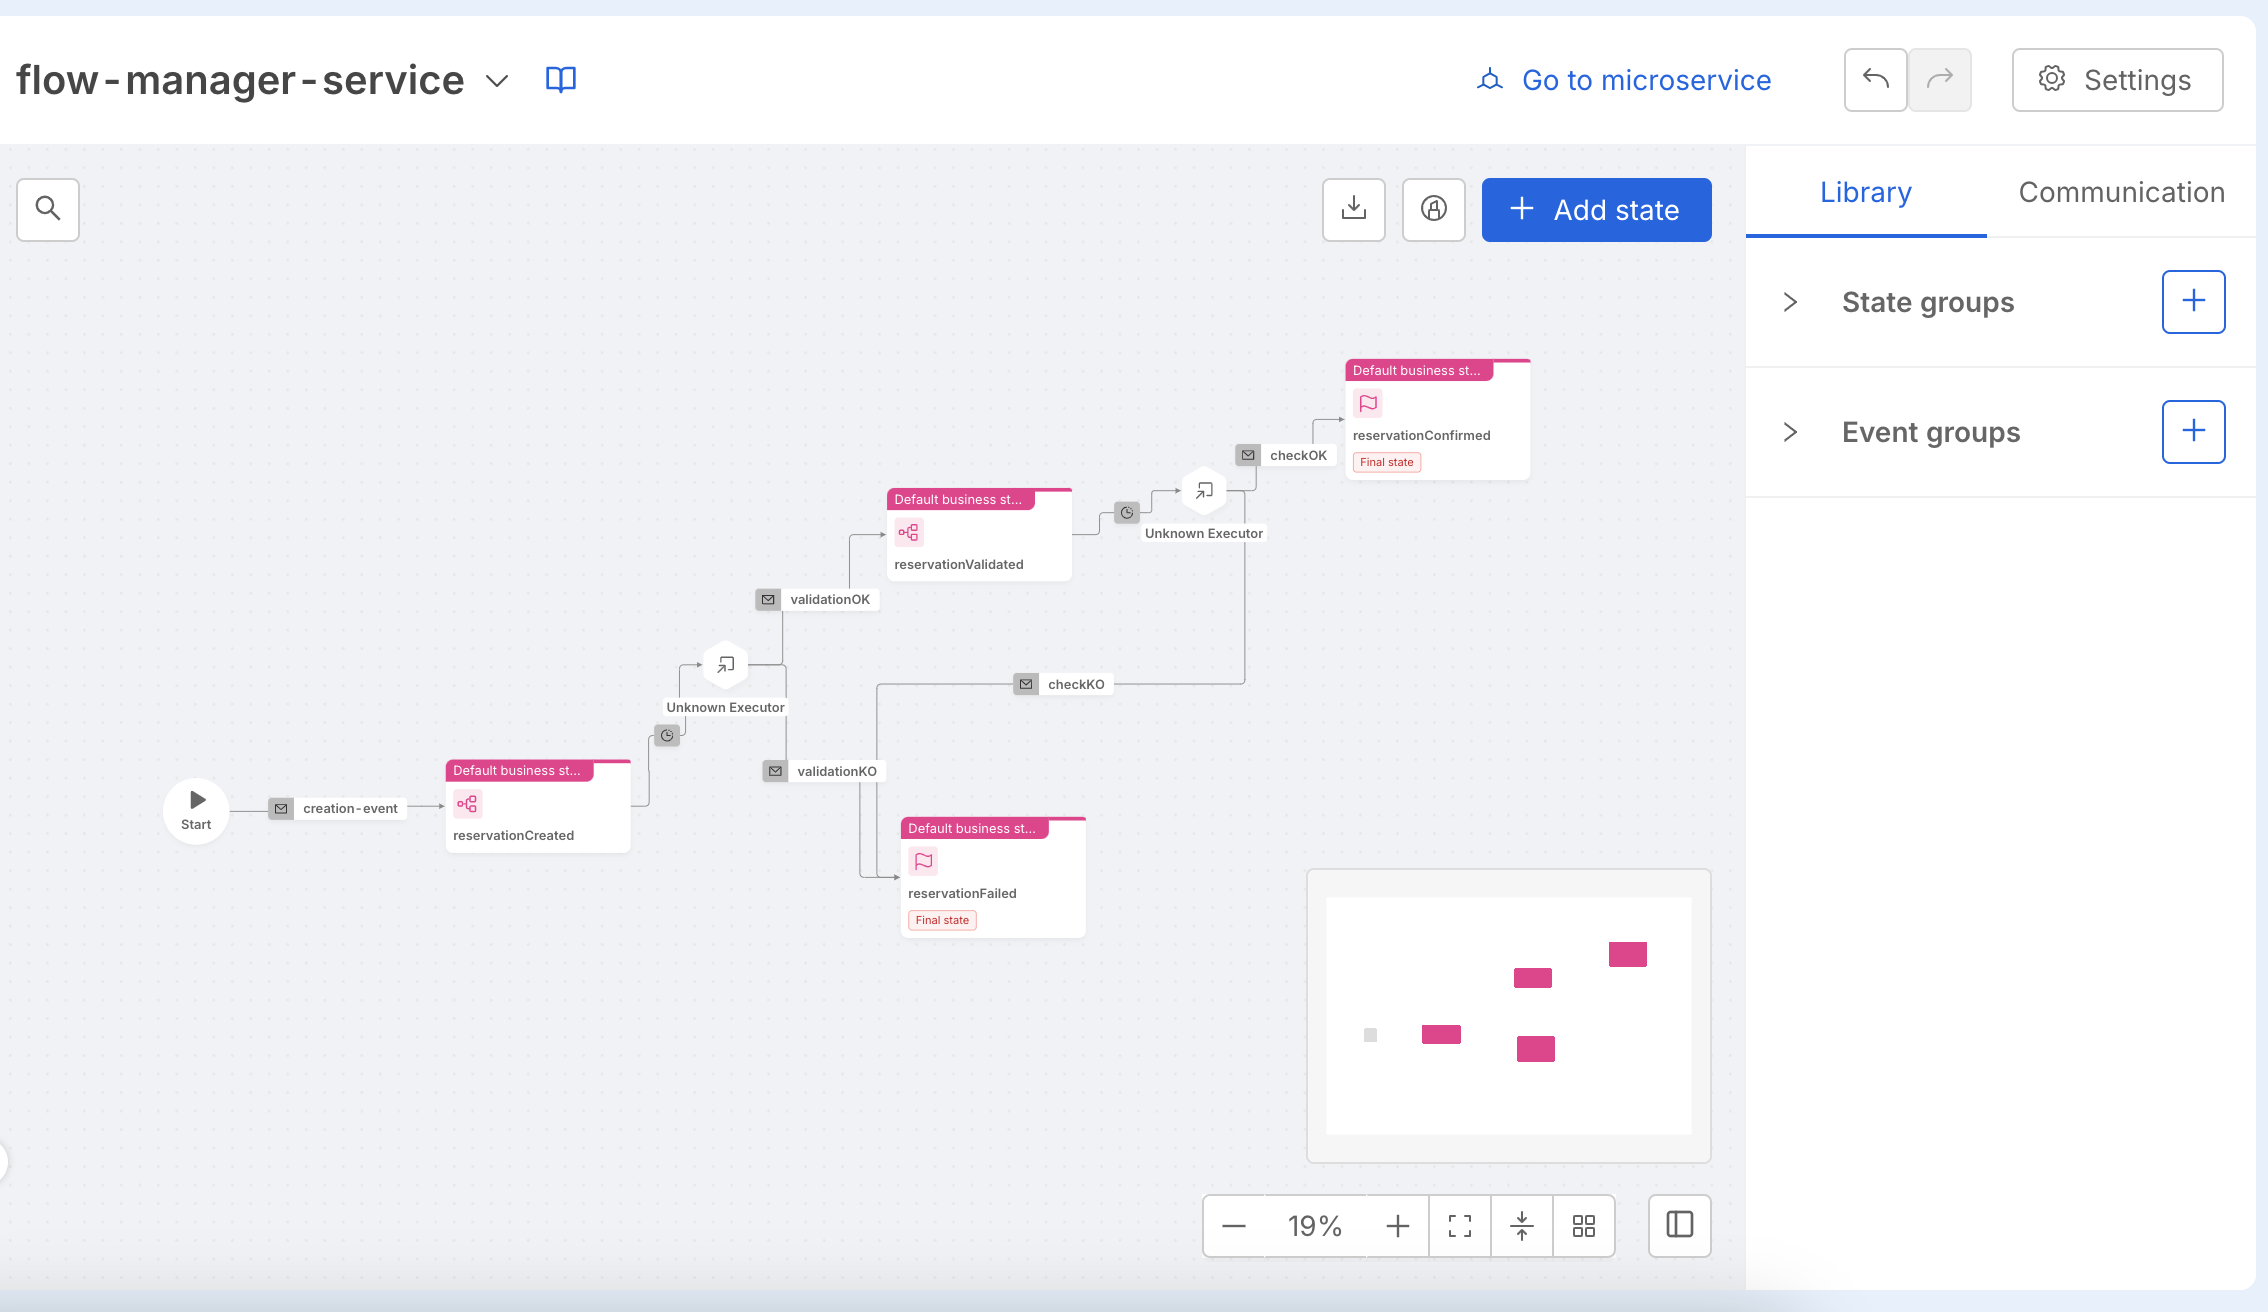
Our example saga will contain four events:
- validationOK: an event representing that a validation logic on the reservation data has completed successfully.
- validationKO: an event representing that a validation logic on the reservation data resulted in its refusal or the check logic failed with an error.
- checkOK: an event representing that a check logic on the reservation has been confirmed successfully.
- checkKO: an event representing that a check logic on the reservation resulted in its refusal or the check logic failed with an error.
To create these events you have to follow the following transitions as explained from the next picture:
- From
reservationCreatedtoreservationValidatedwith thevalidationOKevent. - From
reservationCreatedtoreservationFailedwith thevalidationKOevent. - From
reservationValidatedtoreservationConfirmedwith thecheckOKevent. - From
reservationValidatedtoreservationFailedwith thecheckKOevent.
Configure Communication Protocol
In this section we will configure the Communication Protocol for our Flow Manager.
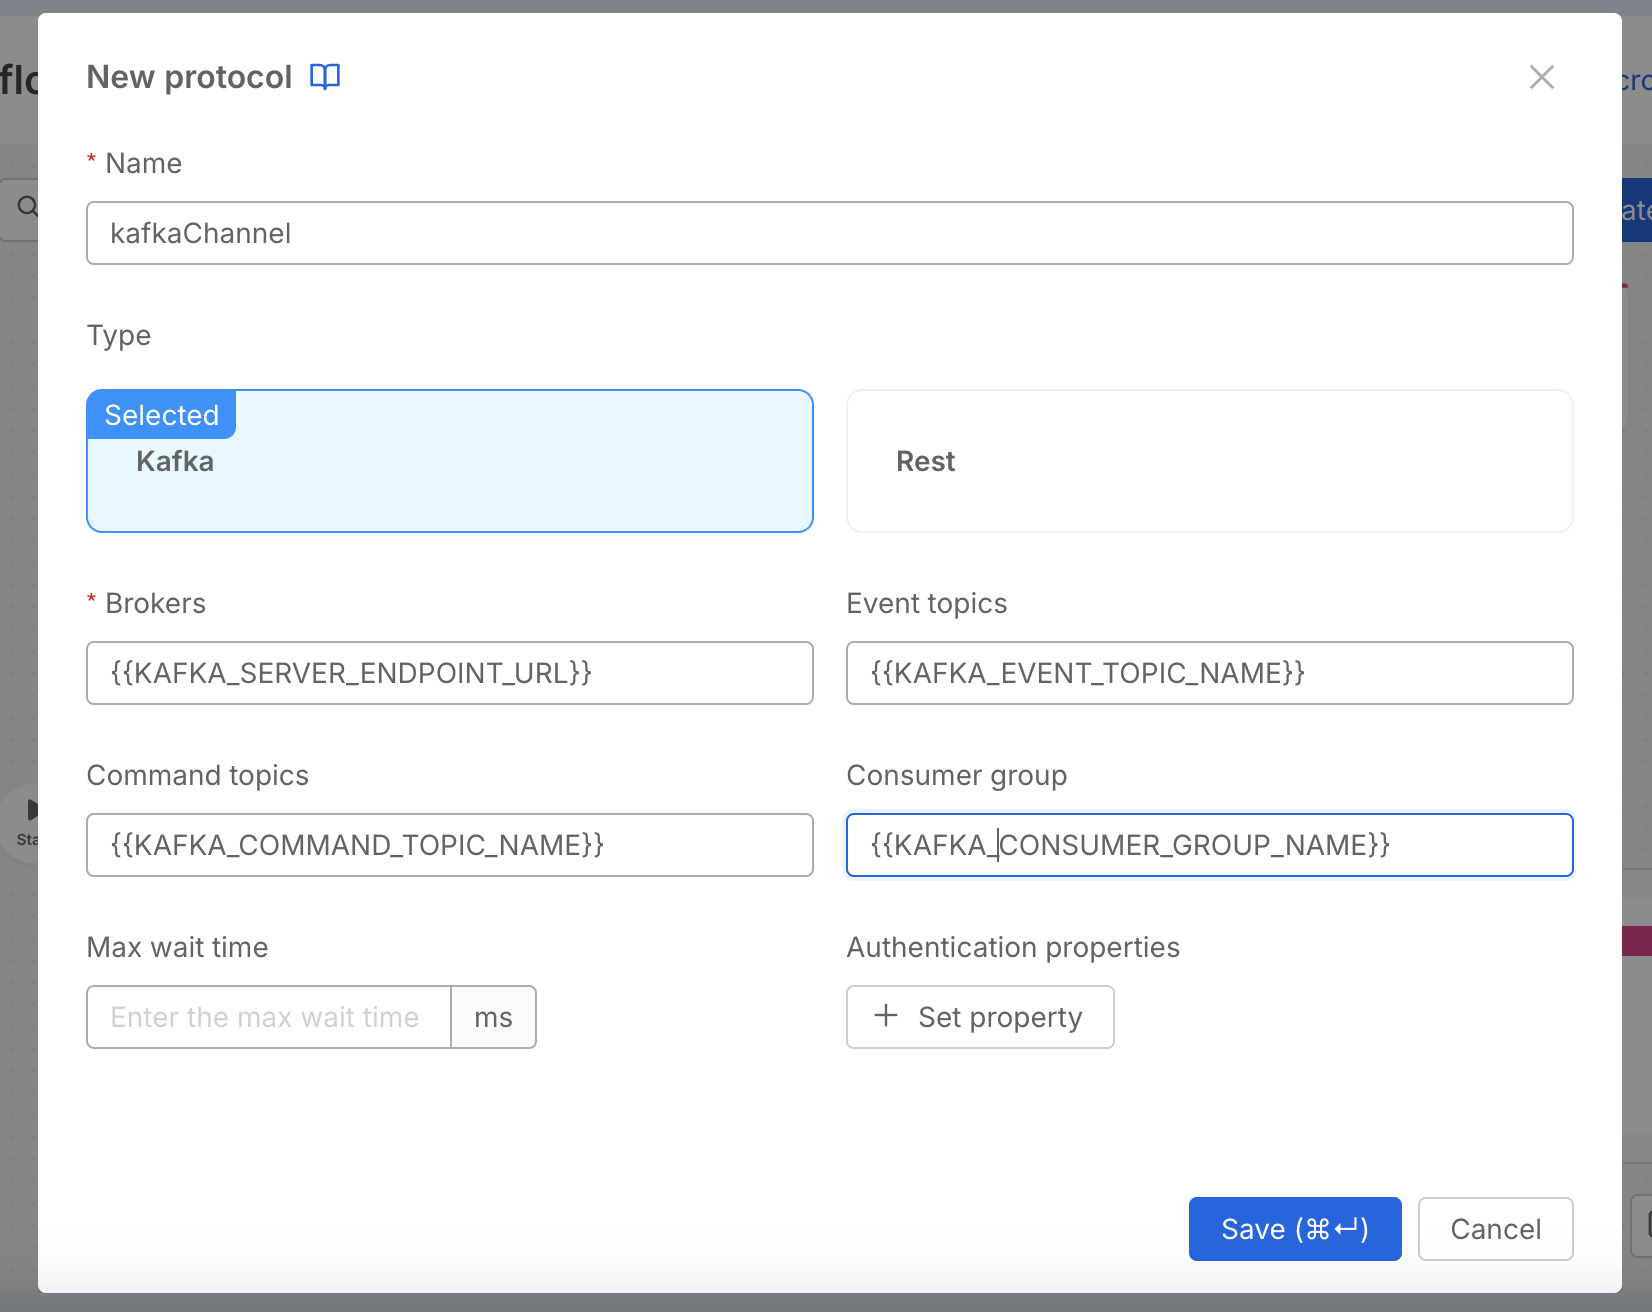
There are two types of Flow Manager communication channels supported: Kafka and Rest. In this tutorial, we will focus on how to configure a flow leveraging Kafka.
You need to have a running Kafka infrastructure in order to proceed. The Kafka message broker should have these configurations:
- allow authentication through user credentials with
plain,scram-sha-256orscram-sha-512mechanisms (scram-sha-256is used in this tutorial). - configure a consumer group.
- configure at least two topics (one for commands and one for events).
We will configure the Flow Manager service using the information above.
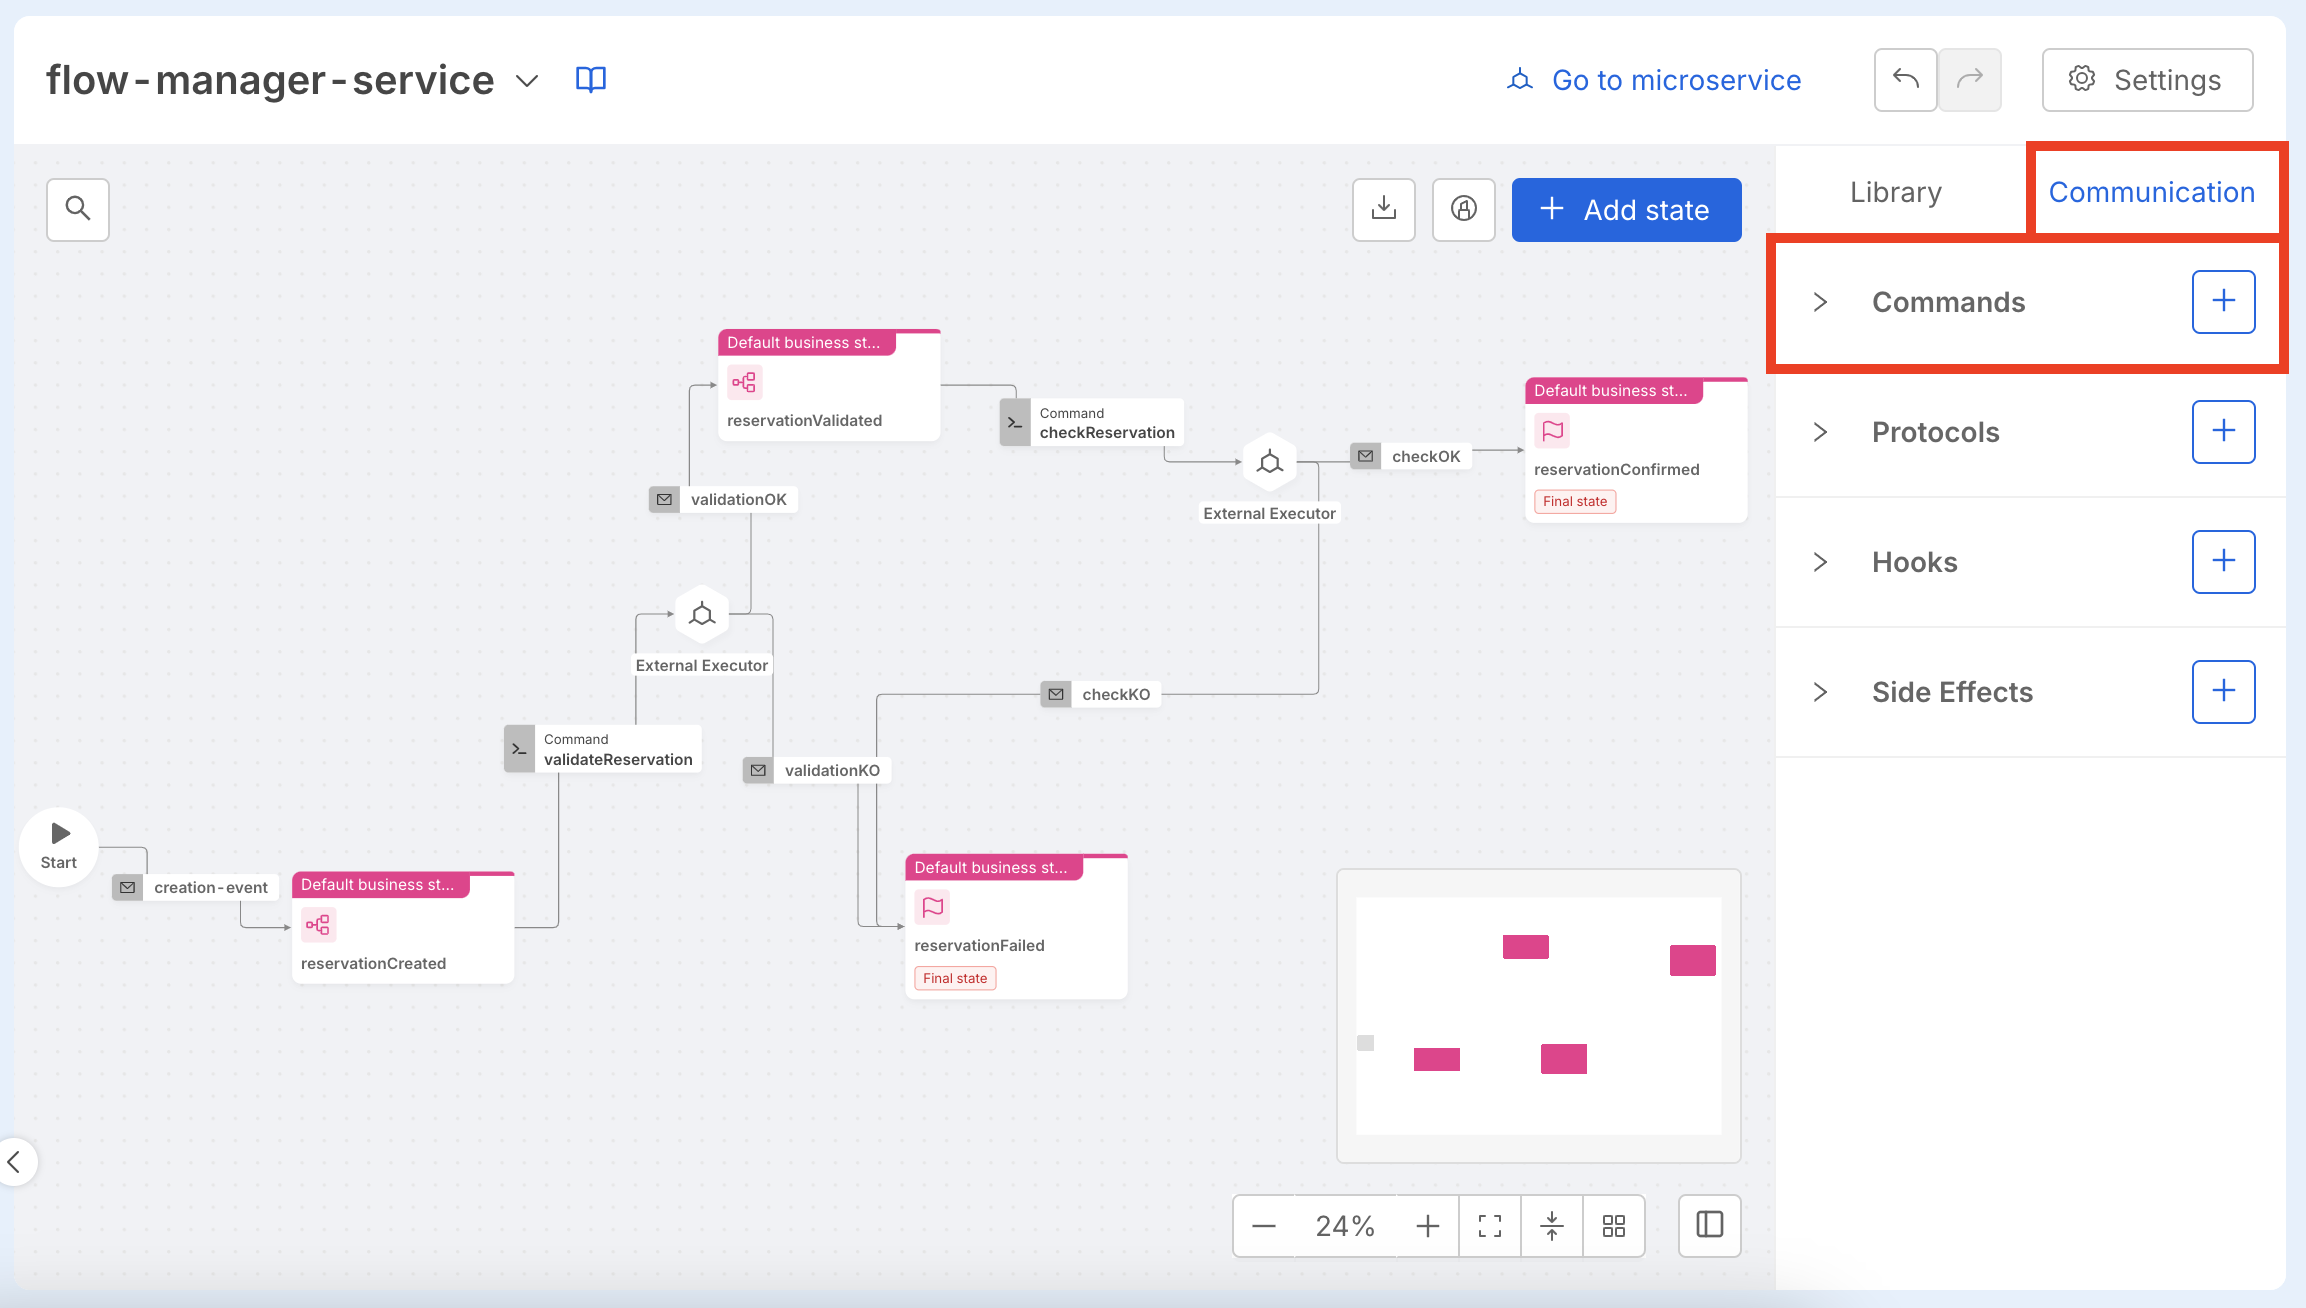
You will need to the Communication tab on the left of the page and create a new protocol as showed in the following picture.

You can find more information on Communication Protocols of the Flow Manager in the dedicated page.
Define commands
In this step we continue extending the Flow Manager configurations by adding commands.
We can define commands as representation of external service executions. Commands are responsible for starting the communication with other actors of the saga, which in turn will respond by firing events. In our saga a reservation must be validated to check for wrong input submitted by users and also checked if it can be confirmed or not depending on business constraints. For example, in a book reservation application we might check for the book existence and then if there are any available copies of the book.
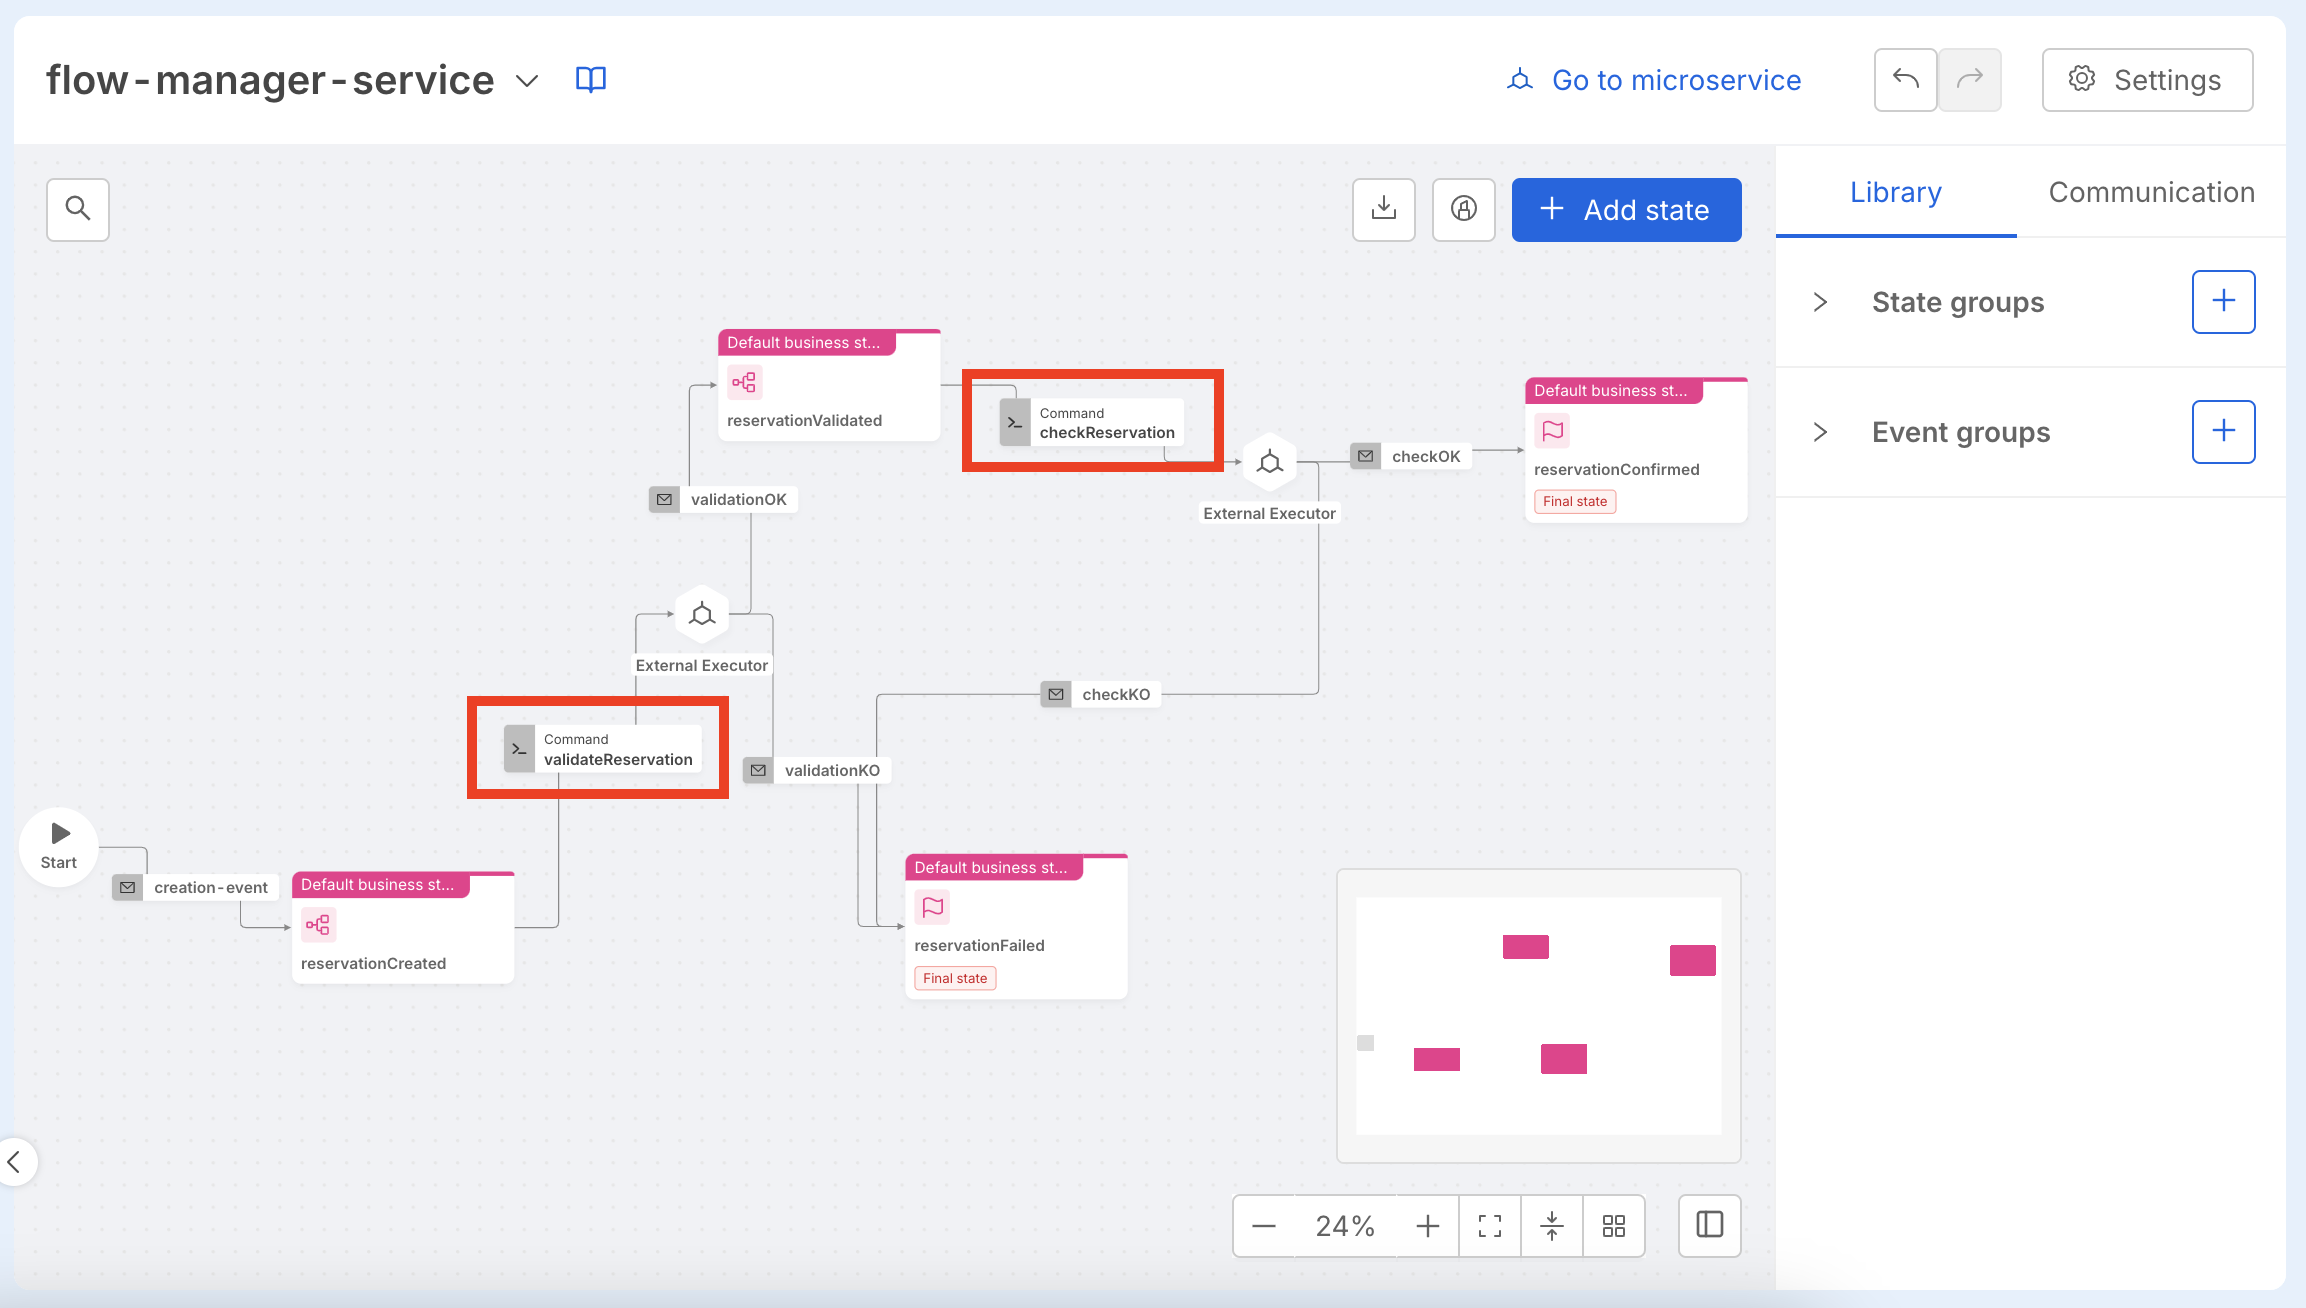
We will define two commands:
- validateReservation: a command representing the execution of a validation logic on the reservation data
- checkReservation: a command representing the execution of a check logic on the reservation, deciding if it can be confirmed or not
You will need to the Communication tab on the left of the page and create a new Command as showed in the following picture. Then link the command with the right state as showed in the second picture.
When creating a command, you can also define an External Executor, which is the service responsible for executing the command and triggering the flow to the next state.
By connecting two states, the default command is set to Waiting for the Event. To select a specific command to link, you need to click on the connection between the two states and choose the desired command.
When assigning a command to a state, you can override the default external executor defined for that command by enabling the Overwrite External Executor toggle.
You can find a complete definition of state and initialState fields in the configuration chapter of the Flow Manager dedicated page.
Configure Persistency
In this section we will configure the Persistency Management for our Flow Manager.
We must configure a persistency manager to store permanently the modifications applied to the saga. There are three strategies that can be used for adding persistency to the Flow Manager plugin:
- Rest
- MongoDB
- CRUD service
In this tutorial, we will focus on how to add persistency using a CRUD service.
Create a CRUD for persistency
To create a CRUD service you can follow this tutorial. As data schema please import this schema.
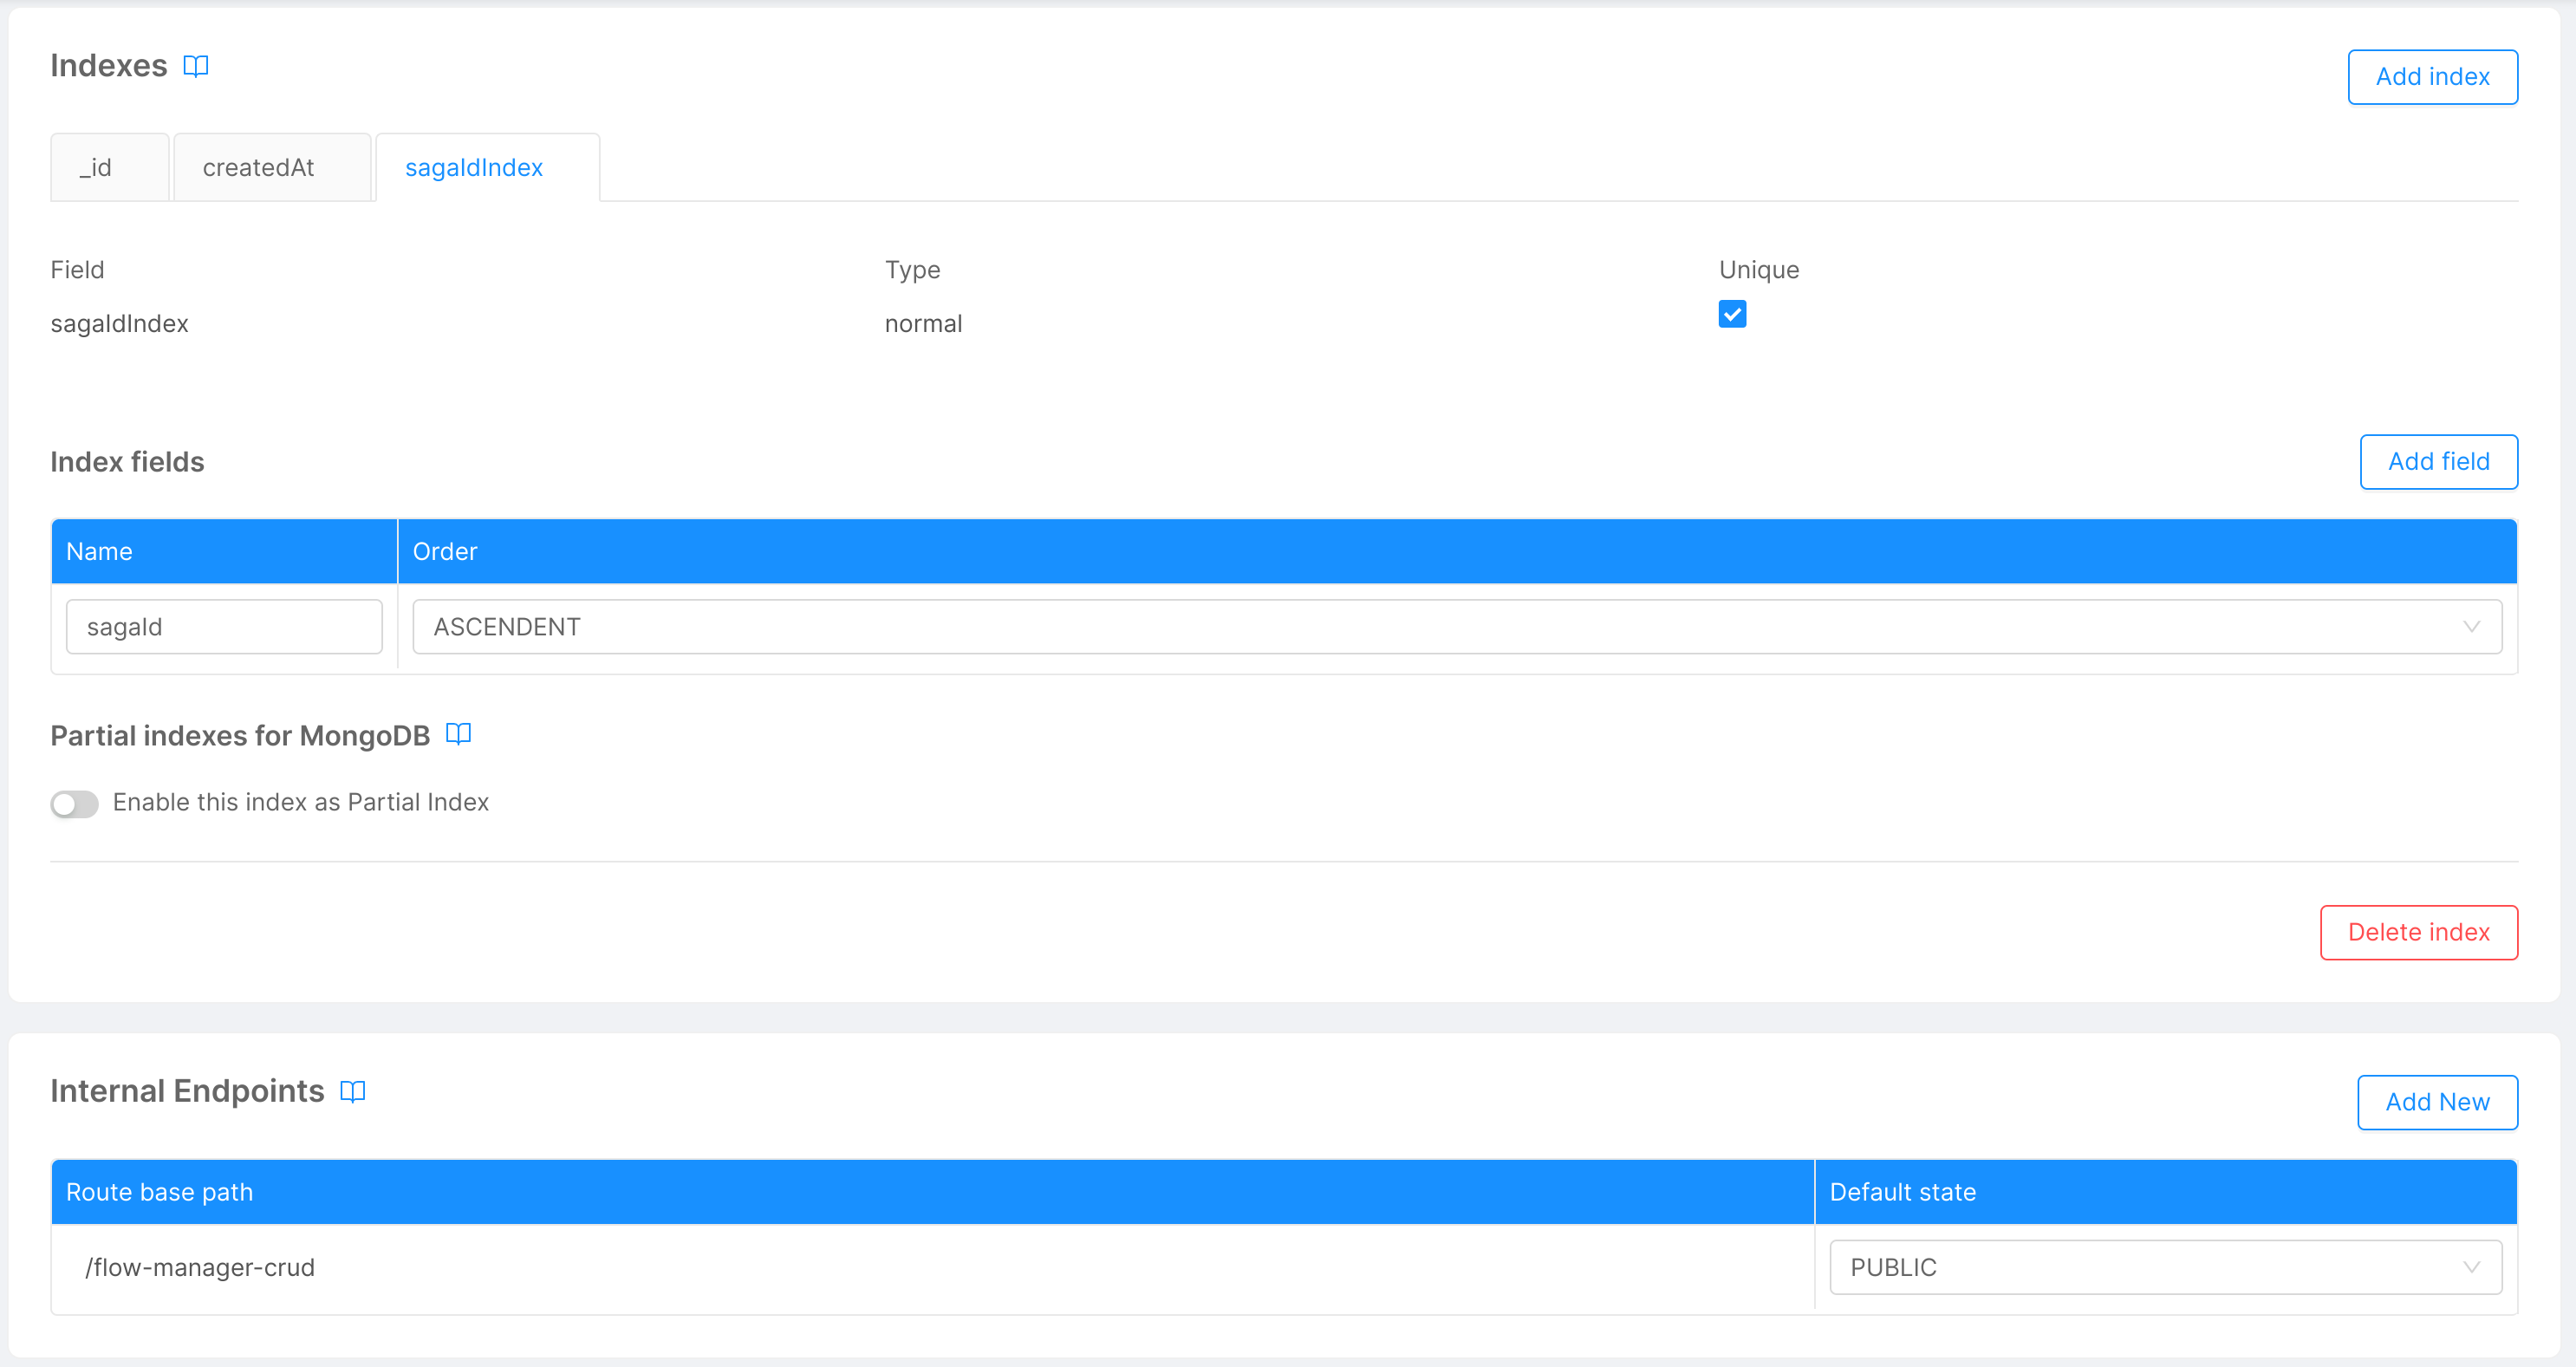
Remember to create a unique index for the collection on the sagaId field and to set the default state for new documents to PUBLIC.
To do this follow these steps:
- Open the Design section of the Console.
- On the left panel, in the Data Models group, click on MongoDB CRUD section.
- Click on the CRUD you created.
- In the Indexes section click Add index.
- Enter these values:
- Name:
sagaIdIndex - Type:
Normal - Field:
sagaId
- Name:
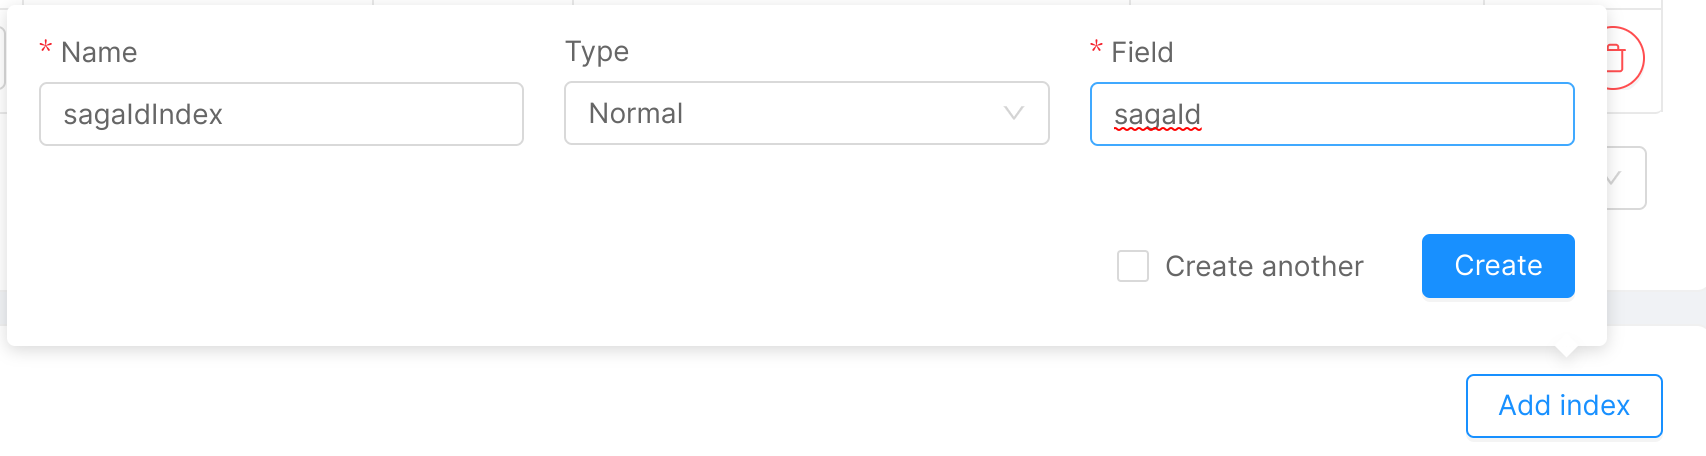
- Click Create. The new index will be shown.
- Set the
uniquecheckbox for thesagaIdIndexindex. - In the Internal Endpoints section make sure that
Default stateis set toPUBLIC.
You can find more information on CRUD Persistency Manager in the dedicated page.
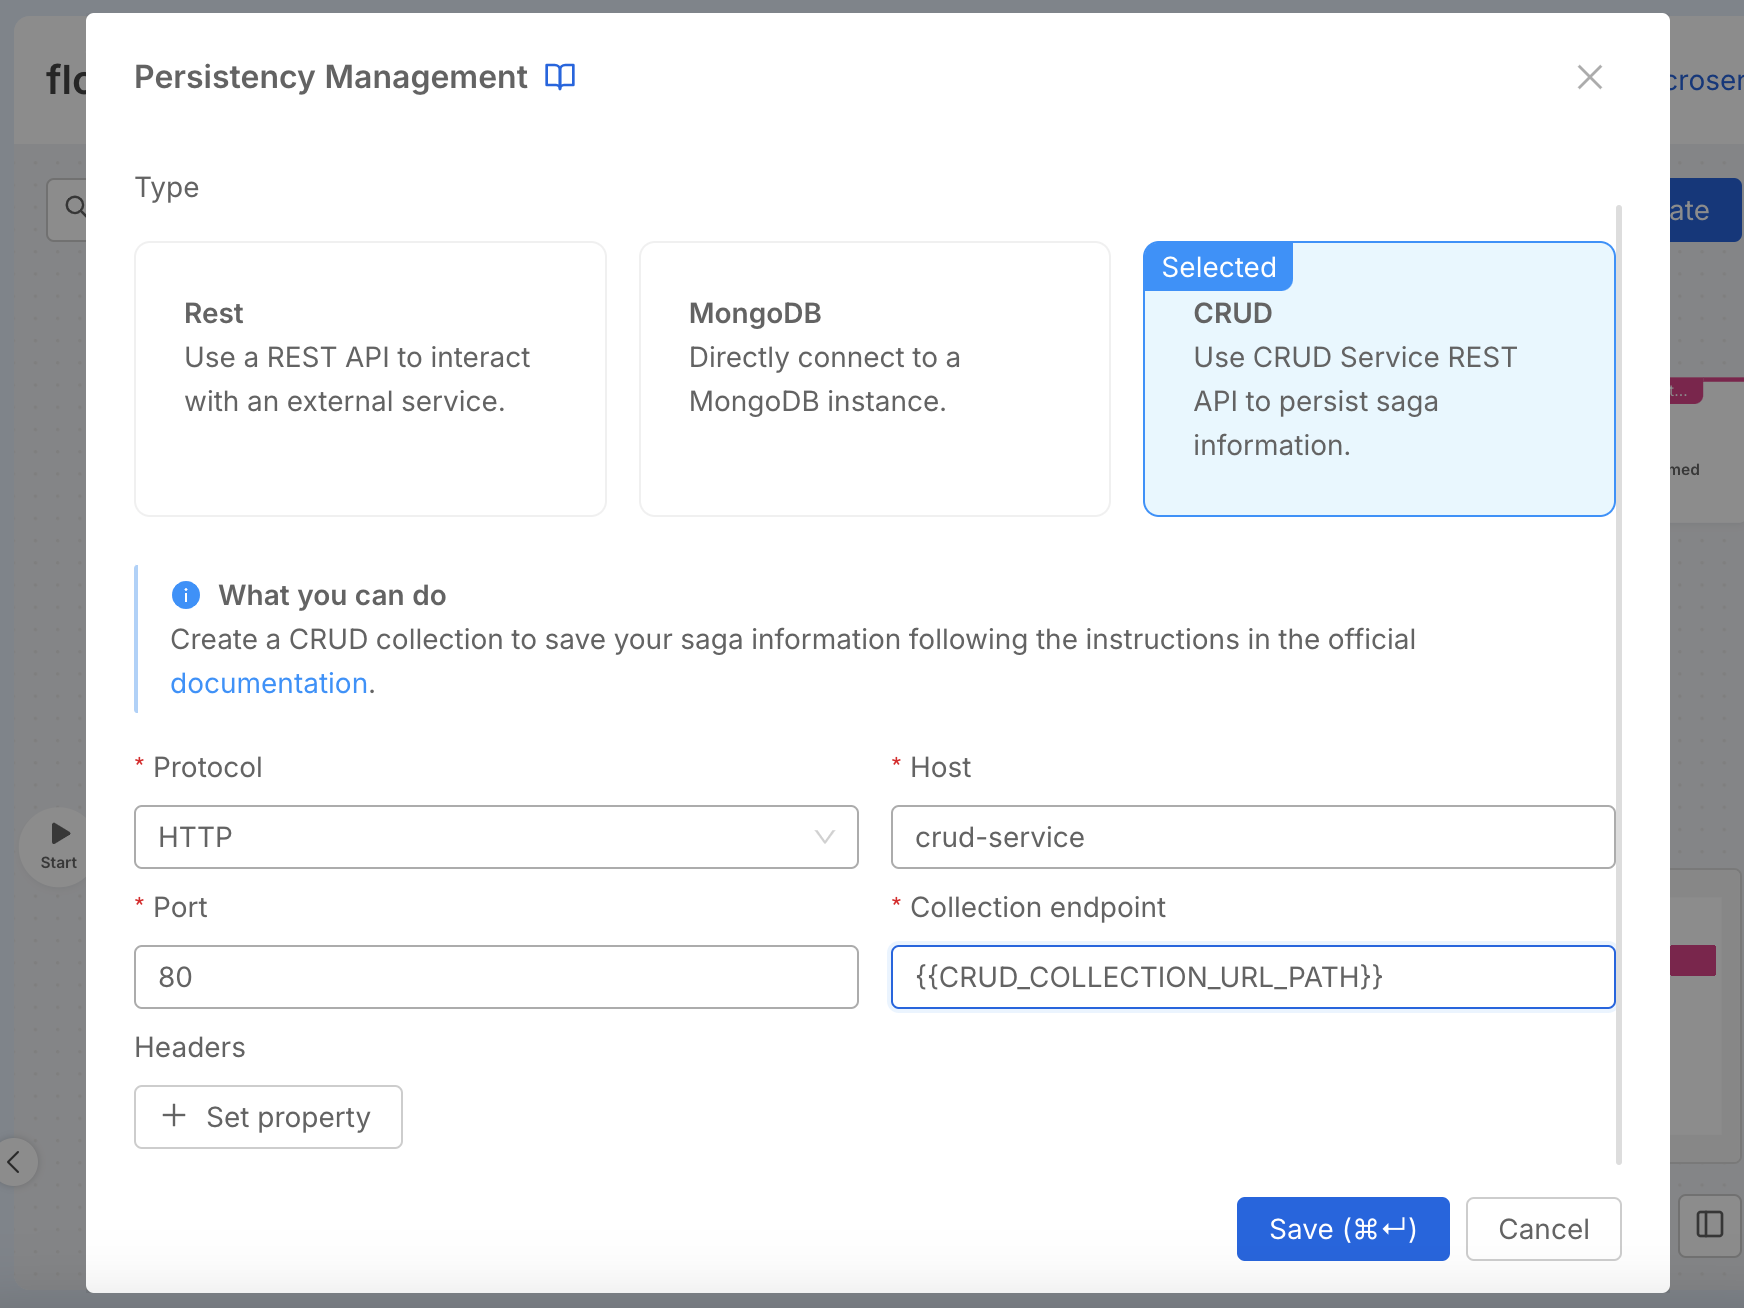
Configure Persistency Management
You will need to modify click on the Settings button on the top right of the canvas and then Persistency management.
Then configure the Persistency Manager as follow:
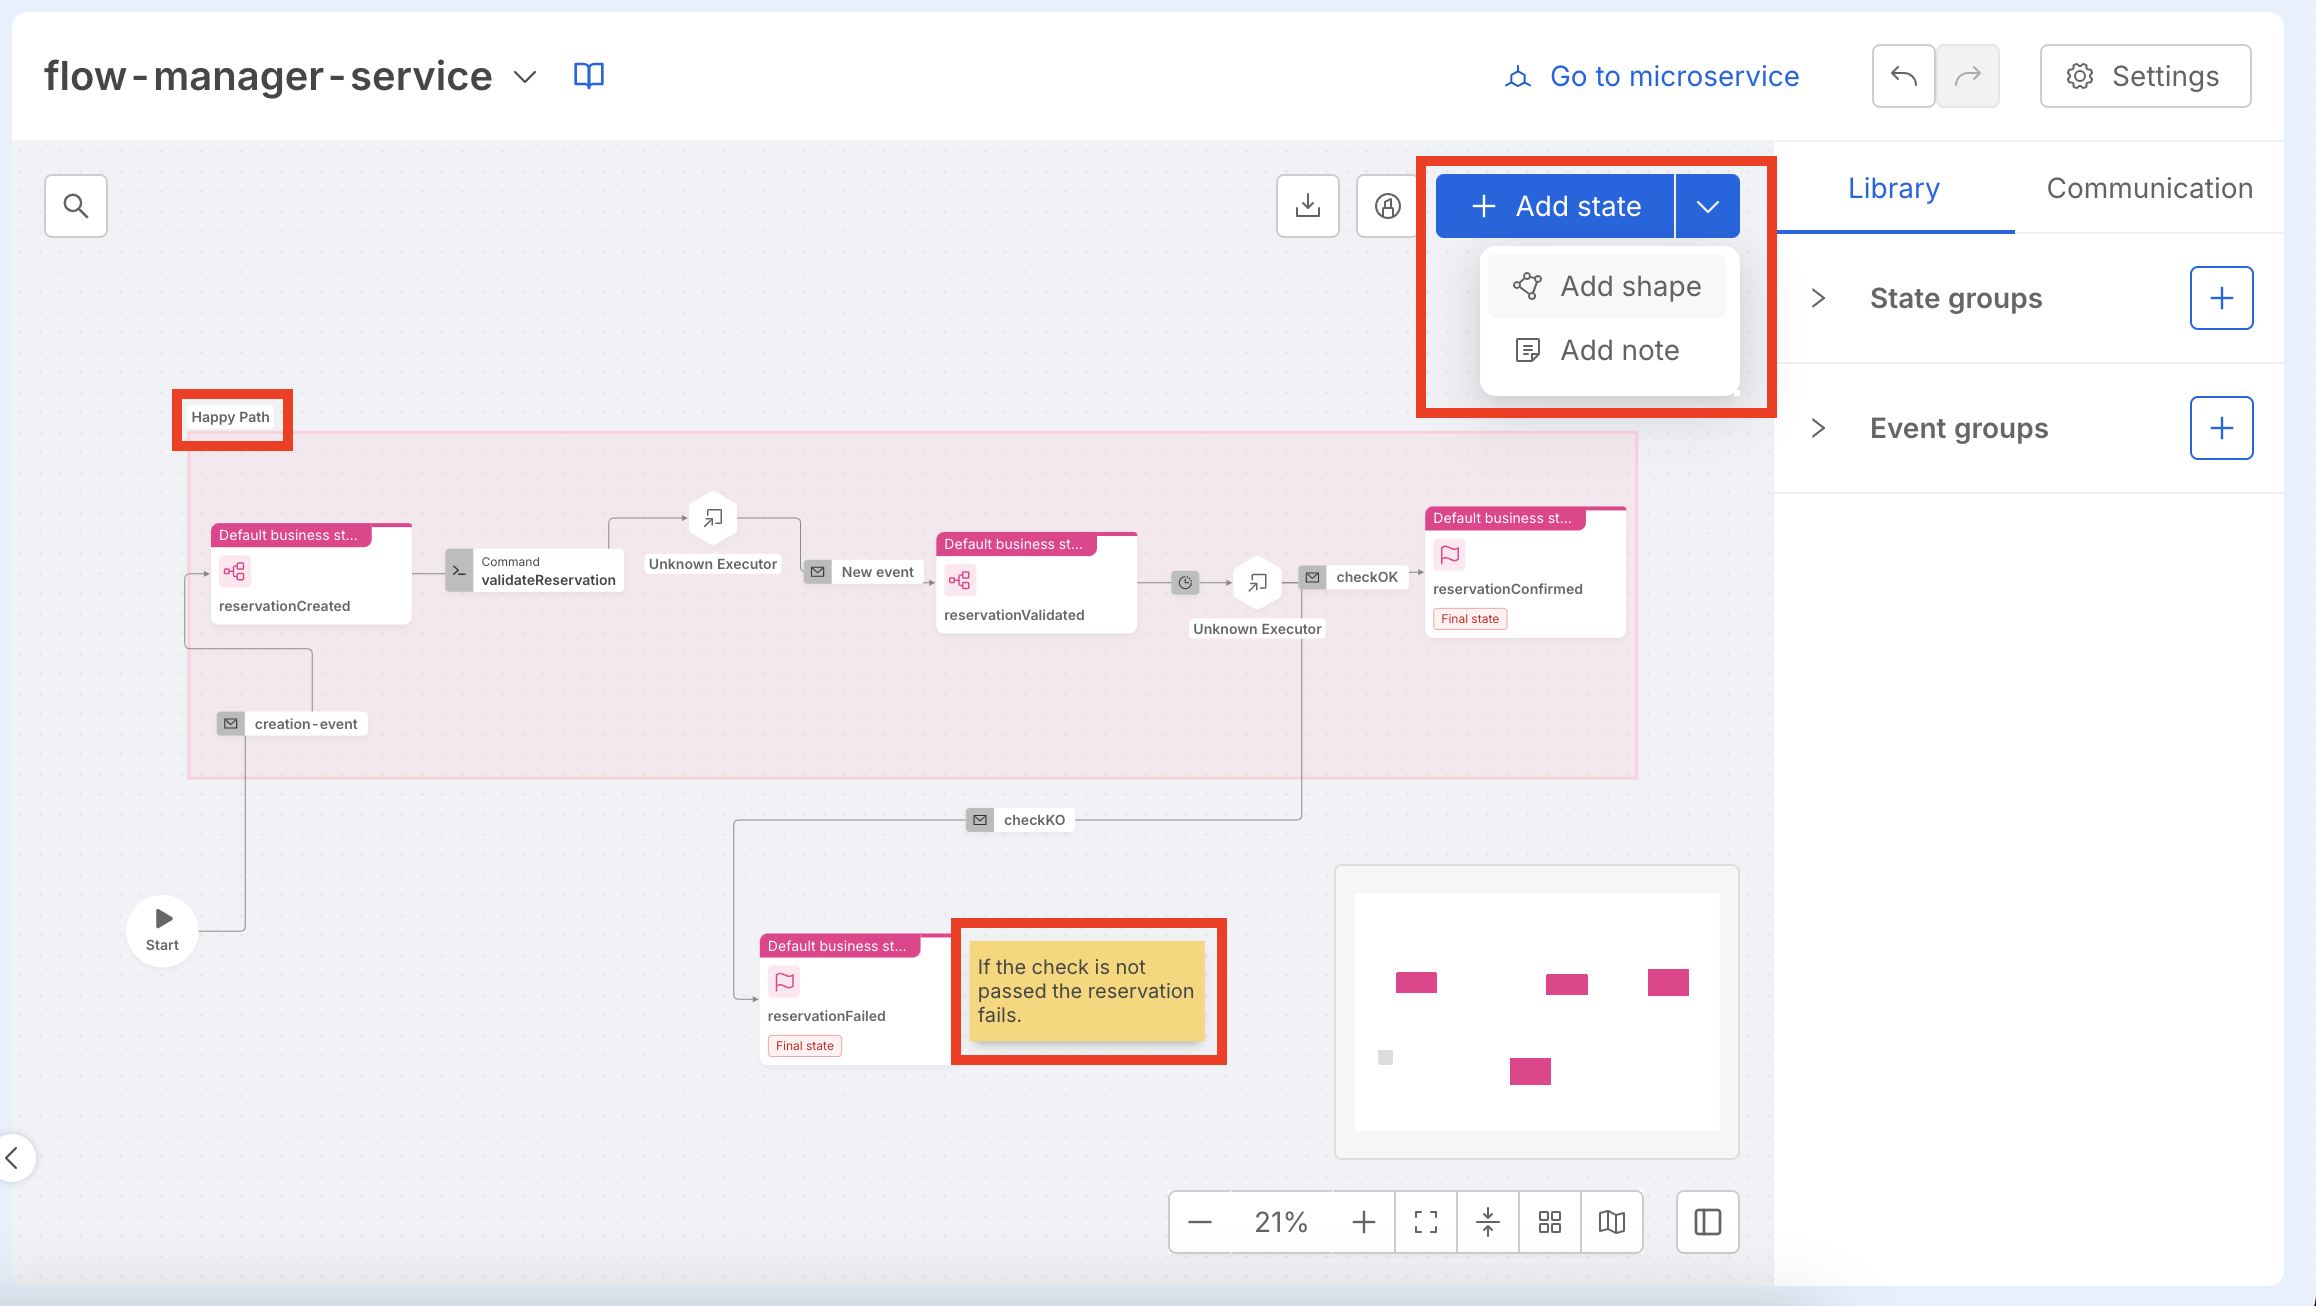
Customize the canvas adding information to the flow
If you want to highlight a specific part of the flow—for example, to distinguish the happy path from error state handling—you can add Shapes.
If instead, you need to provide additional details for a specific point in the flow, you can add Notes.
To do this, expand the Add State action button, select either Add a shape or Add a note, depending on what you want to add, and then place the element on the canvas.
Expose Flow Manager
The Flow Manager service provides a REST API that we want to make available outside the project in order to use it in the Interact paragraph. To expose the Flow Manager microservice we will create an endpoint on the Console.
To create and endpoint please follow these steps:
- Open the the Design section of the Console.
- Click Endpoints, in the API Gateway & Security section on the left pane.
- Click Create new endpoint.
- Enter the following values:
- Base path:
/flow-manager - Type:
Microservice - Microservice: select the Flow Manager microservice you created
- Base path:
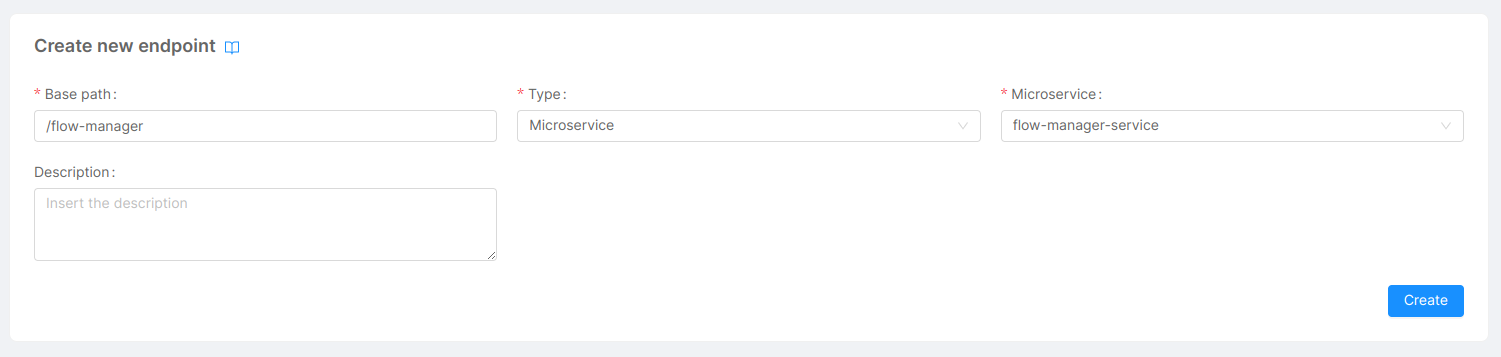
- Click Create.
Save and Deploy
We have completed all the configurations necessary for the correct execution of the Flow Manager service and to interact with it.
You can now save your configuration and deploy to your preferred environment.
Interact
We can distinguish two kinds of interaction with a Flow Manager service:
- A general interaction: the service exposes a REST API for this kind of interaction to get information about the whole service configuration or to create a new saga;
- A saga-specific interaction with business logic services: during this interaction a saga id is provided and the protocol used depends on the
communicationProtocolset in the service configurations.
In our case, the latter kind of interaction is made through kafka.
Let's see how to use these two kinds of API in order to create a new saga and send events related to it.
Create a new saga
In this section, we will make an HTTP request to the Flow Manager in order to create a new saga. The new saga will be created in the state defined as initialState in the configuration.
To create the saga, we will use the API Portal:
- Click on the
POST /flow-manager/sagarequest. - Enter
testforassociatedEntityIdin Body Params section. - Click on Properties in the metadata section.
- You can add a custom metadata property:
- Enter
reservation-idas Property name. - Click the add button.
- You can set a value of the
reservation-idproperty by clicking on the drop-down menu next to it. - Select
integer. - Enter a value in the input below. For example, enter
1.
- Enter
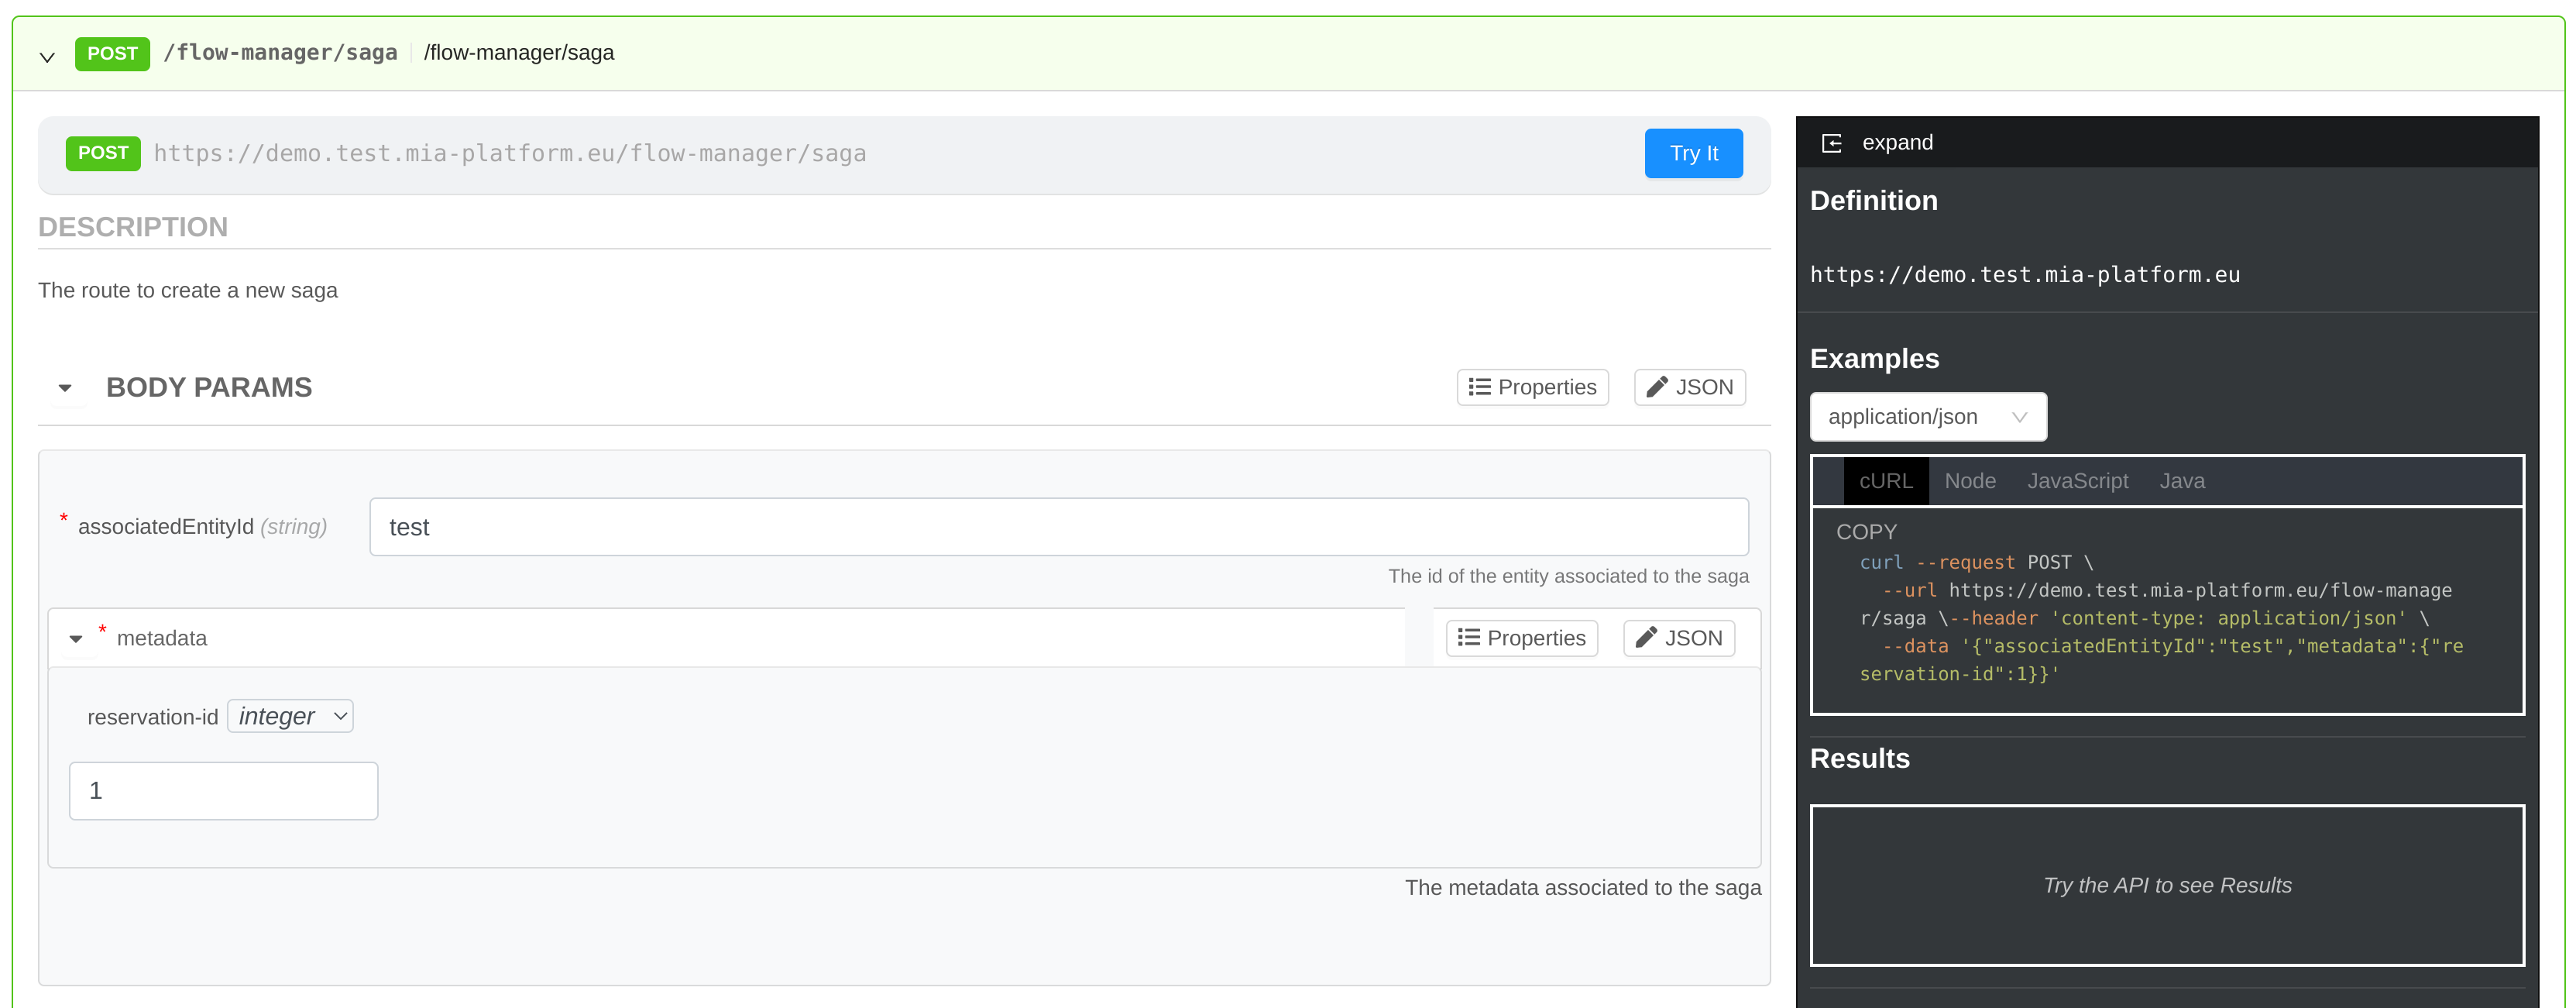
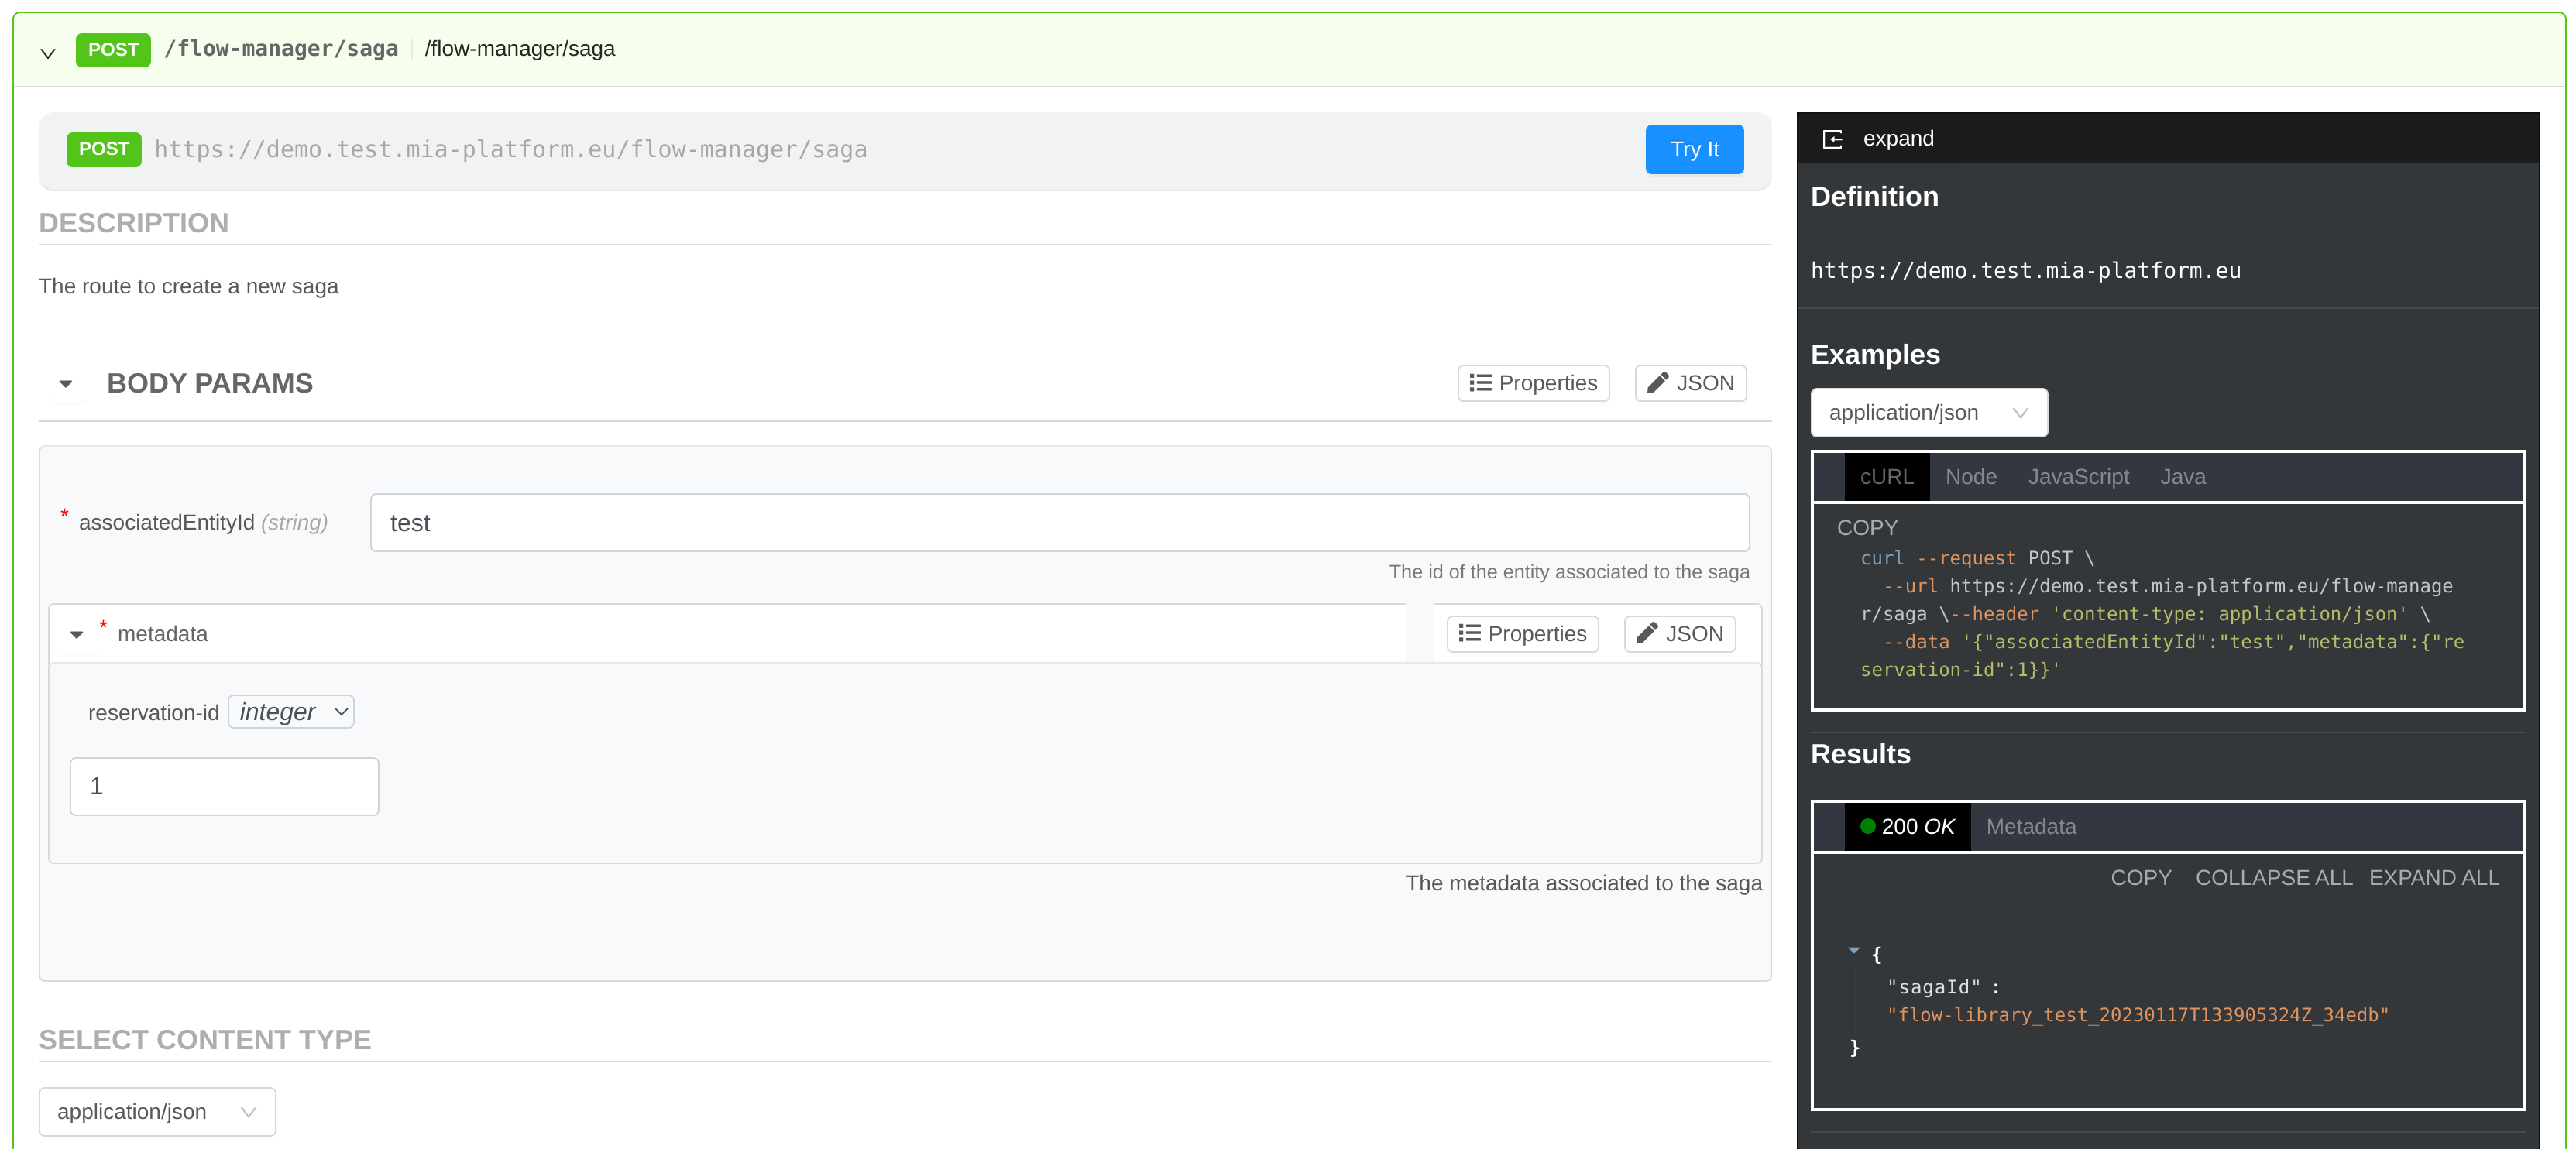
- Click on the Try It button above the request configuration.
- On the right window you should see a successful result with a
sagaIdin the response body. Copy and paste it in a safe place in order to use it in the next steps.
Send events related to a saga
At this point we have a working Flow Manager service but the saga is not complete.
In fact, you have to add services that implement the business specific logic that the Flow Manager will orchestrate. With the configuration we applied in this tutorial, the services you have to add will need to interact with Flow Manager by consuming commands and producing events on the Kafka topics configured previously.
The Flow Manager service produces command messages on the command Kafka topic using the Saga id as key, while the message payload should be in the form:
{
  "messageLabel": "The label of the command",
  "messagePayload": "The payload needed by the called service to execute the command"
}
You will have to add microservices that consume messages from the commands Kafka topic and implement the custom logics related to the saga. The microservices will be activated by the previously configured commands:
- validateReservation
- checkReservation
The Flow Manager consumes event messages on the event Kafka topic using the Saga id as key, while the message payload should be in the form:
{
  "messageLabel": "The label of the event",
  "messagePayload": "The payload of the event"
}
The external microservices will need to produce messages to the event Kafka topic for the following events depending on the custom logics related to the saga:
- validationOK
- validationKO
- checkOK
- checkKO
If you want to implement these microservices in Javascript you can use the Flow Manager Client library developed by Mia-Platform. This library simplifies the development of the external microservices that need to interact with Flow Manager.