Create a custom Microservice
In this tutorial, we will see how to create and develop a new microservice starting from one of the templates, offered by the Mia-Platform Marketplace, up to the actual coding of the endpoints. We will also deep dive into the functionalities that Mia-Platform Console offers to the developer during the whole software lifecycle.
What we will Build
We will develop a simple microservice that exposes a route returning the shipping cost depending on whether the user is a new customer or not. Moreover, the values returned by the endpoint will be based on the value of some environment variables.
We will also create a CRUD service to store the data related to customers and orders, and we will see how to communicate between different services, the one we are developing and the curd-service.
In the final part, we will go over how to check the logs and status of the services, and how to release the final version into production using semantic versioning.
Prerequisites
Before starting, we will assume that, you already have a clean project in Mia-Platform Console. To know how to create a project on Mia-Platform Console, read this guide.
The project must:
- Be integrated with a deploy pipeline;
- Have an ingress route with "api-gateway" as
service; - Be aware of have configured your project domain to be called. If the project links have been configured, you can find them in the "Environments" section of the "Project Overview" area, under the "Application" column;
- Have a properly configured API Portal.
- Have a properly configured CRUD Service.
Better to have:
- Some familiarity with API and REST concepts.
- Some familiarity with at least one among the following:
- Node.js and Fastify,
- Java and Spring Boot.
If your are using a Mia-Platform Console in PaaS and the project has been created using the "Mia-Platform Basic Project Template", the project is already configured as needed.
Create CRUD collections
Firstly, open your project, and create the following MongoDB CRUD collections:
-
Create
customersCRUD collection, download the schema here or copy it from below;Click to see the customers schema:
-
Create
ordersCRUD collection, download the schema here or copy it from below.Click to see the orders schema:
You don't know how to import CRUD schema? Give a look here
Expose CRUD endpoints
Once the collections have been created, they need to be exposed through an Endpoints.
-
Create
customersCRUD endpoint:- Base path:
/customers; - Type: in the dropdown menu, select
"CRUD"; - CRUD Base Path: in the dropdown menu, select
/customers.
- Base path:
-
Create
ordersCRUD endpoint:- Base path:
/orders; - Type: in the dropdown menu, select
"CRUD"; - CRUD Base Path: in the dropdown menu, select
/orders.
- Base path:
You don't know how to import CRUD schema? Give a look here
Create the Microservice from a Marketplace template
A Microservice can be created starting from existing templates. Starting from a Mia-Platform template or using Mia-Platform service libraries has many advantages and allows your microservices to be compliant with all best practices (such as pipelines, logging, health routes, etc.).
In the Marketplace you can find a list of Examples and Templates powered and supported by Mia-Platform that allows you to set up microservices with a tested and pre-defined function.
- Node.js
- Java
- .NET
We will create a microservice from Node.js template:
-
Go to Microservices section and click Create a Microservice;
-
Search the template
Node.js Template, then select it; -
Now enter the following information:
- Name:
shipping-cost;
- Name:
-
In the detail, go to the Microservice configuration section and set Memory Request Limit to
150and CPU Limit to100.
We will create a microservice from Java Springboot template:
-
Go to Microservices section and click Create a Microservice;
-
Search the template
Springboot Template, then select it; -
Now enter the following information:
- Name:
shipping-cost;
- Name:
-
In the detail, go to the Microservice configuration section and set Memory Request Limit to
150and CPU Limit to100.
We will create a microservice from BrewUp .NET Example:
-
Go to Microservices section and click Create a Microservice;
-
Search the template
BrewUp .NET example, then select it; -
Now enter the following information:
- Name:
shipping-cost;
- Name:
-
In the detail, go to the Microservice configuration section and set Memory Request Limit to
150and CPU Limit to100.
Now you have to expose the microservice:
-
Go to Endpoints section and click Create new endpoint. Then enter the following information:
- Base path:
/shipping-cost-service; - Type: in the dropdown menu select
"Microservice"; - Microservice: in the dropdown menu select
shipping-cost.
- Base path:
-
Click Create button;
-
Commit the changes.
If you have difficulty creating the microservice or exposing it, check out the first tutorial!
Let's code!
The newly created microservice repository can be accessed from the microservice details page, by clicking on View Repository button in the upper right-corner. The Clone button allows you to easily see SSH and HTTPS urls to clone the repository in your local machine or to directly open it with your preferred editor.
Now, we want to implement the route that calculates the shipping cost.
Since Mia-Platform strongly encourages the use of Test Driven Development, we will start by writing the tests. This approach allows the developer to focus on the needed requirements and, in addition, makes the code easier to evolve over time and durable to mistakes.
Write the tests
Let's start writing a simple test for GET /shipping-cost route. It will receive an email in the query string as the customer identifier and return the correct shipping cost.
- Node.js
- Java
- .NET
First of all, open the test/index.test.js file and add, after the require instructions, the lines to include Nock and disable real HTTP requests. We will use this module to mock calls to the CRUD simulating responses from HTTP requests.
After that let's write the real test, replacing the "Insert your tests" comment with the highlighted code:
"use strict";

const t = require("tap");
const lc39 = require("@mia-platform/lc39");
const nock = require("nock");
nock.disableNetConnect();

async function setupFastify(envVariables) {
  const fastify = await lc39("./index.js", {
    logLevel: "silent",
    envVariables,
  });
  return fastify;
}

t.test("shipping-cost", async (t) => {
  // silent => trace for enabling logs
  const fastify = await setupFastify({
    USERID_HEADER_KEY: "userid",
    GROUPS_HEADER_KEY: "groups",
    CLIENTTYPE_HEADER_KEY: "clienttype",
    BACKOFFICE_HEADER_KEY: "backoffice",
    MICROSERVICE_GATEWAY_SERVICE_NAME: "microservice-gateway.example.org",
  });

  t.teardown(async () => {
    await fastify.close();
  });

  t.test("Default customer shipping cost", async (t) => {
    const NEW_CUSTOMER_SHIPPING_COST = 5.99;
    const DEFAULT_SHIPPING_COST = 10;
    const CRUD_BASE_URL = "http://crud-service";
    const getCustomerScope = nock(CRUD_BASE_URL)
      .get(`/customers/`)
      .query({ email: mockedCustomer.email })
      .reply(200, [mockedCustomer]);

    const getOrderScope = nock(CRUD_BASE_URL)
      .get(`/orders/count`)
      .query({ customerId: mockedCustomer._id })
      .reply(200, 1);

    const response = await fastify.inject({
      method: "GET",
      url: "/shipping-cost",
      query: {
        customerEmail: mockedCustomer.email,
      },
    });
    t.equal(response.statusCode, 200);
    t.same(JSON.parse(response.payload), {
      shippingCost: DEFAULT_SHIPPING_COST,
    });

    // Check if the mocked requests have been really called by the handler
    getOrderScope.done();
    getCustomerScope.done();
  });

  t.end();
});
In this test we tested only the "happy path", that is the case in which returning the correct shipping cost for a new customer. To achieve full coverage, we need to also test different inputs and the return of the default shipping cost. You can implement the full test suite on your own or copy the complete test code below:
Tests to get full coverage:
"use strict";

const t = require("tap");
const lc39 = require("@mia-platform/lc39");
const nock = require("nock");
nock.disableNetConnect();

async function setupFastify(envVariables) {
  const fastify = await lc39("./index.js", {
    logLevel: "silent",
    envVariables,
  });
  return fastify;
}

const NEW_CUSTOMER_SHIPPING_COST = 5.99;
const DEFAULT_SHIPPING_COST = 10;
const CRUD_BASE_URL = "http://crud-service";

t.test("shipping-cost", async (t) => {
  // silent => trace for enable logs
  const fastify = await setupFastify({
    USERID_HEADER_KEY: "userid",
    GROUPS_HEADER_KEY: "groups",
    CLIENTTYPE_HEADER_KEY: "clienttype",
    BACKOFFICE_HEADER_KEY: "backoffice",
    MICROSERVICE_GATEWAY_SERVICE_NAME: "microservice-gateway.example.org",
  });

  t.teardown(async () => {
    await fastify.close();
  });

  t.test("GET /shipping-cost", (t) => {
    const customerId = "1";

    const mockedCustomer = {
      _id: customerId,
      email: "customer@email.com",
    };

    t.test("404 - No customer found", async (t) => {
      const getCustomerScope = nock(CRUD_BASE_URL)
        .get(`/customers/`)
        .query({ email: mockedCustomer.email })
        .reply(404, {});

      const response = await fastify.inject({
        method: "GET",
        url: "/shipping-cost",
        query: {
          customerEmail: mockedCustomer.email,
        },
      });
      t.equal(response.statusCode, 404);
      t.same(JSON.parse(response.payload), {
        error: "Customer does not exist",
      });

      getCustomerScope.done();
    });

    t.test("503 - error getting orders count", async (t) => {
      const getCustomerScope = nock(CRUD_BASE_URL)
        .get(`/customers/`)
        .query({ email: mockedCustomer.email })
        .reply(200, [mockedCustomer]);

      const getOrderScope = nock(CRUD_BASE_URL)
        .get(`/orders/count`)
        .query({ customerId: mockedCustomer._id })
        .reply(500, 0);

      const response = await fastify.inject({
        method: "GET",
        url: "/shipping-cost",
        query: {
          customerEmail: mockedCustomer.email,
        },
      });
      t.equal(response.statusCode, 503);
      t.same(JSON.parse(response.payload), {
        error: "Error in Order collection",
      });

      // Check if the mocked requests have been really called by the handler
      getOrderScope.done();
      getCustomerScope.done();
    });

    t.test("New customer shipping cost", async (t) => {
      const getCustomerScope = nock(CRUD_BASE_URL)
        .get(`/customers/`)
        .query({ email: mockedCustomer.email })
        .reply(200, [mockedCustomer]);

      const getOrderScope = nock(CRUD_BASE_URL)
        .get(`/orders/count`)
        .query({ customerId: mockedCustomer._id })
        .reply(200, 0);

      const response = await fastify.inject({
        method: "GET",
        url: "/shipping-cost",
        query: {
          customerEmail: mockedCustomer.email,
        },
      });
      t.equal(response.statusCode, 200);
      t.same(JSON.parse(response.payload), {
        shippingCost: NEW_CUSTOMER_SHIPPING_COST,
      });

      // Check if the mocked requests have been really called by the handler
      getOrderScope.done();
      getCustomerScope.done();
    });

    t.test("Default customer shipping cost", async (t) => {
      const getCustomerScope = nock(CRUD_BASE_URL)
        .get(`/customers/`)
        .query({ email: mockedCustomer.email })
        .reply(200, [mockedCustomer]);

      const getOrderScope = nock(CRUD_BASE_URL)
        .get(`/orders/count`)
        .query({ customerId: mockedCustomer._id })
        .reply(200, 1);

      const response = await fastify.inject({
        method: "GET",
        url: "/shipping-cost",
        query: {
          customerEmail: mockedCustomer.email,
        },
      });
      t.equal(response.statusCode, 200);
      t.same(JSON.parse(response.payload), {
        shippingCost: DEFAULT_SHIPPING_COST,
      });

      // Check if the mocked requests have been really called by the handler
      getOrderScope.done();
      getCustomerScope.done();
    });
    t.end();
  });
});
In this example we will use wiremock package to mock the external calls to the CRUD service simulating responses from HTTP requests and gson to parse and serialize JSON data. So the first thing we are going to do is to import those packages in the pom.xml file under the dependencies tag:
<dependency>
    <groupId>com.github.tomakehurst</groupId>
    <artifactId>wiremock-jre8</artifactId>
    <version>2.35.0</version>
    <scope>test</scope>
</dependency>
<dependency>
    <groupId>com.google.code.gson</groupId>
    <artifactId>gson</artifactId>
    <version>2.10.1</version>
</dependency>
Now install the new dependencies with maven cli:
mvn dependency:resolve
Once we have installed the required packages we can create and open the ShippingControllerTest.java file at the following path src/test/java/eu/miaplatform/customplugin/springboot/ in order to write the required test.
Disclamer: for demonstration purposes, the current example has a simplified structure.
package eu.miaplatform.customplugin.springboot;

import com.github.tomakehurst.wiremock.client.WireMock;
import com.github.tomakehurst.wiremock.junit5.WireMockTest;
import com.google.gson.Gson;
import eu.miaplatform.customplugin.springboot.models.Customer;
import org.junit.jupiter.api.Test;
import org.junit.jupiter.api.extension.ExtendWith;
import org.springframework.beans.factory.annotation.Autowired;
import org.springframework.boot.test.autoconfigure.web.servlet.AutoConfigureMockMvc;
import org.springframework.boot.test.context.SpringBootTest;
import org.springframework.http.MediaType;
import org.springframework.test.context.junit.jupiter.SpringExtension;
import org.springframework.test.web.servlet.MockMvc;
import org.springframework.test.web.servlet.request.MockMvcRequestBuilders;

import static com.github.tomakehurst.wiremock.client.WireMock.*;
import static org.springframework.test.web.servlet.result.MockMvcResultMatchers.jsonPath;
import static org.springframework.test.web.servlet.result.MockMvcResultMatchers.status;

@ExtendWith(SpringExtension.class)
@SpringBootTest
@AutoConfigureMockMvc
@WireMockTest(proxyMode = true, httpPort = 5127)
public class ShippingControllerTest {
    @Autowired
    private MockMvc mvc;
    static final Double NEW_CUSTOMER_SHIPPING_COST = 5.99;
    static final Double DEFAULT_SHIPPING_COST = 10.0;
    static final String CRUD_BASE_URL = "http://crud-service";
    private final Gson gson = new Gson();

     @Test
    public void discountedShippingCost() throws Exception {
        String customerId = "123abc";
        Customer customer = new Customer(customerId, "customer");
        Customer[] crudResponse = {customer};
        int numberOfOrders = 0;

        URL url = new URL(CRUD_BASE_URL);

        stubFor(WireMock.get(urlPathEqualTo("/customers/"))
                .withScheme(url.getProtocol())
                .withHost(WireMock.equalTo(url.getHost()))
                .withQueryParam("email", WireMock.equalTo(customer.getEmail()))
                .willReturn(aResponse()
                        .withHeader("Content-Type", MediaType.APPLICATION_JSON_VALUE)
                        .withBody(gson.toJson(crudResponse))
                )
        );

        stubFor(WireMock.get(urlPathEqualTo("/orders/count"))
                .withScheme(url.getProtocol())
                .withHost(WireMock.equalTo(url.getHost()))
                .withQueryParam("customerId", WireMock.equalTo(customer.get_id()))
                .willReturn(aResponse()
                        .withHeader("Content-Type", MediaType.APPLICATION_JSON_VALUE)
                        .withBody(Integer.toString(numberOfOrders))
                )
        );

        mvc.perform(MockMvcRequestBuilders
                        .get("/shipping-cost")
                        .queryParam("customerEmail", customer.getEmail()))
                .andExpect(status().isOk())
                .andExpect(jsonPath("$.shippingCost").value(NEW_CUSTOMER_SHIPPING_COST));
    }
}
In this test we tested only the "happy path", that is the case in which returning the correct shipping cost for a new customer. To achieve full coverage, we need to also test different inputs and the return of the default shipping cost. You can implement the full test suite on your own or copy the complete test code below:
Tests to get full coverage:
package eu.miaplatform.customplugin.springboot;

import com.github.tomakehurst.wiremock.client.WireMock;
import com.github.tomakehurst.wiremock.junit5.WireMockTest;
import com.google.gson.Gson;
import eu.miaplatform.customplugin.springboot.models.Customer;
import org.junit.jupiter.api.Test;
import org.junit.jupiter.api.extension.ExtendWith;
import org.springframework.beans.factory.annotation.Autowired;
import org.springframework.boot.test.autoconfigure.web.servlet.AutoConfigureMockMvc;
import org.springframework.boot.test.context.SpringBootTest;
import org.springframework.http.MediaType;
import org.springframework.test.context.junit.jupiter.SpringExtension;
import org.springframework.test.web.servlet.MockMvc;
import org.springframework.test.web.servlet.request.MockMvcRequestBuilders;
import org.springframework.web.server.ResponseStatusException;

import java.net.URL;

import static com.github.tomakehurst.wiremock.client.WireMock.*;
import static org.junit.jupiter.api.Assertions.assertEquals;
import static org.junit.jupiter.api.Assertions.assertTrue;
import static org.springframework.test.web.servlet.result.MockMvcResultMatchers.jsonPath;
import static org.springframework.test.web.servlet.result.MockMvcResultMatchers.status;

@ExtendWith(SpringExtension.class)
@SpringBootTest
@AutoConfigureMockMvc
@WireMockTest(proxyMode = true, httpPort = 5127)
public class ShippingControllerTest {
    @Autowired
    private MockMvc mvc;
    static final Double NEW_CUSTOMER_SHIPPING_COST = 5.99;
    static final Double DEFAULT_SHIPPING_COST = 10.0;
    static final String CRUD_BASE_URL = "http://crud-service";
    private final Gson gson = new Gson();

    @Test
    public void discountedShippingCost() throws Exception {
        String customerId = "123abc";
        Customer customer = new Customer(customerId, "customer");
        Customer[] crudResponse = {customer};
        int numberOfOrders = 0;

        URL url = new URL(CRUD_BASE_URL);

        stubFor(WireMock.get(urlPathEqualTo("/customers/"))
                .withScheme(url.getProtocol())
                .withHost(WireMock.equalTo(url.getHost()))
                .withQueryParam("email", WireMock.equalTo(customer.getEmail()))
                .willReturn(aResponse()
                        .withHeader("Content-Type", MediaType.APPLICATION_JSON_VALUE)
                        .withBody(gson.toJson(crudResponse))
                )
        );

        stubFor(WireMock.get(urlPathEqualTo("/orders/count"))
                .withScheme(url.getProtocol())
                .withHost(WireMock.equalTo(url.getHost()))
                .withQueryParam("customerId", WireMock.equalTo(customer.get_id()))
                .willReturn(aResponse()
                        .withHeader("Content-Type", MediaType.APPLICATION_JSON_VALUE)
                        .withBody(Integer.toString(numberOfOrders))
                )
        );

        mvc.perform(MockMvcRequestBuilders
                        .get("/shipping-cost")
                        .queryParam("customerEmail", customer.getEmail()))
                .andExpect(status().isOk())
                .andExpect(jsonPath("$.shippingCost").value(NEW_CUSTOMER_SHIPPING_COST));
    }

    @Test
    public void defaultShippingCost() throws Exception {
        String customerId = "123abc";
        Customer customer = new Customer(customerId, "customer");
        Customer[] crudResponse = {customer};
        int numberOfOrders = 2;

        URL url = new URL(CRUD_BASE_URL);

        stubFor(WireMock.get(urlPathEqualTo("/customers/"))
                .withScheme(url.getProtocol())
                .withHost(WireMock.equalTo(url.getHost()))
                .withQueryParam("email", WireMock.equalTo(customer.getEmail()))
                .willReturn(aResponse()
                        .withHeader("Content-Type", MediaType.APPLICATION_JSON_VALUE)
                        .withBody(gson.toJson(crudResponse))
                )
        );

        stubFor(WireMock.get(urlPathEqualTo("/orders/count"))
                .withScheme(url.getProtocol())
                .withHost(WireMock.equalTo(url.getHost()))
                .withQueryParam("customerId", WireMock.equalTo(customer.get_id()))
                .willReturn(aResponse()
                        .withHeader("Content-Type", MediaType.APPLICATION_JSON_VALUE)
                        .withBody(Integer.toString(numberOfOrders)))
        );

        mvc.perform(MockMvcRequestBuilders
                        .get("/shipping-cost")
                        .queryParam("customerEmail", customer.getEmail()))
                .andExpect(status().isOk())
                .andExpect(jsonPath("$.shippingCost").value(DEFAULT_SHIPPING_COST));
    }

    @Test
    public void noCustomerFound() throws Exception {
        String customerId = "123abc";
        Customer customer = new Customer(customerId, "customer");
        Customer[] crudResponse = {customer};

        URL url = new URL(CRUD_BASE_URL);

        stubFor(WireMock.get(urlPathEqualTo("/customers/"))
                .withScheme(url.getProtocol())
                .withHost(WireMock.equalTo(url.getHost()))
                .withQueryParam("email", WireMock.equalTo(customer.getEmail()))
                .willReturn(aResponse()
                        .withHeader("Content-Type", MediaType.APPLICATION_JSON_VALUE)
                        .withStatus(404)
                        .withBody("{}")
                )
        );

        mvc.perform(MockMvcRequestBuilders
                        .get("/shipping-cost")
                        .queryParam("customerEmail", customer.getEmail()))
                .andExpect(status().isNotFound())
                .andExpect(result -> assertTrue(result.getResolvedException() instanceof ResponseStatusException))
                .andExpect(result -> assertEquals("404 NOT_FOUND \"Customer does not exist\"", result.getResolvedException().getMessage()));
    }

    @Test
    public void errorGetOrdersCount() throws Exception {
        String customerId = "123abc";
        Customer customer = new Customer(customerId, "customer");
        Customer[] crudResponse = {customer};

        URL url = new URL(CRUD_BASE_URL);

        stubFor(WireMock.get(urlPathEqualTo("/customers/"))
                .withScheme(url.getProtocol())
                .withHost(WireMock.equalTo(url.getHost()))
                .withQueryParam("email", WireMock.equalTo(customer.getEmail()))
                .willReturn(aResponse()
                        .withHeader("Content-Type", MediaType.APPLICATION_JSON_VALUE)
                        .withBody(gson.toJson(crudResponse))
                )
        );

        stubFor(WireMock.get(urlPathEqualTo("/orders/count"))
                .withScheme(url.getProtocol())
                .withHost(WireMock.equalTo(url.getHost()))
                .withQueryParam("customerId", WireMock.equalTo(customer.get_id()))
                .willReturn(aResponse()
                        .withHeader("Content-Type", MediaType.APPLICATION_JSON_VALUE)
                        .withStatus(500)
                        .withBody(""))
        );

        mvc.perform(MockMvcRequestBuilders
                        .get("/shipping-cost")
                        .queryParam("customerEmail", customer.getEmail()))
                .andExpect(status().isServiceUnavailable())
                .andExpect(result -> assertTrue(result.getResolvedException() instanceof ResponseStatusException))
                .andExpect(result -> assertEquals("503 SERVICE_UNAVAILABLE \"Invalid orders count\"", result.getResolvedException().getMessage()));
    }
}
The BrewUp .NET Example is based on the Minimal API approach. We will also use xunit.net for testing and moq for mocking.
We can create a new xunit test project in the solution with the following commands:
cd src/
dotnet new xunit -o Tests
dotnet sln BrewUpApiTemplate.sln add Tests/Tests.csproj
We have to add the following dependencies for testing and mocking as well a reference to the main project:
cd Tests/
dotnet add package Microsoft.AspNetCore.Mvc.Testing --version 6.0.13
dotnet add package Moq --version 4.18.4
dotnet add package Moq.Contrib.HttpClient --version 1.4.0
dotnet add reference ../BrewUpApiTemplate/BrewUpApiTemplate.csproj
We can now start to develop the tests.
Disclamer: the current example does not follow the .NET Framework best practice for simplicity of demonstration. Feel free to refactor the results as you see fit.
In order for the test framework to reach our web application we have to add the following line at the end of the src/BrewUpApiTemplate/Program.cs file.
public partial class Program {}
We will use the following Models to be added in the BrewUpApiTemplate project.
namespace BrewUpApiTemplate.Models;

public class Customer
{
    public Customer(string id, string name, string surname, string email, string phone) {
        this._id = id;
        this.name = name;
        this.surname = surname;
        this.email = email;
        this.phone = phone;
    }

    public string _id { get; set; }
    public string name { get; set; }
    public string surname { get; set; }
    public string email { get; set; }
    public string phone { get; set; }
}
namespace BrewUpApiTemplate.Models;

public class Order
{
    public Order(string customerId) {
        this.customerId = customerId;
    }

    public string customerId { get; set; }
}
namespace BrewUpApiTemplate.Models;

public class ServiceResponse
{
    public ServiceResponse(double shippingCost) {
        this.shippingCost = shippingCost;
    }

    public double shippingCost { get; set; }
}
namespace BrewUpApiTemplate.Models;

public class ServiceErrorResponse
{
    public ServiceErrorResponse(string error) {
        this.error = error;
    }

    public string error { get; set; }
}
We have to create a mock for the web application we will use in order to test it without making the real service requests. Create a MockWebApplicationFactory.cs file on the root of the Tests project with the following content.
using System.Net.Http;
using Microsoft.AspNetCore.Hosting;
using Microsoft.AspNetCore.Mvc.Testing;
using Microsoft.Extensions.DependencyInjection;
using Microsoft.Extensions.Options;
using Moq;
using Moq.Contrib.HttpClient;
using BrewUpApiTemplate.Models;
using System.Collections.Generic;
using Newtonsoft.Json;

public class MockWebApplicationFactory : WebApplicationFactory<Program>
{
    public readonly Mock<HttpMessageHandler> mockedHandler = new(MockBehavior.Strict);

    public MockWebApplicationFactory() {
        SetupMocks();
    }

    protected override void ConfigureWebHost(IWebHostBuilder builder)
    {
        builder.ConfigureServices(services =>
        {
            services.AddHttpClient(Options.DefaultName)
                .ConfigurePrimaryHttpMessageHandler(() => mockedHandler.Object);
        });
    }

    private void SetupMocks() {
        var CRUD_BASE_URL = "http://crud-service";

        var mockedNewCustomer = new Customer("test-id-new", "test-name-new", "test-surname-new", "test-email-new", "test-phone-new");
        var mockedNewCustomerResponse = new List<Customer> { mockedNewCustomer };
        var mockedNewCustomerOrderCountResponse = 0;

        mockedHandler.SetupRequest(HttpMethod.Get, $"{CRUD_BASE_URL}/customers/?email={mockedNewCustomer.email}")
                .ReturnsResponse(JsonConvert.SerializeObject(mockedNewCustomerResponse), "application/json");

        mockedHandler.SetupRequest(HttpMethod.Get, $"{CRUD_BASE_URL}/orders/count?customerId={mockedNewCustomer._id}")
                .ReturnsResponse(JsonConvert.SerializeObject(mockedNewCustomerOrderCountResponse), "application/json");
    }
}
We can now write a simple test of the API in the UnitTest1.cs file:
using Xunit;
using Microsoft.AspNetCore.Mvc.Testing;
using Newtonsoft.Json;
using BrewUpApiTemplate.Models;
using Moq;
using System.Net.Http;
using Microsoft.AspNetCore.TestHost;
using Microsoft.Extensions.DependencyInjection;
using Microsoft.Extensions.Options;
using Moq.Contrib.HttpClient;
using System.Collections.Generic;
using Microsoft.Extensions.Configuration;
using System.Threading.Tasks;
using System;
using System.Net;

namespace Tests;

public class UnitTest1: IClassFixture<MockWebApplicationFactory>
{
    private readonly double DEFAULT_SHIPPING_COST = 10;
    private readonly double NEW_CUSTOMER_SHIPPING_COST = 5.99;
    private HttpClient client;

    public UnitTest1(MockWebApplicationFactory factory)
    {
        this.client = factory.CreateClient();
    }

    [Fact]
    public async void TestNewCustomerShippingCost()
    {
        var httpResponse = await client.GetAsync($"/shipping-cost/?customerEmail=test-email-new");

        Assert.True(httpResponse.IsSuccessStatusCode);

        var response = await httpResponse.Content.ReadAsStringAsync();
        var serviceResponse = JsonConvert.DeserializeObject<ServiceResponse>(response);

        Assert.Equal(NEW_CUSTOMER_SHIPPING_COST, serviceResponse?.shippingCost);
    }
}
In this test, we only tested the "happy path", i.e. the return of the correct shipping cost for a new customer. To achieve full coverage by testing the inputs and the return of the default shipping cost you need to write more tests, so if you want to try that or just copy the complete test code below:
Tests and mocks to get full coverage:
using System.Net.Http;
using Microsoft.AspNetCore.Hosting;
using Microsoft.AspNetCore.Mvc.Testing;
using Microsoft.Extensions.DependencyInjection;
using Microsoft.Extensions.Options;
using Moq;
using Moq.Contrib.HttpClient;
using BrewUpApiTemplate.Models;
using System.Collections.Generic;
using Newtonsoft.Json;

public class MockWebApplicationFactory : WebApplicationFactory<Program>
{
    public readonly Mock<HttpMessageHandler> mockedHandler = new(MockBehavior.Strict);

    public MockWebApplicationFactory() {
        SetupMocks();
    }

    protected override void ConfigureWebHost(IWebHostBuilder builder)
    {
        builder.ConfigureServices(services =>
        {
            services.AddHttpClient(Options.DefaultName)
                .ConfigurePrimaryHttpMessageHandler(() => mockedHandler.Object);
        });
    }

    private void SetupMocks() {
        var CRUD_BASE_URL = "http://crud-service";

        var mockedNewCustomer = new Customer("test-id-new", "test-name-new", "test-surname-new", "test-email-new", "test-phone-new");
        var mockedNewCustomerResponse = new List<Customer> { mockedNewCustomer };
        var mockedNewCustomerOrderCountResponse = 0;

        mockedHandler.SetupRequest(HttpMethod.Get, $"{CRUD_BASE_URL}/customers/?email={mockedNewCustomer.email}")
                .ReturnsResponse(JsonConvert.SerializeObject(mockedNewCustomerResponse), "application/json");

        mockedHandler.SetupRequest(HttpMethod.Get, $"{CRUD_BASE_URL}/orders/count?customerId={mockedNewCustomer._id}")
                .ReturnsResponse(JsonConvert.SerializeObject(mockedNewCustomerOrderCountResponse), "application/json");


        mockedHandler.SetupRequest(HttpMethod.Get, $"{CRUD_BASE_URL}/customers/?email=not-existing-email")
                .ReturnsResponse(System.Net.HttpStatusCode.NotFound, "{}", "application/json");


        var mockedOldCustomer = new Customer("test-id-old", "test-name-old", "test-surname-old", "test-email-old", "test-phone-old");
        var mockedOldCustomerResponse = new List<Customer> { mockedOldCustomer };
        var mockedOldCustomerOrderCountResponse = 10;

        mockedHandler.SetupRequest(HttpMethod.Get, $"{CRUD_BASE_URL}/customers/?email={mockedOldCustomer.email}")
                .ReturnsResponse(JsonConvert.SerializeObject(mockedOldCustomerResponse), "application/json");

        mockedHandler.SetupRequest(HttpMethod.Get, $"{CRUD_BASE_URL}/orders/count?customerId={mockedOldCustomer._id}")
                .ReturnsResponse(JsonConvert.SerializeObject(mockedOldCustomerOrderCountResponse), "application/json");


        var mockedInvalidCustomer = new Customer("test-id-invalid", "test-name-invalid", "test-surname-invalid", "test-email-invalid", "test-phone-invalid");
        var mockedInvalidCustomerResponse = new List<Customer> { mockedInvalidCustomer };

        mockedHandler.SetupRequest(HttpMethod.Get, $"{CRUD_BASE_URL}/customers/?email={mockedInvalidCustomer.email}")
                .ReturnsResponse(JsonConvert.SerializeObject(mockedInvalidCustomerResponse), "application/json");

        mockedHandler.SetupRequest(HttpMethod.Get, $"{CRUD_BASE_URL}/orders/count?customerId={mockedInvalidCustomer._id}")
                .ReturnsResponse(System.Net.HttpStatusCode.InternalServerError, "", "application/json");
    }
}
using Xunit;
using Microsoft.AspNetCore.Mvc.Testing;
using Newtonsoft.Json;
using BrewUpApiTemplate.Models;
using Moq;
using System.Net.Http;
using Microsoft.AspNetCore.TestHost;
using Microsoft.Extensions.DependencyInjection;
using Microsoft.Extensions.Options;
using Moq.Contrib.HttpClient;
using System.Collections.Generic;
using Microsoft.Extensions.Configuration;
using System.Threading.Tasks;
using System;
using System.Net;

namespace Tests;

public class UnitTest1: IClassFixture<MockWebApplicationFactory>
{
    private readonly double DEFAULT_SHIPPING_COST = 10;
    private readonly double NEW_CUSTOMER_SHIPPING_COST = 5.99;
    private HttpClient client;

    public UnitTest1(MockWebApplicationFactory factory)
    {
        this.client = factory.CreateClient();
    }

    [Fact]
    public async void TestNewCustomerShippingCost()
    {
        var httpResponse = await client.GetAsync($"/shipping-cost/?customerEmail=test-email-new");

        Assert.True(httpResponse.IsSuccessStatusCode);

        var response = await httpResponse.Content.ReadAsStringAsync();
        var serviceResponse = JsonConvert.DeserializeObject<ServiceResponse>(response);

        Assert.Equal(NEW_CUSTOMER_SHIPPING_COST, serviceResponse?.shippingCost);
    }

    [Fact]
    public async Task TestDefaultCustomerShippingCost()
    {
        var httpResponse = await client.GetAsync($"/shipping-cost/?customerEmail=test-email-old");

        Assert.True(httpResponse.IsSuccessStatusCode);

        var response = await httpResponse.Content.ReadAsStringAsync();
        var serviceResponse = JsonConvert.DeserializeObject<ServiceResponse>(response);

        Assert.Equal(DEFAULT_SHIPPING_COST, serviceResponse?.shippingCost);
    }

    [Fact]
    public async void TestNoCustomerFound()
    {
        var httpResponse = await client.GetAsync($"/shipping-cost/?customerEmail=not-existing-email");

        Assert.Equal(System.Net.HttpStatusCode.NotFound, httpResponse.StatusCode);
    }

    [Fact]
    public async void TestErrorInOrderCount()
    {
        var httpResponse = await client.GetAsync($"/shipping-cost/?customerEmail=test-email-invalid");

        Assert.Equal(System.Net.HttpStatusCode.InternalServerError, httpResponse.StatusCode);
    }
}
Write the handler
Once we have created the test it's time to write the handler:
- Node.js
- Java
- .NET
In order to do it, we need to create and navigate to the handlers folder add a new file called getShippingCost.js.
Firstly, we define the schema for the request and the response:
const schema = {
  querystring: {
    type: "object",
    properties: {
      customerEmail: { type: "string" },
    },
  },
  response: {
    200: {
      type: "object",
      properties: {
        shippingCost: { type: "number" },
      },
    },
    "4xx": {
      type: "object",
      properties: {
        error: { type: "string" },
      },
    },
    "5xx": {
      type: "object",
      properties: {
        error: { type: "string" },
      },
    },
  },
};
As written in the schema, the route accepts a customerEmail as query string parameter and return the associated shipping cost if all goes well, otherwise it returns an appropriate error response.
Now we need to write the code for handler itself, so that it will:
- Read from
customersCRUD to retrive the_idof the customer related to the mail; - Read from
ordersCRUD to count the number of orders placed by the customer; - Return the shipping cost, eventually appling a discount if it is the first order.
The handler code will be the following one:
async function handler(req, rep) {
  const DEFAULT_SHIPPING_COST = 10;
  const NEW_CUSTOMER_SHIPPING_COST = 5.99;
  const CRUD_BASE_URL = "http://crud-service/";
  // Get client to interact with the CRUD Service
  const crudClient = req.getHttpClient(CRUD_BASE_URL);

  // Get query params
  const { customerEmail } = req.query;

  let customerCrudRes;
  try {
    customerCrudRes = await crudClient.get(`/customers/`, {
      query: { email: customerEmail },
    });
  } catch (error) {
    return rep.code(404).send({ error: "Customer does not exist" });
  }

  const [customer] = customerCrudRes.payload;

  let orderCrudRes;
  try {
    orderCrudRes = await crudClient.get(`/orders/count`, {
      query: { customerId: customer._id },
    });
  } catch (error) {
    return rep.code(503).send({ error: "Error in Order collection" });
  }

  const numberOfOrders = orderCrudRes.payload;

  const shippingCost =
    numberOfOrders > 0 ? DEFAULT_SHIPPING_COST : NEW_CUSTOMER_SHIPPING_COST;

  return rep.code(200).send({ shippingCost });
}
As you can see, the Mia-Platform CustomPluginLib for node.js is included by default in the template.
If you have an on-premise installation, you can add your custom templates to the Marketplace in order to have a uniform codebase. You can also create your template for PaaS Marketplace and request to add it by opening a Marketplace Contribution issue in Mia-Platform Community GitHub repository.
In particular, the getHttpClient is used to get an HTTP client to make calls to the CRUD service API following Mia-Platform standards (e.g. injecting some headers used by Mia-Platform plugins).
To learn more how to use API exposed by the CRUD Service, check out the CRUD Endpoints Documentation
The last thing left to do is to export the function:
module.exports = {
  handler,
  schema,
};
Complete snippet:
"use strict";

const schema = {
  querystring: {
    type: "object",
    properties: {
      customerEmail: { type: "string" },
    },
  },
  response: {
    200: {
      type: "object",
      properties: {
        shippingCost: { type: "number" },
      },
    },
    "4xx": {
      type: "object",
      properties: {
        error: { type: "string" },
      },
    },
    "5xx": {
      type: "object",
      properties: {
        error: { type: "string" },
      },
    },
  },
};

async function handler(req, rep) {
  const DEFAULT_SHIPPING_COST = 10;
  const NEW_CUSTOMER_SHIPPING_COST = 5.99;
  const CRUD_BASE_URL = "http://crud-service/";
  // Get client to interact with the CRUD Service
  const crudClient = req.getHttpClient(CRUD_BASE_URL);

  // Get query params
  const { customerEmail } = req.query;

  let customerCrudRes;
  try {
    customerCrudRes = await crudClient.get(`/customers/`, {
      query: { email: customerEmail },
    });
  } catch (error) {
    return rep.code(404).send({ error: "Customer does not exist" });
  }

  const [customer] = customerCrudRes.payload;

  let orderCrudRes;
  try {
    orderCrudRes = await crudClient.get(`/orders/count`, {
      query: { customerId: customer._id },
    });
  } catch (error) {
    return rep.code(503).send({ error: "Error in Order collection" });
  }

  const numberOfOrders = orderCrudRes.payload;

  const shippingCost =
    numberOfOrders > 0 ? DEFAULT_SHIPPING_COST : NEW_CUSTOMER_SHIPPING_COST;

  return rep.code(200).send({ shippingCost });
}

module.exports = {
  handler,
  schema,
};
First we need to create the classes that will represent the data models we are going to use, which will be shipping and customer. In order to do it, create the package eu.miaplatform.customplugin.springboot.models. We can now are going to create the classes inside it.
The Shipping class will be:
package eu.miaplatform.customplugin.springboot.models;

public class Shipping {
    public Double shippingCost;

    public Shipping() {}

    public Shipping(Double shippingCost) {
        this.shippingCost = shippingCost;
    }
}
The customer class will be:
package eu.miaplatform.customplugin.springboot.models;

public class Customer {
    String _id;
    String email;

    public Customer() {}

    public Customer(String _id, String email) {
        this._id = _id;
        this.email = email;
    }

    public String get_id() {
        return _id;
    }

    public String getEmail() {
        return email;
    }
}
Finally, we are ready to write the handler. It will acepts a customerEmail as query string parameter and return the associated shipping cost if all goes well, otherwise it returns an appropriate error response.
Now we need to write the manager itself for:
- Read from CRUD
customersto retrive the_idof the customer related to the mail; - Read from CRUD
ordersto count the number of orders placed by the customer; - Return the shipping cost, if it is the first order the shipping will be less.
The handler code will be the following one:
package eu.miaplatform.customplugin.springboot.controllers;

import com.google.gson.Gson;
import eu.miaplatform.customplugin.ServiceClientFactory;
import eu.miaplatform.customplugin.springboot.models.Customer;
import eu.miaplatform.customplugin.springboot.models.Shipping;
import eu.miaplatform.service.InitServiceOptions;
import eu.miaplatform.service.Protocol;
import eu.miaplatform.service.Service;
import okhttp3.Response;
import org.springframework.http.HttpStatus;
import org.springframework.web.server.ResponseStatusException;

import java.io.IOException;
import java.net.URL;
import java.util.HashMap;

public class ShippingController {
    static final Double NEW_CUSTOMER_SHIPPING_COST = 5.99;
    static final Double DEFAULT_SHIPPING_COST = 10.0;
    static final String CRUD_BASE_URL = "http://crud-service";

    static final Gson gson = new Gson();

    public Shipping getShippingCost(String customerEmail) throws IOException {
        URL url = new URL(CRUD_BASE_URL);
        Protocol protocol = url.getProtocol().equals("https") ? Protocol.HTTPS : Protocol.HTTP;
        int port = url.getPort() > 0 ? url.getPort() : 3000;

        InitServiceOptions serviceOptions = new InitServiceOptions(url.getPort(), protocol, new HashMap<>(),  url.getPath());
        Service serviceClient = ServiceClientFactory.getDirectServiceProxy(url.getHost(), serviceOptions);

        Customer customer;
        try {
            Response customerResponse = serviceClient.get("/customers/",
                    String.format("email=%s", customerEmail),
                    null);
            okhttp3.ResponseBody customerResponseBody = customerResponse.body();
            if (customerResponse.code() != HttpStatus.OK.value() || customerResponseBody == null) throw new Exception();
            String customerString = customerResponseBody.string();
            customer = gson.fromJson(customerString, Customer[].class)[0];
        } catch (Exception e) {
            throw new ResponseStatusException(HttpStatus.NOT_FOUND, "Customer does not exist");
        }

        Integer numberOfOrders;
        try {
            Response ordersCountResponse = serviceClient.get("/orders/count",
                    String.format("customerId=%s", customer.get_id()),
                    null);
            okhttp3.ResponseBody ordersCountBody = ordersCountResponse.body();
            if (ordersCountResponse.code() != HttpStatus.OK.value() || ordersCountBody == null) throw new Exception();
            String ordersCountString = ordersCountBody.string();
            numberOfOrders = gson.fromJson(ordersCountString, Integer.class);
        } catch (Exception e) {
            throw new ResponseStatusException(HttpStatus.SERVICE_UNAVAILABLE, "Invalid orders count");
        }

        if (numberOfOrders == 0)
            return new Shipping(NEW_CUSTOMER_SHIPPING_COST);

        return new Shipping(DEFAULT_SHIPPING_COST);
    }

}
As you can see, the Mia-Platform CustomPluginLib for Java Spring Boot is included by default in the template.
If you have an on-premise installation, you can add your custom templates to the Marketplace in order to have a uniform codebase. You can also create your template for PaaS Marketplace and request to add it by opening a Marketplace Contribution issue in Mia-Platform Community GitHub repository.
In particular, the getDirectServiceProxy is used to get an HTTP client to make calls to the CRUD service API following Mia-Platform standards (e.g. injecting some headers used by Mia-Platform plugins).
To learn more how to use API exposed by the CRUD Service, check out the CRUD Endpoints Documentation
In the BrewUpApiTemplate project we need to add the following dependency:
cd BrewUpApiTemplate/
dotnet add package Newtonsoft.Json --version 13.0.2
We have to register HttpClient to the DI service container, so add the highlighted line in the Program.cs file just before the application is built:
...
builder.Services.AddHttpClient();

var app = builder.Build();
...
We can now add the ShippingCostModule.cs file containing the handler of the API.
using BrewUpApiTemplate.Models;
using FluentValidation;
using Newtonsoft.Json;

namespace BrewUpApiTemplate.Modules;

public sealed class ShippingCostModule : IModule
{
    public bool IsEnabled => true;
    public int Order => 0;

    public IServiceCollection RegisterModule(WebApplicationBuilder builder)
    {
        return builder.Services;
    }

    public IEndpointRouteBuilder MapEndpoints(IEndpointRouteBuilder endpoints)
    {
        endpoints.MapGet("/shipping-cost", GetShippingCostHandler)
            .Produces(StatusCodes.Status200OK)
            .ProducesValidationProblem()
            .WithName("GetShippingCost")
            .WithTags("ShippingCost");

        return endpoints;
    }

    private static async Task<IResult> GetShippingCostHandler(HttpClient client, string customerEmail) {
        double DEFAULT_SHIPPING_COST = 10;
        double NEW_CUSTOMER_SHIPPING_COST = 5.99;
        string CRUD_BASE_URL = "http://crud-service";

        client.BaseAddress = new Uri(CRUD_BASE_URL);
        client.DefaultRequestHeaders.Add("USERID_HEADER_KEY", "miauserid");
        client.DefaultRequestHeaders.Add("GROUPS_HEADER_KEY", "miausergroups");
        client.DefaultRequestHeaders.Add("CLIENTTYPE_HEADER_KEY", "client-type");
        client.DefaultRequestHeaders.Add("BACKOFFICE_HEADER_KEY", "isbackoffice");

        HttpResponseMessage customerResponse;

        try {
            customerResponse = await client.GetAsync($"/customers/?email={customerEmail}");
        } catch(Exception e) {
            Console.WriteLine(e.Message);
            return Results.NotFound(new ServiceErrorResponse("Error in Customer request"+e.Message));
        }

        if(!customerResponse.IsSuccessStatusCode) {
            Console.WriteLine($"request to CRUD received status code=${customerResponse.StatusCode}");
            return Results.NotFound(new ServiceErrorResponse("Customer does not exist"));
        }

        var customerContent = await customerResponse.Content.ReadAsStringAsync();
        var customerList = JsonConvert.DeserializeObject<List<Customer>>(customerContent);

        if(customerList == null || customerList.Count == 0) {
            return Results.NotFound(new ServiceErrorResponse("None or more than 1 customer found"));
        }

        var customer  = customerList.First();


        HttpResponseMessage orderResponse;

        try {
            orderResponse = await client.GetAsync($"/orders/count?customerId={customer._id}");
        } catch(Exception e) {
            Console.WriteLine(e.Message);
            return Results.Json(data:new ServiceErrorResponse("Error in Order collection"), statusCode:500);
        }

        if(!orderResponse.IsSuccessStatusCode) {
            Console.WriteLine($"request to CRUD received status code=${orderResponse.StatusCode}");
            return Results.Json(data:new ServiceErrorResponse("Error in Order collection"), statusCode:500);
        }

        var orderContent = await orderResponse.Content.ReadAsStringAsync();
        var orderCount = JsonConvert.DeserializeObject<int>(orderContent);

        var shippingCost = orderCount > 0 ? DEFAULT_SHIPPING_COST: NEW_CUSTOMER_SHIPPING_COST;

        var response = new ServiceResponse(shippingCost);

        return Results.Ok(response);
    }
}
The GetShippingCostHandler method is the handler that will serve requests on the /shipping-cost route. It takes a HttpClient from the DI service container and a customerEmail mapped from request query string.
The base address of the CRUD service is set and the Mia-Platform headers are added to the HttpClient instance.
Then calls to /customers and /orders/count CRUD API are executed.
Finally it is returned the shipping cost value based on the number of orders linked to the requested user.
To take in deeper how to use API exposed by the CRUD Service check out the CRUD Endpoints Documentation
Add the route
Now it is time to register the route with the handler build previously.
- Node.js
- Java
- .NET
Go back to index.js file and add the route GET /shipping-cost handled by the function written previously:
"use strict";

const customService = require("@mia-platform/custom-plugin-lib")();
const getShippingCost = require("./handlers/getShippingCost");

module.exports = customService(async function index(service) {
  service.addRawCustomPlugin(
    "GET",
    "/shipping-cost",
    getShippingCost.handler,
    getShippingCost.schema
  );
});
Now run the tests we have implemented previously by running the properly NPM script command:
npm run test
Finally commit and push changes to master.
As previously mentioned Mia-Platform cares about TDD programming so you will not be able to commit until 100% coverage is reached, to check the current coverage you can run:
npm run coverage
To do so, decorate the function to register it with spring:
package eu.miaplatform.customplugin.springboot.controllers;

import com.google.gson.Gson;
import eu.miaplatform.customplugin.ServiceClientFactory;
import eu.miaplatform.customplugin.springboot.models.Customer;
import eu.miaplatform.customplugin.springboot.models.Shipping;
import eu.miaplatform.service.InitServiceOptions;
import eu.miaplatform.service.Protocol;
import eu.miaplatform.service.Service;
import io.swagger.annotations.Api;
import io.swagger.annotations.ApiOperation;
import okhttp3.Response;
import org.springframework.http.HttpStatus;
import org.springframework.web.bind.annotation.GetMapping;
import org.springframework.web.bind.annotation.RequestParam;
import org.springframework.web.bind.annotation.ResponseBody;
import org.springframework.web.bind.annotation.RestController;
import org.springframework.web.server.ResponseStatusException;

import java.io.IOException;
import java.net.URL;
import java.util.HashMap;

@RestController
@Api(value = "ShippingController")
public class ShippingController {
    static final Double NEW_CUSTOMER_SHIPPING_COST = 5.99;
    static final Double DEFAULT_SHIPPING_COST = 10.0;
    static final String CRUD_BASE_URL = "http://crud-service:5127";

    static final Gson gson = new Gson();

    @GetMapping("/shipping-cost")
    @ApiOperation(value = "shipping")
    @ResponseBody
    public Shipping getShippingCost(@RequestParam("customerEmail") String customerEmail) throws IOException {
        URL url = new URL(CRUD_BASE_URL);
        Protocol protocol = url.getProtocol().equals("https") ? Protocol.HTTPS : Protocol.HTTP;
        int port = url.getPort() > 0 ? url.getPort() : 3000;

        InitServiceOptions serviceOptions = new InitServiceOptions(url.getPort(), protocol, new HashMap<>(),  url.getPath());
        Service serviceClient = ServiceClientFactory.getDirectServiceProxy(url.getHost(), serviceOptions);

        Customer customer;
        try {
            Response customerResponse = serviceClient.get("/customers/",
                    String.format("email=%s", customerEmail),
                    null);
            okhttp3.ResponseBody customerResponseBody = customerResponse.body();
            if (customerResponse.code() != HttpStatus.OK.value() || customerResponseBody == null) throw new Exception();
            String customerString = customerResponseBody.string();
            customer = gson.fromJson(customerString, Customer[].class)[0];
        } catch (Exception e) {
            throw new ResponseStatusException(HttpStatus.NOT_FOUND, "Customer does not exist");
        }

        Integer numberOfOrders;
        try {
            Response ordersCountResponse = serviceClient.get("/orders/count",
                    String.format("customerId=%s", customer.get_id()),
                    null);
            okhttp3.ResponseBody ordersCountBody = ordersCountResponse.body();
            if (ordersCountResponse.code() != HttpStatus.OK.value() || ordersCountBody == null) throw new Exception();
            String ordersCountString = ordersCountBody.string();
            numberOfOrders = gson.fromJson(ordersCountString, Integer.class);
        } catch (Exception e) {
            throw new ResponseStatusException(HttpStatus.SERVICE_UNAVAILABLE, "Invalid orders count");
        }

        if (numberOfOrders == 0)
            return new Shipping(NEW_CUSTOMER_SHIPPING_COST);

        return new Shipping(DEFAULT_SHIPPING_COST);
    }

}
Now run tests implemented previously by the properly Maven script command:
mvn test
Finally commit and push changes to master.
We already added the /shipping-cost route in the ShippingCostModule class inside the MapEndpoints method. This method is called by the ModuleExtensions helper that automatically registers all routes of the modules found in the application.
Now you can test the implemented service with the following commands:
cd Tests/
dotnet test
Try the Microservice
Now we can deploy the service, so we can test it. Be careful to flag the "Always release services not following semantic versioning" checkbox, we will see the semantic versioning later in the tutorial.
After the deploy has been finished, open the API Portal and use the Customers CRUD routes to add this document:
Click to see the customer schema:
{
  "name": "Awesome",
  "surname": "Customer",
  "email": "awesome.customer@email.com",
  "phone": 1234567890
}
Now you can try the GET /shipping-cost route and you will see that it will return the NEW_CUSTOMER_SHIPPING_COST value which will be 5.99, if you followed the tutorial.
Now use the Orders CRUD routes to add this document:
Click to see the orders schema:
{
  "customerId": "<_id>",
  "productId": 1234,
  "quantity": 2,
  "expectedShipmentDate": "2023-10-10",
  "statusHistory": ["received"]
}
Get the response _id from the creation of the client and replace the "<_id>" placeholder in customerId in the previous json.
Now if you try again the GET /shipping-cost route you will see that it will return the DEFAULT_SHIPPING_COST value which will be 10, because it will be the second order.
Environment variable
You should know, as a developer, that writing values directly into the code it isn't a good practice, so we want to extract the CRUD_BASE_URL, DEFAULT_SHIPPING_COST and NEW_CUSTOMER_SHIPPING_COST variables as environment variables.
An environment variable is a variable whose value is set outside the microservices made up of a name/value pair. You can set a different value based on the environment (Development, Production, etc.).
Create an environment variable
In order to do it, follow these steps:
- Open your project in Mia-Platform Console;
- Go to Project Overview area;
- Click on Public Variables tab and click Add variable;
- Fill in the following values:
- Insert
DEFAULT_SHIPPING_COSTas key - Insert
12as Development value; - Insert
300as Production value;
- Insert
- Confirm
In this way, we have created the DEFAULT_SHIPPING_COST that values 12 in the Development environment and 300 for Production, so it is possible to use different values based on the environment.
Add the ENV to the microservice
Now we have to add the environment variable to the microservice:
- Go to Microservices and select the get-shipping-cost service.
- Go to section Environment variable configuration click Add Environment Variable
- Create the
DEFAULT_SHIPPING_COSTand enter{{DEFAULT_SHIPPING_COST}}as value; - Create the
NEW_CUSTOMER_SHIPPING_COSTand enter7as value; - Insert the key
CRUD_BASE_URLandhttp://crud-serviceas value. - Commit the changes
In this way the microservice can access to DEFAULT_SHIPPING_COST ENV. Using {{env_name}} Mia-Platform automatically interpolates the correct value for each environment where the microservice will run.
Edit microservice
Now we need to modify the microservice so that it uses environment variabiles.
- Node.js
- Java
- .NET
As the first thing adjust the tests in /tests/index.test.js file injecting the variables in the setupFastify method:
t.test('shipping-cost', async t => {
  // silent => trace to enable logs
  const fastify = await setupFastify({
    USERID_HEADER_KEY: 'userid',
    GROUPS_HEADER_KEY: 'groups',
    CLIENTTYPE_HEADER_KEY: 'clienttype',
    BACKOFFICE_HEADER_KEY: 'backoffice',
    MICROSERVICE_GATEWAY_SERVICE_NAME: 'microservice-gateway.example.org',
    NEW_CUSTOMER_SHIPPING_COST,
    DEFAULT_SHIPPING_COST,
    CRUD_BASE_URL,
  })
  ...
})
After we have to edit index.js and set the schema of the environment variables used by the microservice:
...
const customService = require("@mia-platform/custom-plugin-lib")({
  type: "object",
  required: [
    "CRUD_BASE_URL",
    "DEFAULT_SHIPPING_COST",
    "NEW_CUSTOMER_SHIPPING_COST",
  ],
  properties: {
    CRUD_BASE_URL: {
      type: "string",
      description: "Base url where CRUD exposes its APIs",
    },
    DEFAULT_SHIPPING_COST: {
      type: "number",
      description: "Default shipping cost",
    },
    NEW_CUSTOMER_SHIPPING_COST: {
      type: "number",
      description: "Shipping cost for new clients",
    },
  },
});
...
Finally change the /handlers/getShippingCost.js handler in order to use the ENV, this will be available under config property of the request:
async function handler(req, reply) {
  const { NEW_CUSTOMER_SHIPPING_COST, DEFAULT_SHIPPING_COST, CRUD_BASE_URL } = this.config
  req.log.info({ value: CRUD_BASE_URL }, 'CRUD_BASE_URL value')
  req.log.info({ value: DEFAULT_SHIPPING_COST }, 'DEFAULT_SHIPPING_COST value')
  req.log.info({ value: NEW_CUSTOMER_SHIPPING_COST }, 'NEW_CUSTOMER_SHIPPING_COST value')
  // Get client to interact with the CRUD Service
  const crudClient = req.getHttpClient(CRUD_BASE_URL)

  ...
}
Furthermore we will log the value of the ENV.
Check out the Guidelines for logs for more details about the log instance.
Now you can commit and push the code to the master branch.
First of all we want to create test-specific variables, so we create the file application-test.proprieties and enter the default variables:
constants.shipping.new=5.99
constants.shipping.default=10
constants.crud.url=http://crud-service:5127
And update also the tests:
package eu.miaplatform.customplugin.springboot;

...

@ExtendWith(SpringExtension.class)
@SpringBootTest
@AutoConfigureMockMvc
@TestPropertySource(locations = "/application-test.properties")
@WireMockTest(proxyMode = true, httpPort = 5127)
public class ShippingControllerTest {
    @Autowired
    private MockMvc mvc;
    @Value("${constants.shipping.new}")
    private Double NEW_CUSTOMER_SHIPPING_COST;
    @Value("${constants.shipping.default}")
    private Double DEFAULT_SHIPPING_COST;
    @Value("${constants.crud.url}")
    private String CRUD_BASE_URL;

    private final Gson gson = new Gson();

     @Test
    public void discountedShippingCost() throws Exception {
      ...
    }
}
We need also to add the variabiles to the application.properties in order to make the environment variabiles accessible to spring handler:
constants.shipping.new=${NEW_CUSTOMER_SHIPPING_COST}
constants.shipping.default=${DEFAULT_SHIPPING_COST}
constants.crud.url=${CRUD_BASE_URL}
And finally we update the handler to use the variabiles:
package eu.miaplatform.customplugin.springboot.controllers;

import com.google.gson.Gson;
import eu.miaplatform.customplugin.ServiceClientFactory;
import eu.miaplatform.customplugin.springboot.models.Customer;
import eu.miaplatform.customplugin.springboot.models.Shipping;
import eu.miaplatform.service.InitServiceOptions;
import eu.miaplatform.service.Protocol;
import eu.miaplatform.service.Service;
import io.swagger.annotations.Api;
import io.swagger.annotations.ApiOperation;
import okhttp3.Response;
import org.springframework.beans.factory.annotation.Value;
import org.springframework.http.HttpStatus;
import org.springframework.web.bind.annotation.GetMapping;
import org.springframework.web.bind.annotation.RequestParam;
import org.springframework.web.bind.annotation.ResponseBody;
import org.springframework.web.bind.annotation.RestController;
import org.springframework.web.server.ResponseStatusException;

import java.io.IOException;
import java.net.URL;
import java.util.HashMap;

@RestController
@Api(value = "ShippingController")
public class ShippingController {
    @Value("${constants.shipping.new}")
    private Double NEW_CUSTOMER_SHIPPING_COST;
    @Value("${constants.shipping.default}")
    private Double DEFAULT_SHIPPING_COST;
    @Value("${constants.crud.url}")
    private String CRUD_BASE_URL;

    static final Gson gson = new Gson();

    @GetMapping("/shipping-cost")
    @ApiOperation(value = "shipping")
    @ResponseBody
    public Shipping getShippingCost(@RequestParam("customerEmail") String customerEmail) throws IOException {
      ...
    }
}
We commit and push the code to the master branch.
First let's update the handler to read the environment variables:
private static async Task<IResult> GetShippingCostHandler(HttpClient client, string customerEmail) {
    double DEFAULT_SHIPPING_COST = double.Parse(Environment.GetEnvironmentVariable("DEFAULT_SHIPPING_COST")!);
    double NEW_CUSTOMER_SHIPPING_COST = double.Parse(Environment.GetEnvironmentVariable("NEW_CUSTOMER_SHIPPING_COST")!);
    string CRUD_BASE_URL = Environment.GetEnvironmentVariable("CRUD_BASE_URL")!;
    ...
}
Update also the test class:
public class UnitTest1: IClassFixture<MockWebApplicationFactory>
{
    private readonly double DEFAULT_SHIPPING_COST = double.Parse(Environment.GetEnvironmentVariable("DEFAULT_SHIPPING_COST")!);
    private readonly double NEW_CUSTOMER_SHIPPING_COST = double.Parse(Environment.GetEnvironmentVariable("NEW_CUSTOMER_SHIPPING_COST")!);
    private HttpClient client;
    ...
}
Final test
We deploy the project to try the microservice.
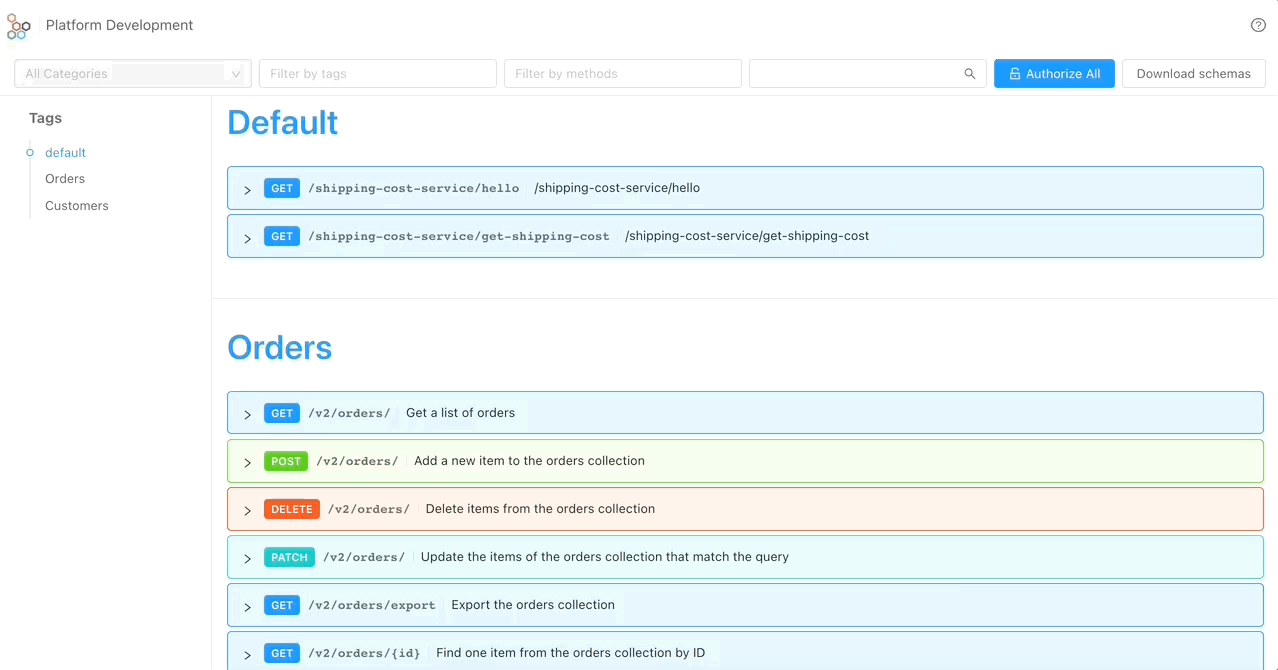
After the deploy, open the Documentation Portal and try the GET /shipping-cost route, it will return the new values:
Health routes
Let's go back to the Console, specifically go to the microservice detail page. You can see several configuration fields (check out this page for more details), in particular the probes section define the health routes for the Kubernetes pod:
- The Readiness path provides k8s with information about when the container is ready to receive incoming traffic. The default route is
/-/ready. - The Liveness path provides k8s with information about when the container is in a healthy state. The default route is
/-/healthz.
These routes are called automatically by Kubernetes and the microservice you just created has a default implementation provided by the Mia-Platform custom plugin libs: Node.js, Go and Java implementations.
Check out Kubernetes official documentation for more details about probes.
Those information are shown also in the runtime section to know if a service is healthy or not.
Runtime
In this tutorial, we have created a microservice perfectly integrated with Mia-Platform Console, as the last step, we will find out how to monitor microservices logs:
- From your project, go to section Runtime.
- From here, you can see select the environment and see the list of current running pods. Select Development as environment and search for
get-shipping-cost-...pod. - Click on the pod name to see all logs. Here you should see the logs with the value of the
CRUD_BASE_URL,DEFAULT_SHIPPING_COSTandNEW_CUSTOMER_SHIPPING_COSTenvironmental variables.
Tag and deploy the first release
Now the last thing to do is to use semantic versioning on the console release, so after those changes we are ready to tag this version.
To do so:
- Open the design section;
- In the upper right-corner open the git section;
- Click the tag icon;
- In the form:
- Create from:
master; - Tag name:
v0.1.0; - Short description:
first project release.
- Create from:
- Click the create tag button.
Now to deploy it go to the Deploy section, select the tag v0.1.0 and deploy!