Create CRUDs
What is a CRUD?
A CRUD is a service that allows you to interact with persistently stored data and modify it by using four main functions:
- Create
- Read
- Update
- Delete
These functions combined define the acronym CRUD and are described in detail here.
In this section, you will understand how to configure your first CRUD Service collections through user interface by creating and managing one or more CRUDs without worrying about setting up any database on your own.
If the MongoDB CRUD section in your project is disabled because the crud-service had not been added during project creation, you can autonomously add it to your branch by creating it from the Marketplace. Visit its documentation to learn how to do so.
To manage your CRUDs, Mia-Platform's Console offers a specific section, MongoDB CRUD, in the Design area of your project.
Create a new CRUD
In order to create a new CRUD, open the dedicated section, select Create new CRUD and fill in the following information:
- Name: the name of the CRUD that will be used for data storage (we recommend using
snake_caseas naming convention). In our case, we will name the collection “books”; - Internal endpoint: this is the first endpoint that will be exposed by the CRUD Service. The console will prefill it but you can change it according to your preference.
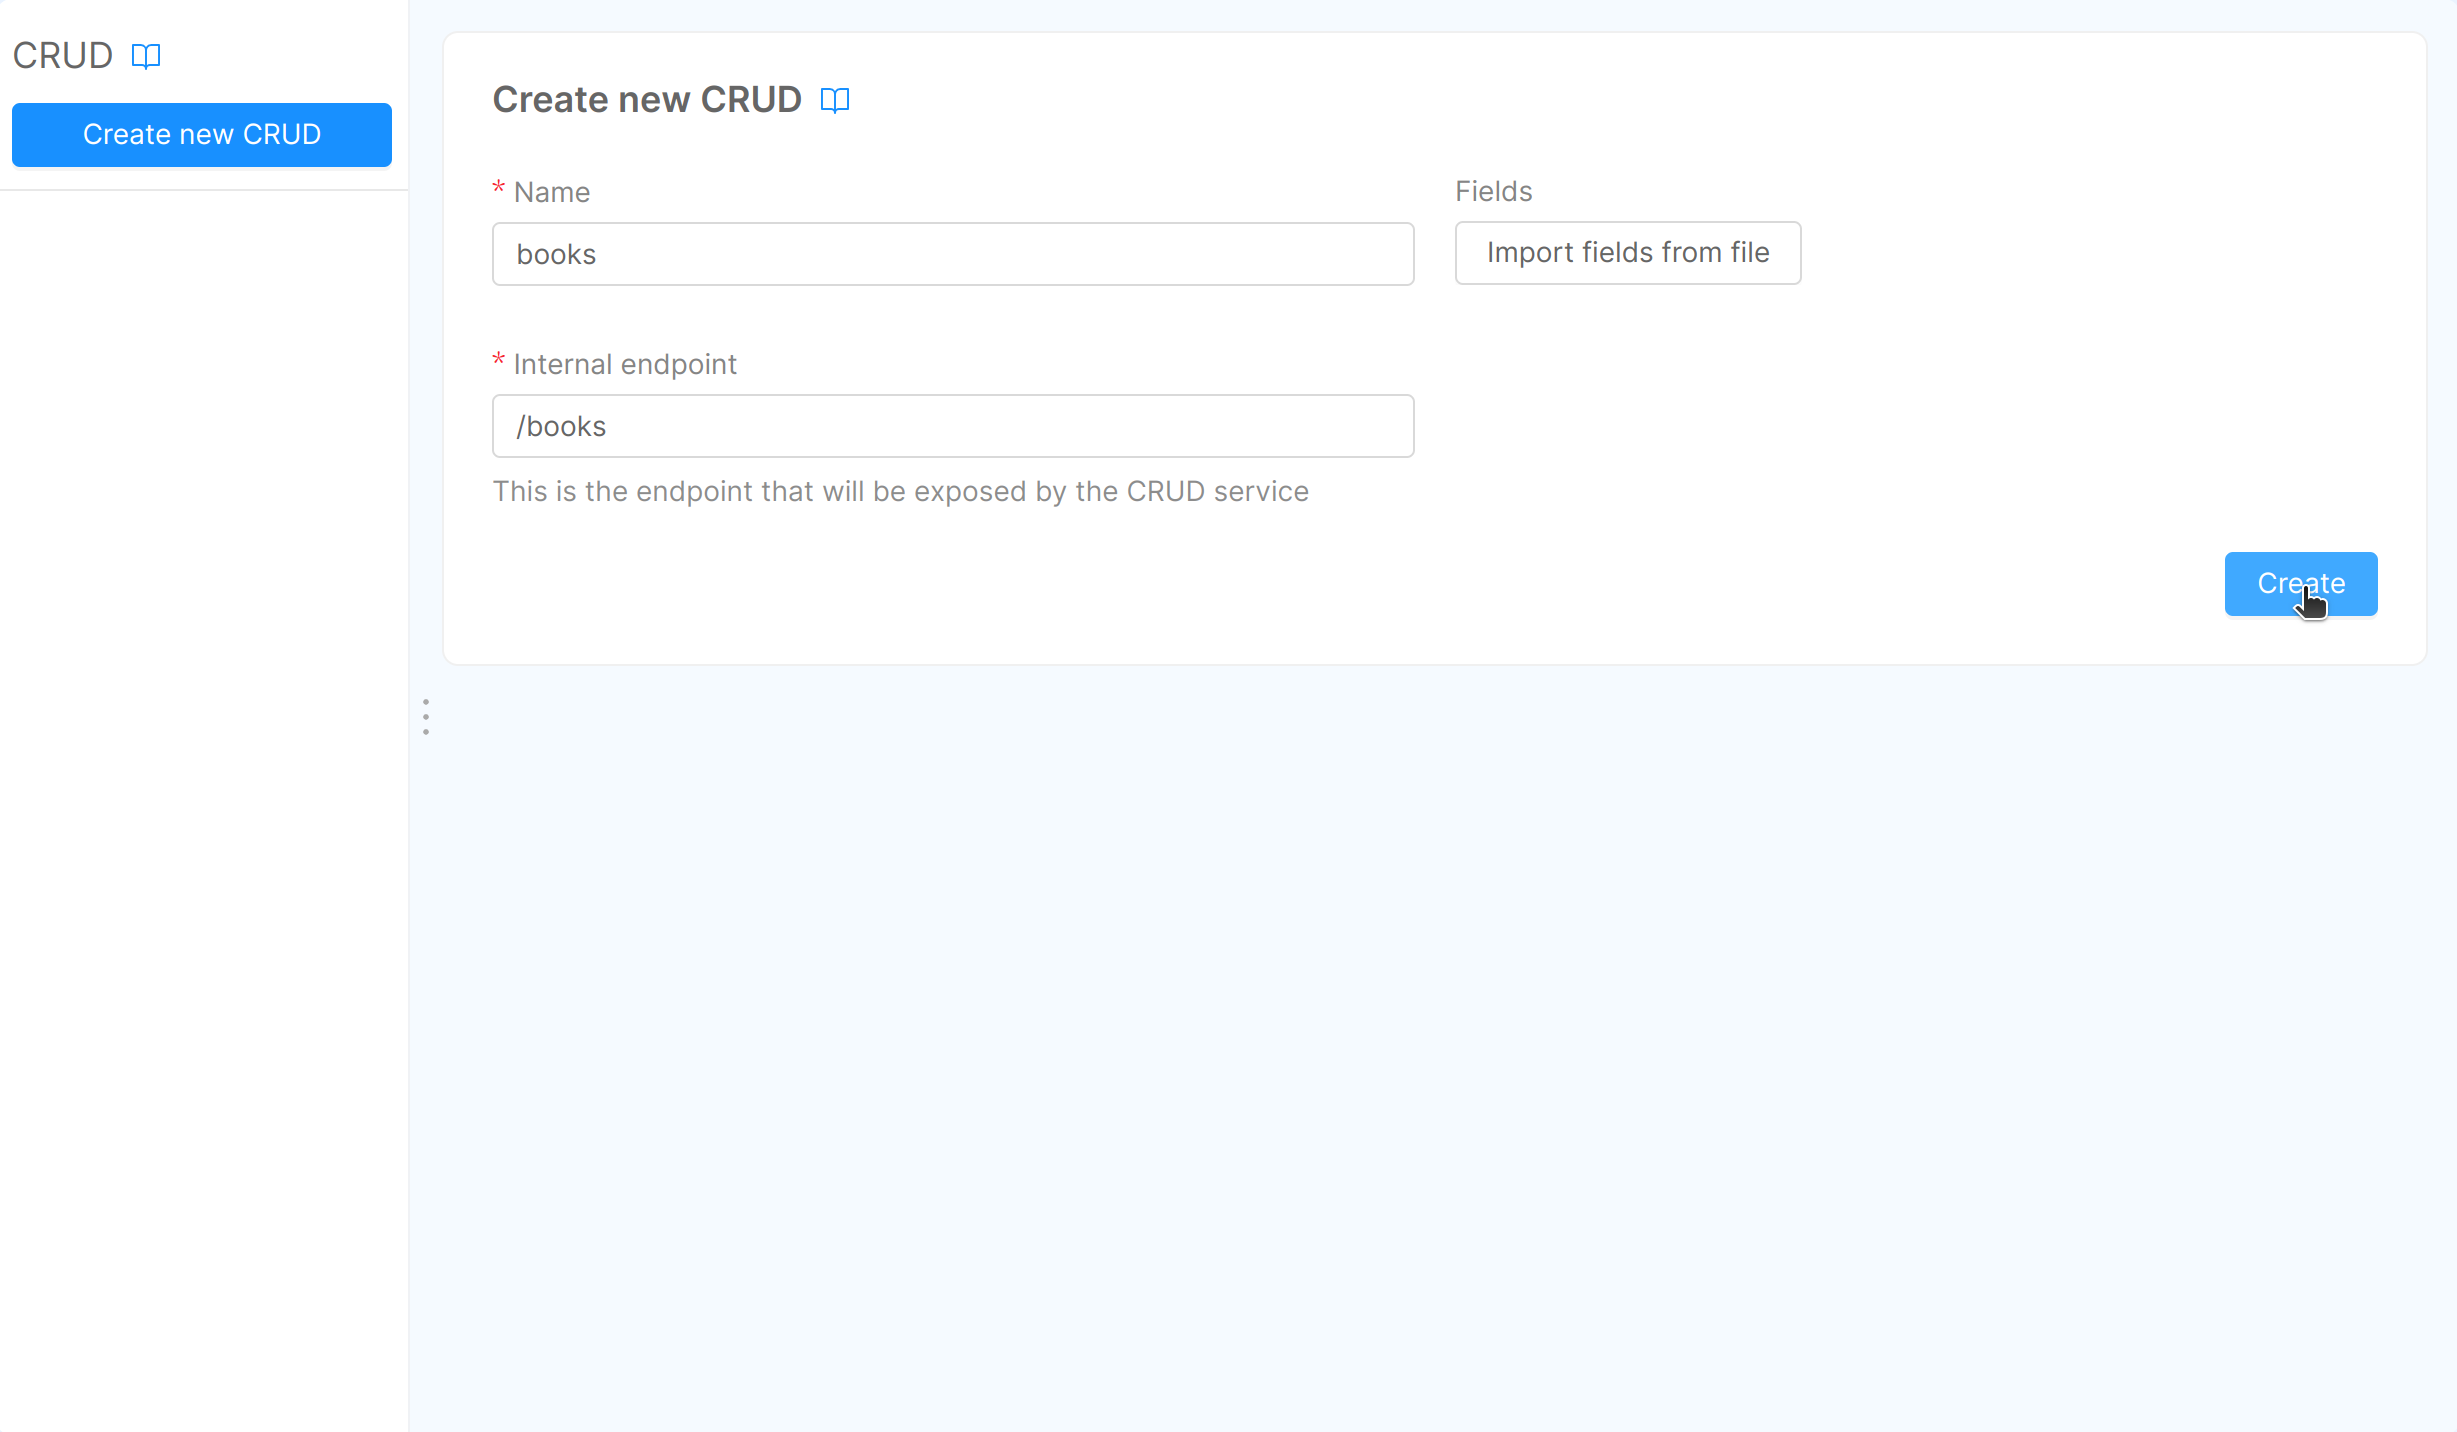
Once you have entered all required fields, press the Create button on the right and you will see your newly created CRUD.
As soon as you push Create, a new page ("books" in our example) is created and you can enter a short and optional description of your collection: default description will be “Collection of books”.
Fields
In the section Fields, you can enter the properties of your collection.
By default, there are fields that can not be changed, such as: _id, creatorId, createdAt, updaterId, updatedAt, _STATE_.
These fields are internally required; you can use them to perform queries or to create indexes.
Here you can find a detailed description of the default fields.
You can add new fields by selecting Add new and fill in the blank form with the value you need.
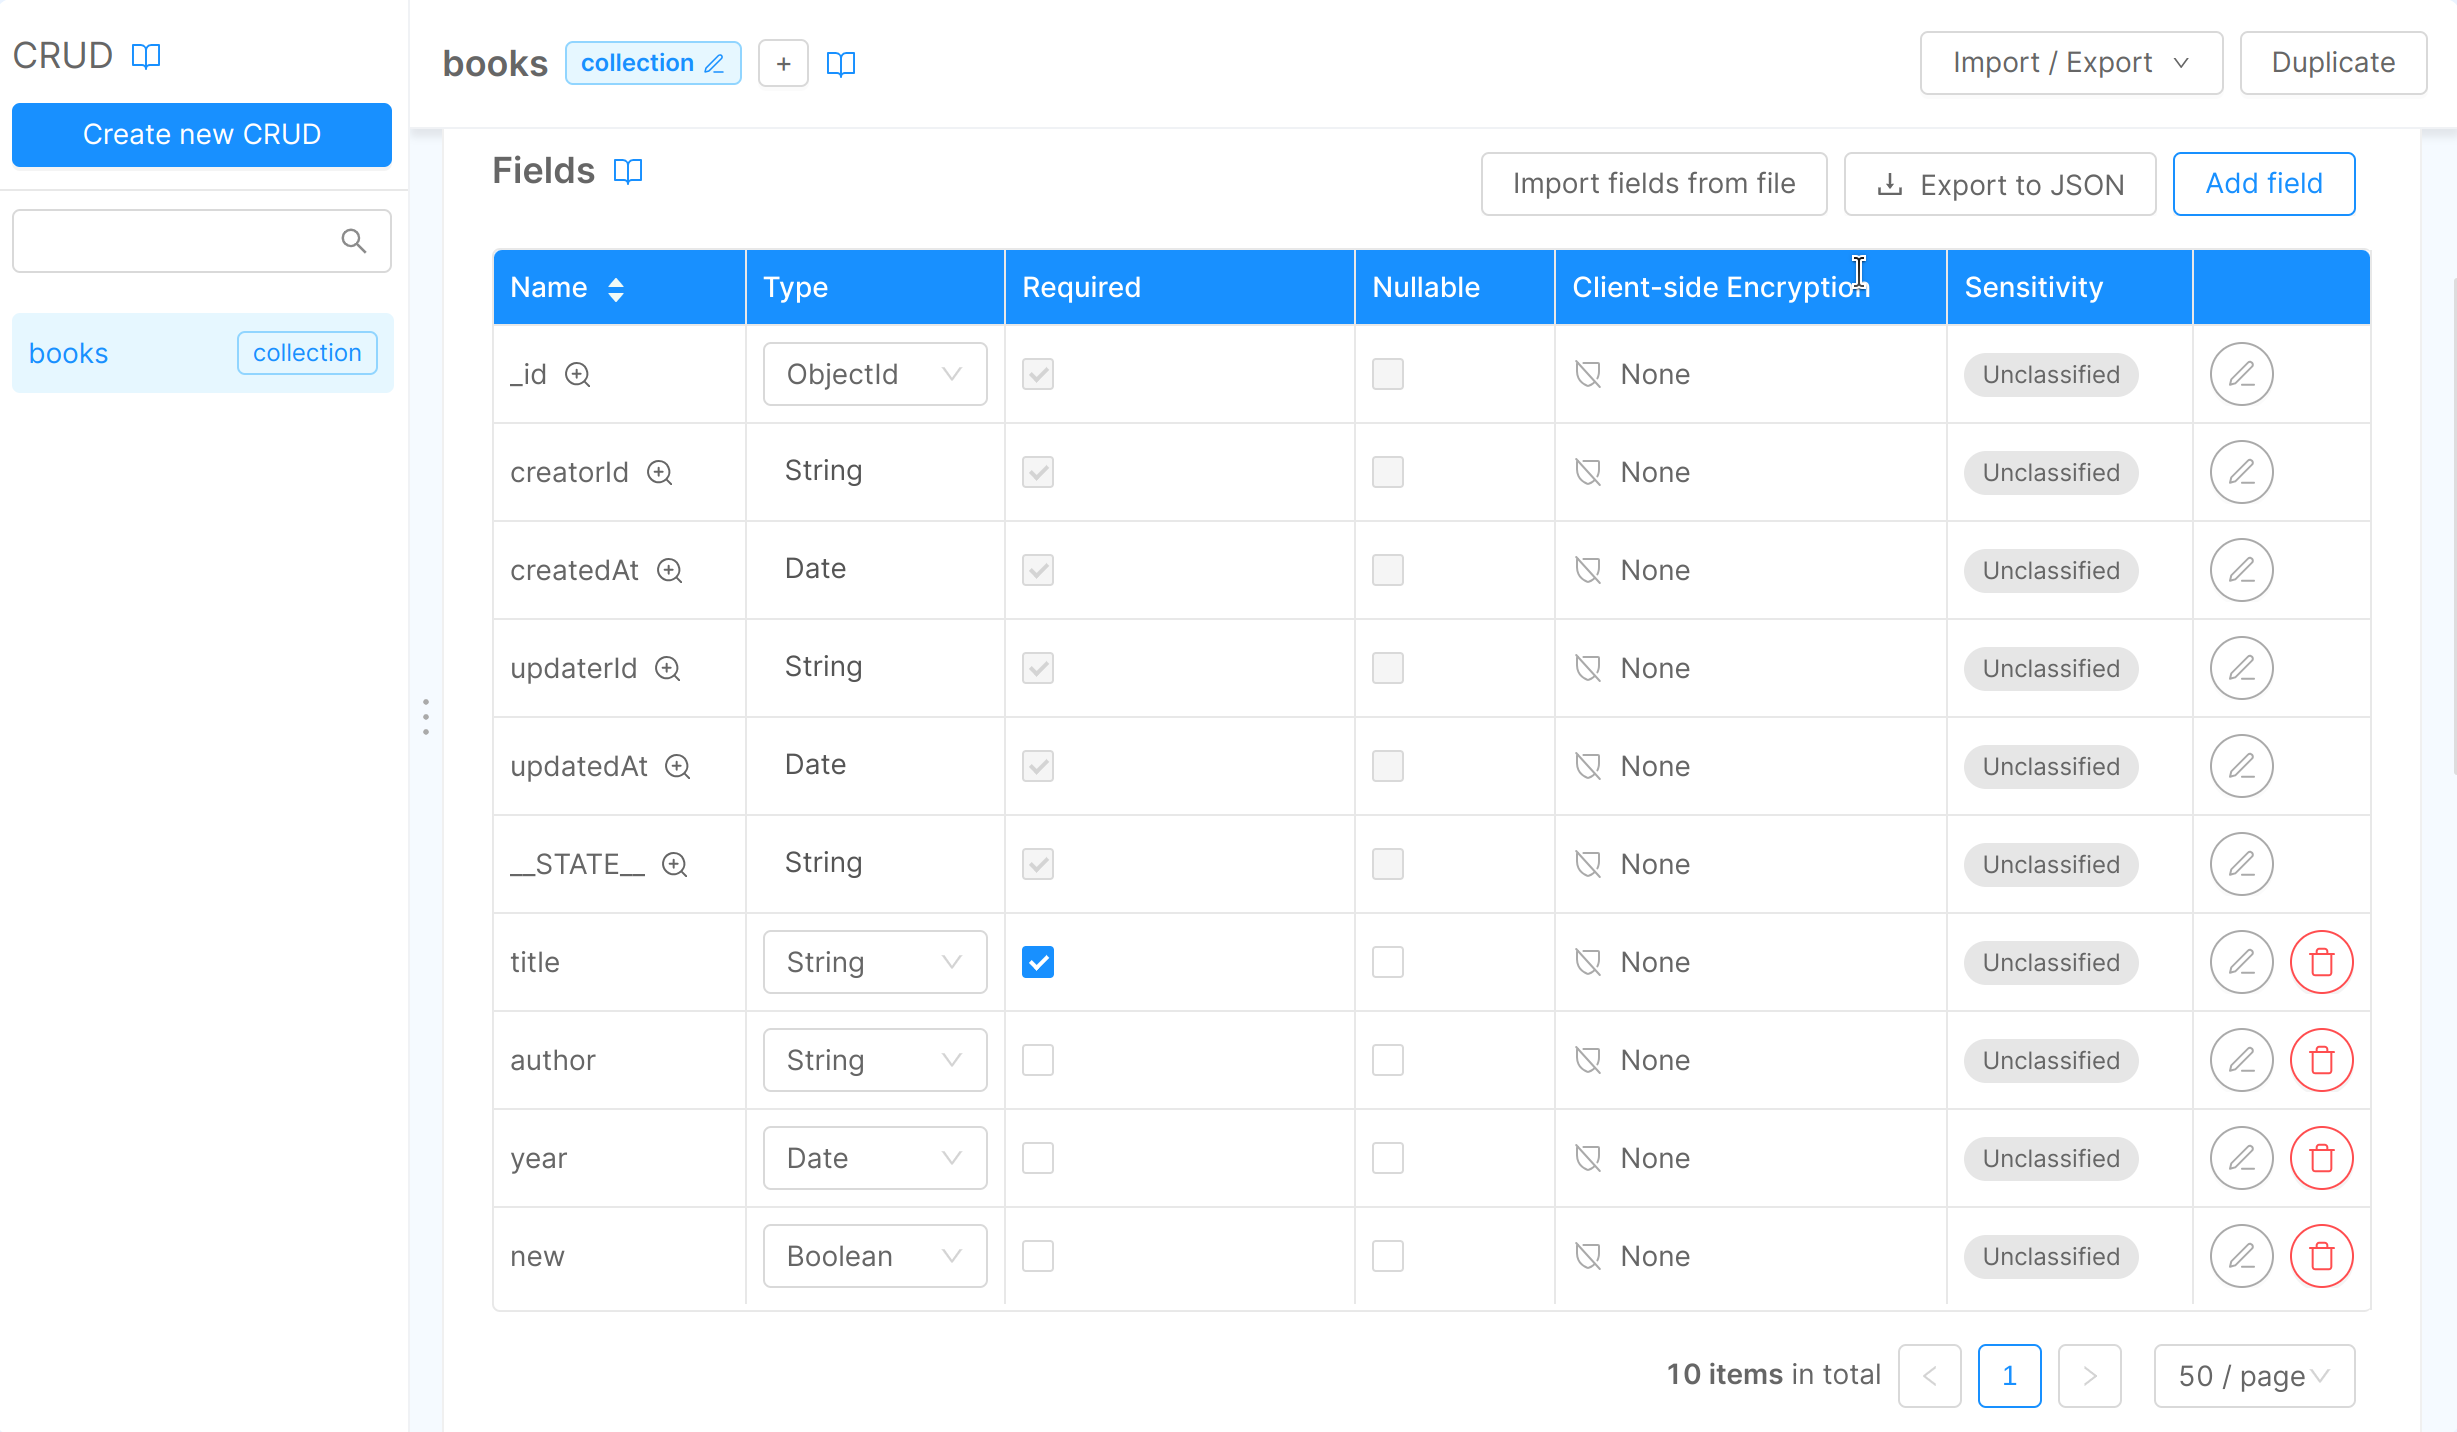
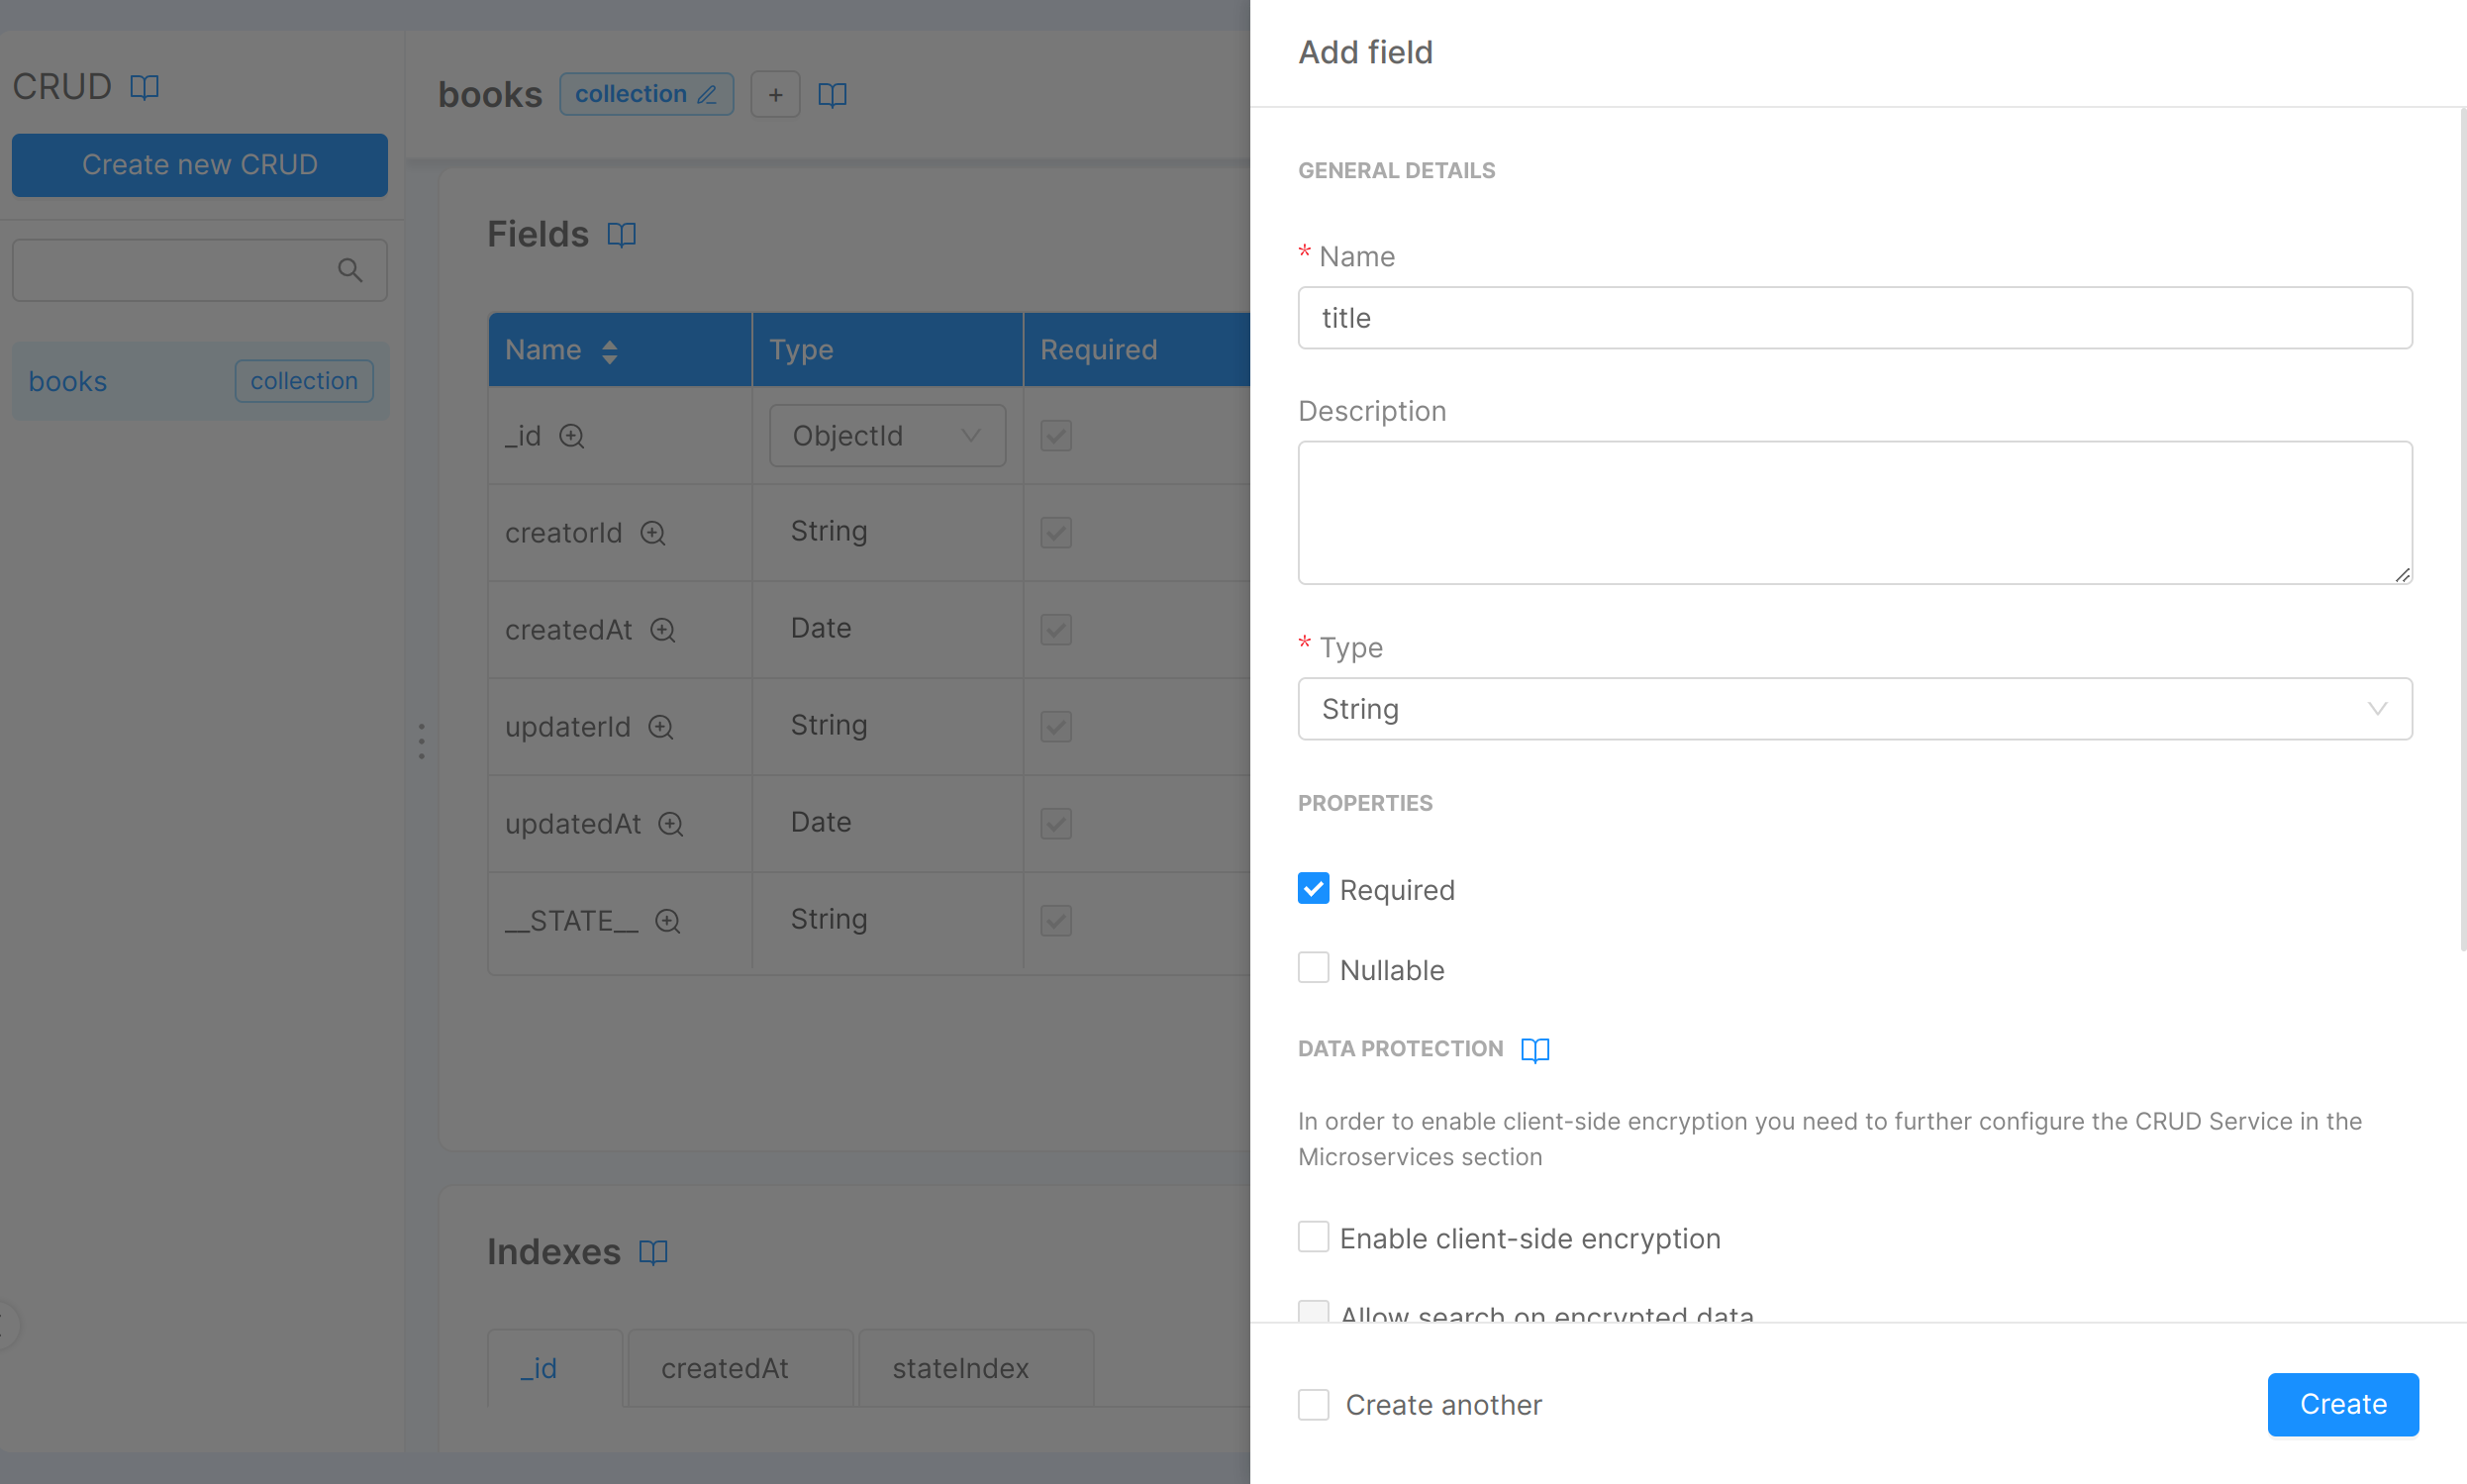
You can add the fields you need and select the appropriate properties:
-
name (we recommend using
camelCasenaming convention); in our case we will insert "title", "author", "year", "new", etc. -
type:
- String if it is a classic text string
- Number if it is a number
- Date if it is a date. The date must be a string compliant with ISO-8601 standard with the following format: YYYY-MM-DDTHH:mm:ss.sssZ
- Boolean if it can only be
trueorfalse - Geopoint if you want to save a specific place coordinates
- Object if you want to insert an object.
- Array of if you want to save as an ordered set of properties. Array items must be of the same type. Currently, accepted types are:
- String
- Number
- Object
- ObjectId if you want to save a unique reference to another CRUD that uses an objectId as primary key.
-
If you select required the property is mandatory.
-
If you select nullable you can make the value null.
-
In the description field you can enter a short optional description.
Create nested CRUDs
Fields of type Object and Array of Object can be used to create nested CRUDs. You just need to add a field of type Object or Array of Object and click on the edit button to configure it through the lateral drawer: use the JSON Schema Editor to define its properties.
Object and Array of Object support both a custom JSON Schema.
It can be used to specify the schema of the object for the former and the schema of each item of the array for the latter.
The following options are supported:
properties: must be a valid 'properties' field of a json schema of type object.required: array of name properties that are required. It's the required field of a JSON schema of type object.additionalProperties: boolean,trueif the object can have additional properties.
When configuring the JSON schema of a field of type Object you can also add the type option to the schema, but the only accepted value for this option is object.
Valid schema example
{
    "properties": {
        "address": {
            "title": "user address",
            "type": "string"
        },
        "groups": {
            "default": [ "users" ],
            "items": { "type": "string" },
            "title": "groups of the user",
            "type": "array"
        },
        "name": {
            "examples": ["Jane"],
            "title": "The user name",
            "type": "string"
        },
        "phone": {
            "title": "mobile number of user",
            "type": "integer"
        }
    },
    "additionalProperties": false,
    "required": ["address", "groups", "name", "phone"]
}
Schema validation
The schema specified in properties (for both of them) cannot have the following operators:
oneOfanyOfallOfif$ref
The JSON Schema Editor validates the JSON schema that you provide as input and gives feedback if some errors are made.
In particular, it checks if your input follows JSON rules and if it is a valid json schema as defined before.
Adding the previously listed operators (like oneOf, for example) in the input schema will not make the validation fail.
Remember to avoid using them.
You can also create nested CRUDs by importing a JSON file, check this section to understand how.
CRUD Service exposed routes
The CRUD Service will handle your data model and expose its API to the services within your project, without the need to expose the CRUD to the outside world, by using the specified CRUD endpoint routes in the dedicated card in CRUD detail view.
This is particularly helpful when you want one of your microservices to maintain a specific state and, to do so, you need to persistently store some data. Since this data has the only purpose of describing the state of your microservice, it is preferable to avoid exposing it to the outside world (it can also be confidential data, that you want to keep private).
Therefore, our CRUD Service will handle this situation for you, by making your microservices interact with your CRUDs internal routes without the need to define an external endpoint route that will unnecessarily expose your CRUD.
Otherwise, if you want the CRUD to be accessible from the outside, you can create a new CRUD-type Endpoint in the Design Endpoint section. By doing so, you will be able to view your CRUD API Documentation in Mia-Platform Documentation Portal, where you can also interact with your CRUD and test the calls to it.
To take in deeper how to use API exposed by the CRUD Service check out the CRUD Endpoints Documentation.
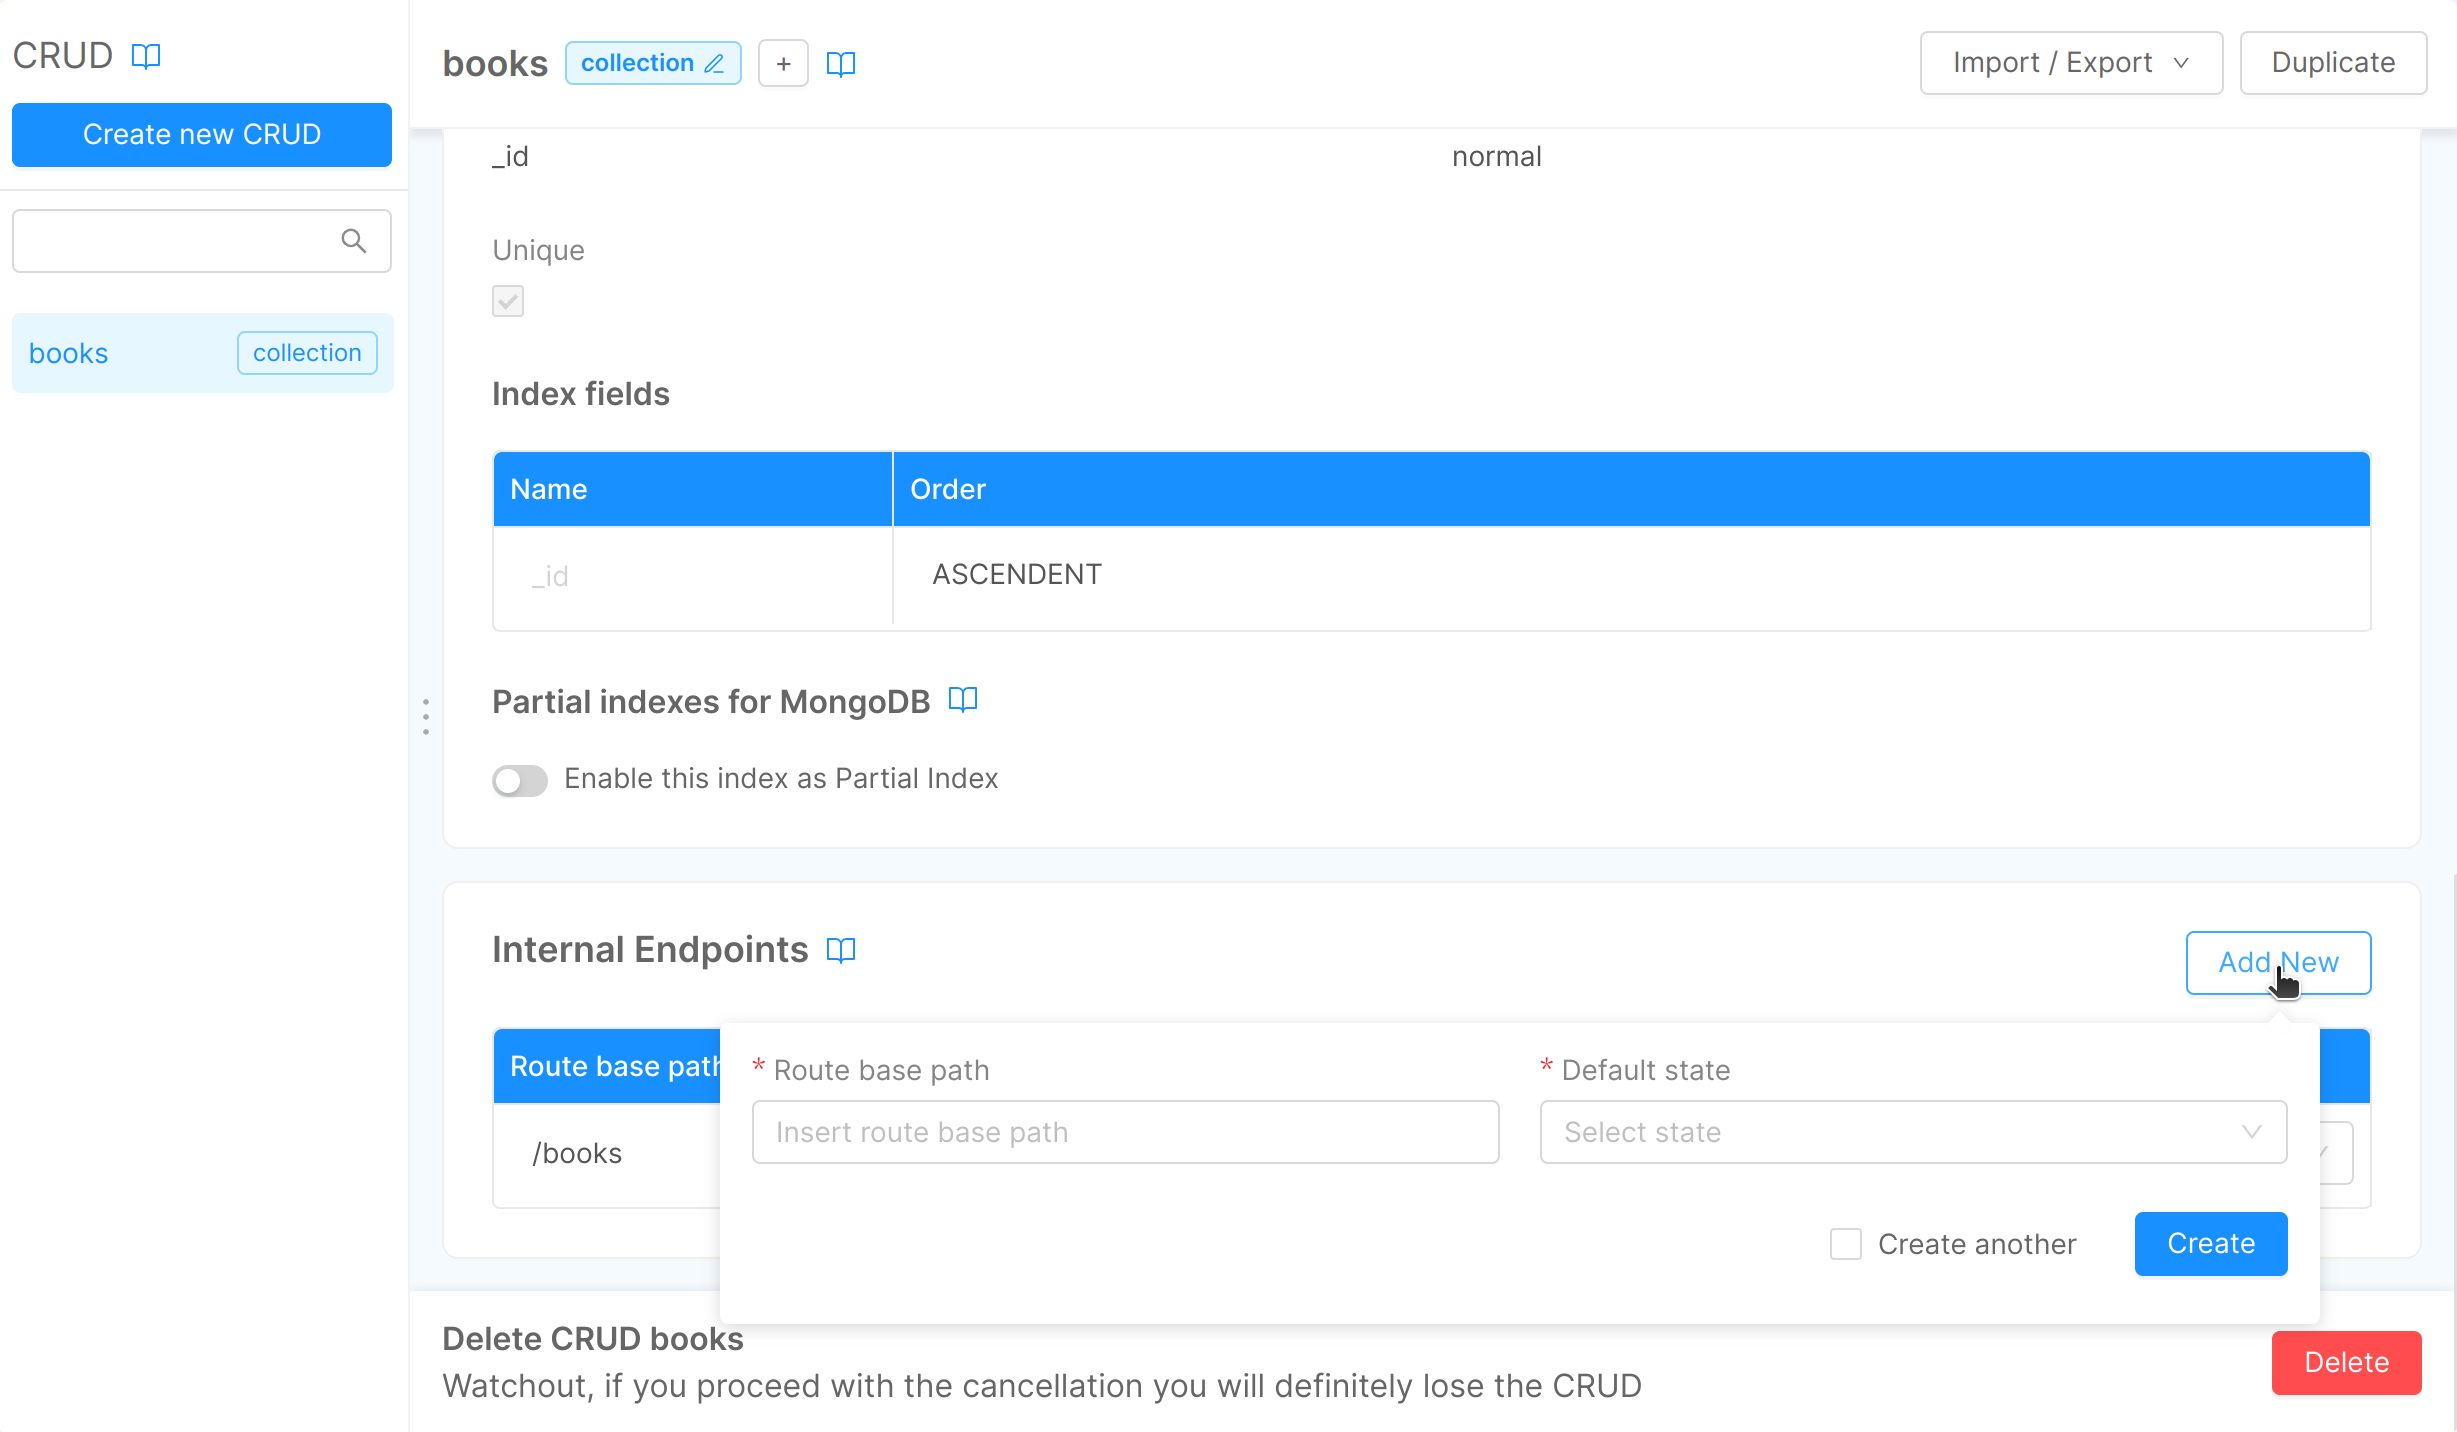
Beyond the first route, automatically exposed when creating the CRUD, you can always add new routes and modify existing ones.
In each CRUD's detail page you can view all the internal routes associated with your CRUD and edit them.
The definition of multiple internal routes can be useful when you want to gather different documents based on their __STATE__ property. For example, one internal route can gather all documents in DRAFT state, another one the ones in PUBLIC state.
For an in depth description of the __STATE__ field, follow this link.
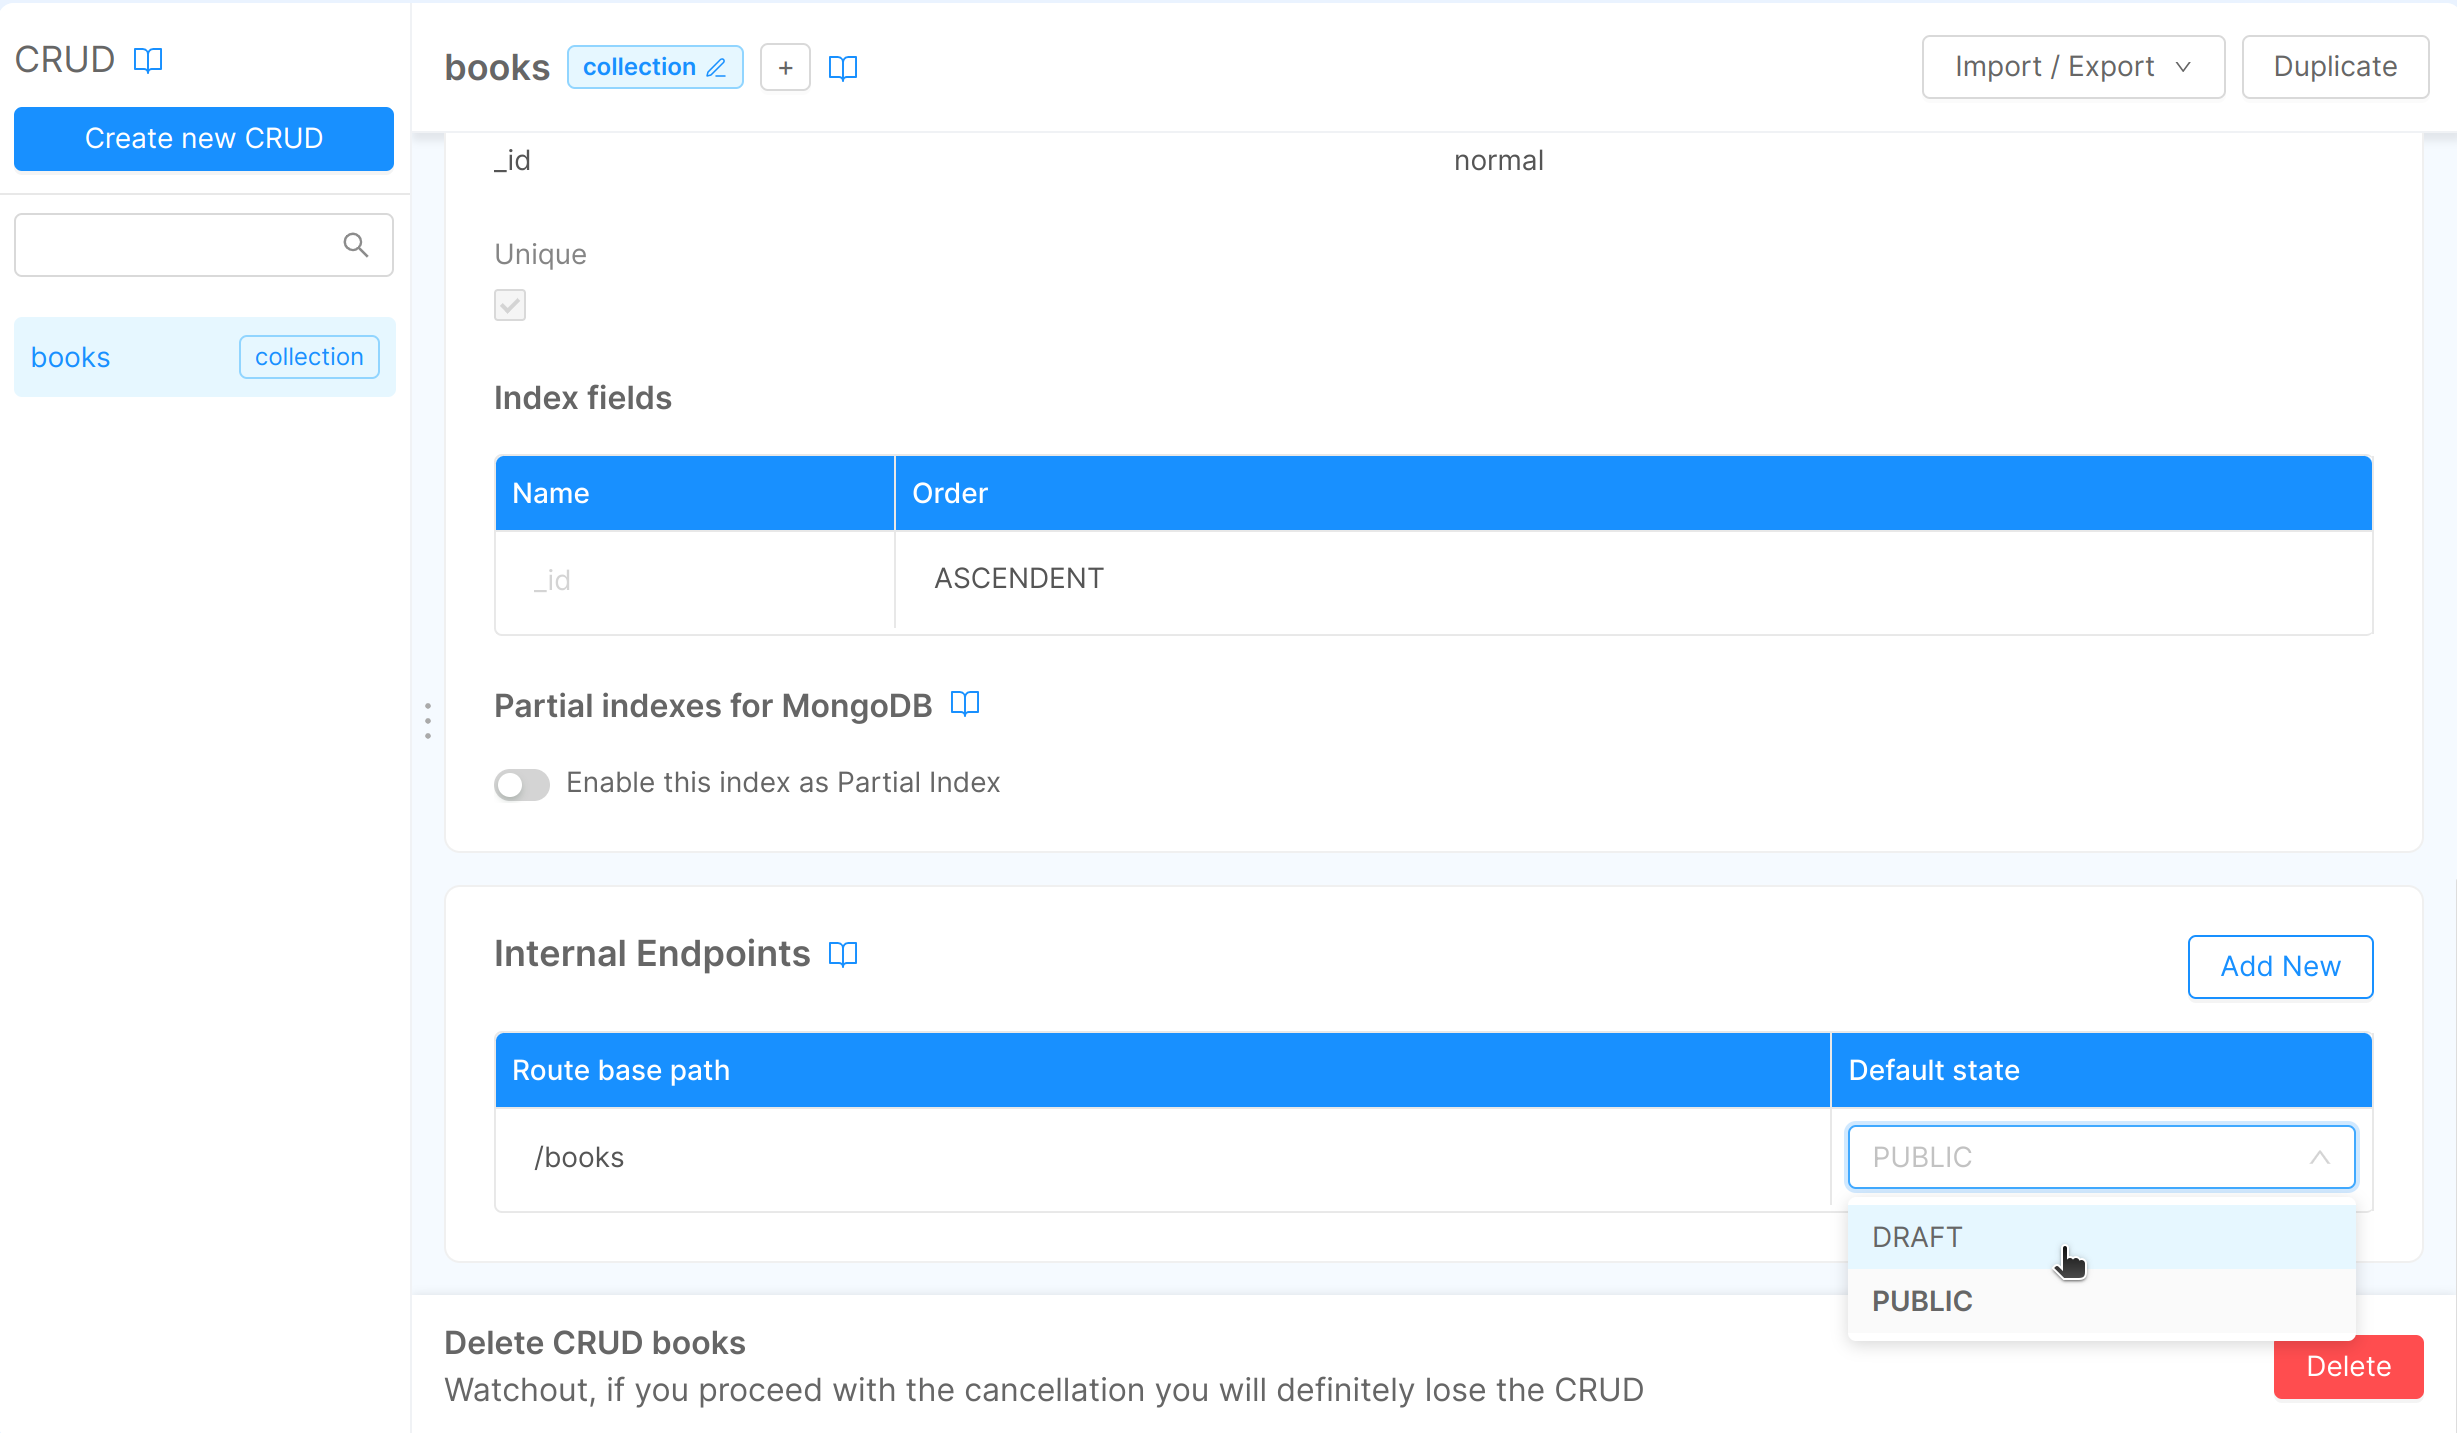
In our case we will see the first internal endpoint with a route base path equal to "/books". The default state (used on document creation) is set to DRAFT by default.
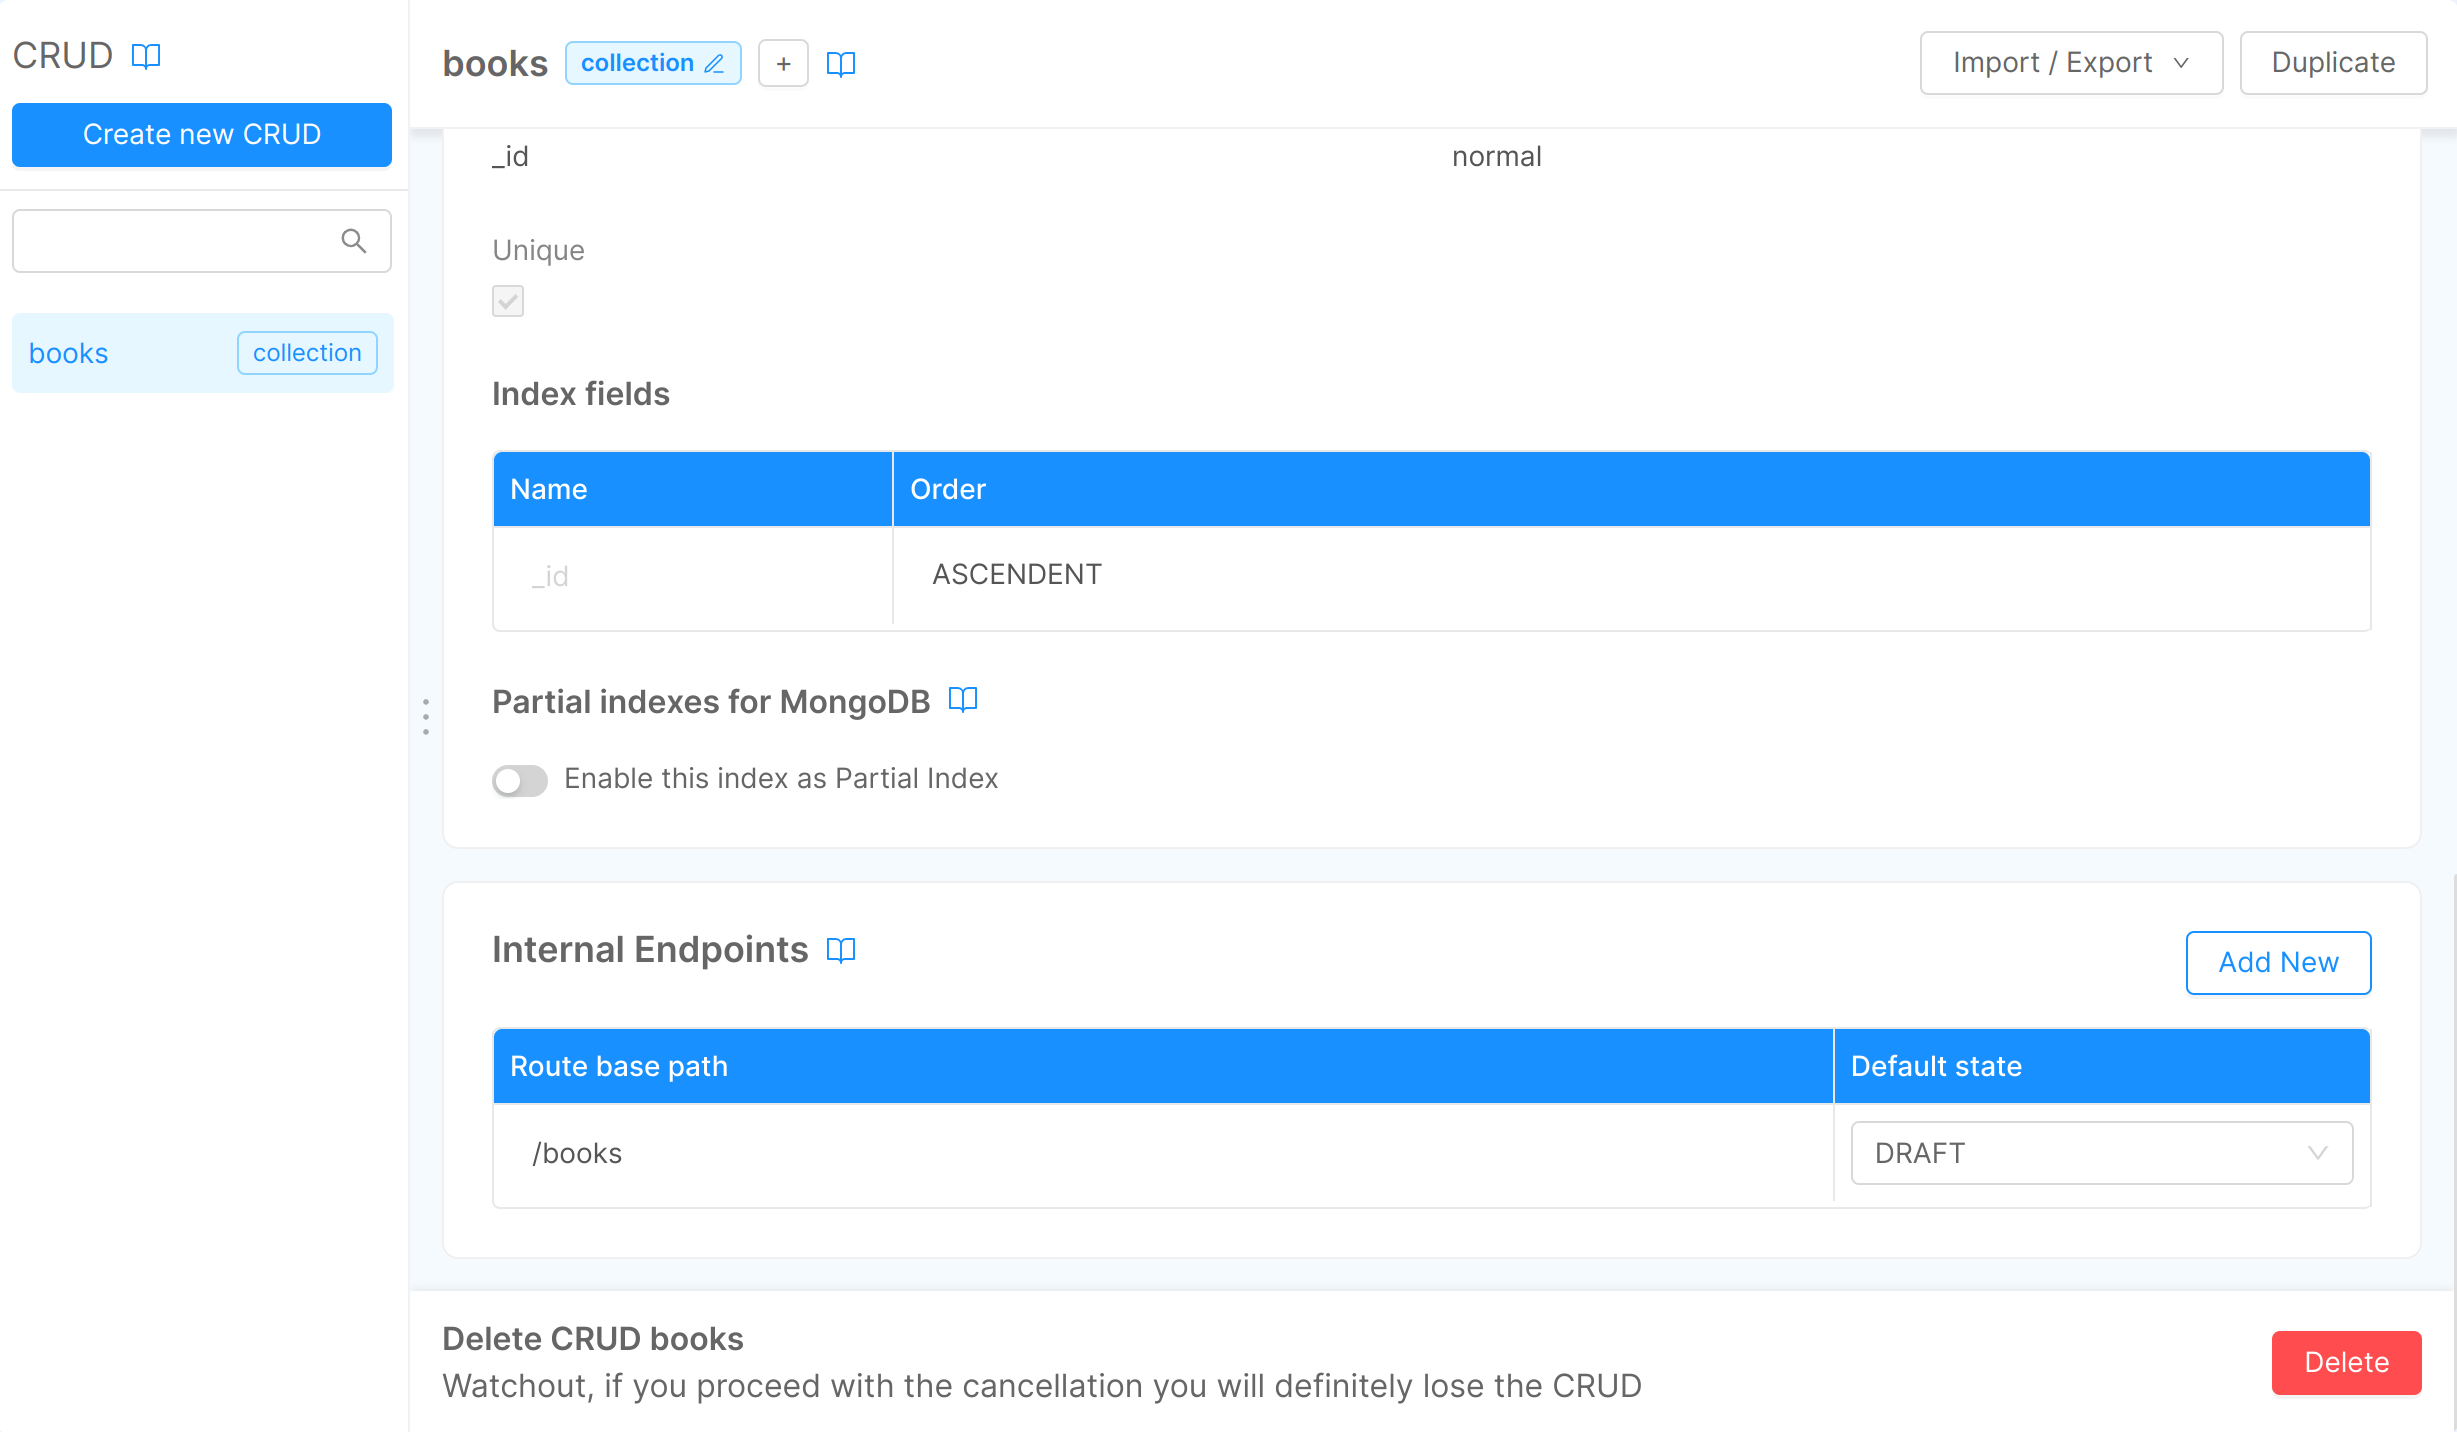
To create a new endpoint click on the Add new button in the card and fill in Route base path and the Default state property for the new endpoint.
Please note that these endpoints must be unique through all the configured CRUD, the Console will check for you that this constraint is satisfied when creating or editing any CRUD route in your project. In case this happens you will be warned with an error message.
You can always change the default state of an existing route by simply clicking on the field default state. The two possible values are DRAFT or PUBLIC.
You can delete a route but you must always leave at least one endpoint exposed by the CRUD Service, otherwise the CRUD won't be accessible by anyone, neither the services in your project.
Import CRUD collection fields
In addition to manually manually creating your CRUD fields, it is also possible to import them:
- from a JSON schema
- from a data sample
This simplify the schema definition whenever it has already been defined somewhere else or a record representative of your dataset is available.
How to create the fields of your CRUD by importing a JSON
In the Fields card, from the Import field button you can select the From JSON schema option.
Remember that the file must be a JSON with the following directions:
- Enter the property
namein camelCase - Add properties with their
typesspelling as follow:stringDatenumberbooleanGeoPointRawObjectArray_stringArray_numberArray_RawObject
requiredmust befalseortruenullablemust befalseortrue
RawObject and Array_RawObject support both a custom JSON Schema that is explained here.
To correctly import it, add a property schema to the field that contains the custom JSON Schema.
This is an example of a field of type RawObject where is specified the schema object the properties of the object (properties), the required properties (somethingNumber) and if object could accept additional properties (in this example it is set to false):
{
  "name": "fieldObject",
  "type": "RawObject",
  "schema": {
    "properties": {
      "somethingArrayObject": {
        "type": "array",
        "items": {
          "type": "object",
          "properties": {
            "anotherNumber": { "type": "number" }
          },
        }
      },
      "somethingNumber": {
        "type": "number"
      },
      "somethingObject": {
        "type": "object",
        "properties": {
          "childNumber": {
            "type": "number"
          }
        },
        "additionalProperties": true
      }
    },
    "required": [
      "somethingNumber"
    ],
    "additionalProperties": false,
  },
  "required": false
}
The following is an example of Array_RawObject (Array of RawObject) with the JSON schema of the object items.
{
  "name": "fieldArrayOfObjects",
  "type": "Array_RawObject",
  "schema": {
      "properties": {
        "name": {
          "type": "string"
        },
        "nestedArr": {
          "type": "array",
          "items": {
            "type": "number"
          }
        }
    },
    "required": [
      "name"
    ],
    "additionalProperties": false,
  },
  "required": false
}
Here, schema refers to the object of each item (which are of type RawObject). It's NOT the schema of the array itself.
So, each item of the array must follows the following rules:
- name property must be a string ad it is required
- nestedArr property must be an array of numbers
- additional properties are allowed
Here's an example of the file to upload.
{
  "name": "updatedAt",
  "type": "Date",
  "required": true,
  "nullable": false,
  "description": "updatedAt"
},
{
  "name": "__STATE__",
  "type": "string",
  "required": true,
  "nullable": false,
  "description": "__STATE__"
},
{
  "name": "PublicationDate",
  "type": "number",
  "required": true,
  "nullable": true
},
{
  "name": "new",
  "type": "boolean",
  "required": true,
  "nullable": false
},
{
  "name": "location",
  "type": "GeoPoint",
  "required": false,
  "nullable": false
},
{
  "name": "Writer",
  "type": "RawObject",
  "schema": {
    "properties": {
      ...
    },
    "required": ["fieldname1"],
    "additionalProperties": true
  },
  "required": false,
  "nullable": false
},
{
  "name": "editors",
  "type": "Array_string",
  "required": false,
  "nullable": true
},
{
  "name": "editions",
  "type": "Array_number",
  "required": false,
  "nullable": false
},
{
  "name":"shops",
  "type":"Array_RawObject",
  "schema": {
    "properties": {
      ...
    },
    "required": ["fieldname1"],
    "additionalProperties": true
  },
  "required": true,
  "nullable": true,
  "description":"where to find the books"
}
Once you imported the JSON from files, it automatically appears in the table under the default fields.
If you want to delete a row, select red trash symbol on the right of the the table.
The collection has not yet been saved it is necessary to continue the process described below
How to generate from data sample your CRUD fields
From the Import fields button, select the From data sample option.
Doing this will replace the current fields with those contained within the file.
The supported file extension are: .csv and .json.
Example json
[
  {
    "field1": "anyString",
    "field2": "true",
    "field3": "123"
  }
]
Example CSV
field1,field2,field3
false,anyString,123
At the end of the upload an internal function will try to cast the types correctly, otherwise it will treat them as strings by default.
Import of fields is supported only for the following data types: String, Number, Boolean or Date. For example, you cannot import fields of type object.
In case some fields are not in the correct format, they will be ignored.
You cannot import fields with the same name as one of the metadata fields. If this happens, a warning will be displayed and the import won't be successful
Indexes
You can configure the indexes, a data structure designed to improve search (query) data, by avoiding to scan every document inside of a collection.
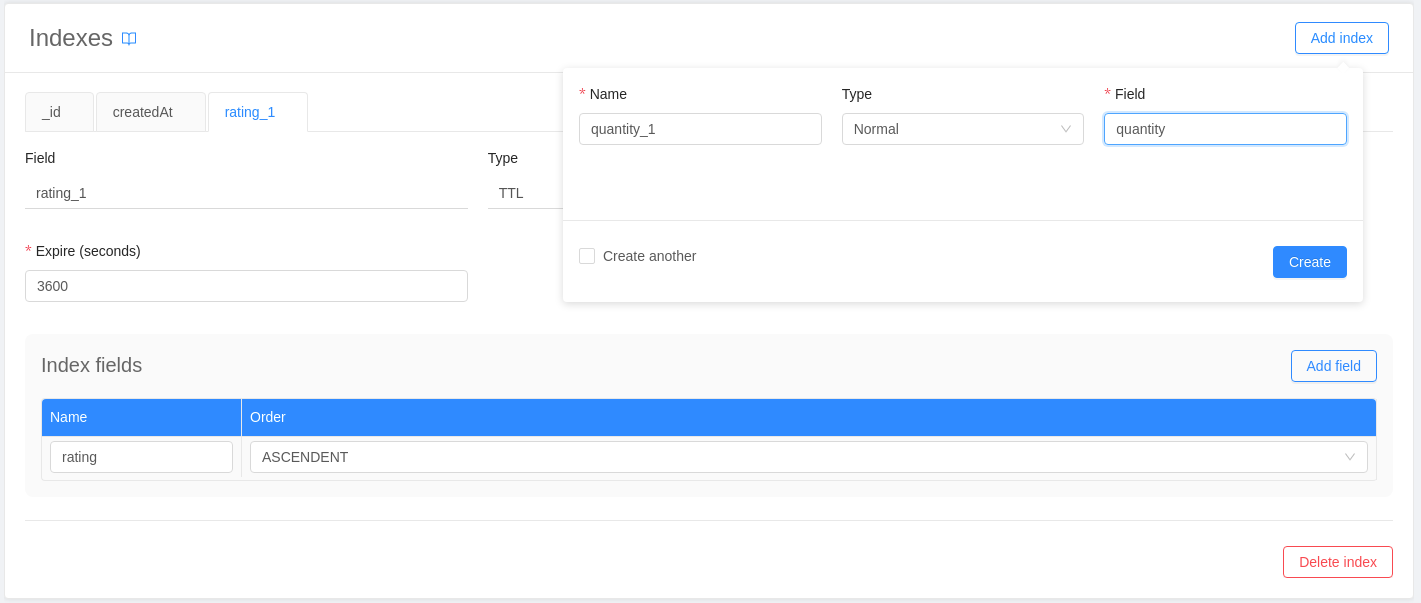
After selecting a MongoDB CRUD, to create a new index select Add index in the "Indexes" section.
Once you named your index, you can choose among 4 types:
- Normal
- Geo
- Hash
- TTL
If you want to know more about what indexes are, how you can use them and what type of index suits your needs, please consult the crud service documentation.
You can also choose whether to make the index unique by ticking the correspondent checkbox.
Partial Indexes
From version 6.0.1 of the CRUD Service, it is possible to configure an index as a partial index. A partial index, as explained in details in the dedicated MongoDB documentation page, is an index defined by a conditional expression. In order to create a partial index in the console, it is necessary to activate the "Enable this index as Partial Index" toggle button included in the Indexes card, then write the filter expression inside the JSON editor that will show up, as shown in the image below.
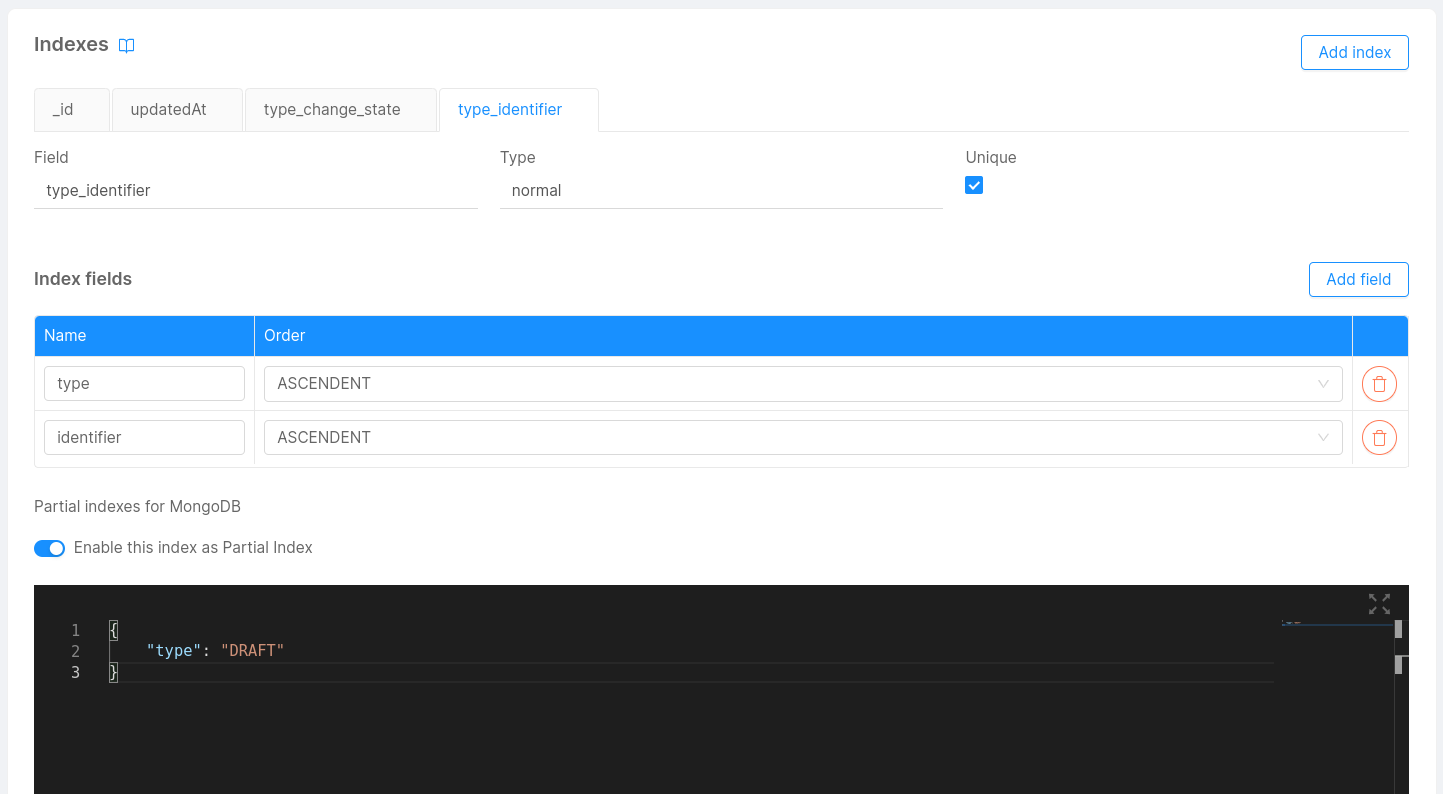
This filter expression should be a JSON with the definition that accepts the documents based on filter conditions. This JSON will be included in the collection's configuration as a string and used by Mongo when starting the CRUD Service. Its content should be identical to the value of the property partialFilterExpression as explained in the official MongoDB documentation.
Note that any field included in the filter expression is used only during the filtering operation and are unrelated to those included in the index table.
The expression in the screenshot will index only documents where type is equal to "DRAFT", but you can use comparison expressions and various operations, as explained in the MongoDB documentation. E.g., the following filter expression will index only those documents where the property age is lower than 21:
{
  "age": { "$lt": 21 }
}