Version: 11.x (Current)

Application Creation

Creating the Developer Portal using the Mia-Platform Console is extremely simple. With just a few clicks and almost no configuration, you will be able to create all the necessary resources composing the Dev Portal architecture.

Integration requirements

To integrate the Dev Portal, you only need to be able to access the project from which it will be exposed.

Integration steps

To deploy a Dev Portal instance on the Mia Platform Console, you will have to:

  • create the Dev Portal application;
  • configure the theming properties of micro-lc;
  • configure redirects;
  • configure API documentation, authentication, and notifications (optional).

1. Create Dev Portal Application

The first fundamental requirement for a correct Dev Portal configuration is creating the Dev Portal application through the Marketplace.

The following steps will lead you to create an instance of the Dev Portal application:

  1. Open the Design area of your project

  2. Move to the Application section;

  3. Create a new application using the Dev Portal application available in the Core Plugins - Dev Portal section of the marketplace:

    Dev Portal Application

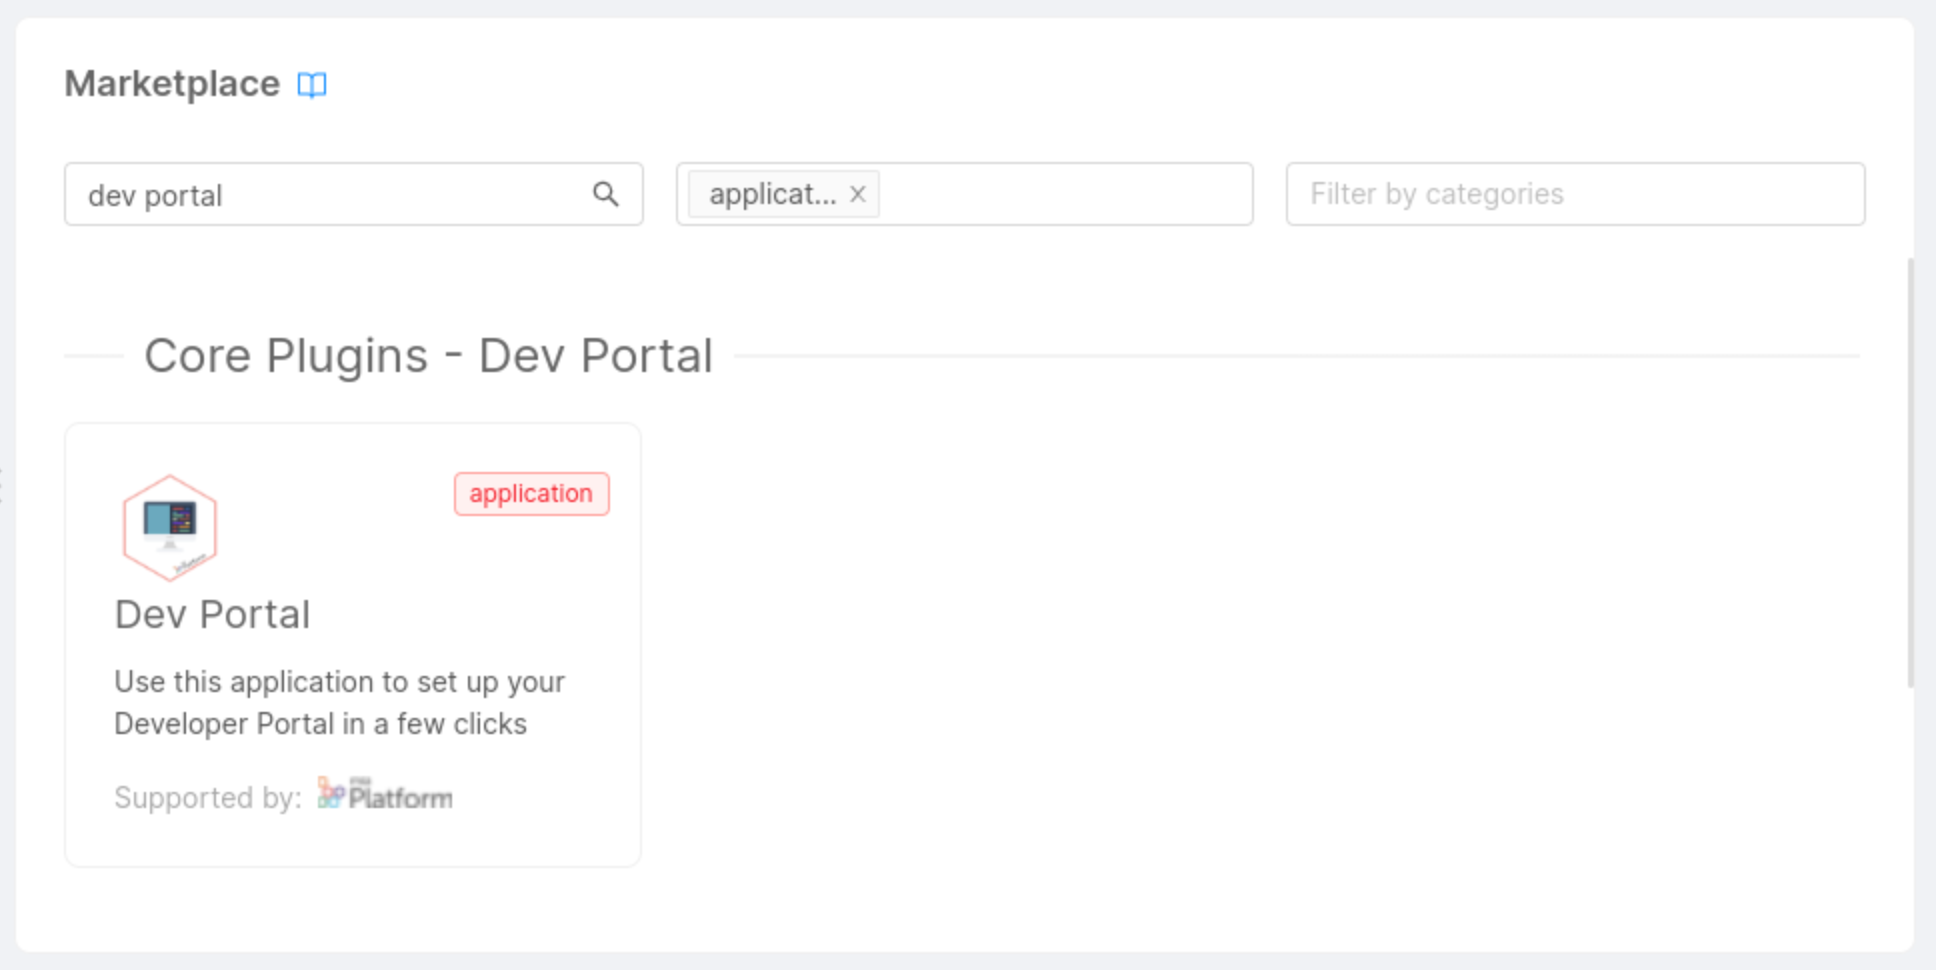
  4. Configure the name and the description for both the application and all the microservices composing it:

    Dev Portal Application Creation

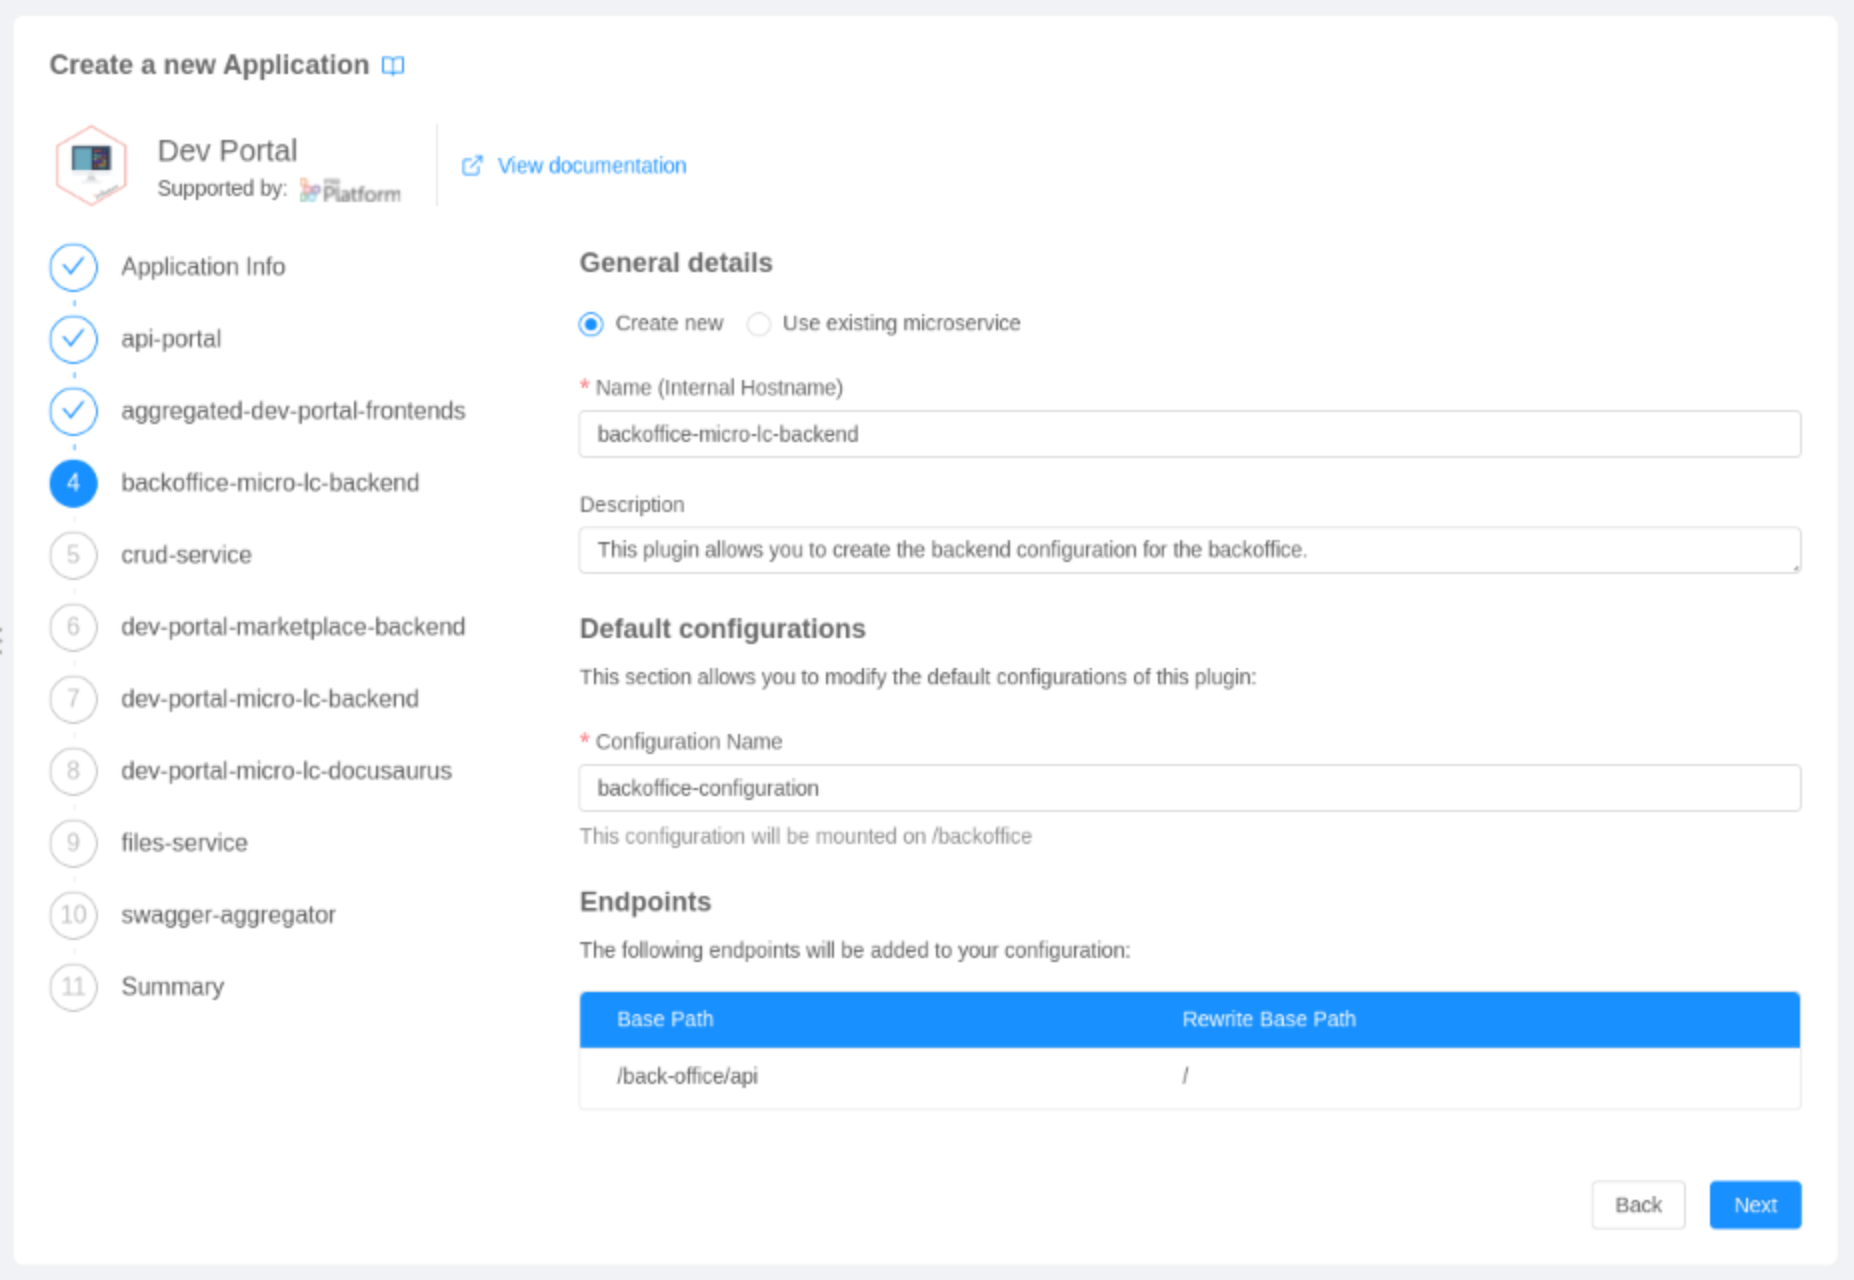
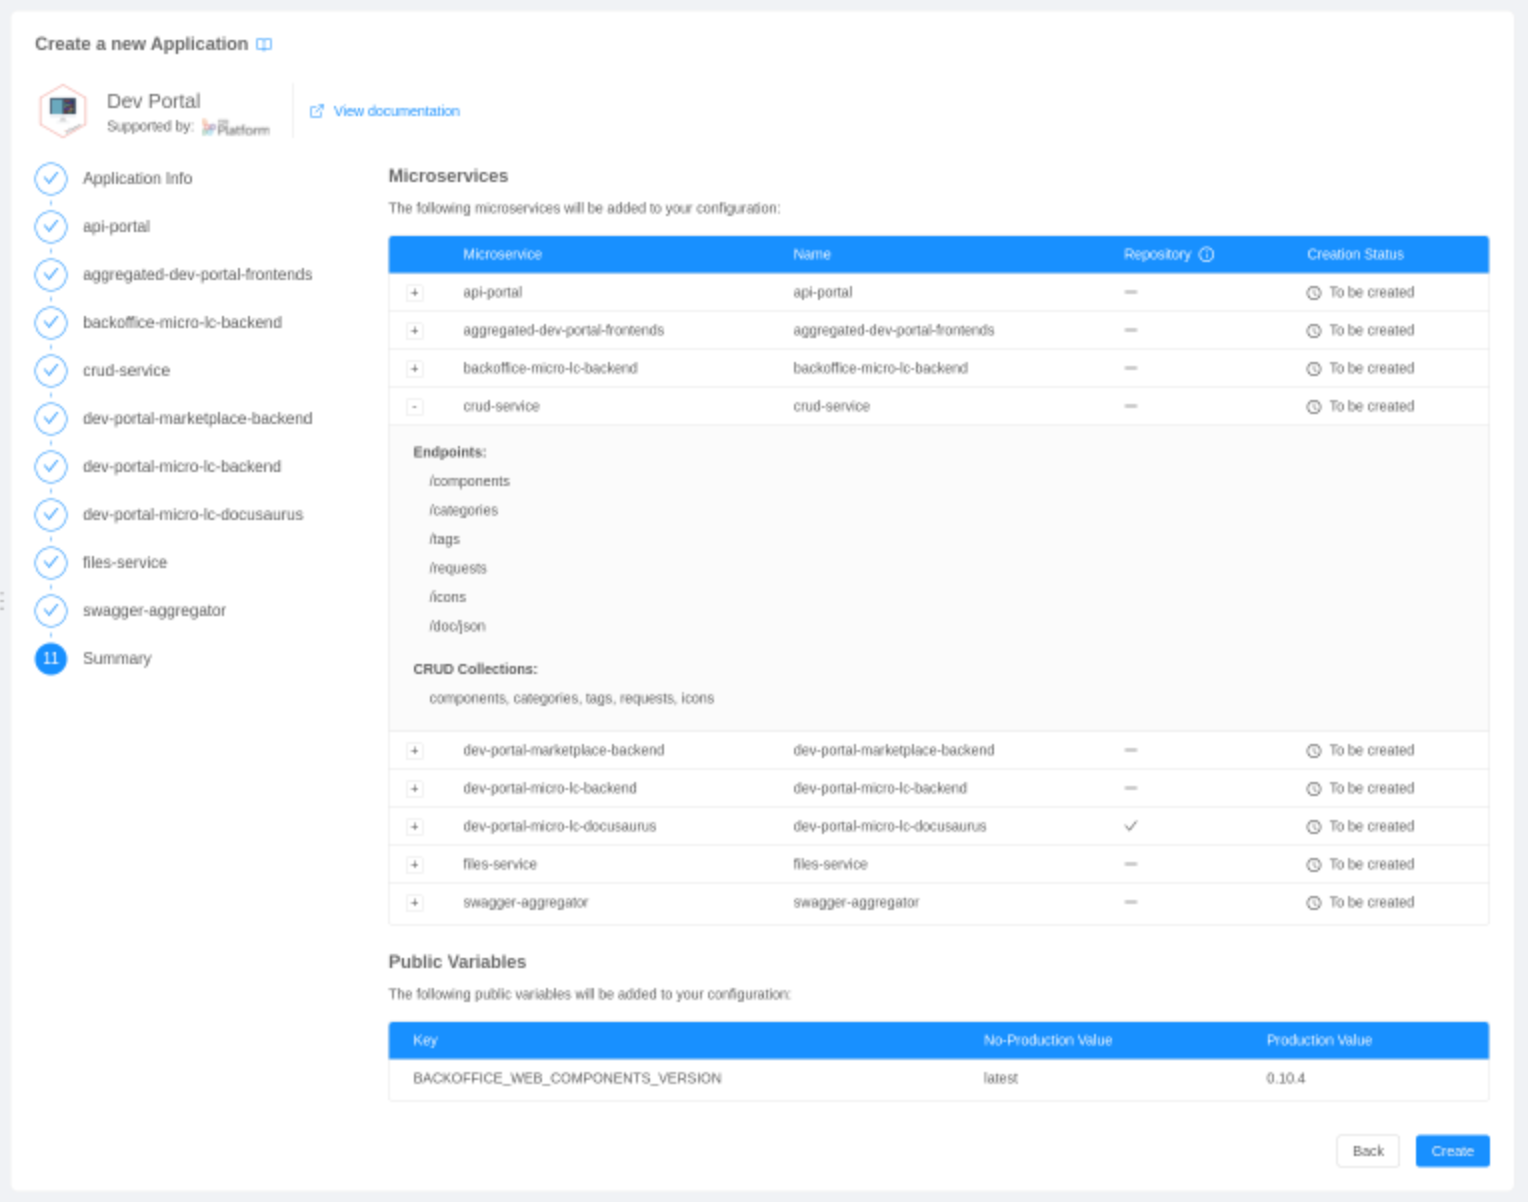
  5. Review the creation of all the resources composing the application (microservices, endpoints, collections and public variables):

    Dev Portal Application Summary

  6. Complete the creation of the Dev Portal application by clicking Create.

2. Configure dev-portal-micro-lc-backend

After creating the Dev Portal application, you will be able to customize it with your logos and default theme colors.

The following steps will lead you to the configuration of the theming properties used by the Dev Portal.

  1. Go to the Microservices section

  2. Open the detail of the microservice originally named dev-portal-micro-lc-backend;

  3. Move to the ConfigMaps section

  4. Edit the theming property of the file configuration.json;

    caution

    The remaining configurations are already set for the Dev Portal: to know more about their purpose, please consult the Core Configuration section of micro-lc.

3. Configure Redirects

For this configuration step, move to the Advanced section of the console and select the api-gateway microservice.

info

These endpoints allow the two micro-lc instances, created respectively for the Backoffice and Dev Portal sections, to exist simultaneously without conflicts.

Search for the following files and paste the content below:

  • maps-proxyUrl.before.map
# micro-lc Dev Portal
"~^\w+-/dev-portal/.+/api/v1/microlc(?<path>[/\?].*|$)$" "/v1/microlc$path";

# micro-lc Backoffice
"~^\w+-/back-office/.+/api/v1/microlc(?<path>[/\?].*|$)$" "/v1/microlc$path";

# micro-lc user info
"~^\w+-/.+/userinfo(?<path>[/\?].*|$)$" "/userinfo$path";
  • maps-proxyName.before.map
# micro-lc Dev Portal
"~^(secreted|unsecreted)-1-GET-/dev-portal/.*/api/v1/microlc/.*" "dev-portal-micro-lc-backend";

# micro-lc Backoffice
"~^(secreted|unsecreted)-1-GET-/back-office/.*/api/v1/microlc/.*" "backoffice-micro-lc-backend";

# micro-lc user info
"~^(secreted|unsecreted)-1-\w+-/.*/userinfo([/\?].*|$)$" "auth0-client";
  • root-location-extension.conf
location = / {
include /etc/nginx/customization.d/header-debug.conf;

return 302 '$original_request_scheme://$original_request_host/dev-portal/';
}

location = /dev-portal {
include /etc/nginx/customization.d/header-debug.conf;

return 302 '$original_request_scheme://$original_request_host/dev-portal/';
}

location = /back-office {
include /etc/nginx/customization.d/header-debug.conf;

return 302 '$original_request_scheme://$original_request_host/back-office/';
}

caution

Please ignore any red feedback that may appear when pasting this content within the advanced section files.

Final result

At the end of these steps, the configuration of your project should include all the resources listed in the following sections.

Microservices

The complete configuration of the Developer Portal will include the following microservices:

MicroserviceVersionDescription
API Gateway5.0.0routes requests to the correct service and verifies the need of authentication.
API Portal1.16.3shows the exposed APIs' documentation in the Dev Portal section.
Aggregated Dev Portal Frontends0.4.2present graphically both the Backoffice and the Dev Portal sections.
Backoffice Micro-lc Backend0.7.0manage the Backoffice section.
Crud Service5.2.2manage the crud operations.
Dev Portal Marketplace Backend0.2.1manage the API marketplace section.
Dev Portal Micro-lc Backend0.7.0manage the Dev Portal section.
Dev Portal Micro-lc Docusaurusx.x.xdisplays the documentation inside the Dev Portal.
Files Service2.3.4handles files upload and download operations in the Backoffice section.
Microservice Gateway6.0.6provides the ability to specify HTTP hooks to be invoked before and after each request.
Swagger Aggregator3.4.4expose the APIs' documentations of your microservices.
caution

When you create a Dev Portal application with already existing services, the version of these services will not be automatically upgraded.

Make sure the microservices in your project use the versions specified above. A Dev Portal application deployed with different versions may not be able to work properly.

Endpoints

The complete configuration of the Developer Portal will include the following endpoints:

Aggregated Frontend Plugins

The APIs necessary for the Dev Portal frontend:

EndpointMicroserviceRewrite Base Path
/aggregated-dev-portal-frontends/

Backoffice

The APIs necessary for the management of the Backoffice section:

EndpointMicroserviceRewrite Base Path
/back-office/apibackoffice-micro-lc-backend/
/filesfiles-service/

Dev Portal

The APIs necessary for the management of the Dev Portal section:

EndpointMicroserviceRewrite Base Path
/dev-portal/apidev-portal-micro-lc-backend/
/bffdev-portal-marketplace-backend/
/docusaurusdev-portal-micro-lc-docusaurus/
/documentation/assetsdev-portal-micro-lc-docusaurus/assets
/dev-portal/documentation/assetsdev-portal-micro-lc-docusaurus/assets
/dev-portal/api-portal/apiswagger aggregator/
/dev-portal/documentation/search-index.jsondev-portal-micro-lc-docusaurus/search-index.json

CRUD Endpoints

The APIs necessary for the management of the CRUD operations:

EndpointCRUD Collection
/componentscomponents
/categoriescategories
/tagstags
/requestsrequests
/iconsicons

CRUD Collections

The data model used for the management of the Developer Portal will include four collections:

Components

This collection is used to store the components that will be displayed in the marketplace. Excluding the default properties of the CRUD (_id, creatorId, createdAt, updaterId, updatedAt, STATE), the defined fields are:

  • title: the title of the component;
  • icon: the object that contains the file icon definition. For more detail, refer to the icons section;
  • type: the type of the component (API, Event...);
  • category: the category to which the component belongs;
  • tags: the tags to which the component is associated to;
  • description: the description of the component, that will be displayed in the component detail;
  • linkApiPortal: the URL used to redirect the user to the API portal;
  • linkDocumentation: the URL used to redirect the documentation portal;
  • supporterName: name of the entity that supports the component;
  • supporterIcon: the object that contains the supporter icon definition. For more detail, refer to the icons section.

Categories

This collection is used to save the name and description of the categories that can be used to group your components inside the marketplace. Excluding the default properties of the CRUD (_id, creatorId, createdAt, updaterId, updatedAt, STATE), the defined fields are:

  • name: Contains the name of the category;
  • description: Contains the description of the category.

Tags

This collection is used to save the name and description of the tags that can be used to enrich your components inside the Marketplace. Excluding the default properties of the CRUD (_id, creatorId, createdAt, updaterId, updatedAt, STATE), the defined fields are:

  • name: Contains the name of the tag;
  • description: Contains the description of the tag.

Requests

This collection is used to save the access requests to your components, made from the components marketplace. Excluding the default properties of the CRUD (_id, creatorId, createdAt, updaterId, updatedAt, STATE), the defined fields are:

  • userEmail: the email of the user that is requesting the access;
  • userName: the name of the user that is requesting the access;
  • status: the current status of the request (open, completed...);
  • userOrganization: the organization to which the user belongs to;
  • requestedComponentId: ID of the component that the user wants to access;
  • publicKey: the RSA public key of the user that is requesting the access;
  • additionalDescription: an additional description field to include further details regarding the request.

Icons

This collection is used to save the icons associated with each component. Excluding the default properties of the CRUD (_id, creatorId, createdAt, updaterId, updatedAt, STATE), the defined fields are:

  • name: the original name of the uploaded file;
  • size: the size of the uploaded file;
  • location: the location of the file on the bucket;
  • file: the name of the file on the bucket.

Public Variables

The complete configuration of the Developer Portal will include the following public variables:

VariableDescription
BACKOFFICE_WEB_COMPONENTS_VERSIONthe version of the Backoffice components used in the `backoffice-micro-lc-backend` configurations.