Sometimes you could need to keep your kubernetes cluster private and not publicly reachable for security reasons.
The reasons to do this are different:
- you want to improve the cluster security;
- Company policies impose this limitation on the infrastructure;
- you don't expose APIs to be publicly used, but just for internal purpose;
- ... and so on
The ways to do this are different too, but in this document we will assume that you already own a private cluster, regardless of the used approach.
What does it mean to have a private cluster for Software Life Cycle Management?
On the Mia-Platform Console we "directly" interact with the kubernetes clusters in few pages:
- Runtime page: represents the overview of the runtime environment status and allows the user to see and interact with elements on kubernetes (depends on the user permissions);
- Deploy page: when enabling the smart-deploy toggle, the Mia-Platform Console query the kubernetes cluster to show the user differences between the actual release and the new release;
- Deploy page: deploying a project will usually trigger the deploy pipeline to update the kubernetes resources with the new version.
How can we handle the operations above if the cluster is private?
Proxy is the way
The proxy solution solved all the use cases listed above because using, for example, a bastion proxy, you can:
- allow the Runtime page to reach the cluster, authenticating it through on the proxy with an AuthN/AuthZ flow;
- allow the Deploy service to reach the cluster, authenticating it through on the proxy with an AuthN/AuthZ flow, to get the actual kubernetes resources and to publish new resources on the cluster.
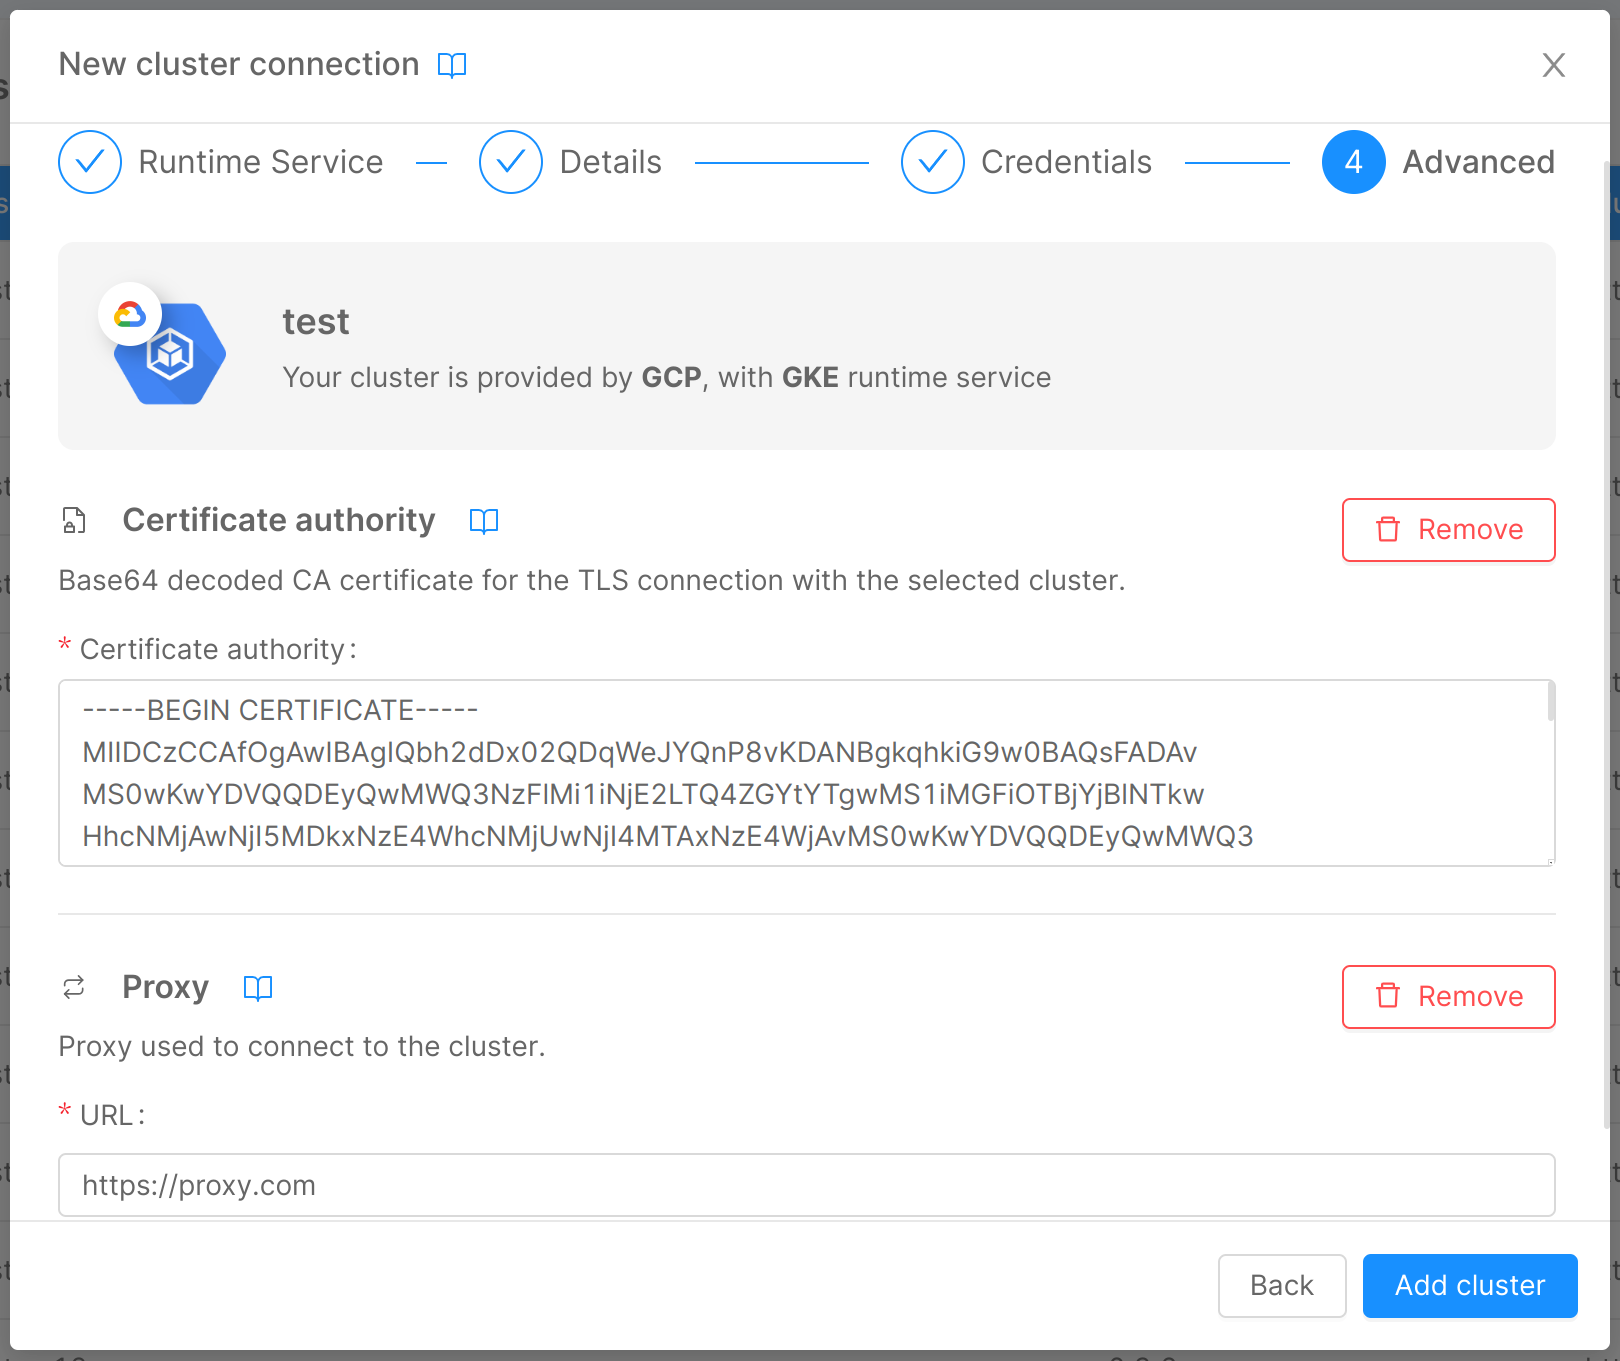
You can set the proxy you need to reach the cluster directly on the Mia-Platform Console, during the cluster creation in your company page. To do that you can:
- Navigate, through the Mia-Platform Console, to your company settings page;
- Click on the Clusters menu;
- Click on the Add cluster connection button (or editing an existing one);
- Insert cluster's details, until you reach the Advanced section of the "Cluster creation stepper";
- Insert the proxy's URL and, if you need it, a TLS certificate, as reported in this documentation page.
If you have a Pure License Mia-Platform Console instance and the Mia-Platform Console is installed on the same runtime environment, you won't need the proxy because the communications between the Mia-Platform Console and the cluster will be internal.
N.B. despite that, you could need a proxy or a VPN connection to reach the Mia-Platform Console UI, based on your infrastructure configurations.
Virtual Private Cloud network
A Virtual Private Cloud network (VPC from now) is a virtual version of a physical network useful to let servers on different networks to communicate each other as if they where in the same one.
Almost all cloud providers have their version of a VPC, for example:
A Virtual Private Cloud (VPC) network is a virtual version of a physical network that is implemented inside of Google's production network by using Andromeda.
With Amazon Virtual Private Cloud (Amazon VPC), you can launch AWS resources in a logically isolated virtual network that you've defined. This virtual network closely resembles a traditional network that you'd operate in your own data center, with the benefits of using the scalable infrastructure of AWS.
Azure Virtual Network is a service that provides the fundamental building block for your private network in Azure. An instance of the service (a virtual network) enables many types of Azure resources to securely communicate with each other, the internet, and on-premises networks.
How can a VPC solve the problem?
The VPC can completely or partially solve the problem.
Runtime page and Smart Deploy section
Configuring a VPC you can create a link between:
- the cluster the Mia-Platform Console is installed on;
- your destinations clusters;
in this way the services inside the Mia-Platform Console cluster will be able to reach the destination clusters, allowing the Console to correctly show you the Runtime and the Smart Deploy sections.
The cluster the Mia-Platform Console is installed on strictly depends on your Mia-Platform license (PaaS, BYOI or Self hosted).
Contact your Mia-Platform referent to know more about that.
What about the deploy pipeline?
The operation of the deploy pipeline really depends on the specific use case.
The Mia-Platform Console Deploy page allows the user to trigger a deploy using the configured Continuous Delivery, but it's just a trigger, the Mia-Platform Console will not do the deploy itself.
The VPC creates a virtual network between two phisically different networks. If the deploy pipeline tool is installed on the same Mia-Platform Console cluster, you can solve this problem too, because the deploy tool will already be able to reach the destination clusters; otherwise you can:
- install another VPC, between the deploy tool pipeline server;
- use the Pull strategy instead of the Push strategy.
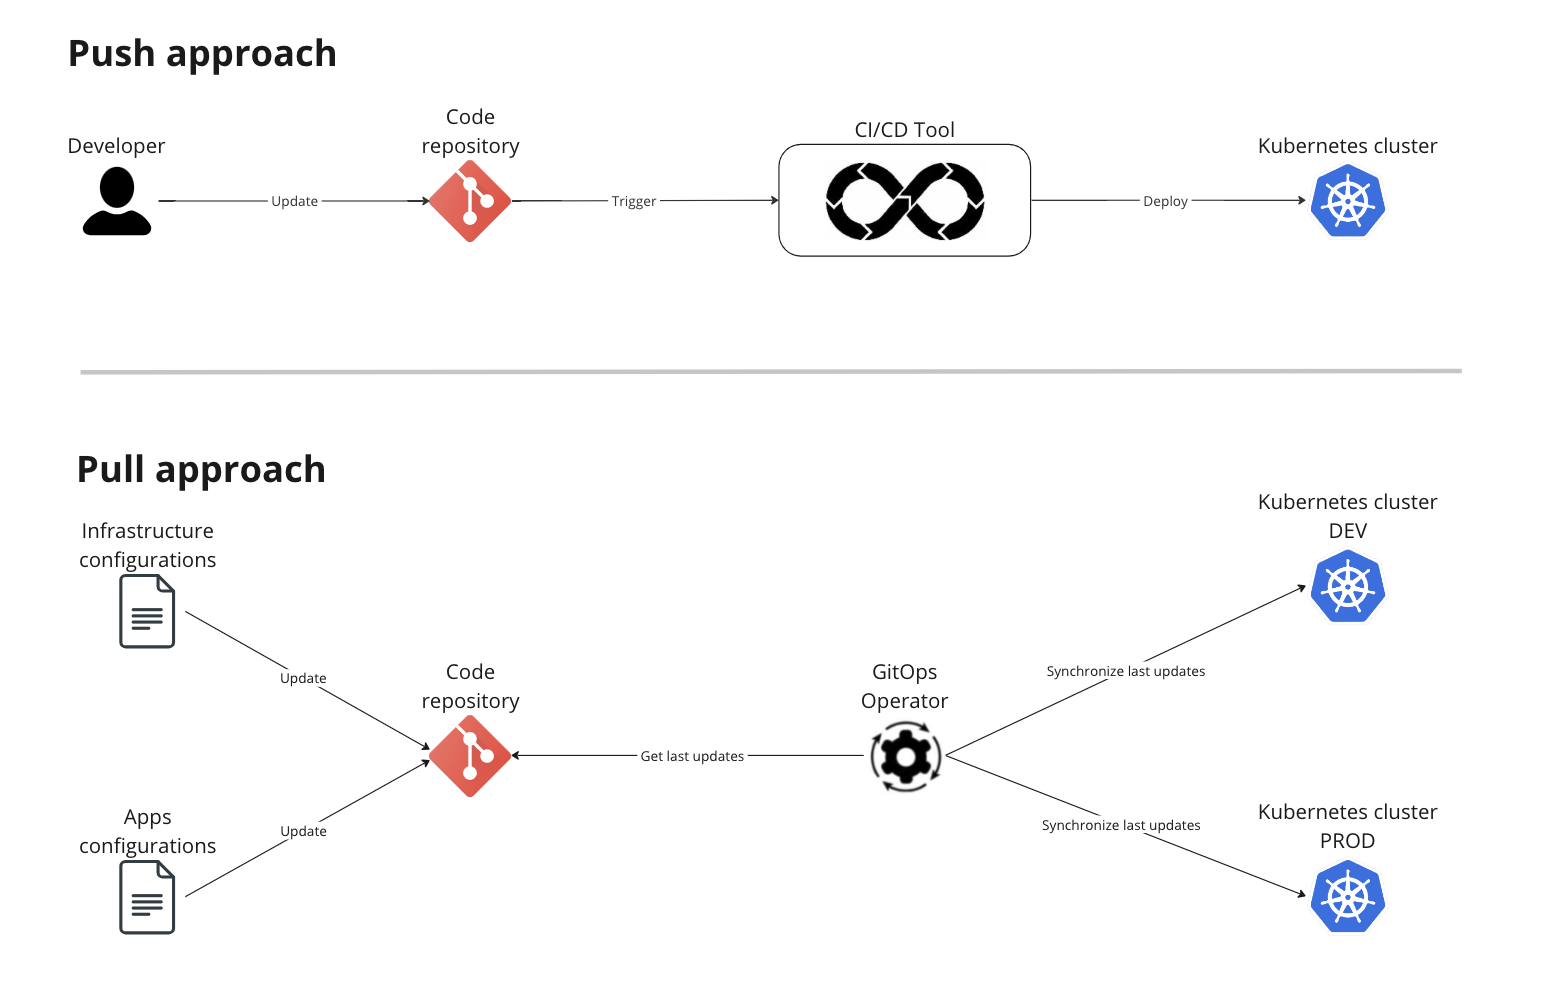
Pull and Push are different approaches with their different pros and cons.
The Push approach (most common one) is based on a tool that, when triggered, pushes the resources (yml files) on the kubernetes cluster to update it.
The Pull approach involves an agent installed on k8s instead; the agent periodically, or based on specific rules that depend on the tool you are using, pulls the resources and synchronize them with the resources on the cluster, if needed.
Pull instead of push
The Pull strategy can be implemented in different ways and with different tools. Following some sample tool:
- GitLab Agent: you can find a Mia-Platform integration below;
- ArgoCD;
- FluxCD.
ArgoCD and FluxCD are sample tools for GitOps delivery and, if you want more information, read the official documentation linked above.
GitLab Agent
Gitlab provides a Kubernetes Agent to perform advanced deploy on a Kubernetes cluster.
The Agent provides a permanent connection using websockets or gRPC between a Kubernetes cluster and a GitLab instance. The Agent is made up by two components:
Agentk: the cluster-side component that has to be deployed in the Kubernetes cluster;Kas: is the GitLab Agent Server for Kubernetes. It is the GitLab server-side component that is managed alongside GitLab. It is responsible for much of the heavy lifting, since the cluster agent has to be left as lightweight as possible.
The agent has two different approaches and both require the agent installation on the Kubernetes cluster:
- GitOps pull based approach;
- typical GitLab CI/CD Pipeline approach, that allows the pipeline to run
kubectlcommands.
We tried, for a private cluster, to configure it with the second approach, but few steps are shared through both of them.
For more information we suggest to read the official GitLab documentation.
Agent setup on GitLab
In this paragraph we will see the steps to add a GitLab Agent on a project on GitLab.
The agent should already be installed on the Kubernetes cluster.
- Navigate in the GitLab repository of the project you want to Deploy on Kubernetes with the GitLab Agent;
- create a
.gitlab/agents/<agent_name>folder. The project could be dedicated for the Agent or it could be a project of an existing application. - create a
config.yamlfile (IMPORTANT:yaml, notyml) in the<agent-name>folder, which contains the config of the agent;
The config.yaml file has the following structure:
ci_access:
  groups:
    - id: cluster-setup
      access_as:
        ci_job: {}
ci_access: specifies that the approach is the Gitlab CI/CD flow;groupssection: specifies which groups can use this agent;access_as: is the authentication section. The jobs impersonates to Kubernetes asgitlab:ci_job:<job id>belonging togitlab:ci_jobGroup (use this to define RBAC on what the Agent can do on the cluster).
- in the left bar on GitLab, go on
Infrastructure>Kubernetes clusterand configure the agent; - after the agent configuration, GitLab will prompt an Helm command to create the Agent on Kubernetes as a Helm Release, specifying which token you need to use to bound the two agents.
- install the agent on the cluster;
- check if the installation is done, the agent should appear on GitLab in the
Kubernetes clustersection.
Agent usage
Once the agent is configured, the CI/CD pipelines should be able to run kubectl commands.
You can choose to build you custom deploy pipelines, running kubectl command inside them, or you can use mlp.
mlp is a command line tool we use to deploy on Kubernetes, look at the dedicated documentation page for more.
All you need to change, using mlp, is the deploy command, because you need to add the GitLab agent context option:
mlp deploy --ensure-namespace=false --context ${GITLAB_AGENT_CONTEXT} --deploy-type "${DEPLOY_TYPE}" --force-deploy-when-no-semver=${FORCE_DEPLOY_WHEN_NO_SEMVER} -f ${DESTINATION_PATH} -n "${KUBE_NAMESPACE}"