Mia-Platform Microfrontend Composer Integration with Auth0
In this tutorial, we will guide you through the process of securing Mia-Platform Microfrontend Composer using Auth0 as your Identity Provider. In particular, we will see how to:
- protect the Mia-Platform Microfrontend Composer with the Auth0 login page;
- create, delete and manage both Auth0 users and users' groups from dedicated pages on Mia-Platform Microfrontend Composer;
- use the ACLs feature of Mia-Platform Microfrontend Composer to display to the user only the subset of pages and components they are authorized to access.
What We Will Build
Throughout this tutorial, we will:
- Create the necessary Microservices
- Configure the Microservices and Auth0
- Configure the Microfrontend Composer application
- Configure the authentication process
- Save and Deploy the Microfrontend Composer
- Create a user using Microfrontend Composer
Prerequisites
Before starting this tutorial, you should be familiar with the concepts of the Mia-Platform Microfrontend Composer. We also recommend to complete the Microfrontend Composer Tutorial Basics.
Create the necessary Microservices
Create the Secure API Gateway application:
- Go to Applications and click on the
Create New Applicationbutton. - Search for
Secure ApiGatewayand click on the card.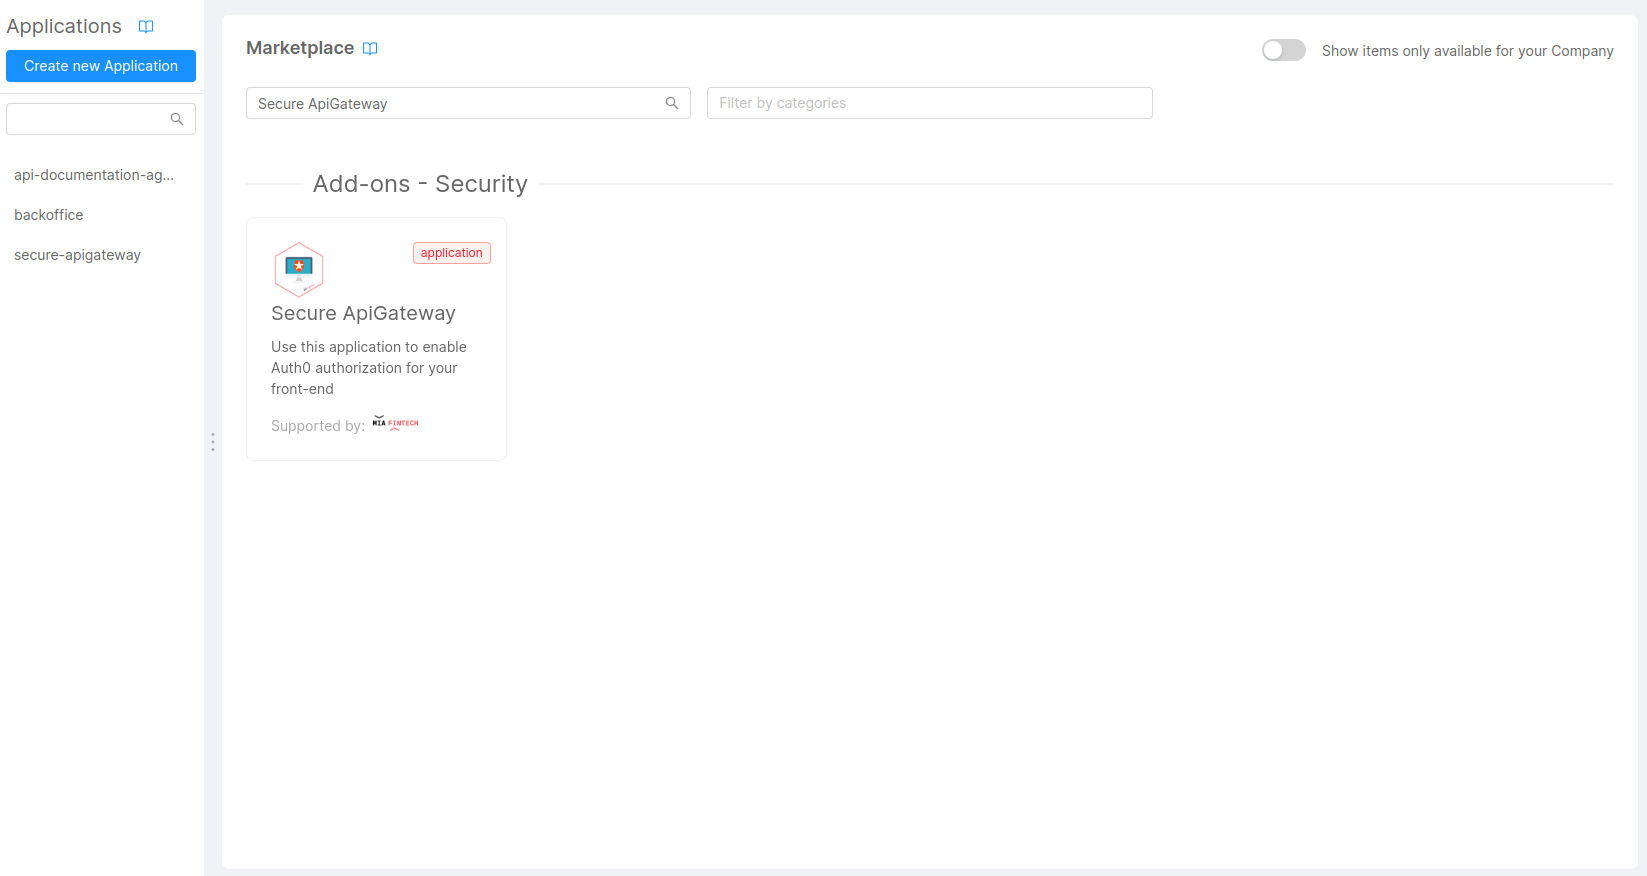
- Follow the wizard, selecting if you want to install new microservices or use existing ones.
- At the end, click the
Createbutton and then save the new Application.
This application will create the following:
- Microservices
Authorization ServiceApi GatewayAuth0 ClientOAuth Login Site
- Endpoints
/web-login/authorize/oauth/token/userinfo/logout
- Public Variables
AUTH0_NAMESPACEAUTH0_CALLBACK_URL
In order to handle the users on Auth0, you need to add the User Manager Service:
- Go to Microservices and click on the
Create a Microservicebutton. - Search for
User Manager Serviceand click on the card.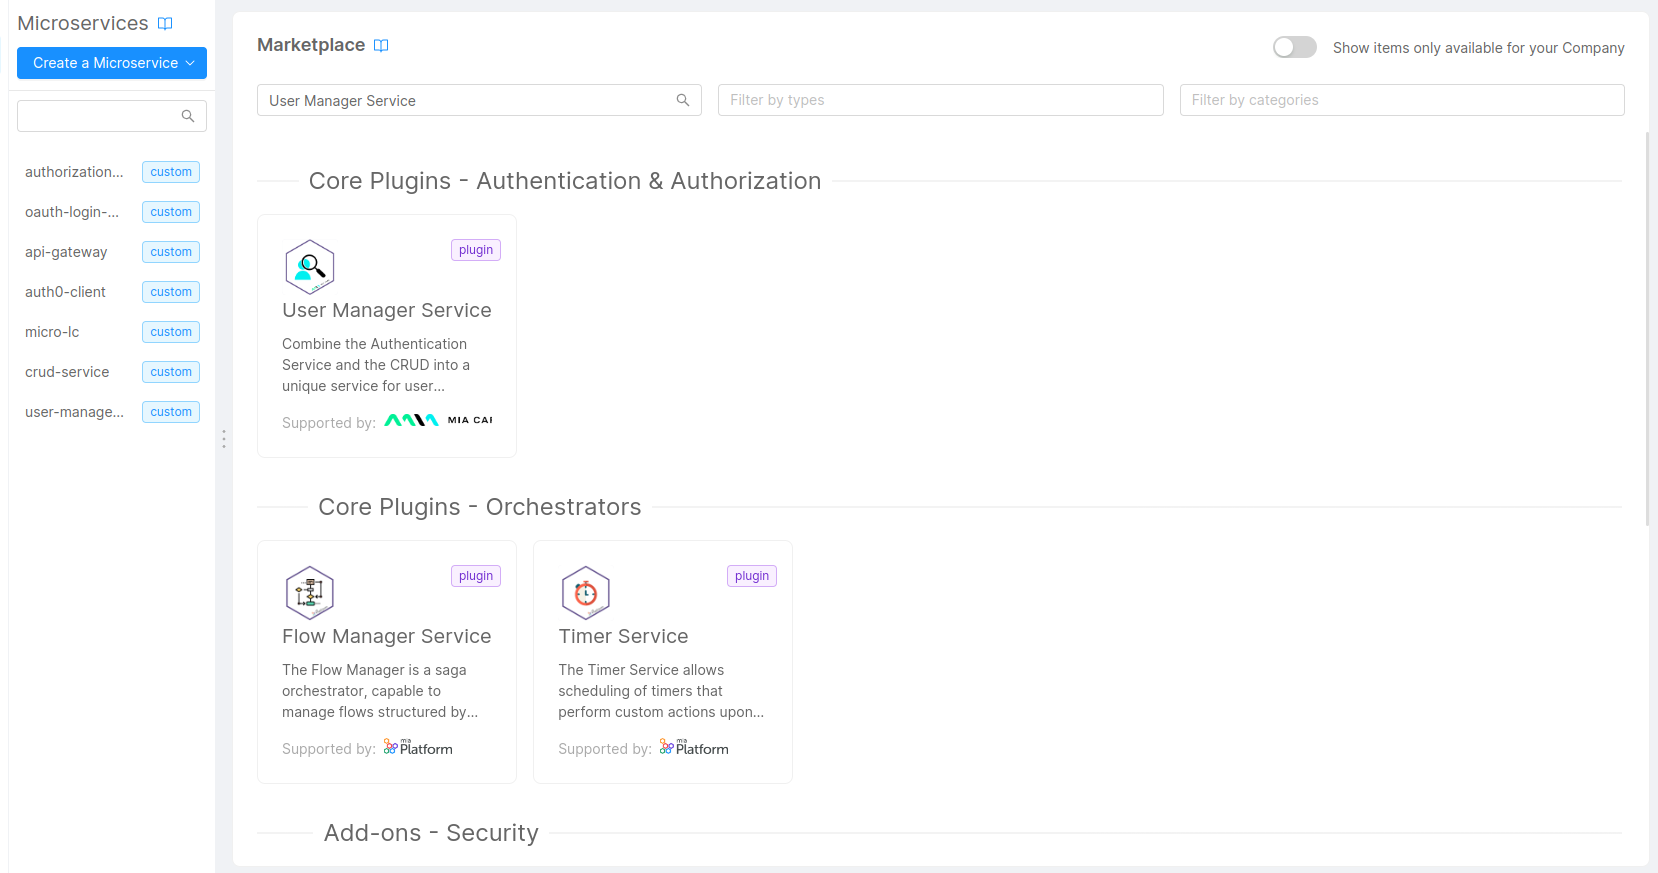
- Choose the name of the service and then click the
Createbutton.
Configure the Microservices and Auth0
All the microservices that you have added in the previous step are Mia-Platform plugins, so you don't need to write code, but just to configure them.
API Gateway
You can follow this page: API Gateway Configuration.
When the configuration is completed, you should have added to the server-extension.conf file the advanced configuration for the api-gateway to redirect calls that need authentication to the Login page.
Authorization Service
You can follow this page: Authorization Service Configuration.
When the process is completed, you should have added the authorization-service configuration inside the auth.json file.
Auth0 and Auth0 Client
In order to configure the auth0-client, the first step is to setup the Auth0 Tenant. You can follow this page: Configure Auth0 (for the scope of this tutorial you can avoid steps 3 and 4).
Once the tenant configuration is completed you should have created:
- one regular application
- one M2M application for user management
- a rule to inject the id token
- one user with the following
app_metadata:
{
  "groups": [
    "admin"
  ]
}
On Auth0 beware to set the following logout url:
https://your-microfrontend-composer-project.mia-platform.eu/web-login
Now, you can configure the auth0-client service. It accepts the following environment variables:
- LOG_LEVEL: defines the logging level of the logger (default:
{{LOG_LEVEL}}) - HTTP_PORT: defines the http port to use (default: 8080)
- SESSION_SCOPE: defines the scope of the session
- REDIS_MODE: defines the redis mode (normal or sentinel) (default: normal)
- REDIS_HOSTS (required): defines the redis hosts (default:
{{REDIS_HOSTS}}) - SERVICE_CONFIG_FILE_NAME (required): defines the service config name (default: config)
- SERVICE_CONFIG_PATH (required): defines the service config path (default: /configs)
The Auth0-Client service uses a single config map called auth0-client-config and the file, config.json, containing the configuration must follow this example:
{
  "clients": {
    "frontEnd": {
      "auth0Url": "{{AUTH0_NAMESPACE}}",
      "clientId": "{{AUTH0_CLIENT_ID}}",
      "clientSecret": "{{AUTH0_CLIENT_SECRET}}",
      "redirectUrl": "{{AUTH0_CALLBACK_URL}}",
      "scopes": [
        "offline_access",
        "profile",
        "email",
        "website"
      ]
    }
  },
  "defaultClient": "frontEnd",
  "managementClient": {
    "auth0Url": "{{AUTH0_NAMESPACE}}",
    "clientId": "{{AUTH0_USER_MANAGEMENT_CLIENT_ID}}",
    "clientSecret": "{{AUTH0_USER_MANAGEMENT_CLIENT_SECRET}}",
    "supportedConnections": [
      "{{AUTH0_CONNECTION}}"
    ],
    "defaultCreateUserConnection": "{{AUTH0_CONNECTION}}"
  },
  "customClaimsNamespaces": [
    "{{MIA_NAMESPACE}}app_metadata",
    "{{MIA_NAMESPACE}}user_metadata"
  ]
}
In order to complete this configuration you have to define the following Public Variables:
AUTH0_NAMESPACE: the namespace of your tenant on Auth0 (i.e. https://tenant-name.eu.auth0.com/)AUTH0_CALLBACK_URL: the url already defined during Auth0 configuration (i.e. https://your-microfrontend-composer-project.mia-platform.eu/web-login/callback)AUTH0_CONNECTION:Username-Password-Authentication, the default Auth0 databaseMIA_NAMESPACE: the namespace you already set in the Rules configuration on Auth0
And Secreted Variables:
AUTH0_CLIENT_ID: the Client ID of your Regular Application (you can find it insideDashboard > Applications > Your Regular Application)AUTH0_CLIENT_SECRET: the Client Secret of your Regular Application (you can find it insideDashboard > Applications > Your Regular Application)AUTH0_USER_MANAGEMENT_CLIENT_ID: the Client ID of your M2M Application (you can find it insideDashboard > Applications > Your M2M Application)AUTH0_USER_MANAGEMENT_CLIENT_SECRET: the Client Secret of your M2M Application (you can find it insideDashboard > Applications > Your M2M Application)
User Manager Service
You can configure user-manager-service following this page: User Manager Service Configuration.
During the configuration you have to:
- create a CRUD collection for Auth0 Users (i.e.
auth0_users) and populate the variableUSERS_CRUD_ENDPOINT(i.e./auth0-users). For the collection you can import the following fields:
[
    {
        "name": "_id",
        "description": "_id",
        "type": "ObjectId",
        "required": true,
        "nullable": false
    },
    {
        "name": "creatorId",
        "description": "creatorId",
        "type": "string",
        "required": true,
        "nullable": false
    },
    {
        "name": "createdAt",
        "description": "createdAt",
        "type": "Date",
        "required": true,
        "nullable": false
    },
    {
        "name": "updaterId",
        "description": "updaterId",
        "type": "string",
        "required": true,
        "nullable": false
    },
    {
        "name": "updatedAt",
        "description": "updatedAt",
        "type": "Date",
        "required": true,
        "nullable": false
    },
    {
        "name": "__STATE__",
        "description": "__STATE__",
        "type": "string",
        "required": true,
        "nullable": false
    },
    {
        "name": "userGroup",
        "type": "string",
        "required": true,
        "nullable": false,
        "sensitivityValue": 0,
        "encryptionEnabled": false,
        "encryptionSearchable": false
    },
    {
        "name": "authUserId",
        "type": "string",
        "required": false,
        "nullable": false,
        "sensitivityValue": 0,
        "encryptionEnabled": false,
        "encryptionSearchable": false
    },
    {
        "name": "username",
        "type": "string",
        "required": false,
        "nullable": false,
        "sensitivityValue": 0,
        "encryptionEnabled": false,
        "encryptionSearchable": false
    },
    {
        "name": "email",
        "type": "string",
        "required": false,
        "nullable": false,
        "sensitivityValue": 0,
        "encryptionEnabled": false,
        "encryptionSearchable": false
    },
    {
        "name": "blocked",
        "type": "boolean",
        "required": false,
        "nullable": false,
        "sensitivityValue": 0,
        "encryptionEnabled": false,
        "encryptionSearchable": false
    },
    {
        "name": "expirationDate",
        "type": "Date",
        "required": false,
        "nullable": false,
        "sensitivityValue": 0,
        "encryptionEnabled": false,
        "encryptionSearchable": false
    },
    {
        "name": "expirationId",
        "type": "string",
        "required": false,
        "nullable": false,
        "sensitivityValue": 0,
        "encryptionEnabled": false,
        "encryptionSearchable": false
    },
    {
        "name": "name",
        "type": "string",
        "required": false,
        "nullable": false,
        "sensitivityValue": 0,
        "encryptionEnabled": false,
        "encryptionSearchable": false
    }
]
- create a CRUD collection for User Manager Service configuration (i.e.
ums_configurations) and populate the variableUMS_CONFIG_CRUD_ENDPOINT(i.e./ums-configurations). For the collection you can import the following fields:
[
    {
        "name": "_id",
        "description": "_id",
        "type": "ObjectId",
        "required": true,
        "nullable": false
    },
    {
        "name": "creatorId",
        "description": "creatorId",
        "type": "string",
        "required": true,
        "nullable": false
    },
    {
        "name": "createdAt",
        "description": "createdAt",
        "type": "Date",
        "required": true,
        "nullable": false
    },
    {
        "name": "updaterId",
        "description": "updaterId",
        "type": "string",
        "required": true,
        "nullable": false
    },
    {
        "name": "updatedAt",
        "description": "updatedAt",
        "type": "Date",
        "required": true,
        "nullable": false
    },
    {
        "name": "__STATE__",
        "description": "__STATE__",
        "type": "string",
        "required": true,
        "nullable": false
    },
    {
        "name": "userGroup",
        "type": "string",
        "required": true,
        "nullable": false,
        "sensitivityValue": 0,
        "encryptionEnabled": false,
        "encryptionSearchable": false
    },
    {
        "name": "crudSchema",
        "type": "RawObject",
        "required": true,
        "nullable": false,
        "sensitivityValue": 0,
        "encryptionEnabled": false,
        "encryptionSearchable": false
    },
    {
        "name": "label",
        "type": "string",
        "required": true,
        "nullable": false,
        "sensitivityValue": 0,
        "encryptionEnabled": false,
        "encryptionSearchable": false
    },
    {
        "name": "authUserCreationDisabled",
        "type": "boolean",
        "required": false,
        "nullable": false,
        "sensitivityValue": 0,
        "encryptionEnabled": false,
        "encryptionSearchable": false
    }
]
- Fill the
ADDITIONAL_HEADERS_TO_PROXYenvironment variable with this value:acl_rows,x-request-id,request-id,cookie,authorization,client-type,host,x-forwarded-host. - Fill the
USERINFO_ADDITIONAL_PROPERTIESenvironment variable with this value:permissions.
Then you have to add new endpoints and modify some of the existing ones (beware that for all the following endpoints the Rewrite Base Path must be equal to the Base path):
- remove the
/oauth/tokenendpoint linked toauth0-clientand create the same endpoint linked touser-manager-service - remove the
/userinfoendpoint linked toauth0-clientand create the same endpoint linked touser-manager-service - add the
/refreshtokenendpoint linked touser-manager-service - add the
/usersendpoint linked touser-manager-service - add the
/ums-configurationsendpoint linked toums-configurationsCRUD path
Configure the Microfrontend Composer application
Now that you have configured all the microservices you need to follow these last steps to configure the Microfrontend Composer to enable the creation of Auth0 users.
Create the pages
First of all, you need to create the pages to handle users and user-manager-service configurations:
- Go to Configurations, select the
Pagestab and click on theCreate new pagebutton. - Select the following configuration
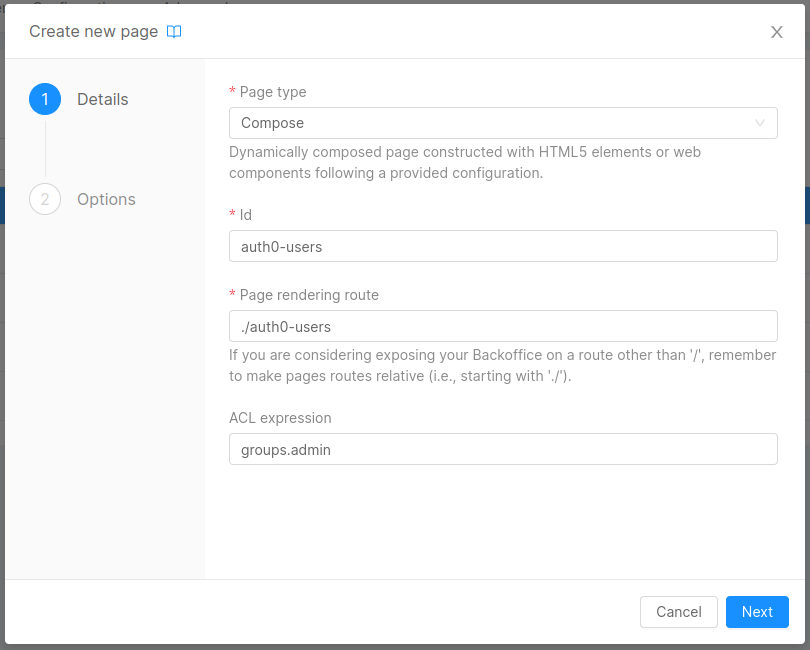

- Click the
Savebutton. - Repeat the first 3 steps to create the page for the
user-manager-serviceconfigurations with only these changes:
| Field | Value |
|---|---|
| Id | ums-configurations |
| Page rendering route | ./ums-configurations |
Link the pages with the CRUD collections
Now you can link the Microfrontend Composer pages with the CRUD collections.
For users:
- Select the configuration for the new
usersjust created. - Click on
Advancedtab. - Search for
"basePath": "/data-source-endpoint"and change it with"basePath": "/users". - Click on the
Applybutton. - Click on
Connectors & Adapterstab, and then onCRUD Client. - Click on
Edit propertybutton under theData schemasection. - Toggle the
Use custom valueswitch and paste the following schema:
{
  "type": "object",
  "properties": {
    "_id": {
      "type": "string",
      "label": "ID",
      "visualizationOptions": {
        "hidden": true
      },
      "formOptions": {
        "hidden": true
      }
    },
    "__STATE__": {
      "type": "string",
      "label": "State",
      "enum": [
        "PUBLIC",
        "DRAFT",
        "TRASH",
        "DELETED"
      ],
      "visualizationOptions": {
        "hidden": true
      },
      "formOptions": {
        "hidden": true
      }
    },
    "name": {
      "label": "Name",
      "type": "string"
    },
    "email": {
      "label": "Email",
      "type": "string"
    },
    "userGroup": {
      "type": "string",
      "label": "Group"
    }
  },
  "required": [
    "userGroup"
  ]
}
- Click on
Layouttab, then onMainandTable. - Click on
Edit propertybutton under theData schemasection on the right-side menu. - Toggle the
Use custom valueswitch and paste the previous schema. - Click on
Form Modaland then on theEdit propertybutton under theData Schemasection on the right-side menu. - Toggle the
Use custom valueswitch and paste the following schema:
{
  "type": "object",
  "properties": {
    "_id": {
      "type": "string",
      "label": "ID",
      "visualizationOptions": {
        "hidden": true
      },
      "formOptions": {
        "hidden": true
      }
    },
    "__STATE__": {
      "type": "string",
      "label": "State",
      "enum": [
        "PUBLIC",
        "DRAFT",
        "TRASH",
        "DELETED"
      ],
      "visualizationOptions": {
        "hidden": true
      },
      "formOptions": {
        "hidden": true
      }
    },
    "name": {
      "label": "Name",
      "type": "string"
    },
    "email": {
      "label": "Email",
      "type": "string"
    },
    "userGroup": {
      "type": "string",
      "label": "Group"
    }
  },
  "required": [
    "userGroup"
  ]
}
For ums-configurations:
- Select the configuration for the new
ums-configurationsjust created. - Click on
Connectors & Adapterstab, and then onCRUD Client. - Select
/v2/ums-configurationsas CRUD Service base path. - Click on the
Generate Schemabutton, thenSaveon the opened modal. - Click on
Layouttab, then onMainandTable. - Click on
Edit propertybutton under theData schemasection on the right-side menu. - Toggle the
Use custom valueswitch and paste the following schema:
{
  "type": "object",
  "properties": {
    "_id": {
      "type": "string",
      "label": "ID",
      "visualizationOptions": {
        "hidden": true
      },
      "formOptions": {
        "hidden": true
      }
    },
    "__STATE__": {
      "type": "string",
      "label": "State",
      "enum": [
        "PUBLIC",
        "DRAFT",
        "TRASH",
        "DELETED"
      ],
      "visualizationOptions": {
        "hidden": true
      },
      "formOptions": {
        "hidden": true
      }
    },
    "userGroup": {
      "type": "string",
      "label": "Group"
    },
    "crudSchema": {
      "type": "object",
      "label": "CRUD Schema",
      "default": {
        "type": "object",
        "required": [
          "email",
          "userGroup",
          "name"
        ],
        "properties": {
          "email": {
            "type": "string",
            "format": "email"
          },
          "userGroup": {
            "type": "string"
          },
          "name": {
            "type": "string"
          }
        }
      },
      "visualizationOptions": {
        "hidden": true
      },
      "formOptions": {
        "hidden": true
      }
    },
    "label": {
      "label": "Label",
      "type": "string"
    },
    "authUserCreationDisabled": {
      "label": "Disable user creation",
      "type": "boolean",
      "default": false,
      "visualizationOptions": {
        "hidden": true
      },
      "formOptions": {
        "hidden": true
      }
    }
  },
  "required": [
    "name"
  ]
}
- Click on
Form Modaland then on theEdit propertybutton under theData Schemasection on the right-side menu. - Toggle the
Use custom valueswitch and paste the following schema:
{
  "type": "object",
  "properties": {
    "_id": {
      "type": "string",
      "label": "ID",
      "visualizationOptions": {
        "hidden": true
      },
      "formOptions": {
        "hidden": true
      }
    },
    "__STATE__": {
      "type": "string",
      "label": "State",
      "enum": [
        "PUBLIC",
        "DRAFT",
        "TRASH",
        "DELETED"
      ],
      "visualizationOptions": {
        "hidden": true
      },
      "formOptions": {
        "hidden": true
      }
    },
    "userGroup": {
      "type": "string",
      "label": "Group"
    },
    "crudSchema": {
      "type": "object",
      "label": "CRUD Schema",
      "default": {
        "type": "object",
        "required": [
          "email",
          "userGroup",
          "name"
        ],
        "properties": {
          "email": {
            "type": "string",
            "format": "email"
          },
          "userGroup": {
            "type": "string"
          },
          "name": {
            "type": "string"
          }
        }
      },
      "visualizationOptions": {
        "hidden": true
      },
      "formOptions": {
        "hidden": true
      }
    },
    "label": {
      "label": "Label",
      "type": "string"
    },
    "authUserCreationDisabled": {
      "label": "Disable User Creation",
      "type": "boolean",
      "default": false,
      "visualizationOptions": {
        "hidden": true
      },
      "formOptions": {
        "hidden": true
      }
    }
  },
  "required": [
    "name"
  ]
}
Add the pages to the Microfrontend Composer
Then you can add the newly created pages to the Microfrontend Composer menu:
- Click on the
Layouttab. - Select
Layoutfrom the left-side menu. - Click on the
Edit propertybutton under theMenu Itemssection on the right-side menu. - On the opened modal click on the
Add itembutton. - Choose the following configuration:
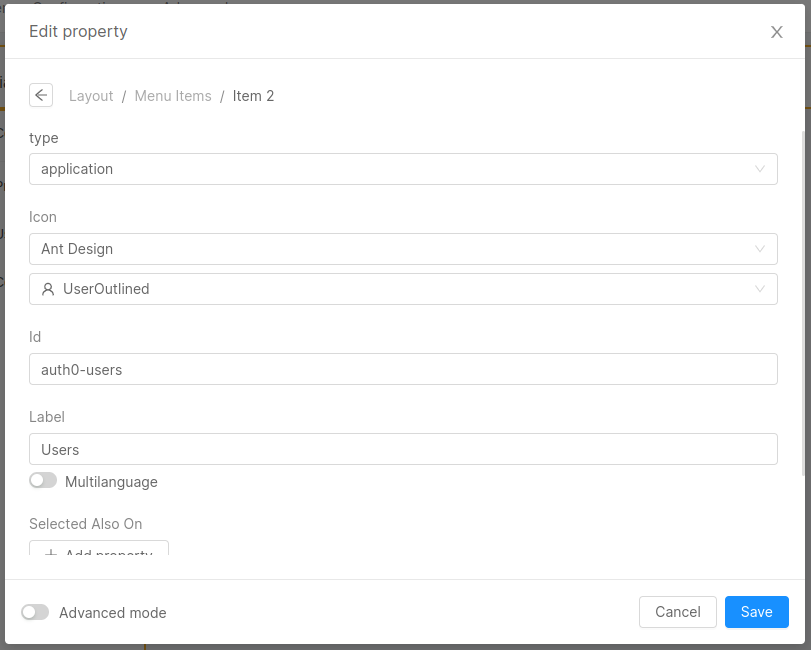
- Click on the
Savebutton. - Repeat the first 6 steps to add the
user-manager-serviceconfigurations page, choosing your favorite Icon and with the following changes:
| Field | Value |
|---|---|
| Id | ums-configurations |
| Label | Configurations |
Define the ACLs
With the ACL Expressions you've just set, users outside groups.admin will see these pages in the left-side menu of the Microfrontend Composer, but will receive a 404 status code page.
In order to hide them the newly created pages, you need to add the ACLs in your advanced configuration:
- Click on
Advancedtab. - Add this expression
"aclExpression": "groups.admin"underlayout > content > properties > menuItemsas property ofauth0-usersandums-configurationsapplications. - Click on the
Applybutton. The result with be similar to the following: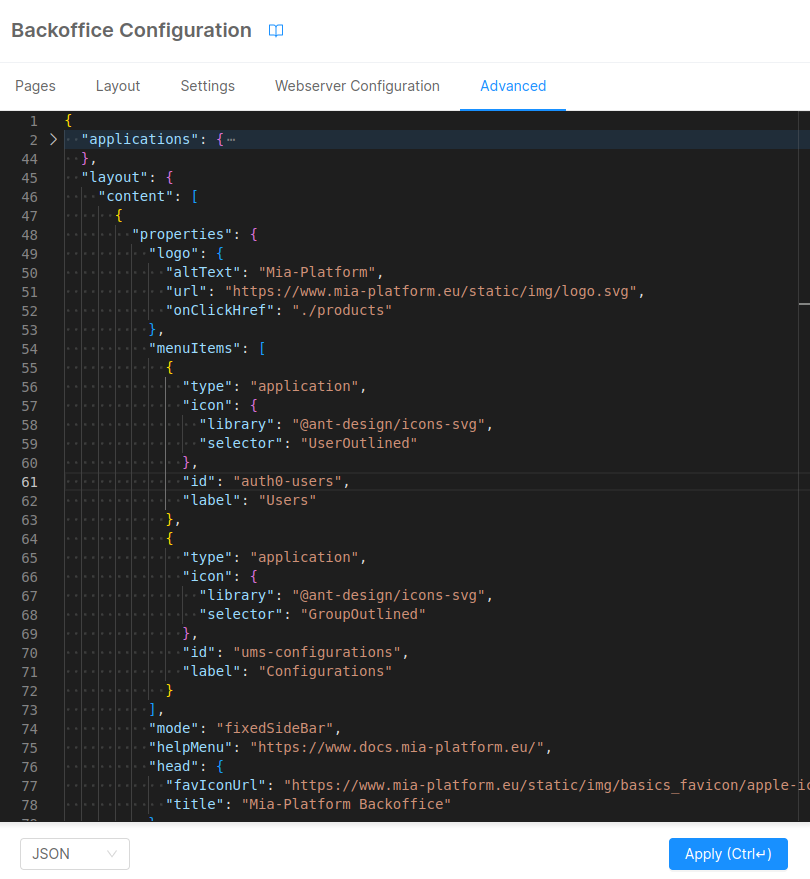
Set the user menu
Then you have to set the user menu:
- Click on the
Layouttab. - Select
Layoutfrom the left-side menu. - Click on the
Edit propertybutton under theLogin and user context menusection on the right-side menu, under theAdvanced Properties. - On the opened modal click fill the
User Context URLwith the value/userinfo - Click on the
Add propertybutton related toLogoutsection. - Fill the
Redirect Urlwith/logout?redirect=/web-login?redirect=/microfrontend-composer. - Click on the
Savebutton.
Configure the authentication process
In order to protect your Microfrontend Composer you need to follow these steps:
- Go to Endpoints, select
/microfrontend-composerand check theAuthentication requiredcheckbox under theEndpoint settings - Set the following variables on
Authentication Service:
USERINFO_URL: http://user-manager-service/userinfoAUTHORIZATION_HEADERS_TO_PROXY: cookie,authorization,client-type
The final configuration step is to change the API key client type with the one defined as defaultClient in the Auth0 Client configuration.
This step will allow the oauth-login-site microservice to obtain the right client key necessary for the authorization process.
- Go to
API Key. - Click on the
Add newbutton. - Create a new API Key with the following configuration and click on the
Createbutton.

After that, you have finally completed the configuration of the authentication process.
Save and Deploy
With all the configurations in place, save your changes and then deploy. For further details on the deploy command, consult the Console Handbook.
Create a user using Microfrontend Composer
In order to create your first user you need to create a configuration. To do that:
- Click on
Configurationspage. - Click on
Add newbutton. - Fill the form with the following parameters:
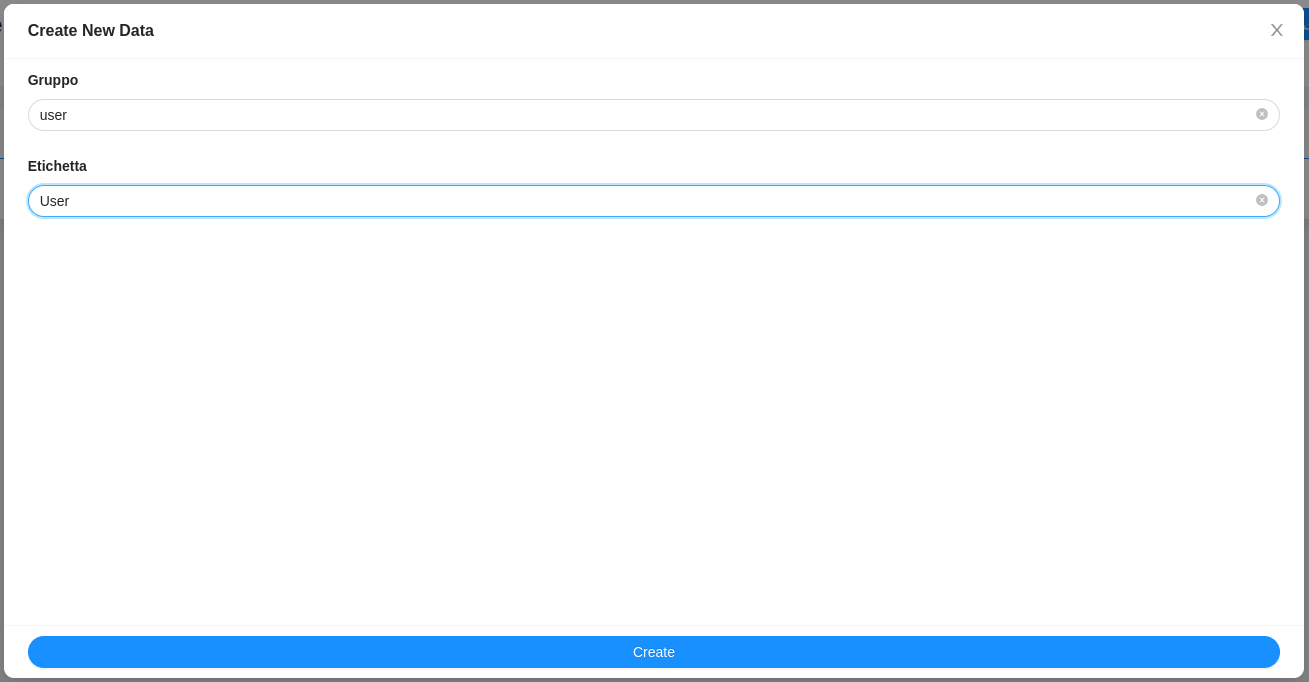
- Click on
Createbutton andConfirmon the warning modal.
Now it's possible to create the first user:
- Click on
Userspage. - Click on
Add newbutton. - Fill the form with the
NameandEmailof your first user and usinguserasGroup. - Click on
Createbutton andConfirmon the warning modal.
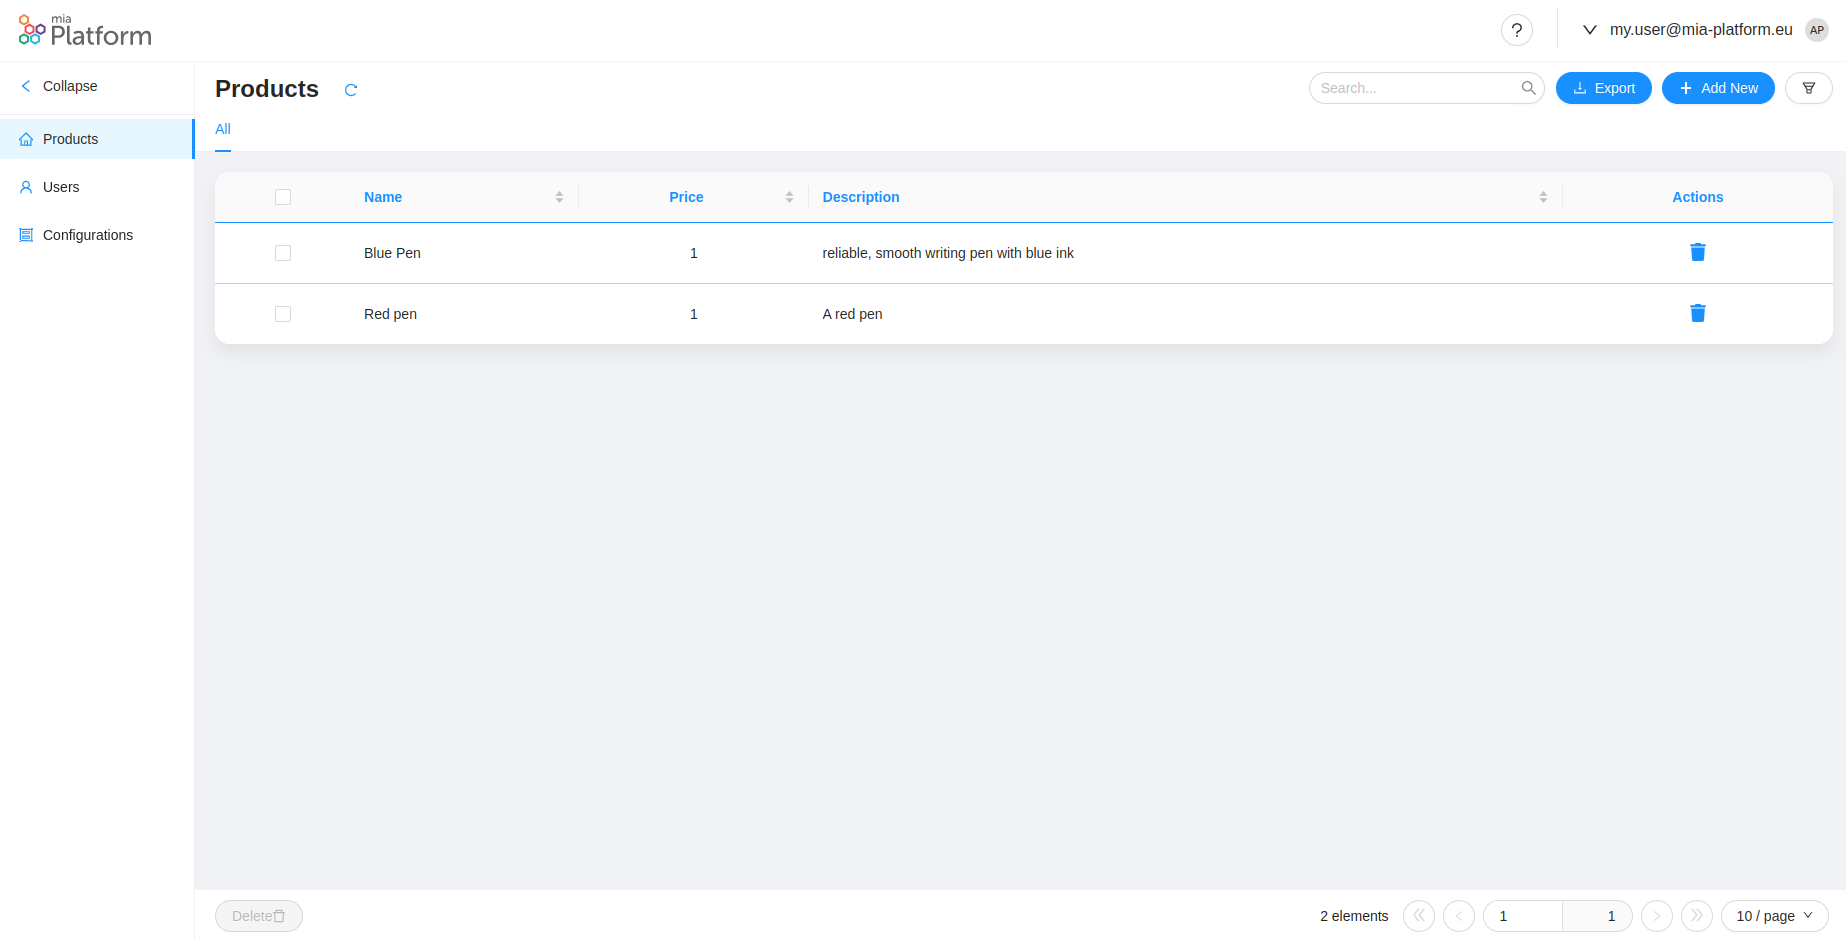
Congratulations! You have successfully created your first user using the microfrontend-composer.
If you try to access the Microfrontend Composer with this new user you won't see the users management pages that are protected with the ACLs created in the previous steps.
Now if you delete the created user it will be blocked on Auth0 and marked as TRASH inside the CRUD collection.
Microfrontend Composer Tutorials
In this tutorial, you've learned how to set up the integration between Microfrontend Composer and Auth0 and to create Auth0 users using the Microfrontend Composer.
Also, make sure to check out:
- The Microfrontend Composer Basics Tutorial where we demonstrate how to create a new Microfrontend Composer and how to create a new Microfrontend Composer Page using the Microfrontend Composer Table Template.
- In the Microfrontend Composer Templates Tutorial, explore how to configure various page types with the Microfrontend Composer Page Composer and an iFrame Page.
- The Microfrontend Composer Microfrontends Tutorial provides guidance on configuring a Microfrontend using Angular or React, and its integration into the Microfrontend Composer.