Fast Data Low Code Tutorial
Fast Data is an event-driven architecture that allows you to collect data, manipulate and aggregate it from your systems in near real-time using a data stream approach.
What We Will Build
In this tutorial, we will create a simple example of a Single View dedicated to a history of orders made by a customer. To do that we will expect to receive data from two different tables: a table that includes a registry of customer data (like the name, address and so on) and a table for a single order (with date, price and the identifier of the customer included in the registry).
We are going also to create the microservices that will store the data received in separate collections (we will call them Projections) and aggregate the Single View.
To do that, in the console, you will:
- Generate two Projections where we will store the data;
- Connect two endpoints to the Projections;
- Create a Single View Low Code that will aggregate the data from the two projections;
- Create an endpoint that will consume the data from the Single View;
- Test the Single View.
Prerequisites
Before starting this tutorial, you need to be familiar with the concepts of:
-
basic knowledge about Fast Data architecture, in particular:
-
familiarity with the concepts of:
-
Kafka (including producers and consumers).
-
MongoDB
For the technical part of this tutorial, you will need both Kafka and MongoDB instances available.
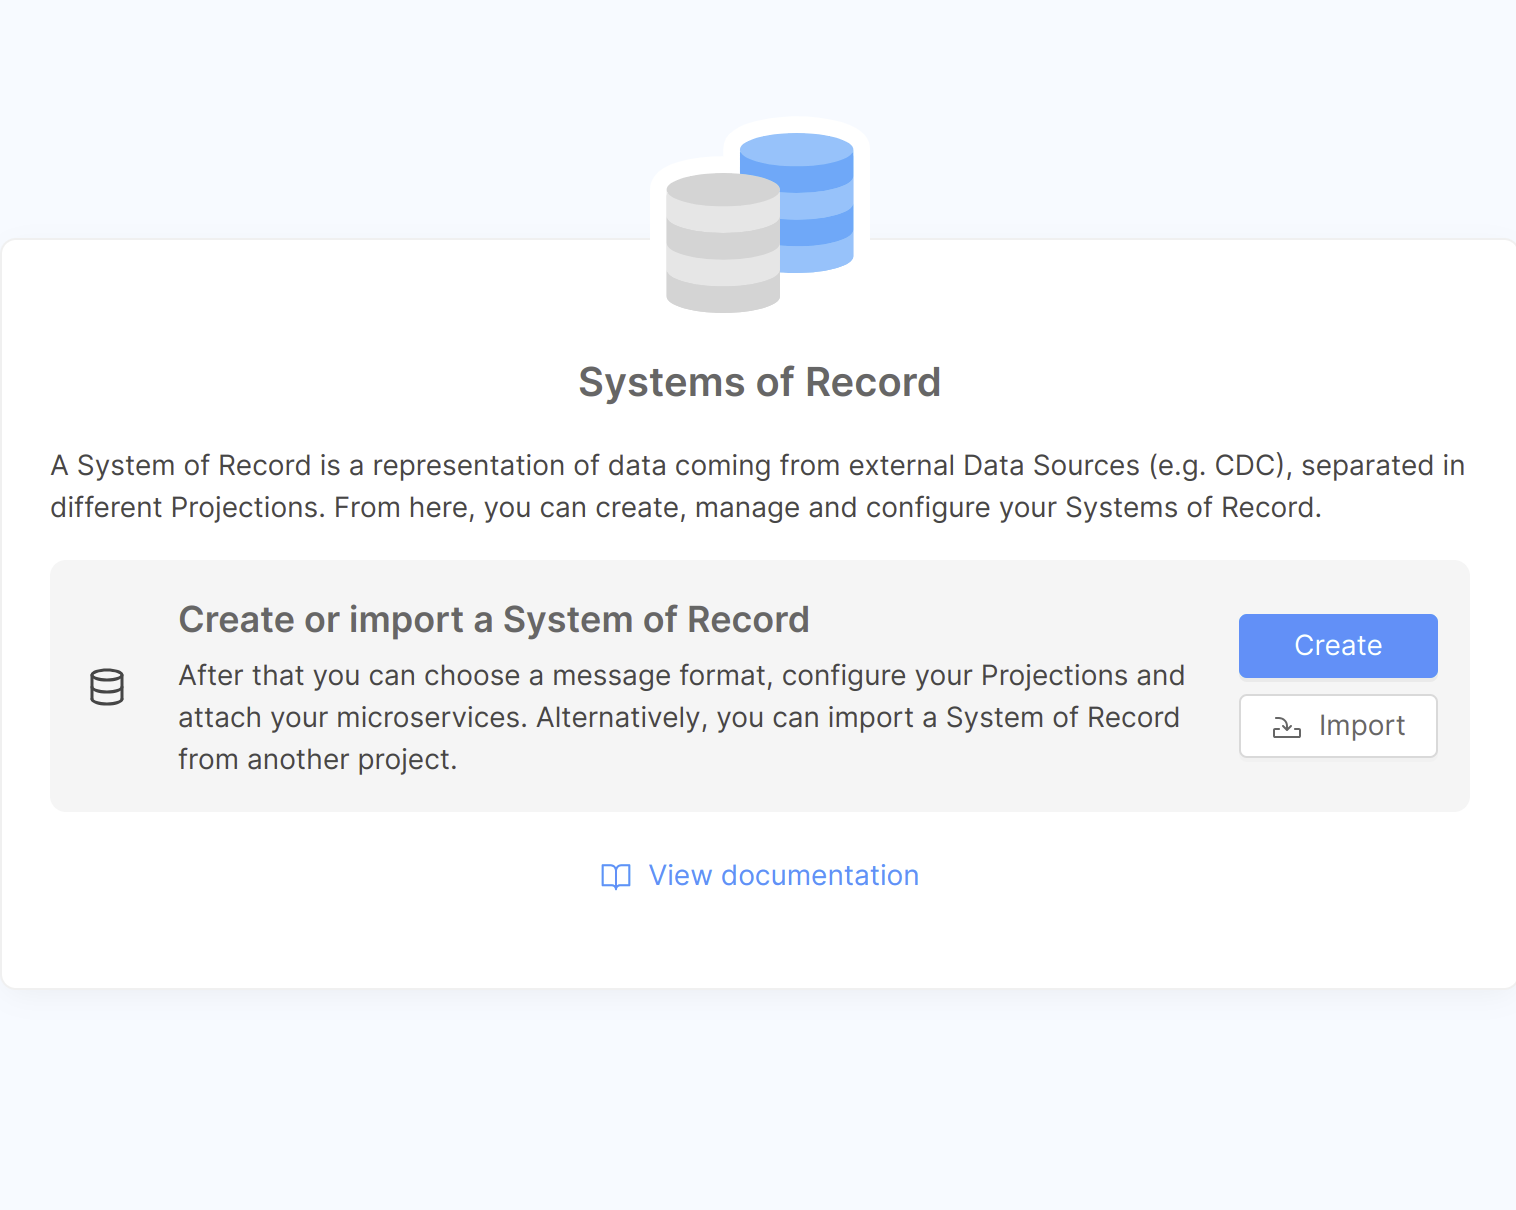
Systems of Record
A System of Record (SoR) is a container of Projections, which are architectural objects responsible for storing the data in a persistent storage, to have a fast and scalable way to decouple the data from the source system. We will use these projections to have a copy of the data from the source systems, and later they will be used to aggregate the data from the source systems, using the Single View Creator.
The architectural component responsible for creating and updating the projection is either the Real-Time Updater or the Projection Storer: we will refer to them as SoR Microservices throughout this tutorial.
Projection Storer is available from v12.0.0 of MIA Console.
This microservice orchestrates a Kafka consumer responsible for fetching data from the source systems and updating the corresponding projections in MongoDB.
In this tutorial, we can imagine a simple delivery platform where the data are the registry and the order of the customers. So, we will create a single System of Record with two projections (one for the registry and one for the order) attached to a single SoR Microservice.
Create the System of Record
Until Console v11.7.0, the Real-Time Updater service was automatically created when a System of Record was created only after saving the configuration.
If you're using a Console version lower than v11.7.0, you can skip the System of Record Microservices section and just configure the required environments variables of the micro-service.
Before starting to create projections, we need to create the System of Record representing the source system we want to connect to.
SoR Creation Steps
- Open the page Projection in the Fast Data section of our left menu;
- Click on the button
Create new Systems of Record:
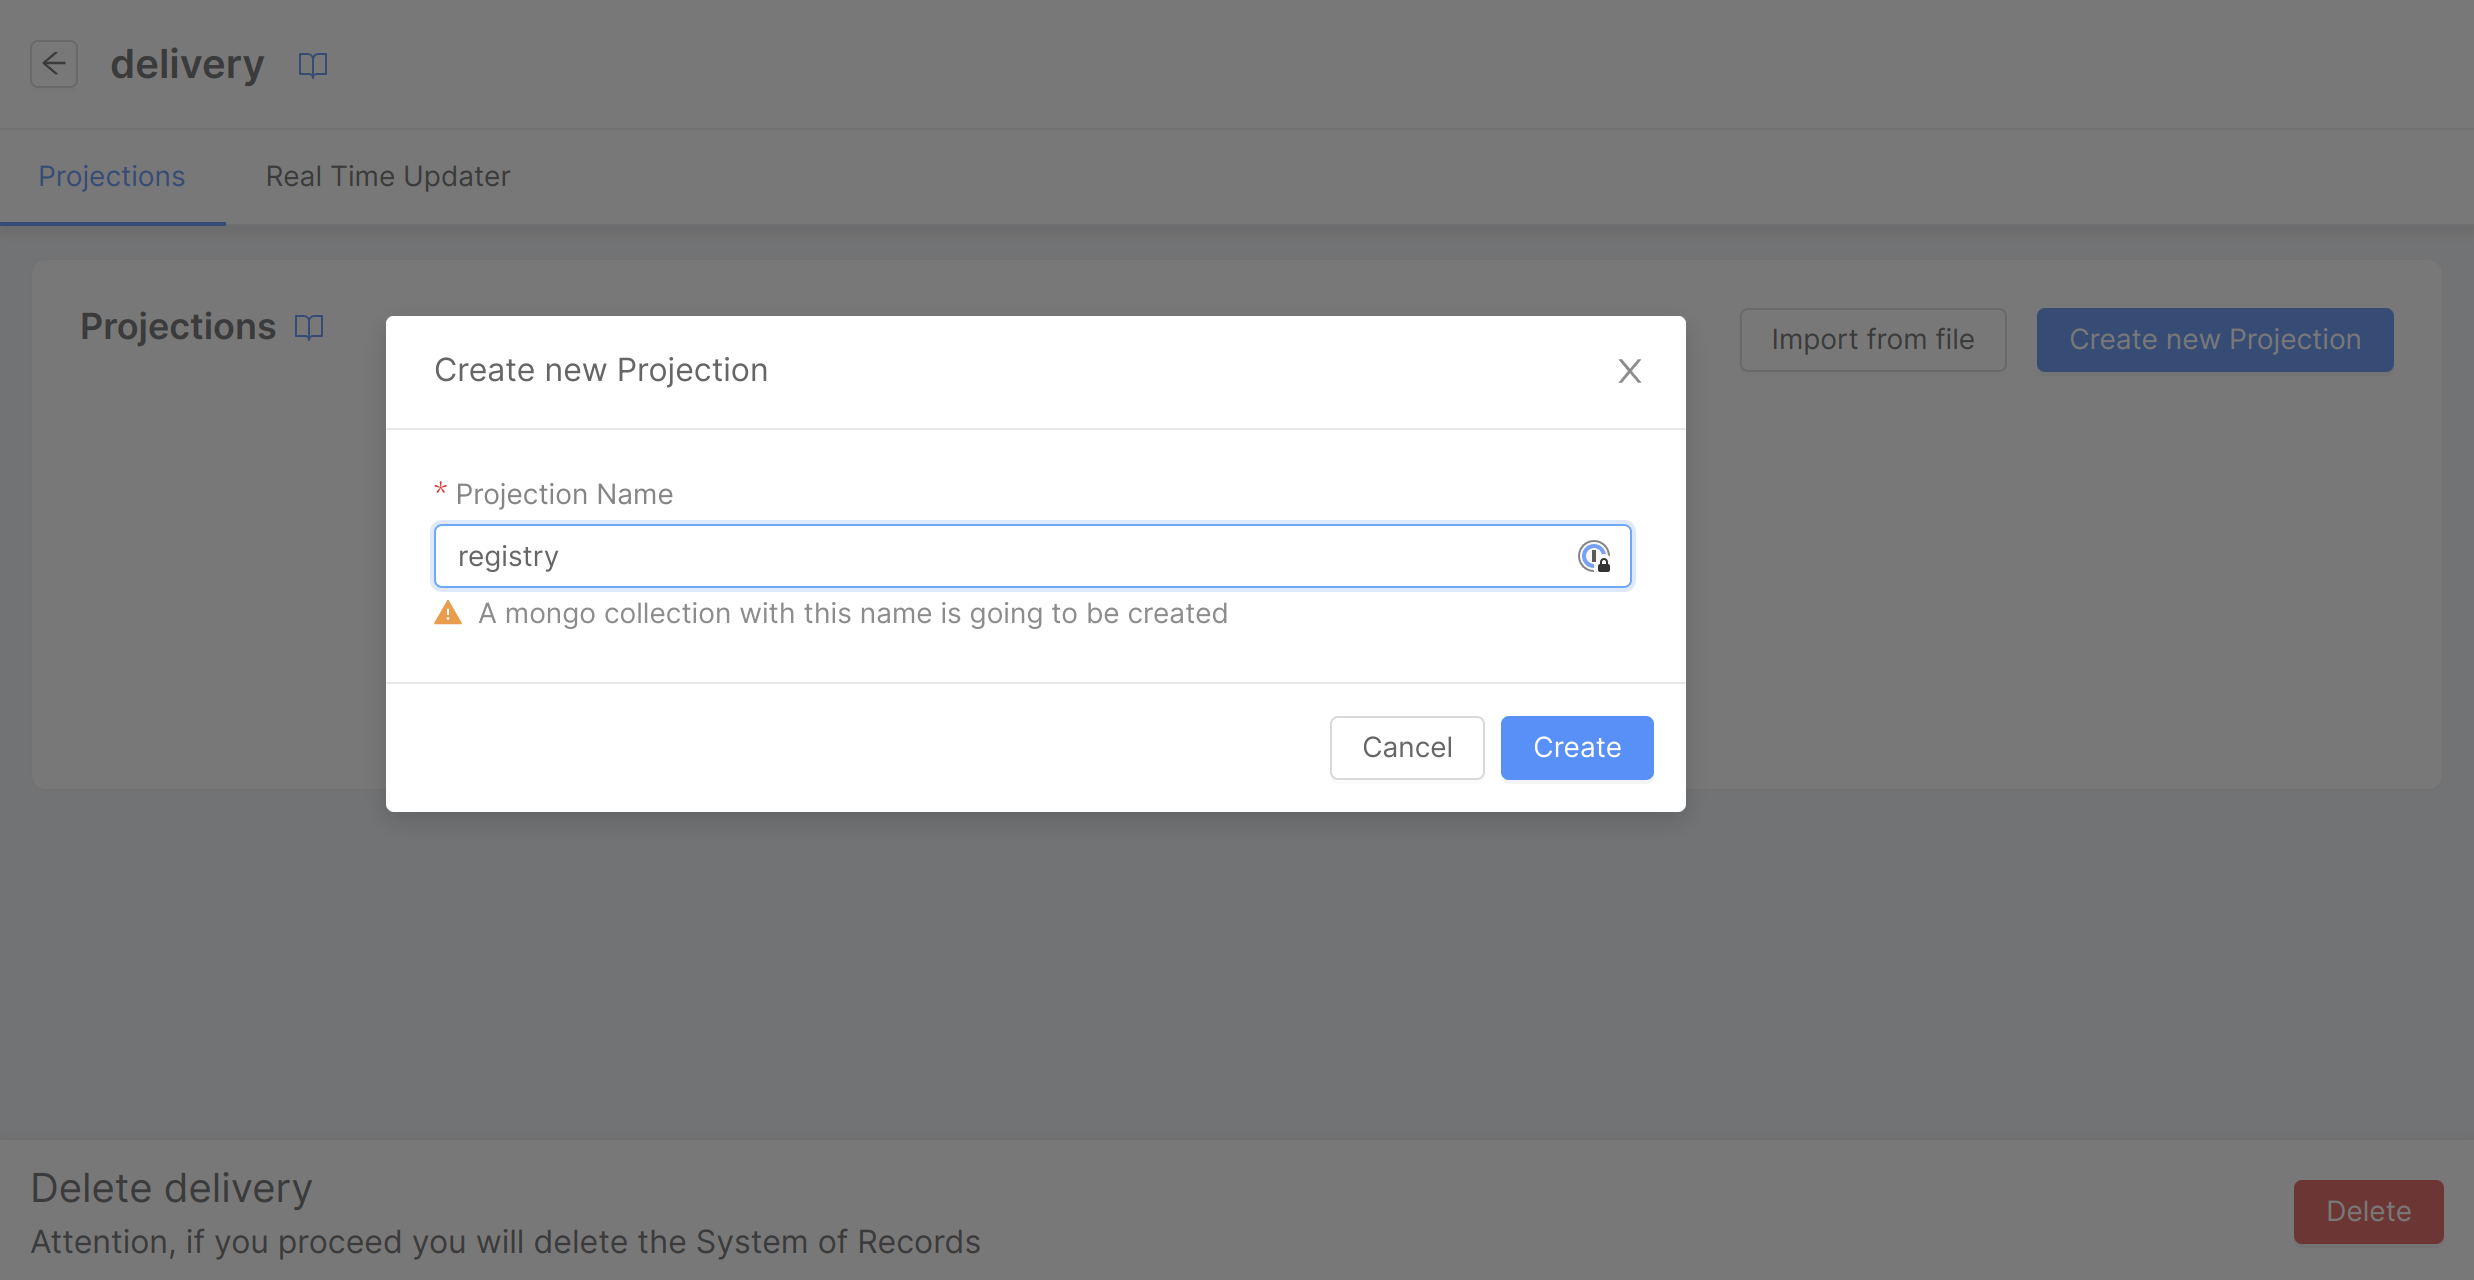
- In the dialog, choose the name (which will act as an identifier of the System of Record, we will call it
delivery) and the Kafka message format (in this case, we will useDebezium) and then click onCreate:
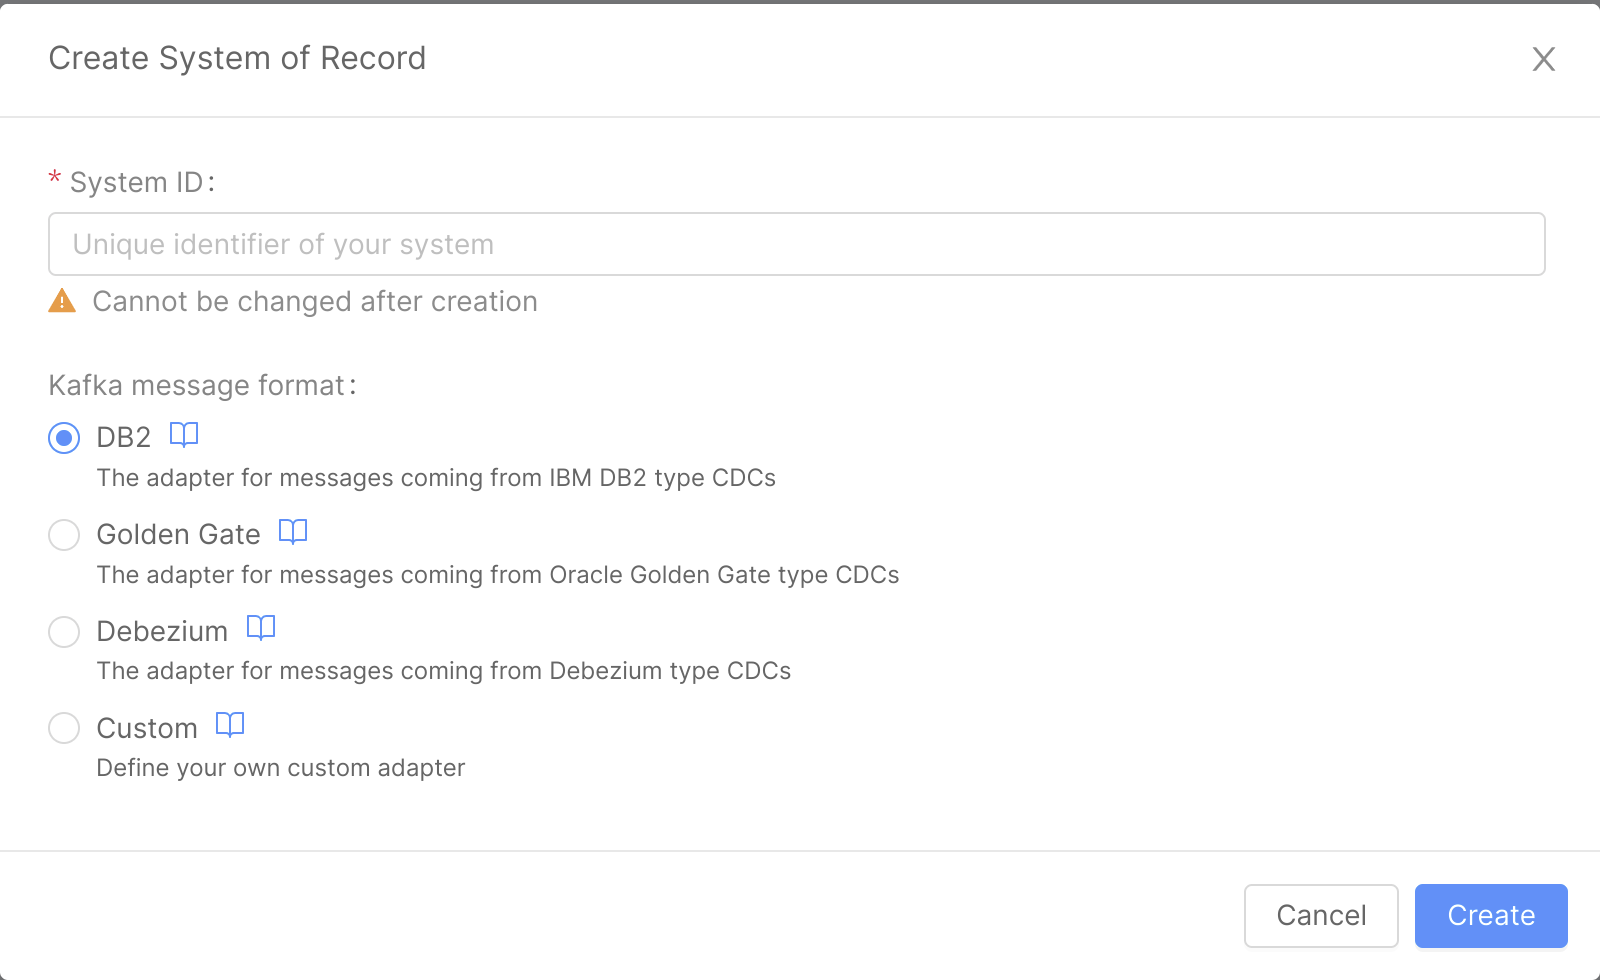
- Now we can either start define the projections or attach SoR microservices inside this System of Record:
System of Record Microservice
Once a system of record has been created, you'll need at least one SoR microservice where projections will be assigned.
You can choose between two microservices: the Real-Time Updater or the Projection Storer.
Although the two services have several differences, that we will see later during strategy handling, they have one shared feature: they read ingestion messages from Kafka topics to store them into the projections on MongoDB.
Projection Storer Setup
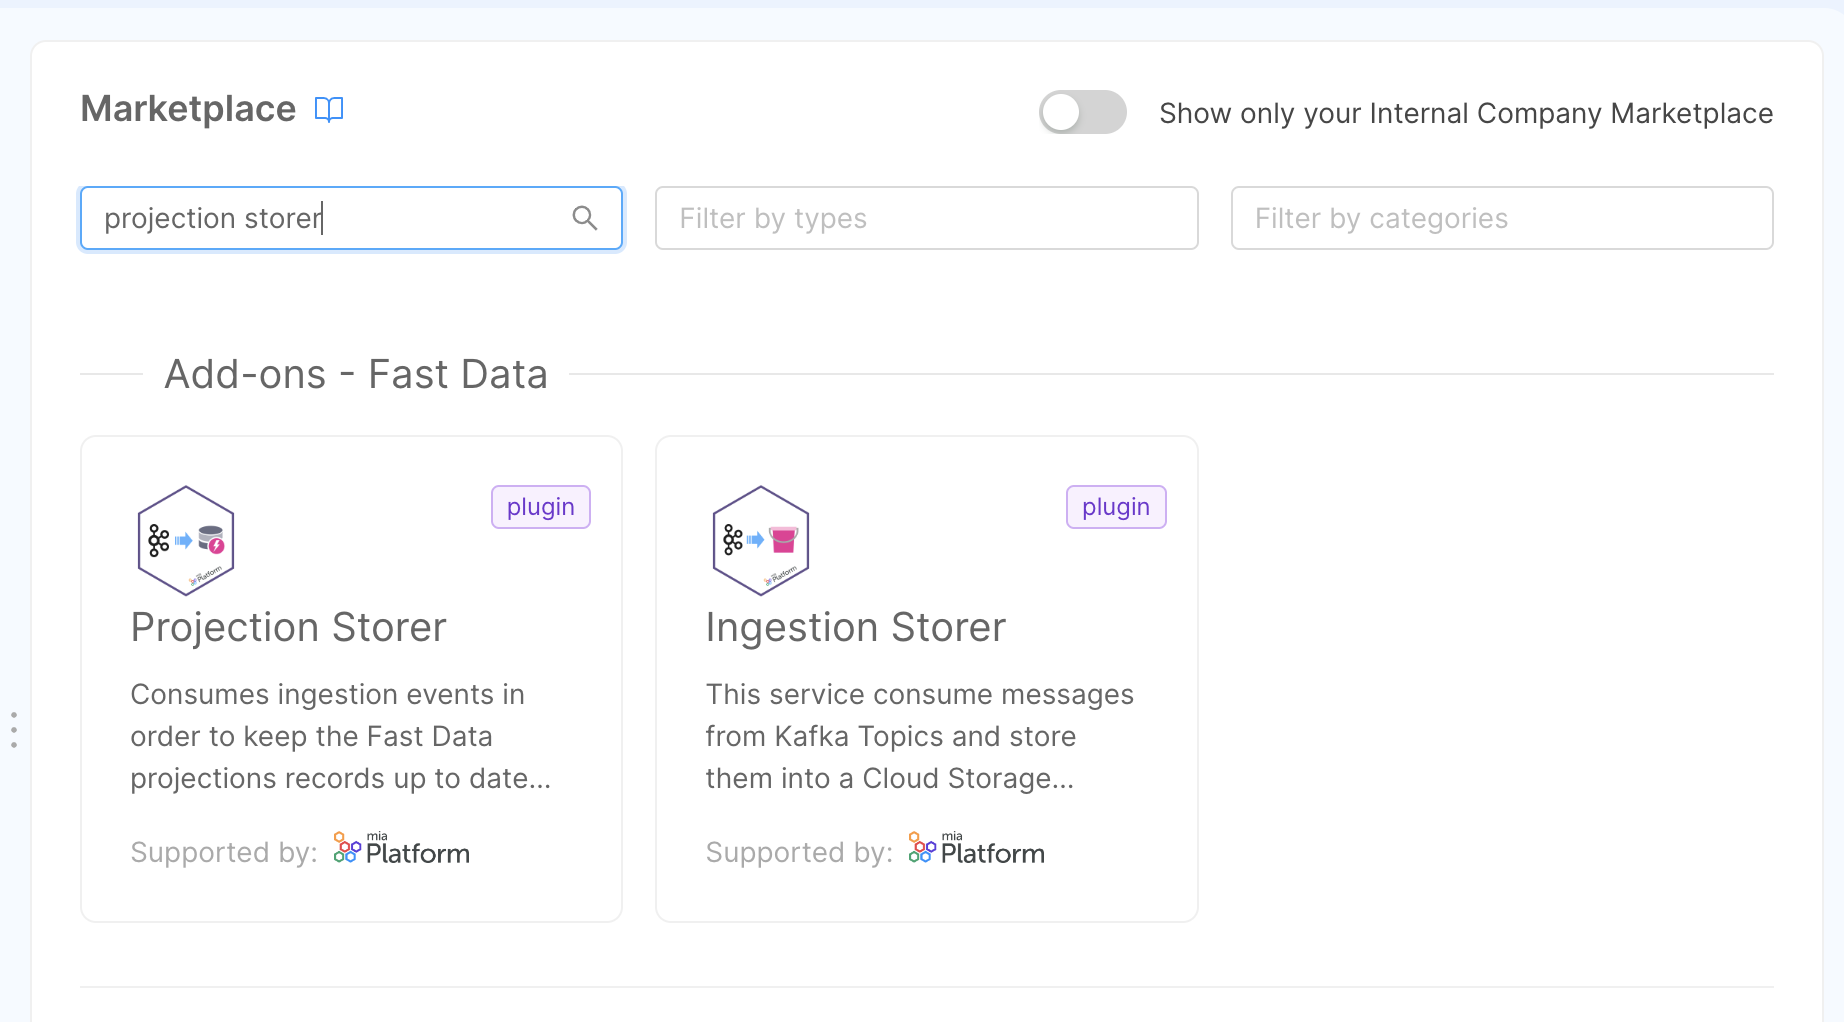
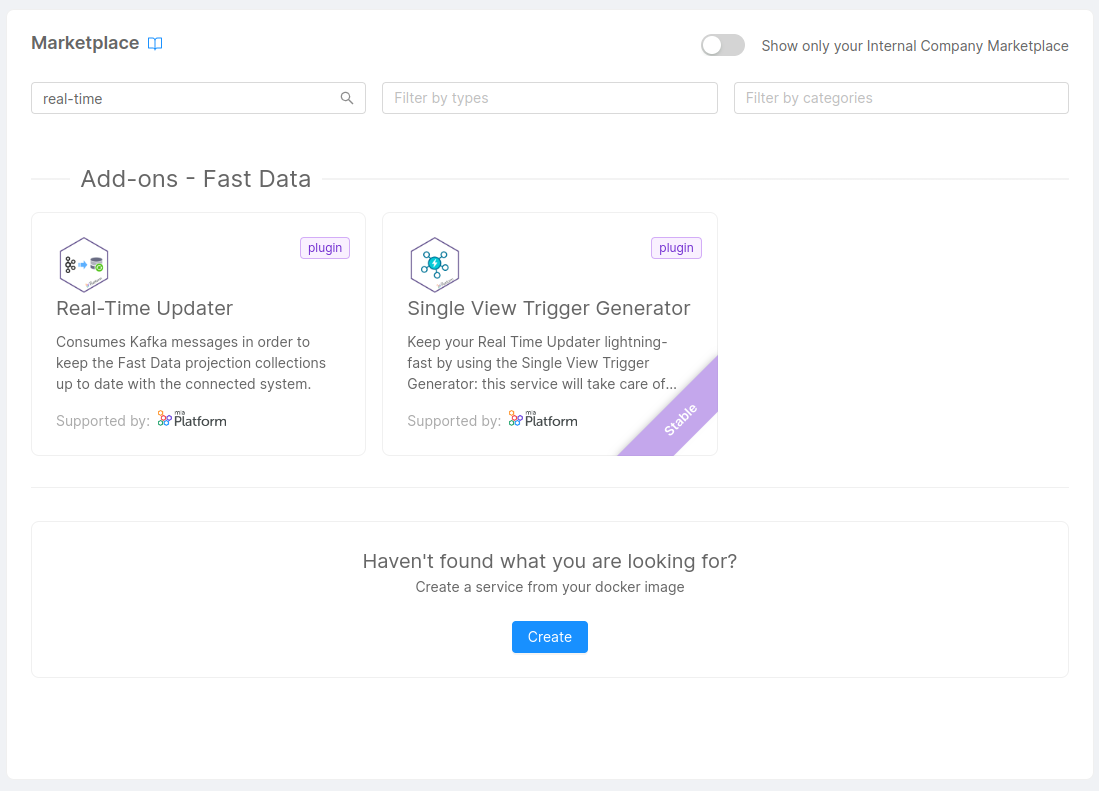
The first step is to create the microservice Projection Storer, that will be attached to the System of Record we created before. To do so, we move to the Microservices section of the Console. From here we can click on the "Create a Microservice" button on the top-left corner to open the Marketplace and select our microservice.
We can find it under the name of Projection Storer.
After selecting the Projection Storer service, you just need to choose a unique name (we suggest delivery-projection-storer) and, eventually the description. Once clicked on the Create button, the service
will be created and we will be redirected to the service page.
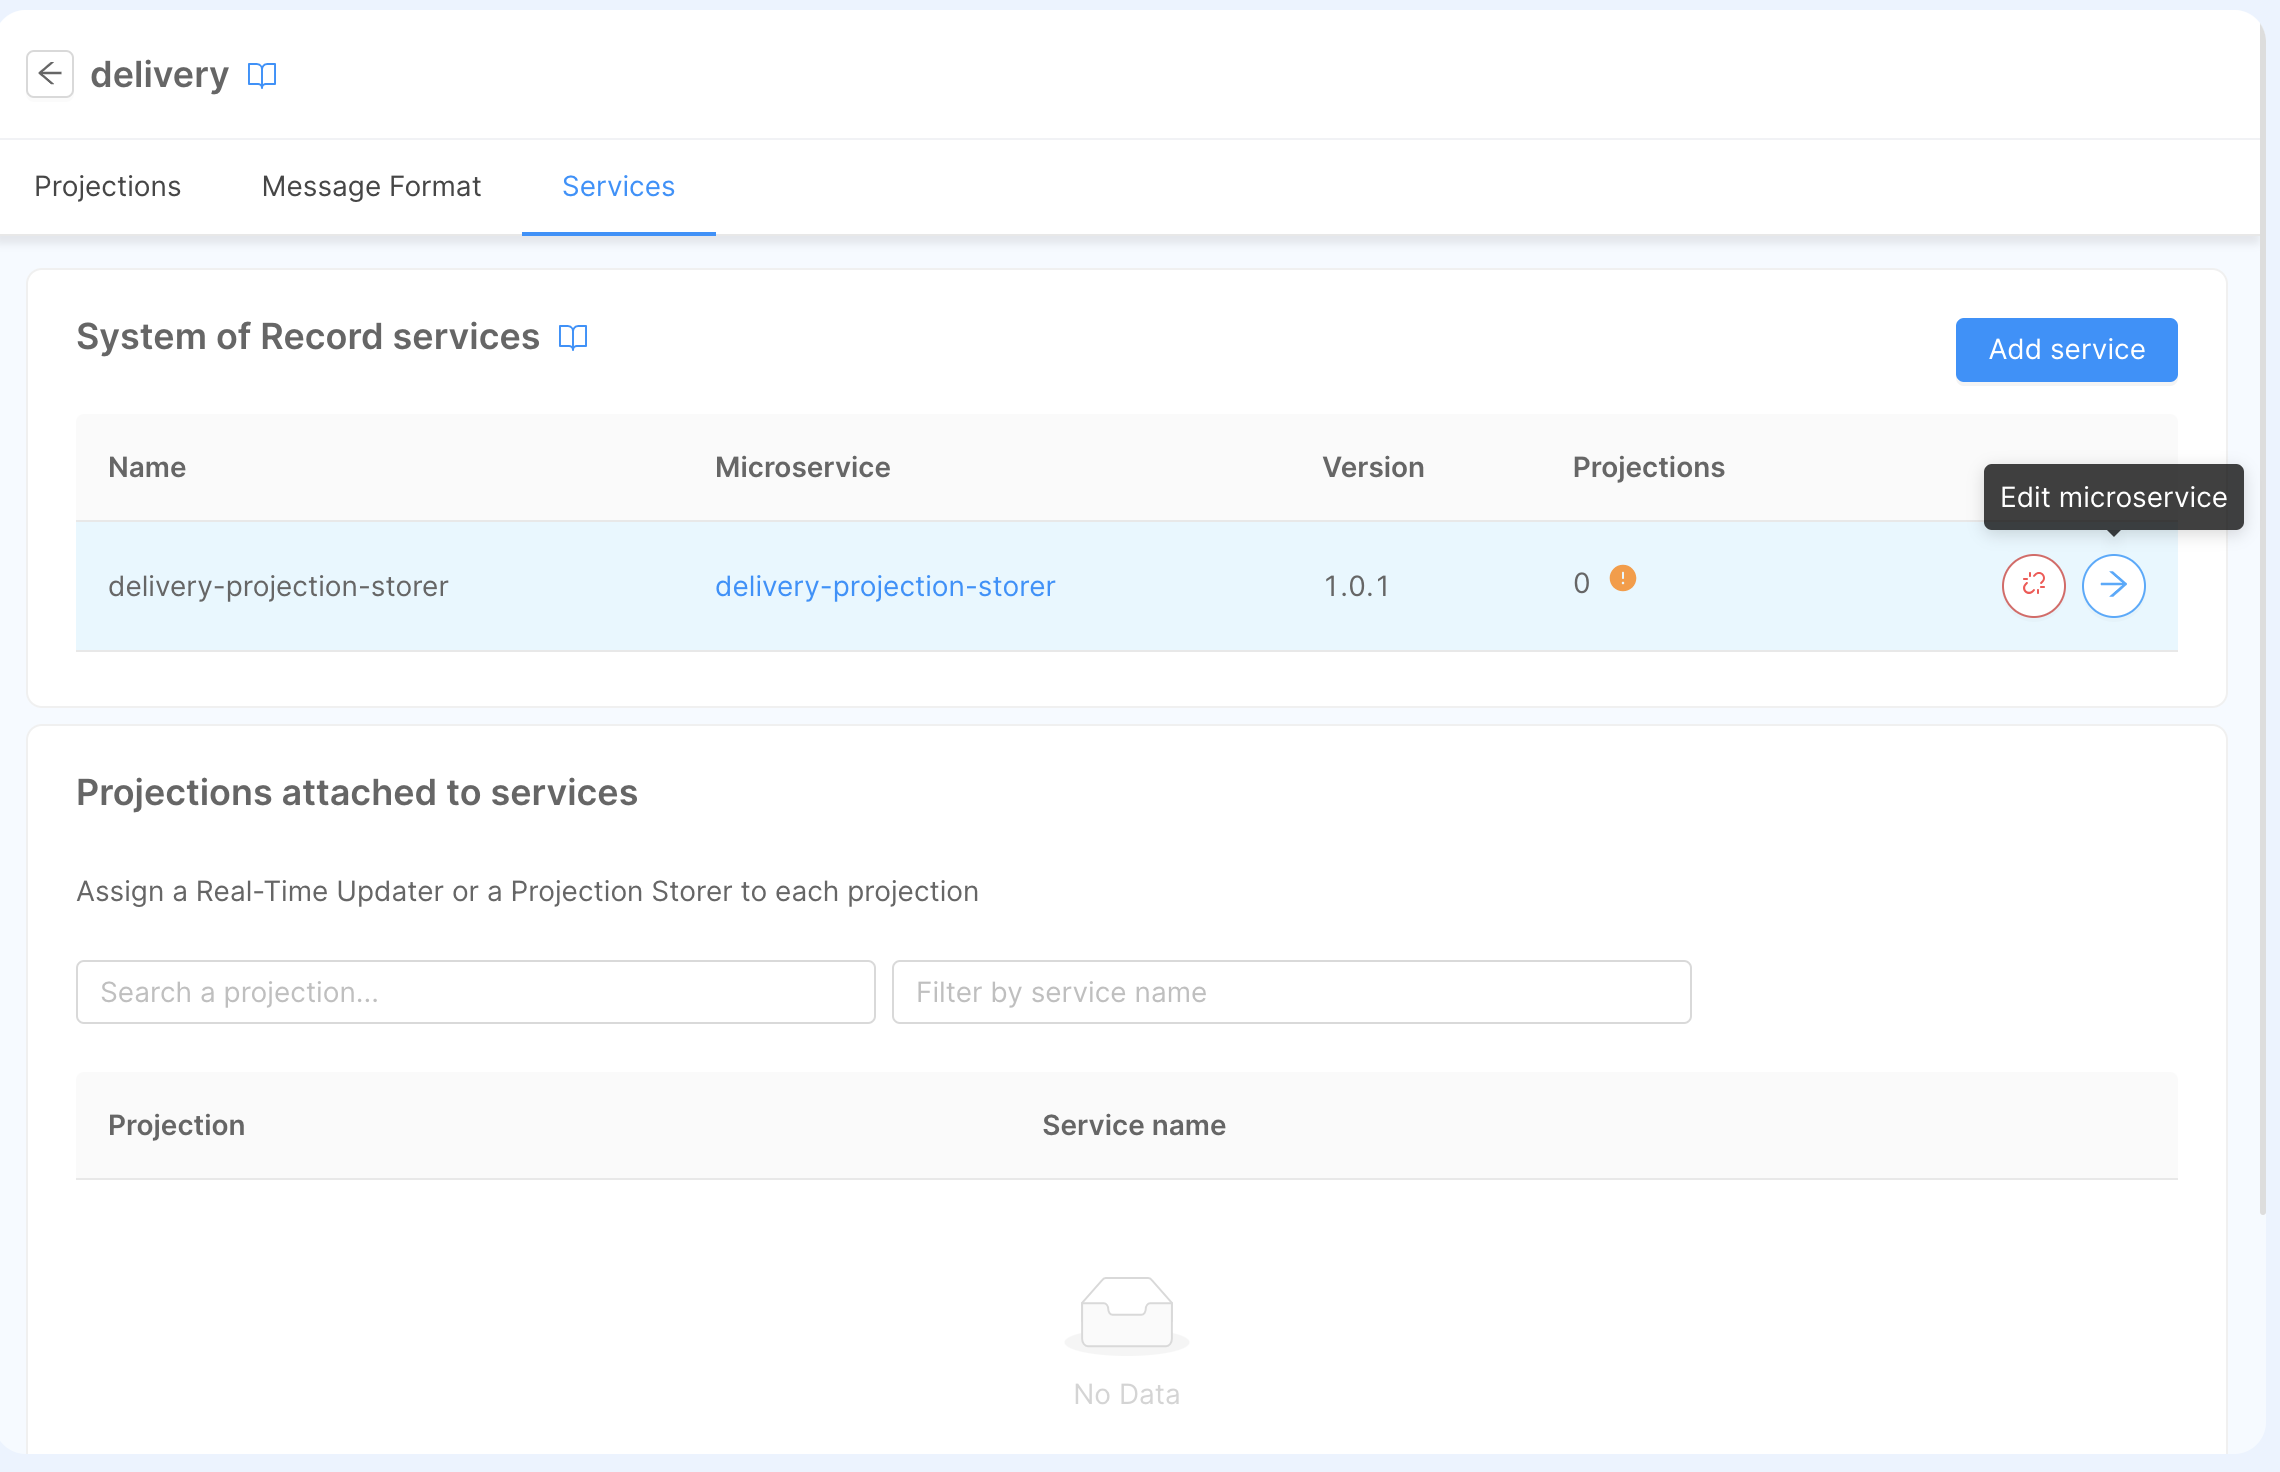
Then, move to the delivery SoR and, in the Services section, attach the newly created service.
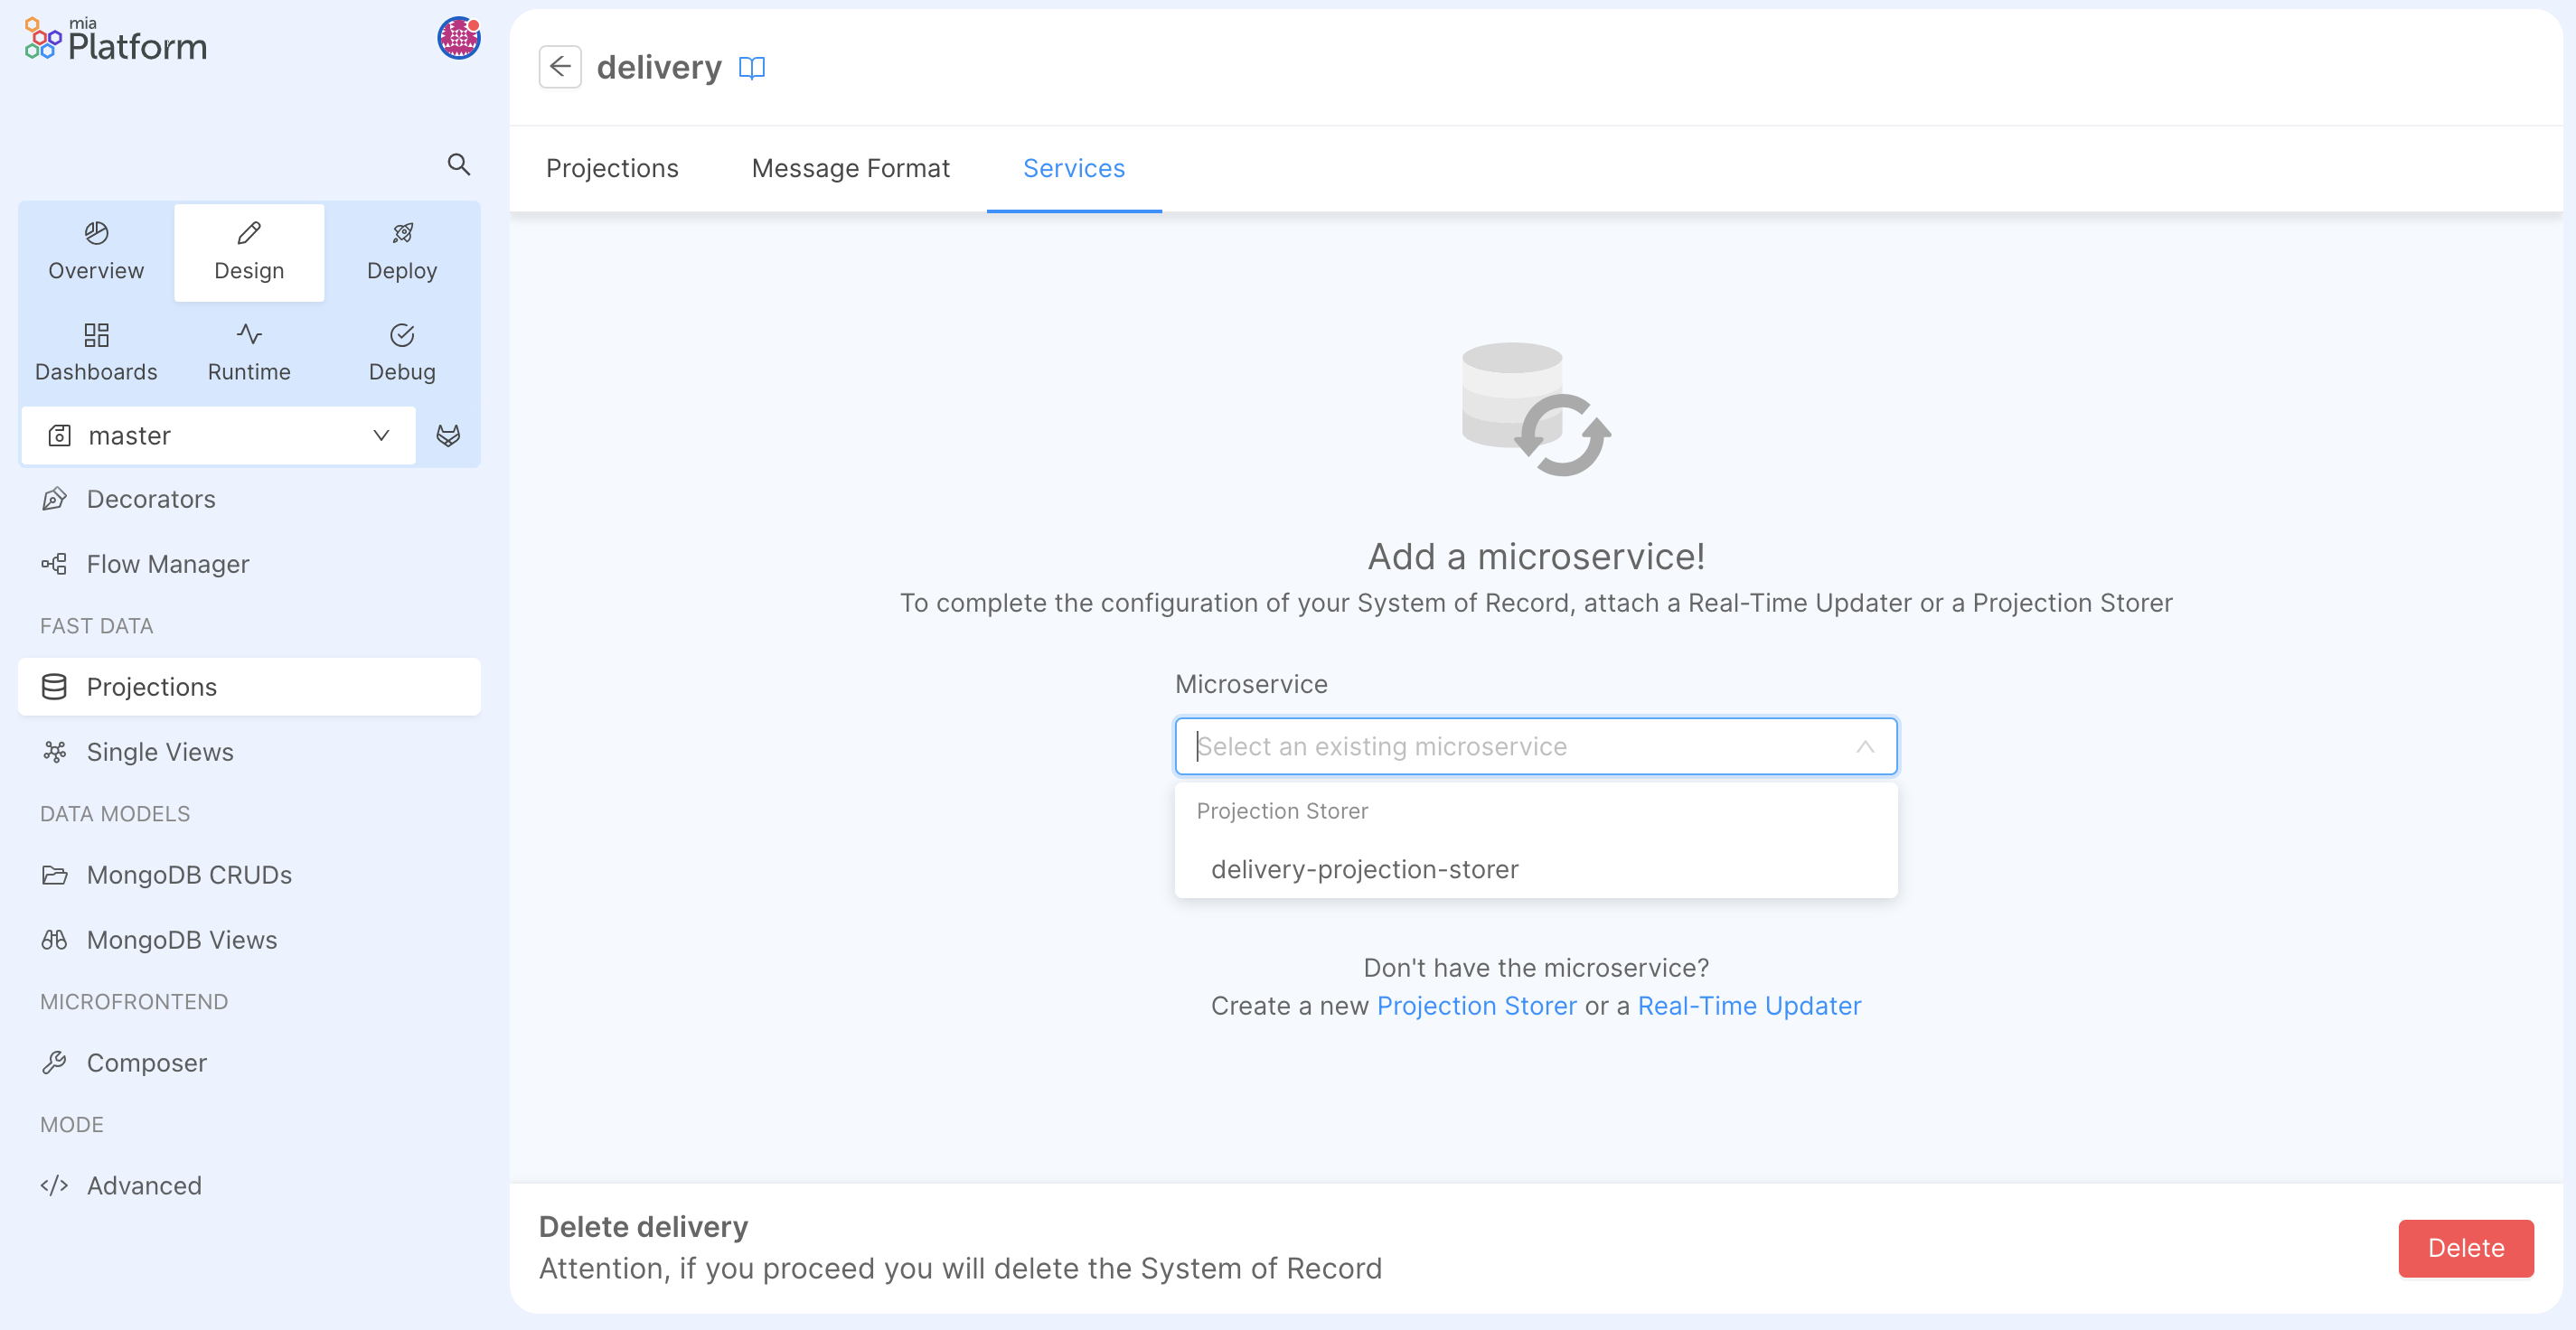
Once the service has been attached, you can click on the right arrow of the micro-service and edit its configuration.
In this section, you can setup the following configurations:
- Kafka Consumer, which will be used to read ingestion-messages,
- Kafka Producer, which will be used to generate pr-update messages,
- Storage Configuration, which will contain the MongoDB connection where the database is located.
Real-Time Updater Setup
If you're using a console version older than v11.7.0, you can skip this paragraph since the service is automatically created when saving the configuration after creating the System of Record.
The first step is to create the microservice Real-Time Updater, that will be attached to the System of Record we will create. To do so, we move to the Microservices section of the Console. From here we can click on the
Create a Microservice button on the top-left corner to open the Marketplace and find the microservice under the name of Real-Time Updater.
After selecting the Real-Time Updater service, the only thing you need to choose is a unique name (we suggest fast-data-delivery-realtime-updater) and, eventually the description. Once clicked on the "Create" button, the service
will be created and we will be redirected to the service page. Now we need to configure all the parameters of the microservice. Here is an example of the fields that we need to configure:
PROJECTIONS_DATABASE_NAME: the name of the database that will be used to store the data of the ProjectionsPROJECTIONS_CHANGES_COLLECTION_NAME: the name of the collection that will be used to store the changes of the Projections; (we suggestfd-pc-delivery)KAFKA_BROKERS: the list of the kafka brokers that will be used to send the data to the Projections;KAFKA_GROUP_ID: the group id that will be used to consume the data from the source systems; (we suggestdemo.development.delivery.real-time-updater)KAFKA_SASL_USERNAME: the username that will be used to login to the kafka brokers;KAFKA_SASL_PASSWORD: the password that will be used to login to the kafka brokers;KAFKA_SASL_MECHANISM: the mechanism that will be used to login to the kafka brokers.
The Real-Time Updater includes more optional parameters that might be included via Environment Variables. If you need to know more about them, you can read the documentation of the Real-Time Updater.
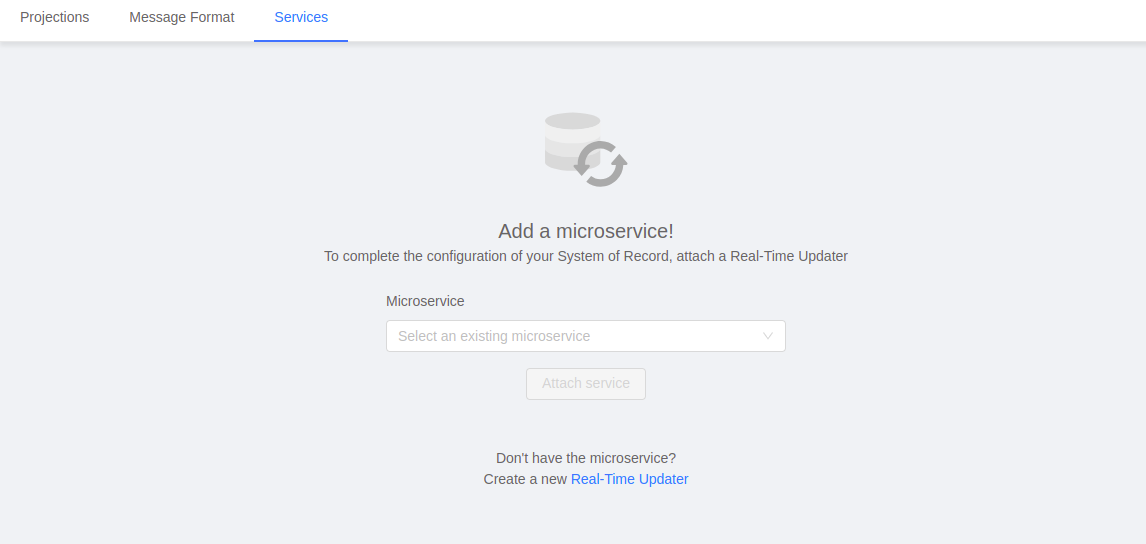
The last step to finish the configuration is to attach the Real-Time Updater to the System of Record we originally created. To do so, move to the Services tab of the Projection page where a placeholder will inform you that no services have been attached yet and suggest you to select one from the list of compatible services, chose the Real-Time Updater you created before and save the configurations.
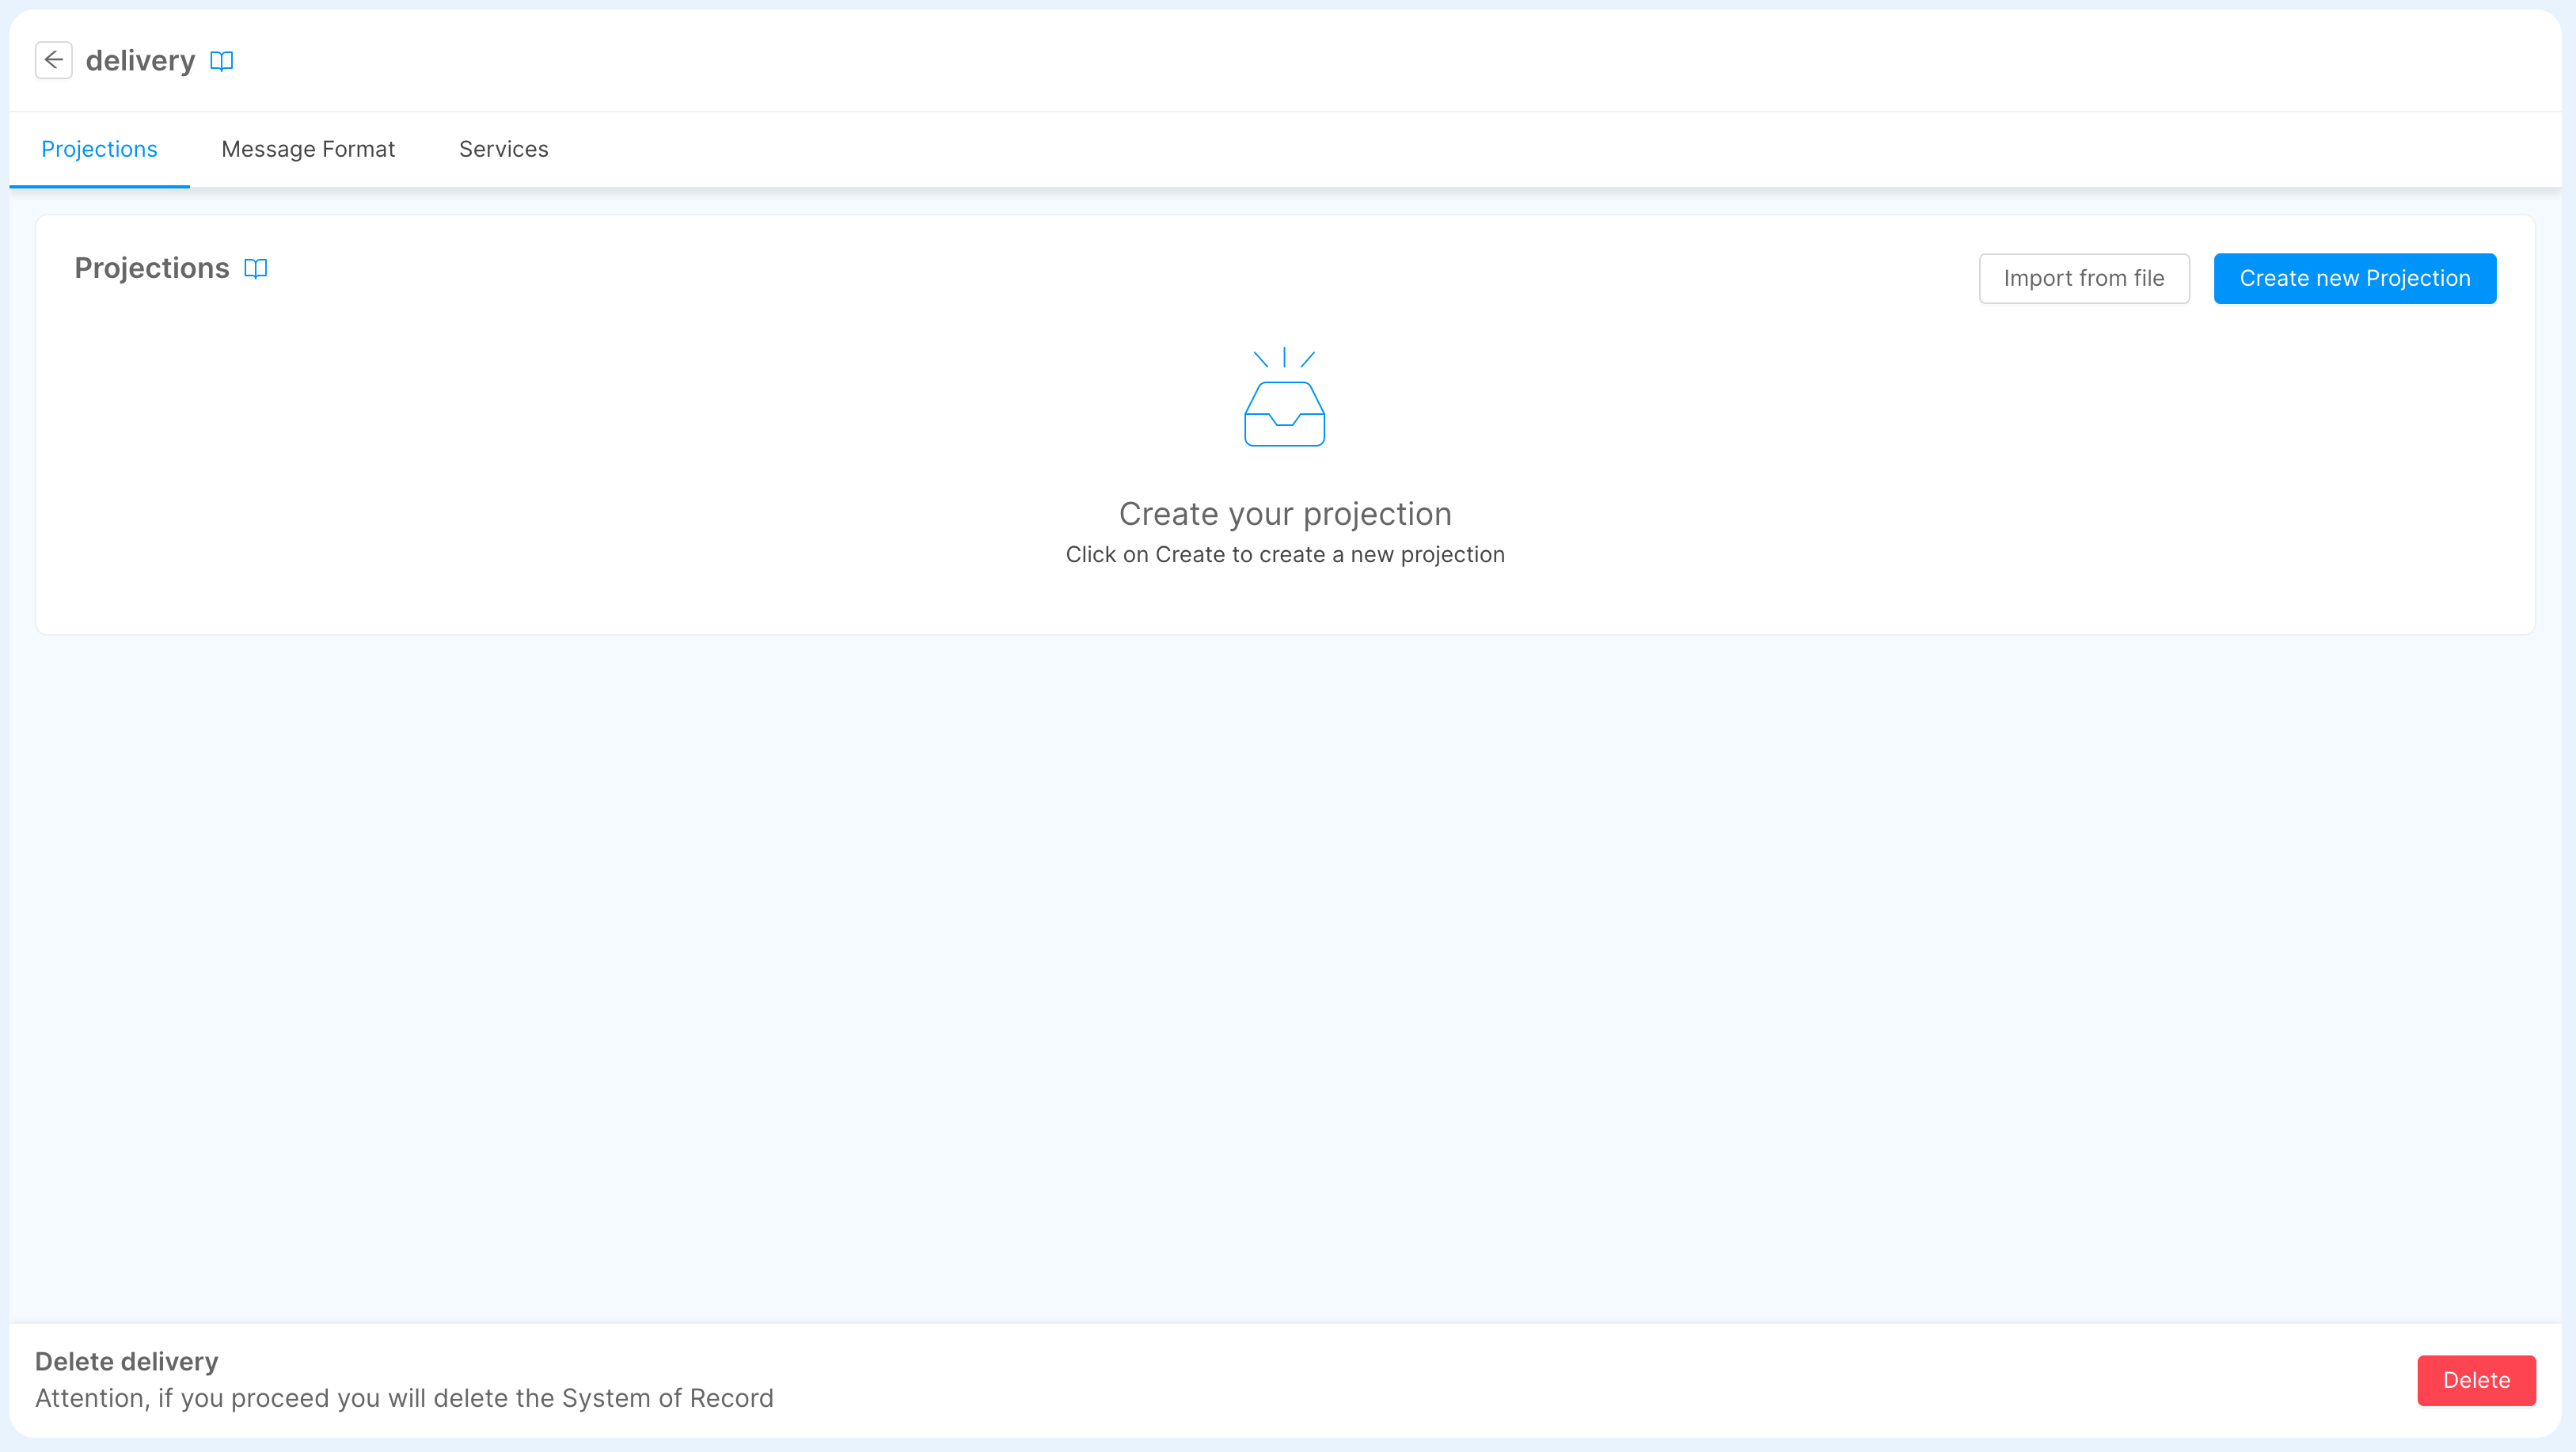
Projections
To start define new Projections, inside a System of Record page, we need to click on the Create new Projection button. Doing so a modal will be opened, allowing the user to choose the Projection name. Click on the Create button to create the Projection.
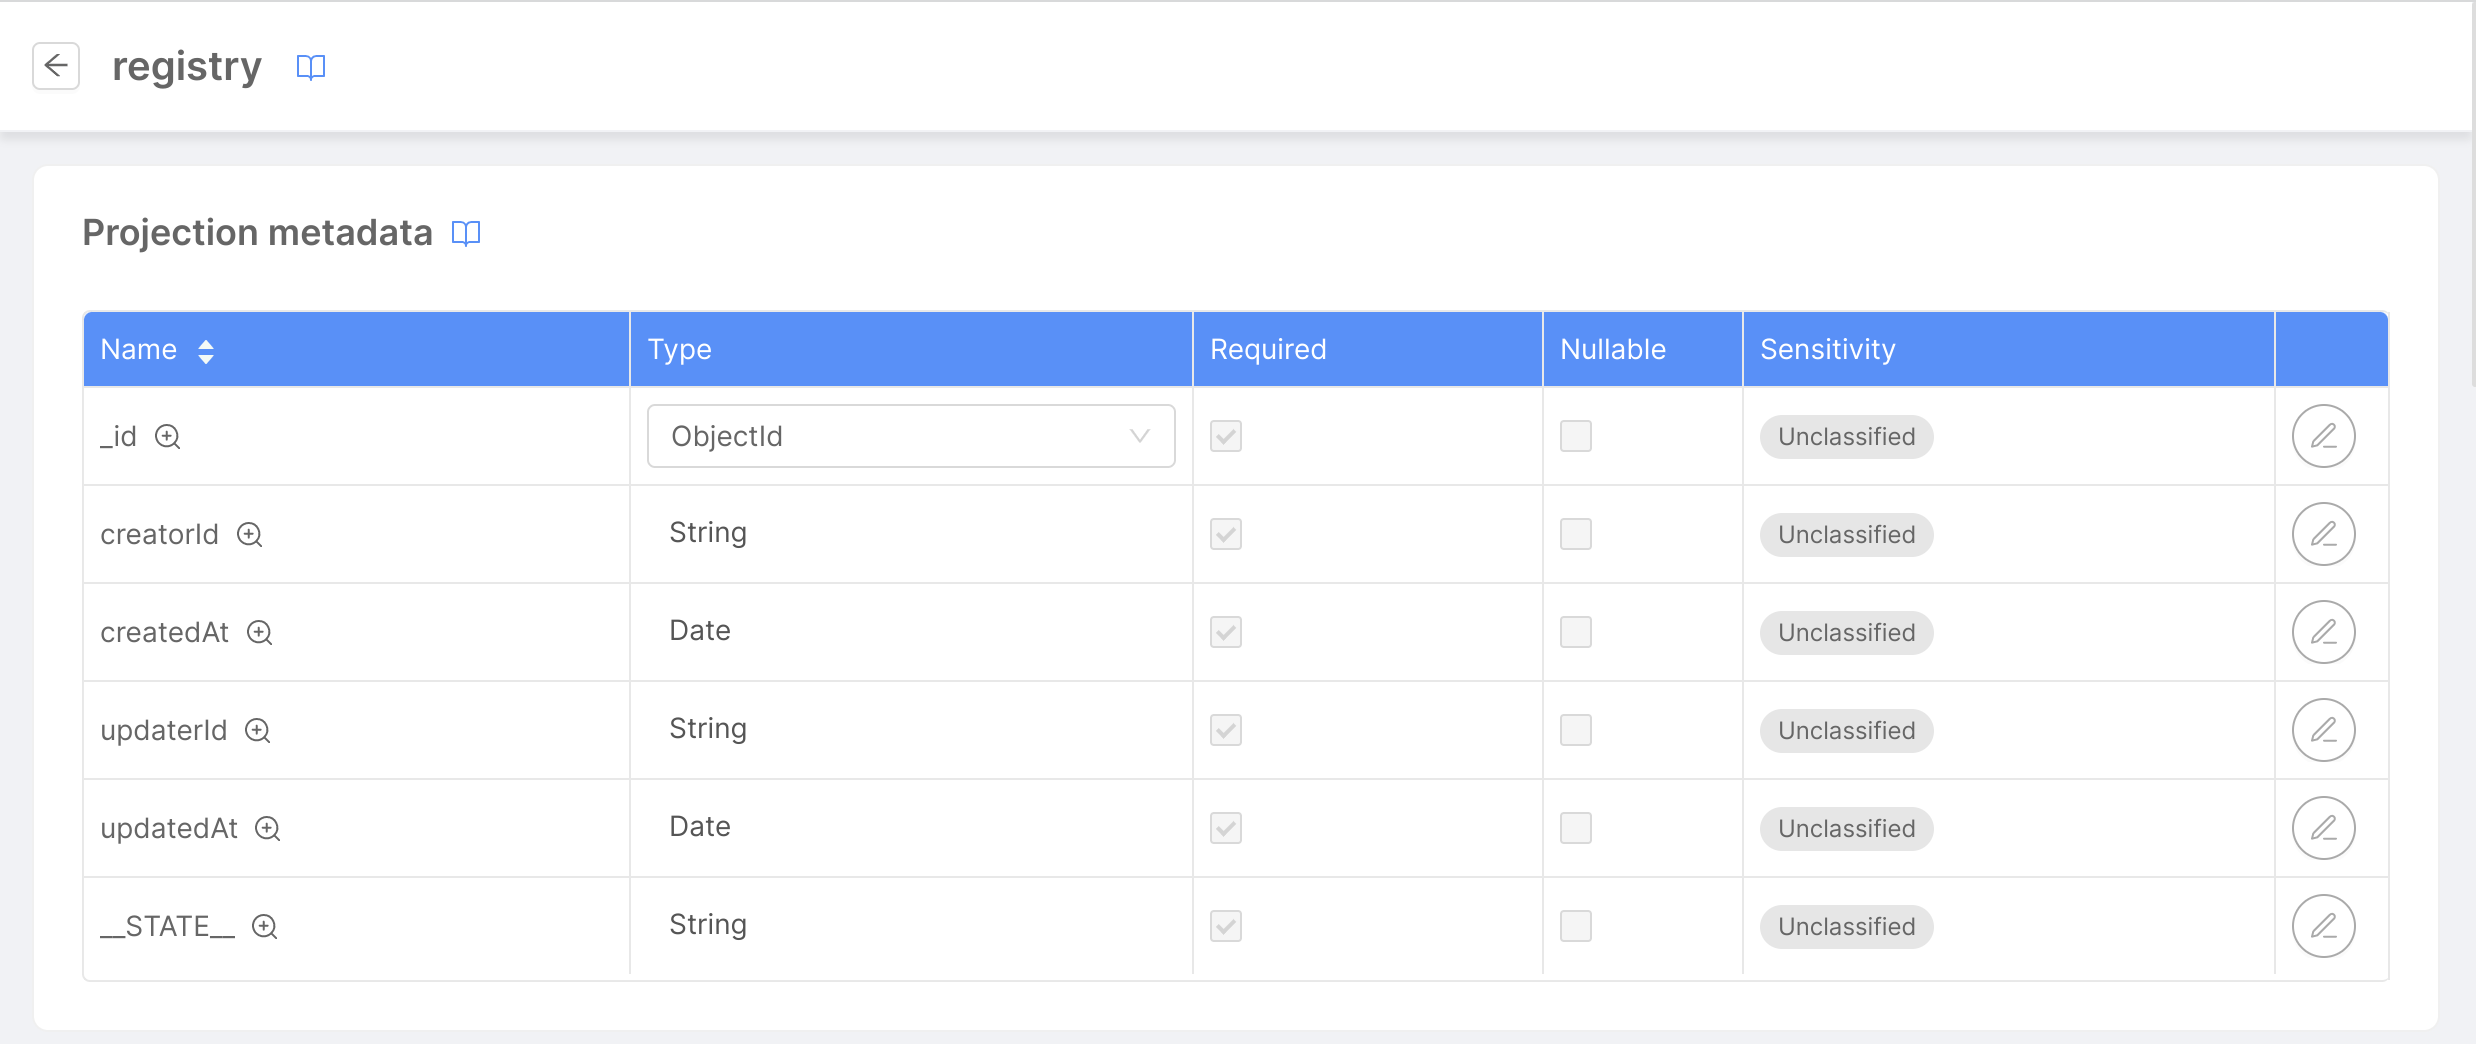
Once the projection is created, you will be automatically redirected to its dedicated page, where we can see the default CRUD data schema already configured.
For this tutorial, we will create two projections:
registry: will store data about the user;orders: will store the data of the user's orders.
For each of them, we have to consider the following aspects.
Fields
Now we need to define the fields that we want to store in the Projection. You can do that by clicking the Add field button located at the top-right of the Fields card.
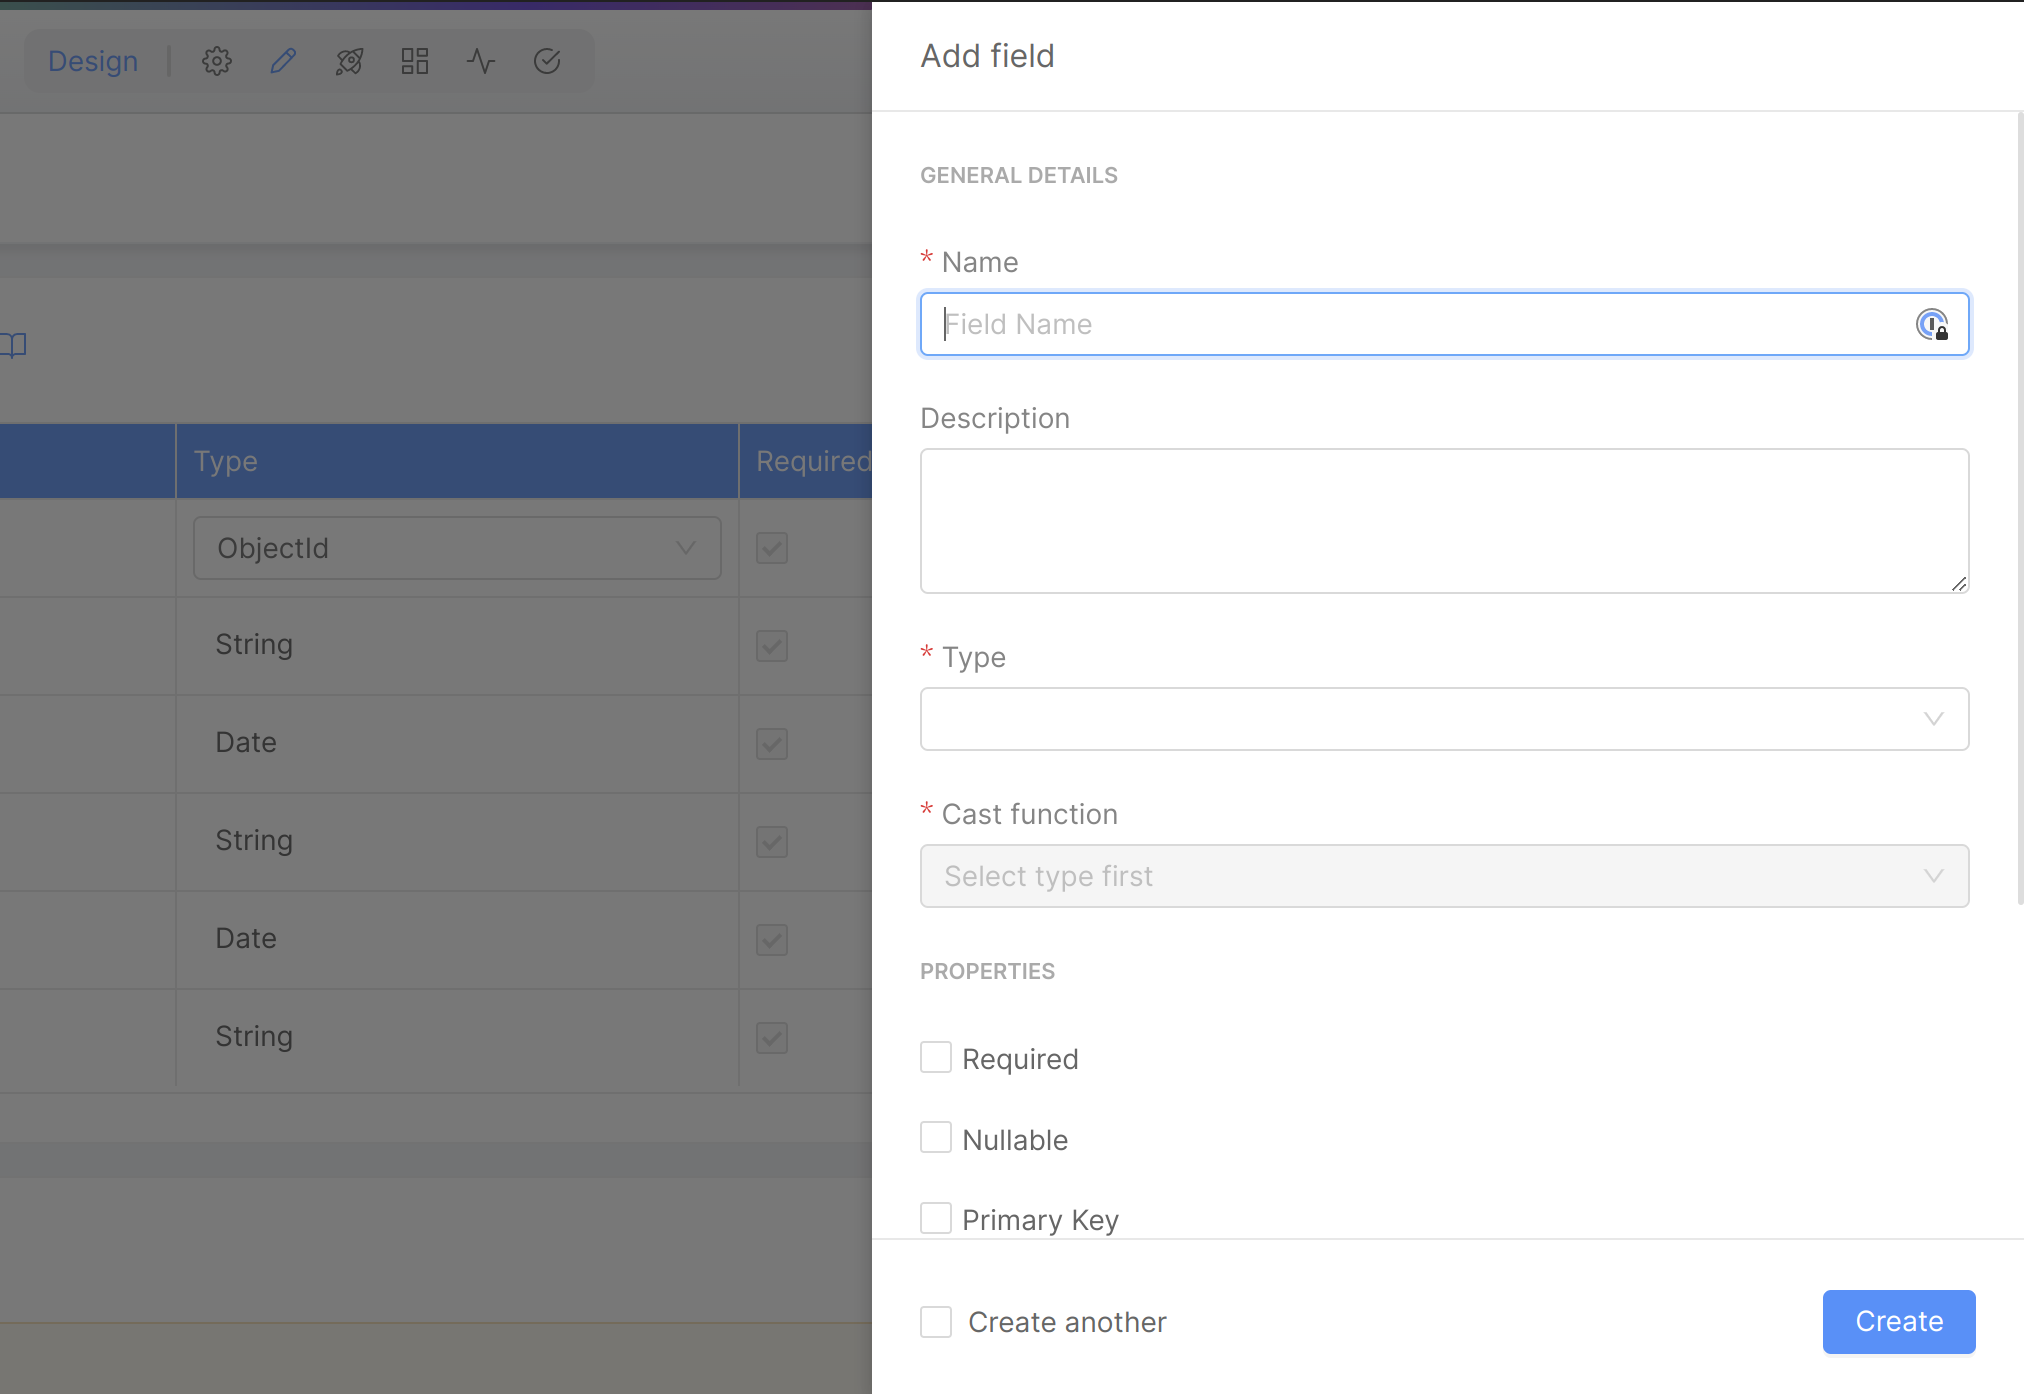
It is mandatory to define at least one custom field. Also, you must define at least one field as Primary Key (select the related checkbox).
Here's the specification for both registry and orders projections.
Registry Fields
| Field | Type | Cast Functions | Required | Primary Key | Description |
|---|---|---|---|---|---|
registry_id | String | defaultIdentity | ✓ | ✓ | The registry ID. |
name | String | defaultIdentity | - | - | The name of the customer to whom the registry refers. |
email | String | defaultIdentity | - | - | The email of the customer to whom the registry refers. |
phone | String | defaultIdentity | - | - | The phone of the customer to whom the registry refers. |
address | String | defaultIdentity | - | - | The address of the customer to whom the registry refers. |
city | String | defaultIdentity | - | - | The city of the customer to whom the registry refers. |
state | String | defaultIdentity | - | - | The State of the customer to whom the registry refers. |
Orders Fields
| Field | Type | Cast Function | Required | Primary Key | Description |
|---|---|---|---|---|---|
order_id | String | defaultIdentity | ✓ | ✓ | The order ID. Check this field as "Required" and "Primary Key". |
name | String | defaultIdentity | - | - | The name of the product. |
price | Number | defaultIdentity | - | - | The price of the product. |
date | Date | defaultCastToDate | - | - | The date when the order was placed. |
registry_id | String | defaultIdentity | - | - | The registry ID of the customer who placed the order. |
Topics
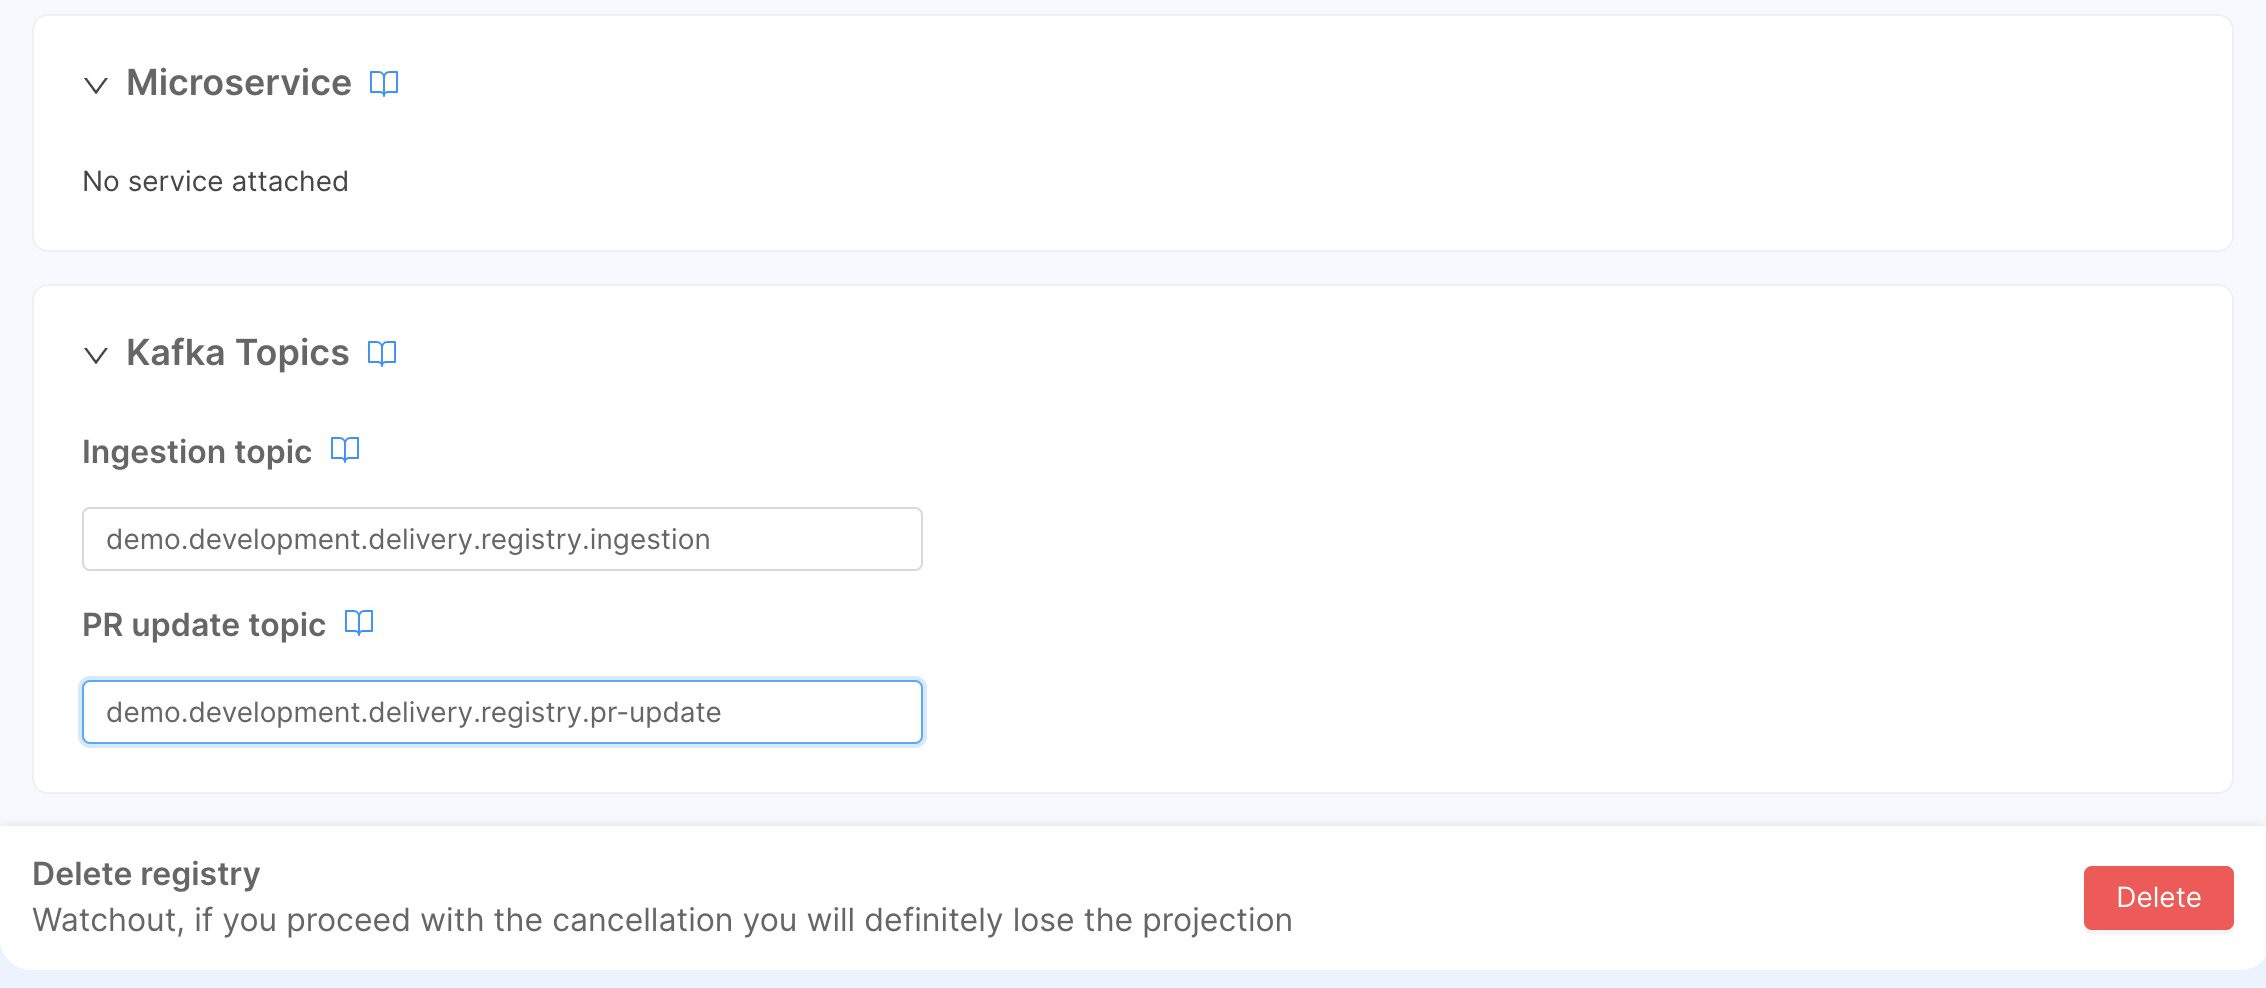
At the bottom of the same page, we can also see the Kafka topics. There are two types of topics:
- Ingestion topic: will be used by the SoR microservice to receive the data from the Source Systems so that the Projections will be updated on the target Database;
- PR Update topic: will be used to notify when a projection has been updated.
The application does not create Kafka topics for you. If you decide to use a different Kafka topic name, please be sure the topic already exists and it is fully operational. The chosen SoR microservice, that will receives the update from the source System, will crash at startup if there is a topic not defined in Kafka.
The Kafka topic names can be changed over time, but please mind that their name must be unique within your Kafka cluster.
Here's the specification for both registry and orders projections.
Registry Topics
These are the suggested naming convention of topics defined in Kafka:
-
Ingestion:
demo.development.delivery.registry.ingestion -
Pr-Update:
demo.development.delivery.registry.pr-updateOrders Topics
These are the suggested naming convention of topics defined in Kafka:
- Ingestion:
demo.development.delivery.order.ingestion - Pr-Update:
demo.development.delivery.order.pr-update
Link to Microservice
Before receiving messages from the ingestion topic defined in the projection, you have to link it to a SoR microservice.
Go back to the Services section of the delivery SoR, and select the microservice you have attached during the previous paragraph: there, on the Projections card, you can pick one or more projections.
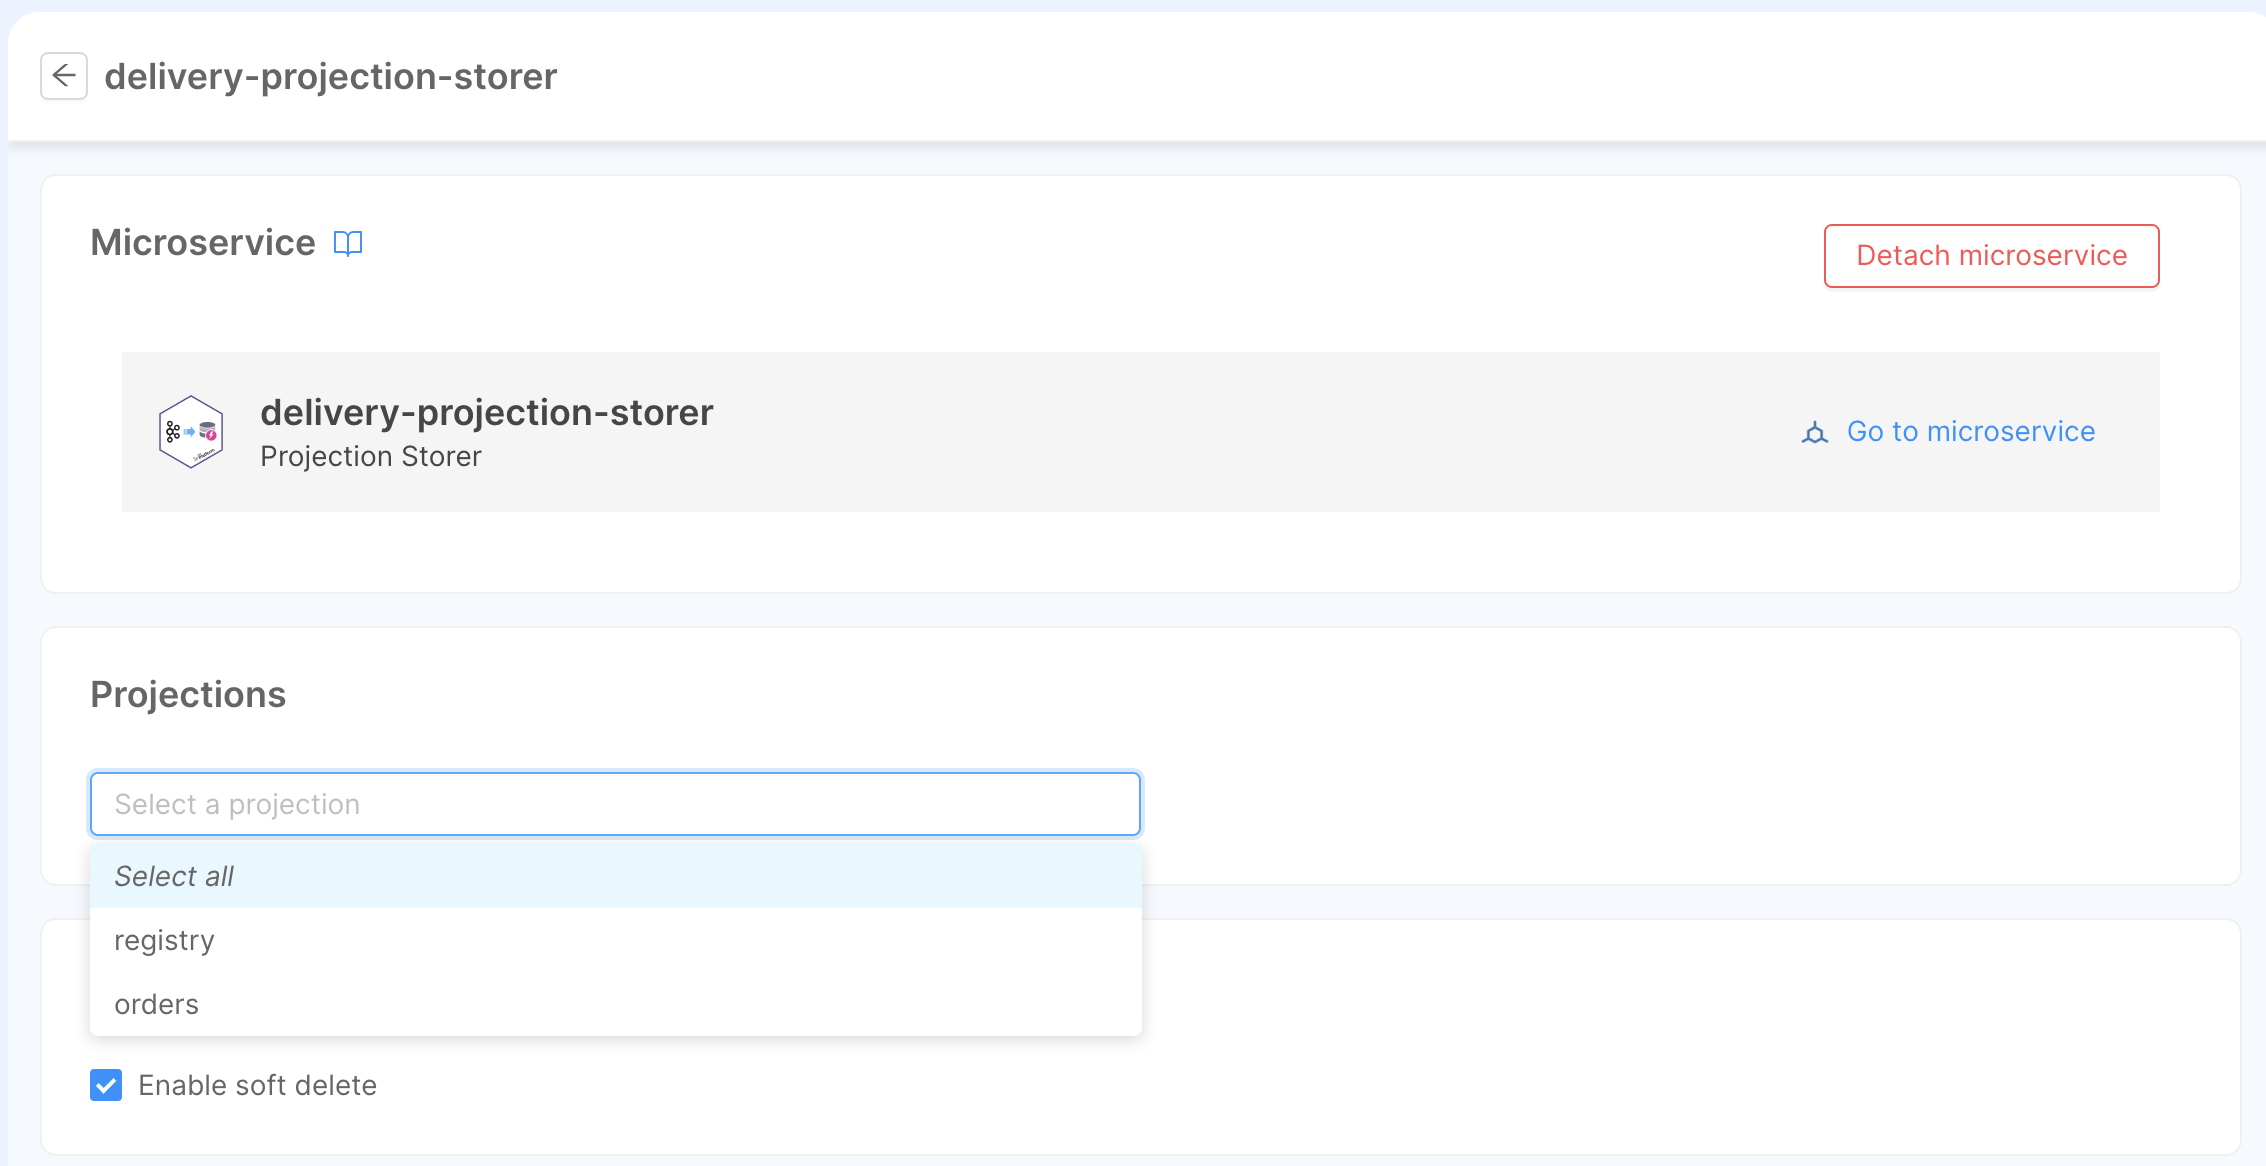
In this particular case, both registry and orders will be linked to the same microservice.
Going back to the projection's page, you can see that the microservice linked to it will appear under the Microservice card.
Expose & Test Projections
At this point, we have configured the microservice, we already have one system of record and two projections, but we need to expose the Projection endpoints.
Create Endpoints
It is not mandatory to expose the Projection endpoints to create, update and work with the Single View, but if you want to expose the raw data stored in the projection you need to create the endpoints.
In the Endpoint section, we can click on the Create new endpoint button to create the Projection's endpoints.

Inside the creation page, we can choose the endpoint path. From the type drop-down we have to choose Fast Data Projection and, in the Fast Data Projection dropdown menu, we can choose the Projection that we want to expose.
We can create two different endpoints, one for the registry and one for the order.
Remember that the endpoints connected to the Fast Data will expose just the GET method: so, we can't perform update and delete operations over them.
Test Projections
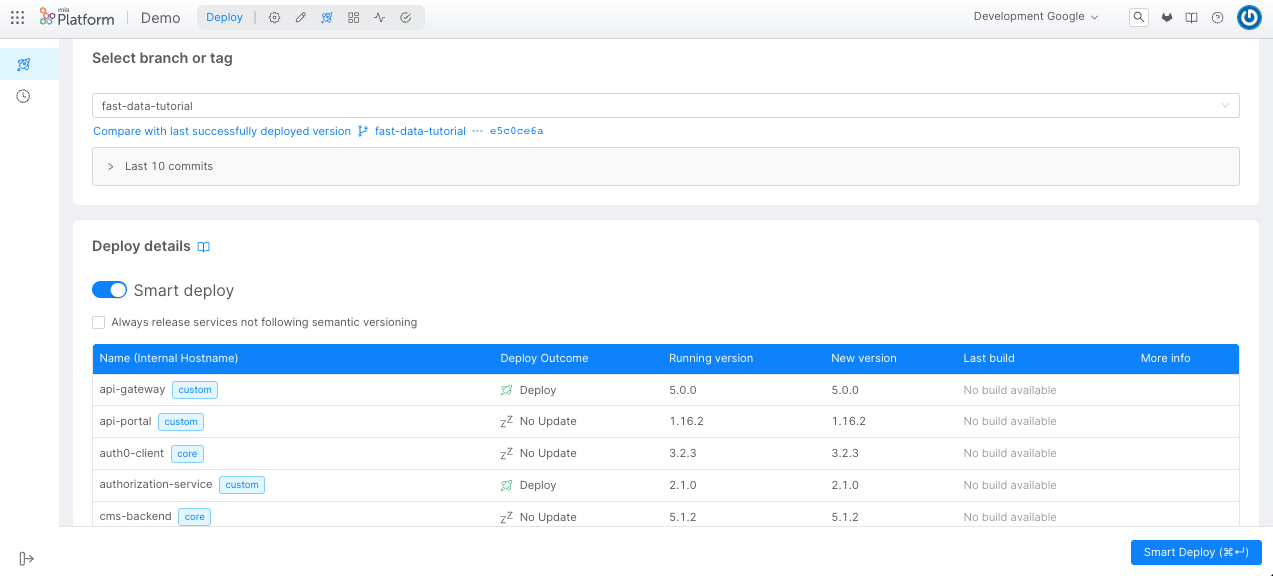
Now it's time to save and deploy the new configuration.
After that, we can try to send a message to the Kafka Ingestion Topics created in the previous steps, and we can see the data stored in the Projection using the APIs available in the API Documentations.
Since we have chosen Debezium as the format for our SoR, the ingestion message that we will send has to comply to its specifications.
Ingestion Example
We will add one registry and one order to our System of Record, respectively reg-1 and ord-1.
This will mean sending the following ingestion messages to the ingestion topics, using a Kafka Producer:
{
  "key": {
    "registry_id": "reg-1"
  },
  "value": {
    "op": "c",
    "before": null,
    "after": {
      "registry_id": "reg-1",
      "address": "customer address",
      "city": "customer city",
      "email": "customer1@mail.com",
      "name": "customer 1",
      "phone": "customer phone",
      "state": "customer state",
    }
  }
}
{
  "key": {
    "order_id": "ord-1"
  },
  "value": {
    "op": "c",
    "before": null,
    "after": {
      "date": "2024-02-16T11:13:48.322Z",
      "name": "order-1",
      "order_id": "ord-1",
      "price": 123,
      "registry_id": "reg-1"
    }
  }
}
If you don't have a direct access to your Kafka broker to produce messages, you can use a dedicated microservice such as Rest2Kafka to produce Kafka messages as REST request directly from MIA Console.
Once messages have been set, you can check from the API Documentations if both registry and orders projections have been updated successfully.
[
  {
    "_id": "63ceb97233241d6536c857e759c02",
    "__STATE__": "PUBLIC",
    "address": "customer address",
    "city": "customer city",
    "createdAt": "2023-01-23T16:44:33.006Z",
    "email": "customer1@mail.com",
    "name": "customer 1",
    "phone": "customer phone",
    "registry_id": "reg-1",
    "state": "customer state",
    "updatedAt": "2023-01-23T16:44:33.006Z"
  }
]
[
  {
    "_id": "63cebcb6d65321231236c857e76b6ab",
    "__STATE__": "PUBLIC",
    "createdAt": "2023-01-23T16:58:30.201Z",
    "date": "2024-02-16T11:13:48.322Z",
    "name": "order-1",
    "order_id": "ord-1",
    "price": 123,
    "registry_id": "reg-1",
    "updatedAt": "2023-01-23T16:58:30.201Z"
  }
]
Single View
The Single View is an architectural object that is used to store the aggregate data from the Projections. The goal of the Single View is to store the data already aggregated and ready to use from the Projection. A good approach is to store the data in Single Views dedicated to each channel and each use.
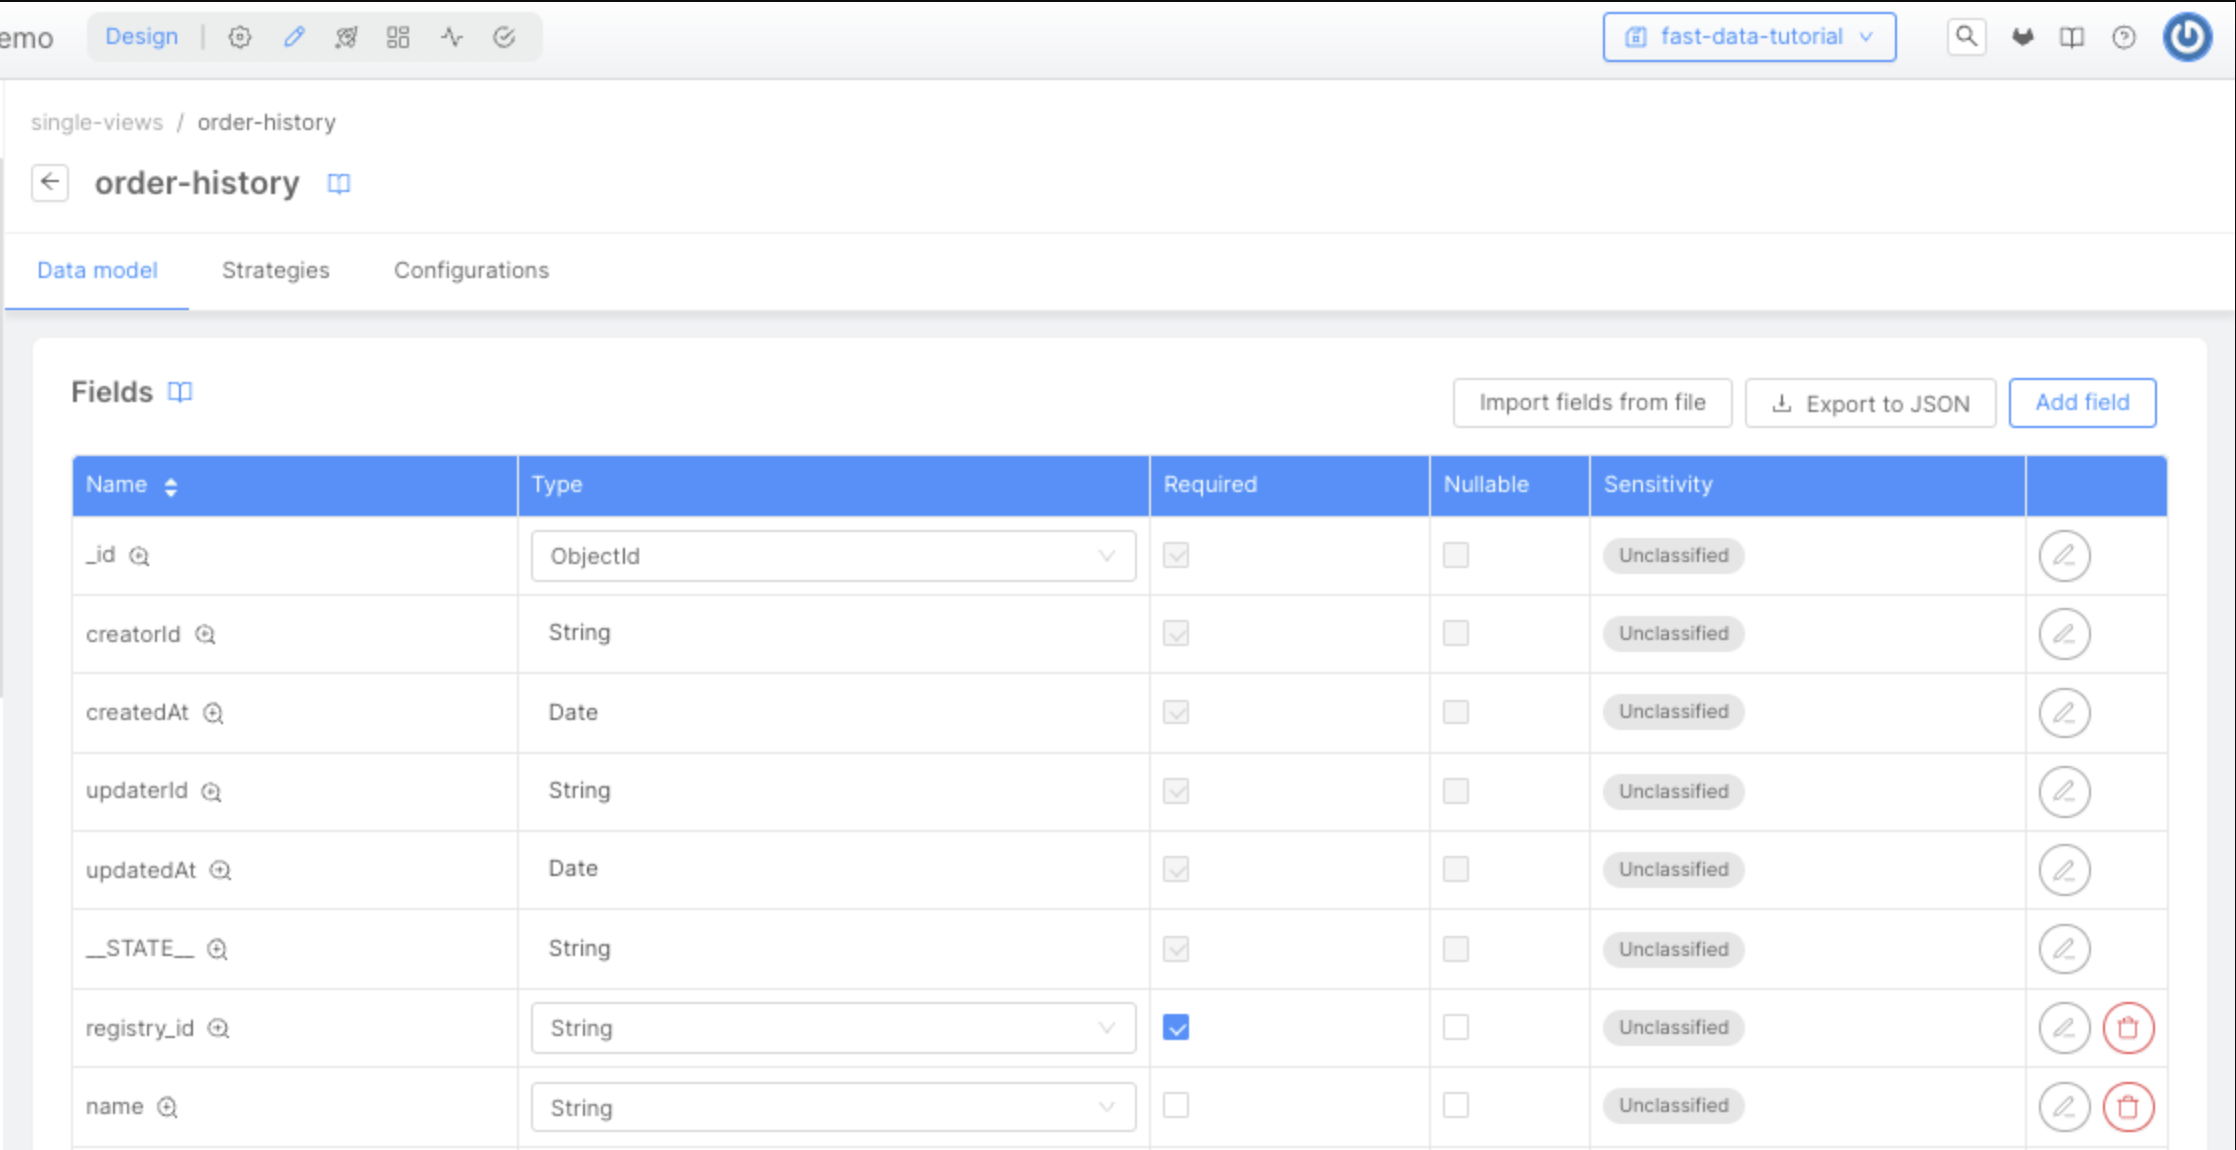
In this tutorial, our Single View is called order-history and its schema has the registry information and its linked orders information: this means that each document is an object that contains the registry information about the user and a list of orders made by the user.
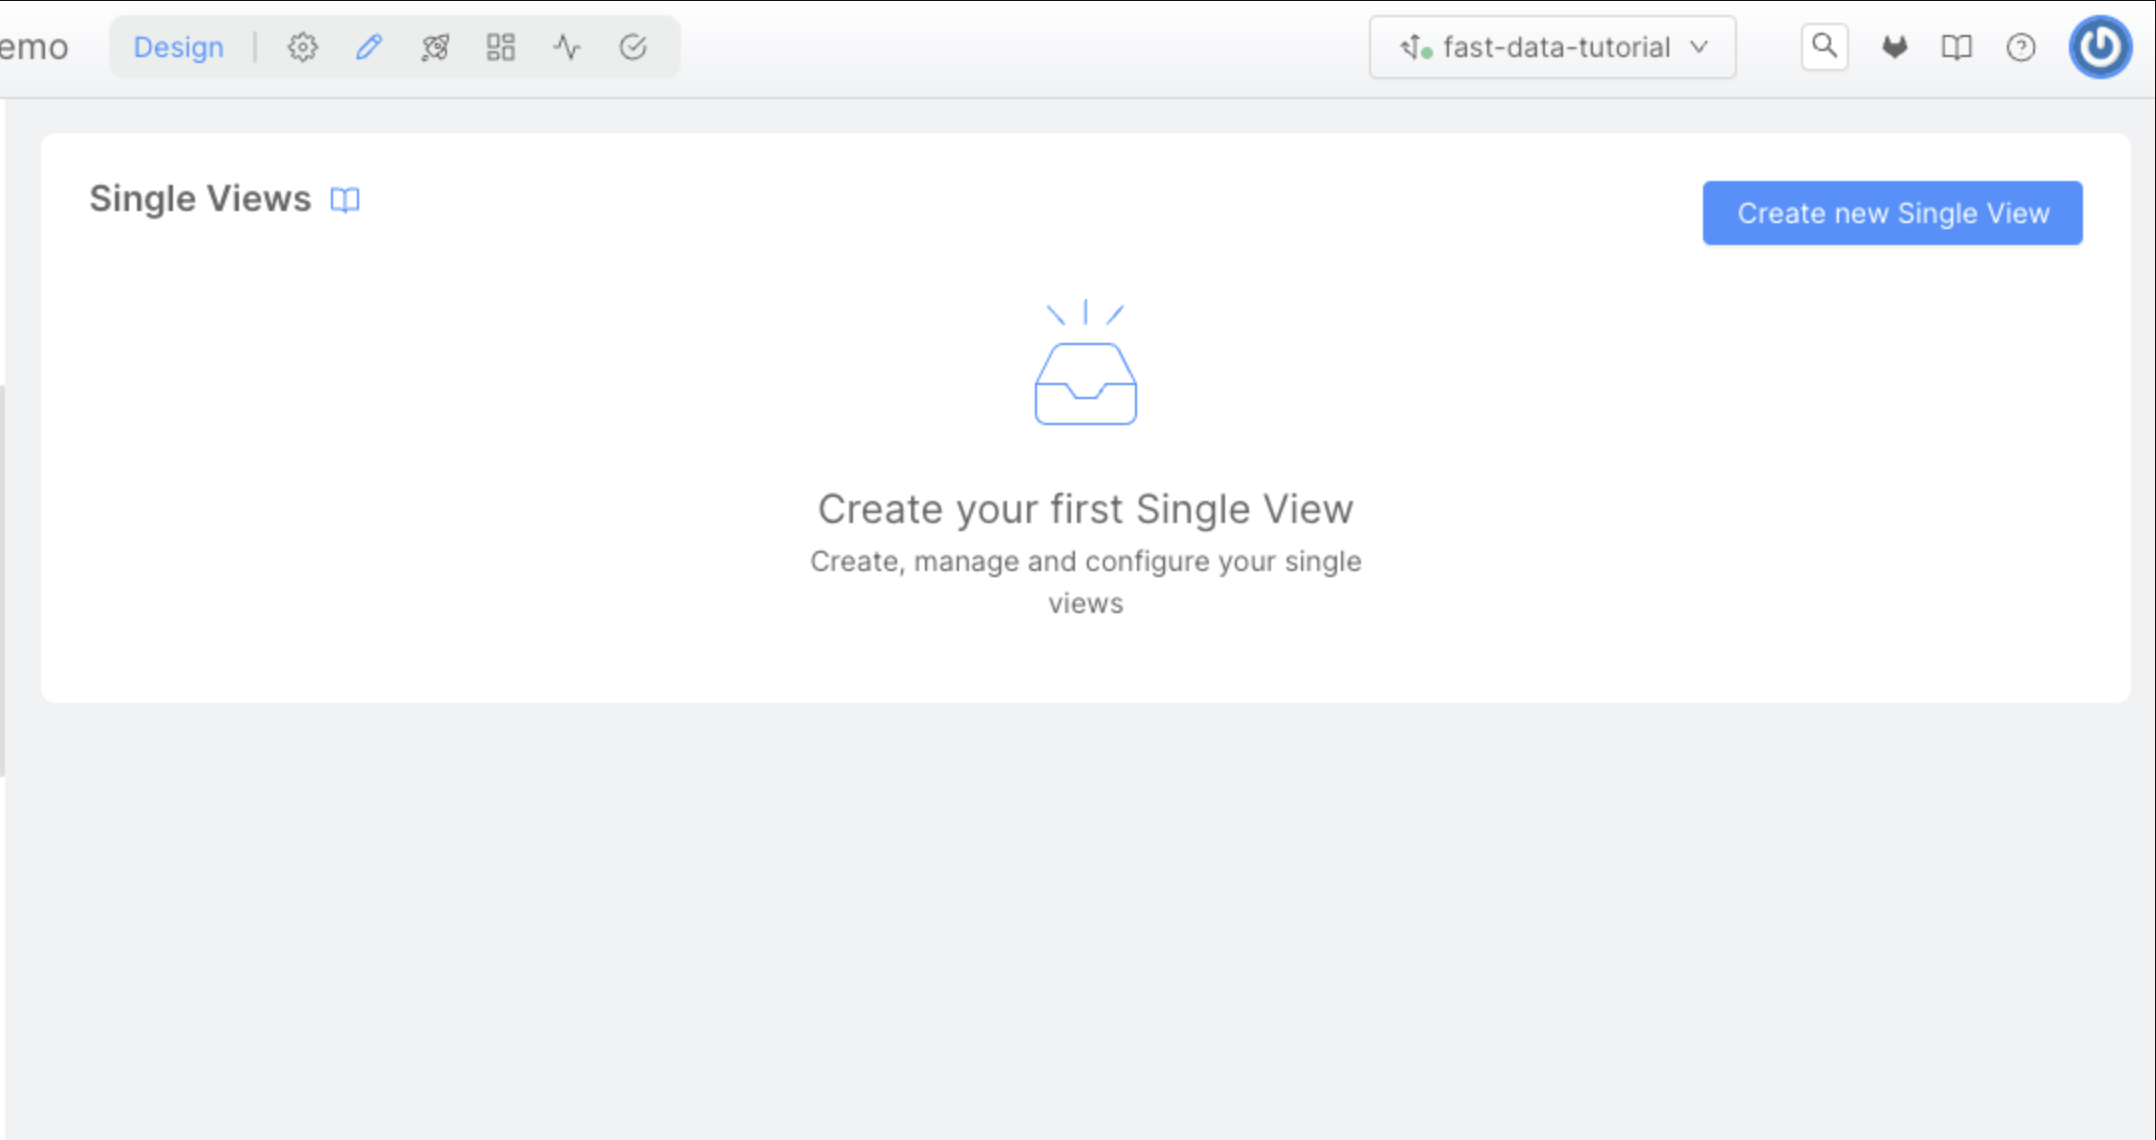
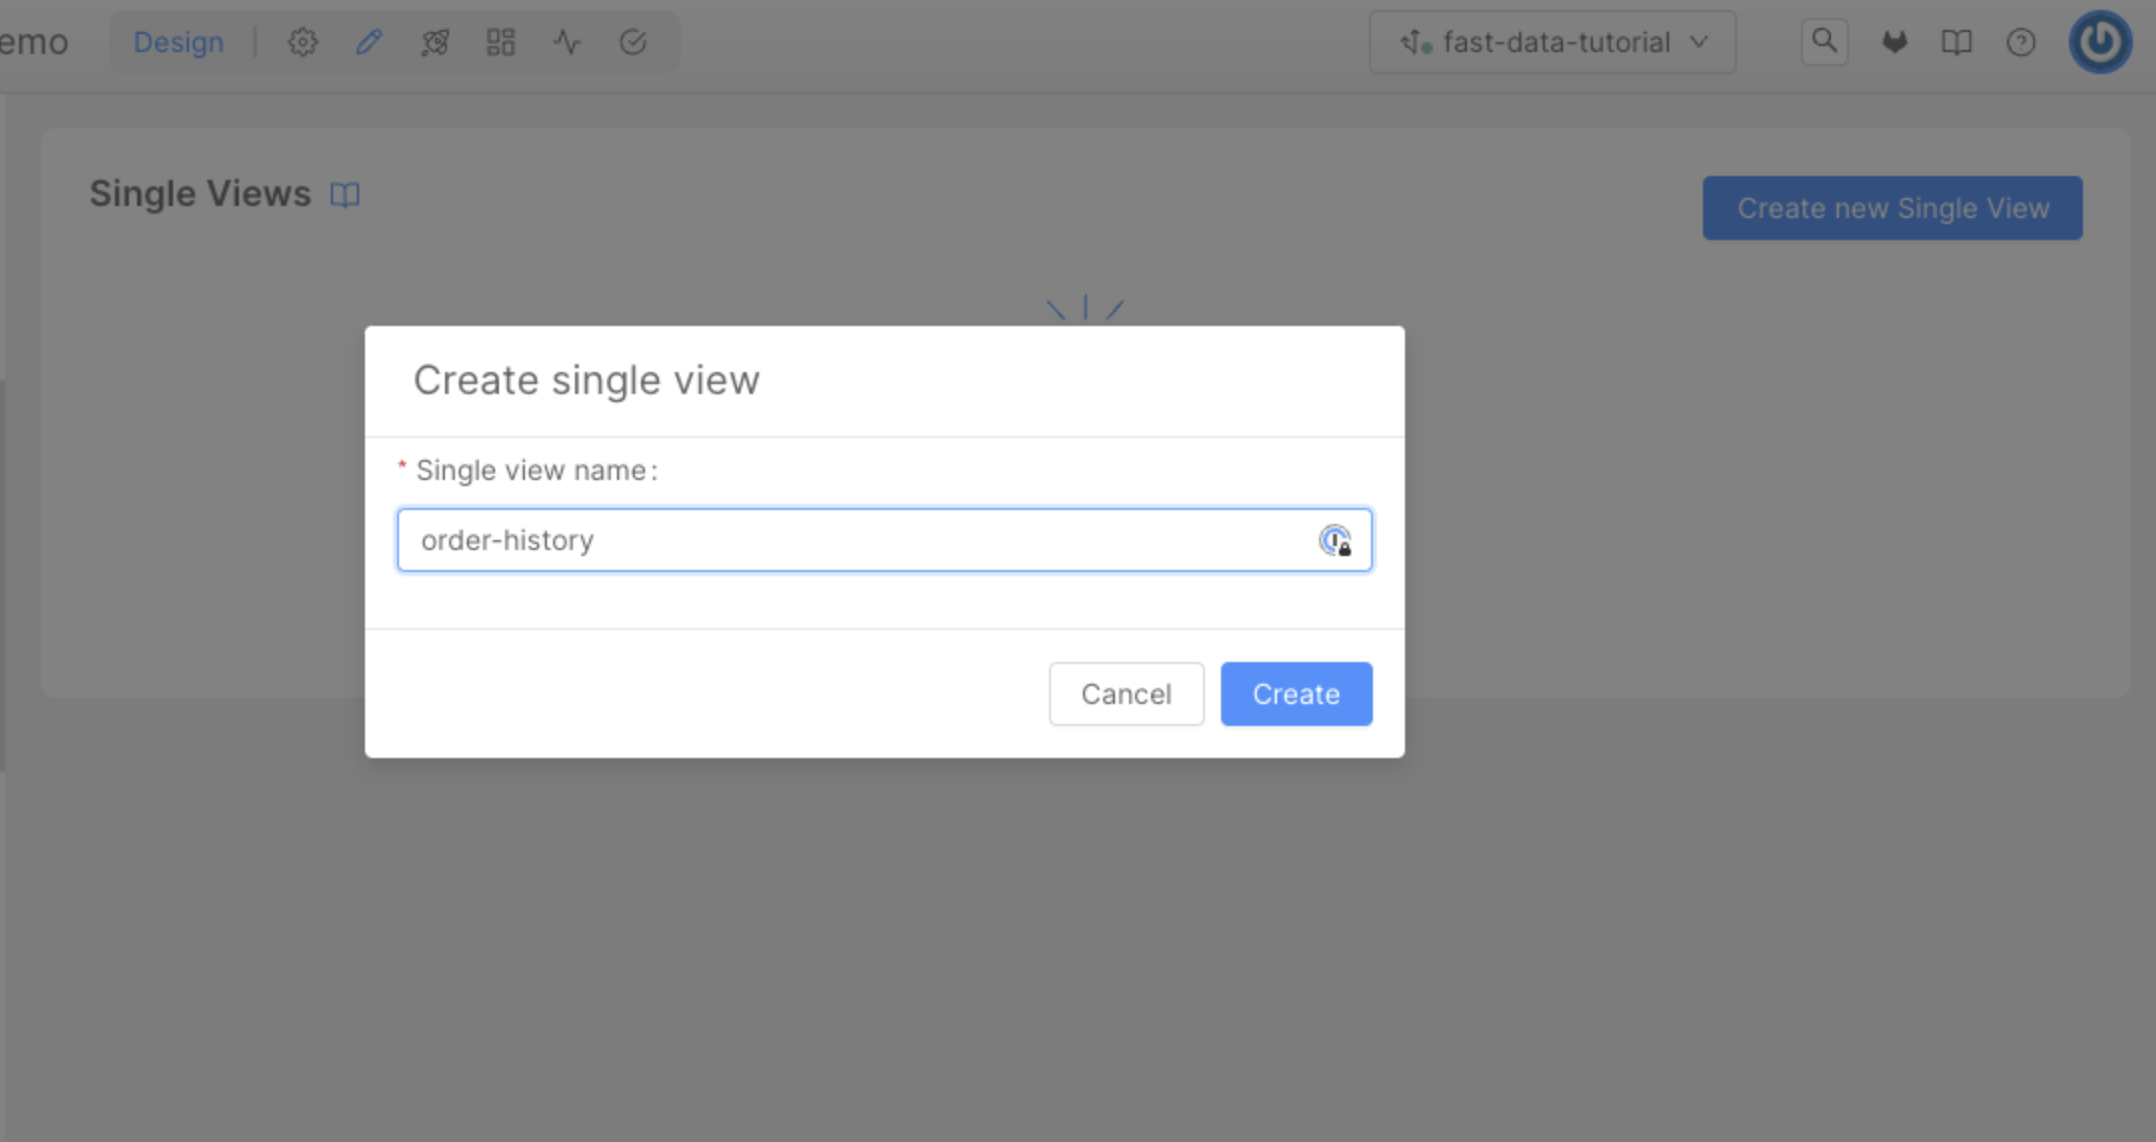
To start define our single view we need to open the Single Views page in the Fast Data section of our left menu, then click on the Create new Single View button.
Here, we can choose the name of the Single View, that will be order-history.
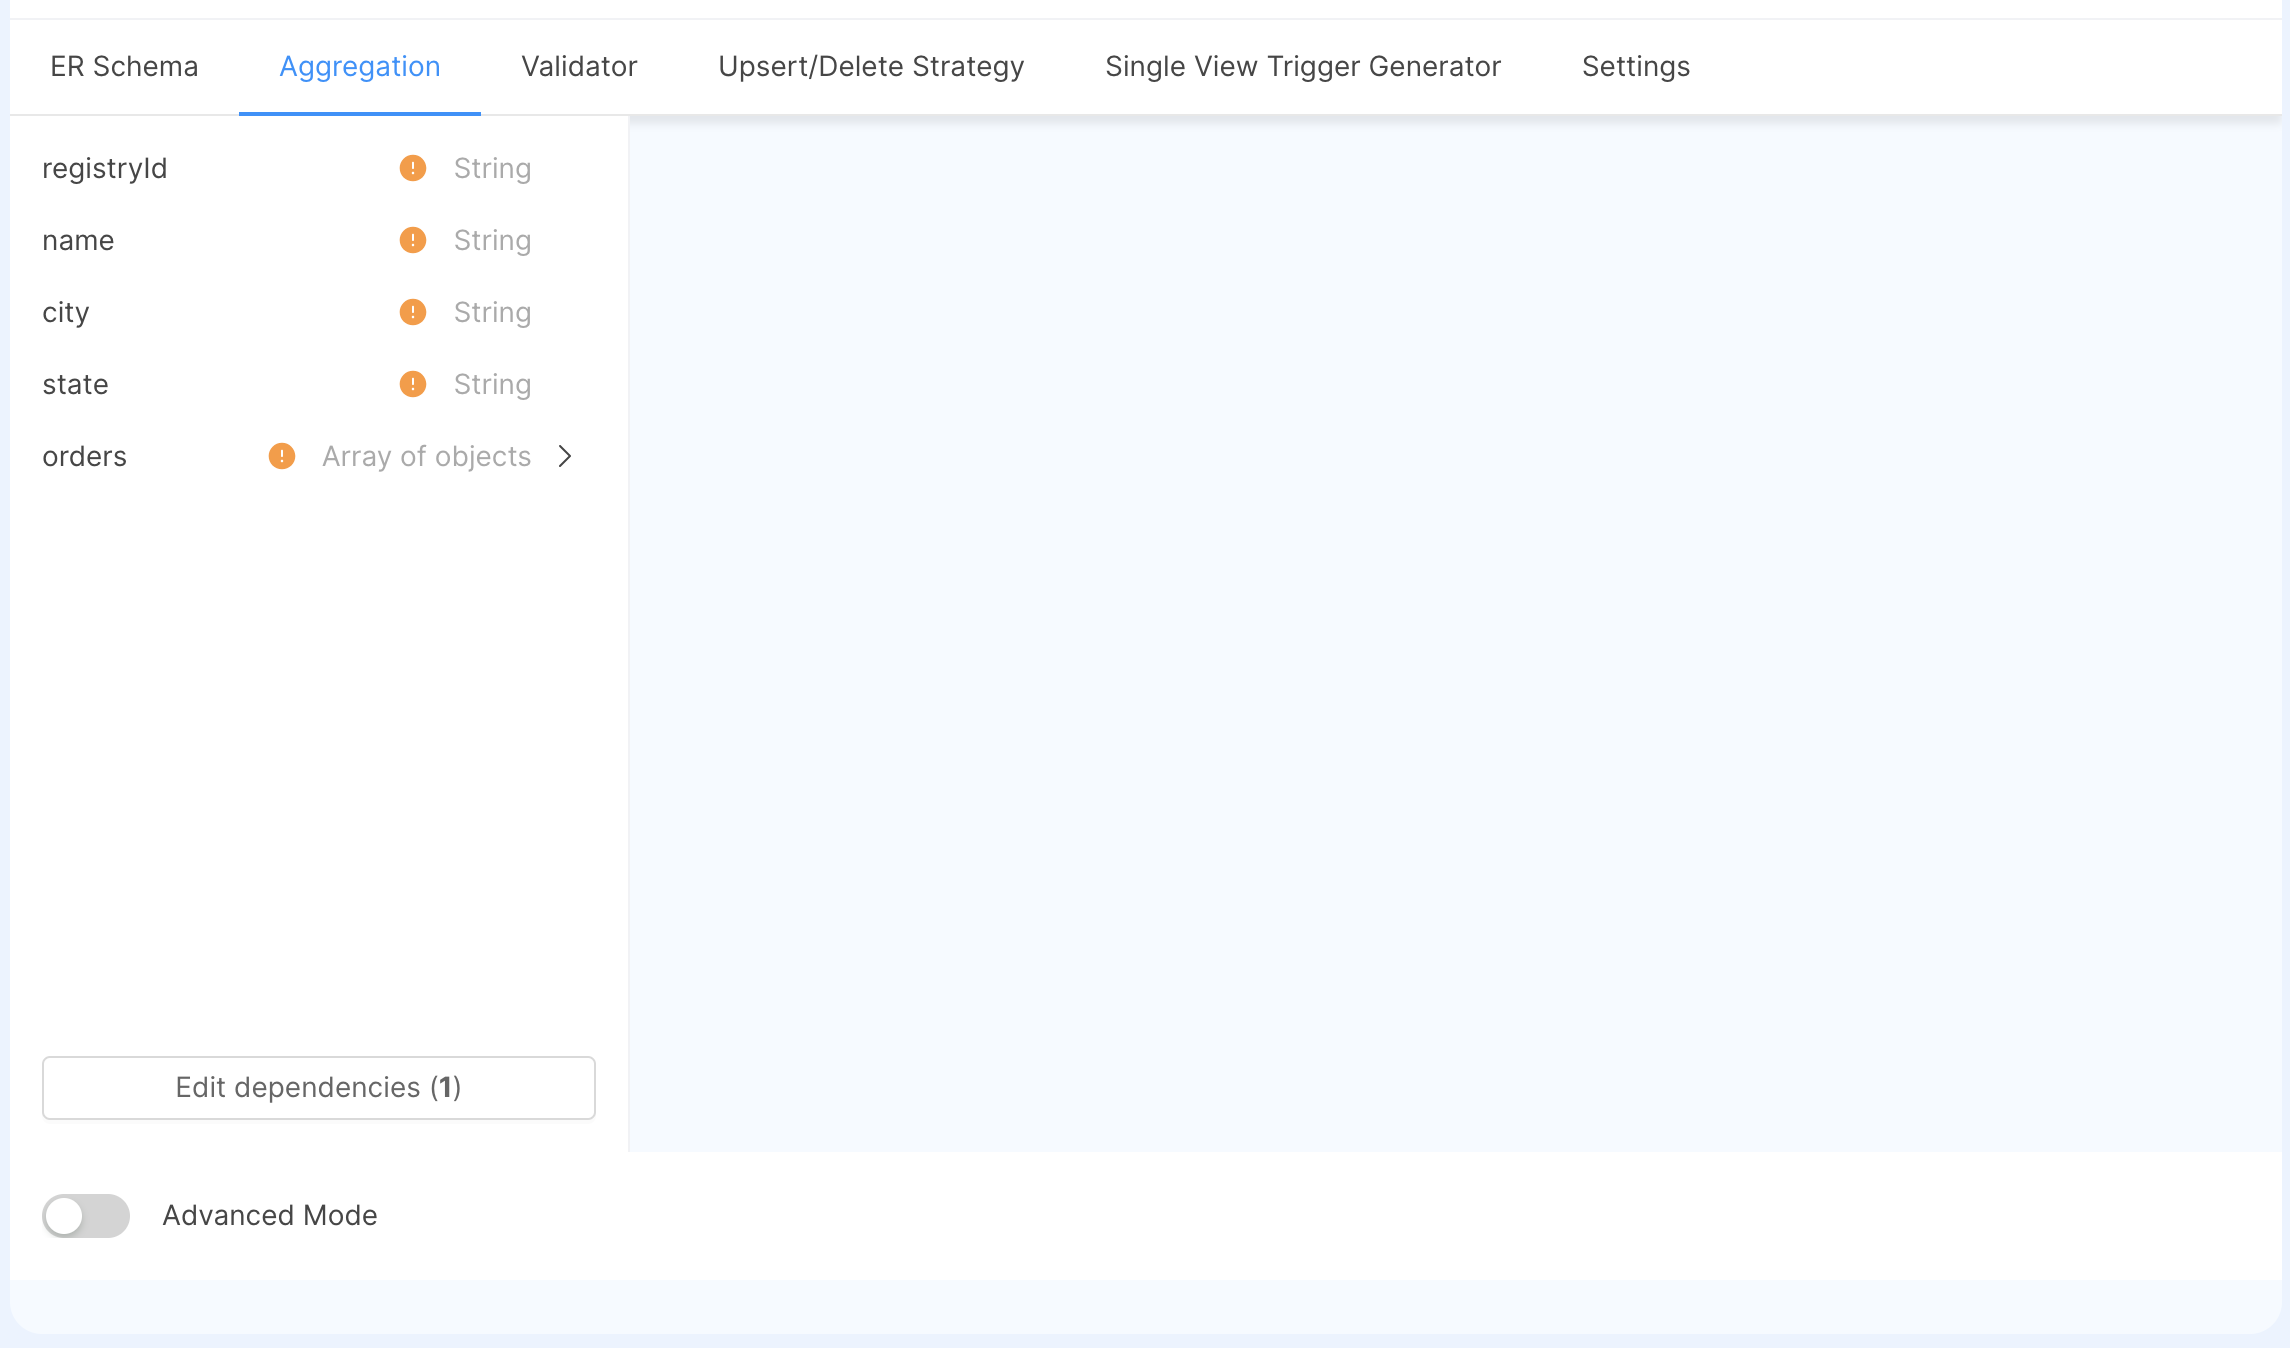
Now, we need to create the fields of the Single View, inside this tutorial we will create the following fields:
| Field | Type | Description |
|---|---|---|
registryId | String | The registry ID. This field must be marked as "Required". |
name | String | The name of the customer to whom the registry refers. |
city | String | The city of the customer to whom the registry refers. |
state | String | The State of the customer to whom the registry refers. |
orders | Array of objects | The orders associated to the registry. |
It is important to also define the JSON Schema for the orders field of the Single View, to let it visible later in the No Code section.
Json Schema for orders array
By clicking the Edit button of the orders field, a right panel will show a JSON Schema editor, where you can place the following object:
{
  "properties": {
    "id": {
      "title": "Order id",
      "type": "string"
    },
    "price": {
      "title": "Order Price",
      "type": "number"
    },
    "name": {
      "title": "Order name",
      "type": "string"
    },
    "date": {
      "type": "string",
      "format": "date"
    }
  },
  "additionalProperties": false,
  "type": "object"
}
Then press on the Save button on the bottom right of the page to apply the changes made to the field.
Microservice Configuration
First of all, we need to create a microservice that we will attach to the Single View that we're going to create. This microservice is called "Single View Creator", and it's available in the microservice Marketplace.
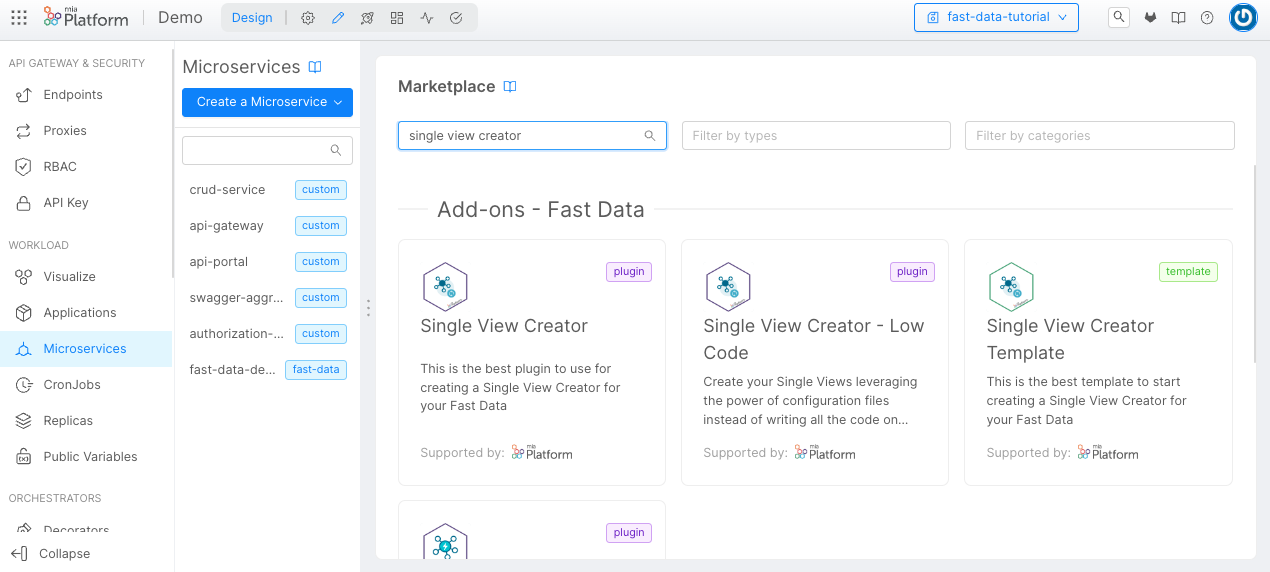
Here we have two different plugins: the first one is for the Single View Creator, and the second one is for the Single View Creator Low Code.
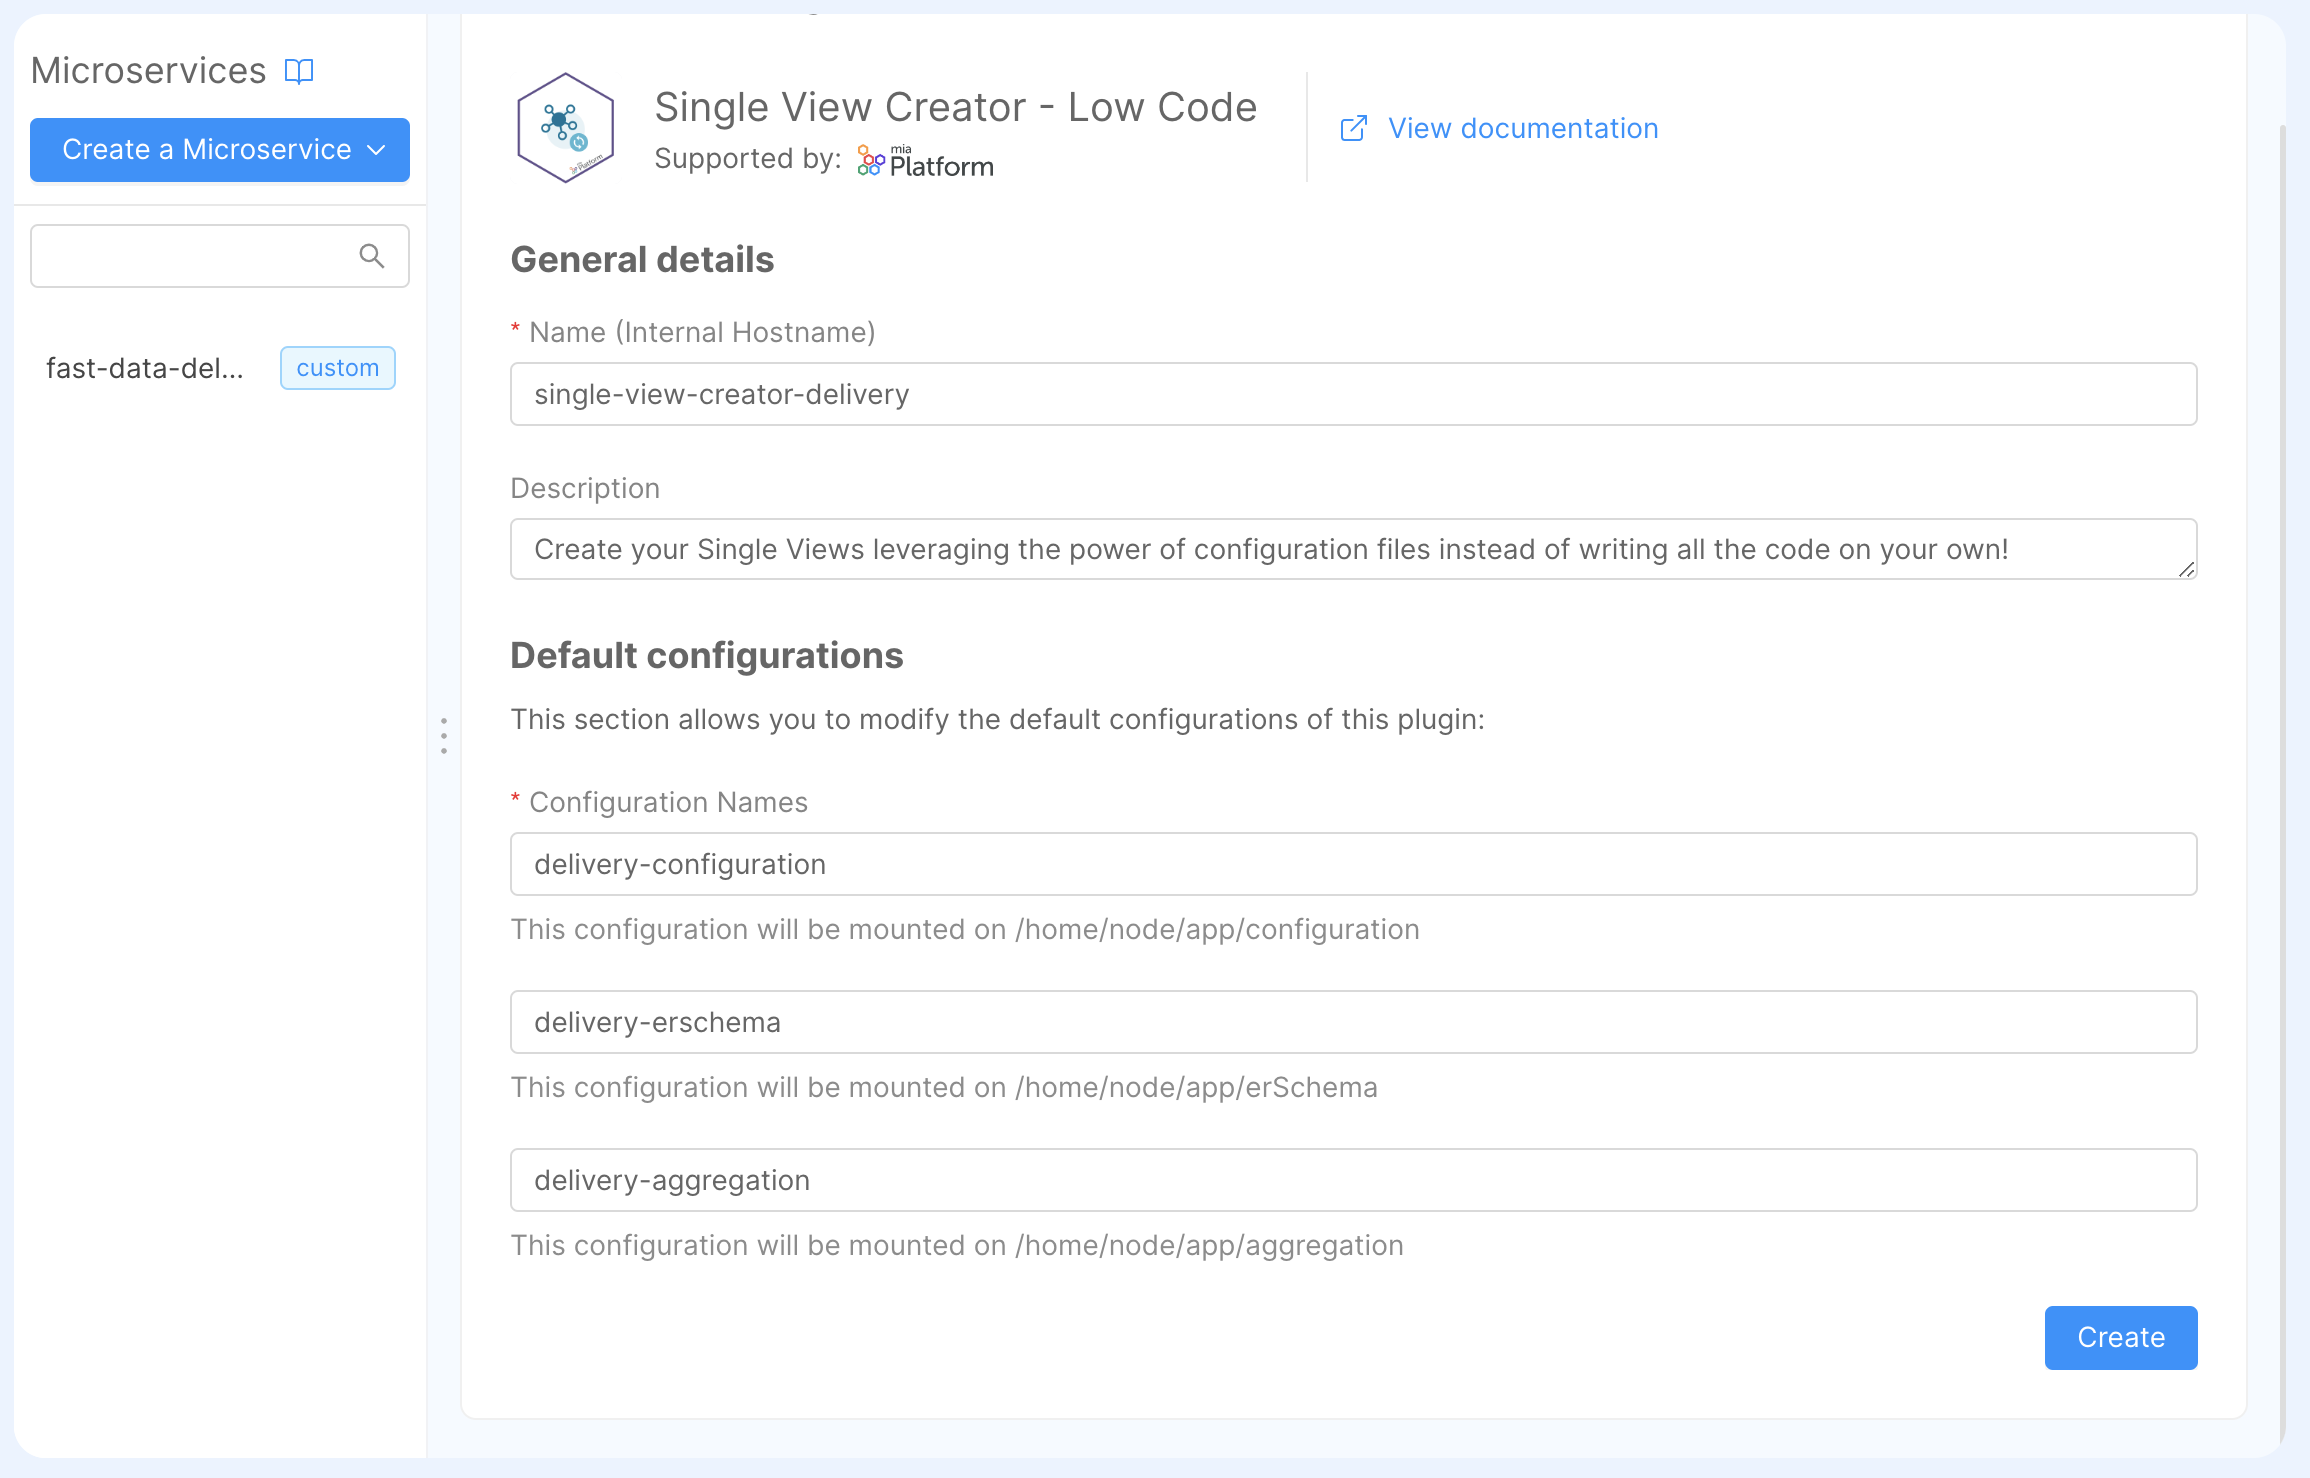
We will go for the latter, since we want to leverage the usage of Low Code / No Code features for a quicker configuration of the microservice. We suggest naming it single-view-creator-delivery.
Now we need to configure all the parameters of the microservice, here is a set of the fields that we need to configure:
SINGLE_VIEWS_COLLECTION: should be the name of the single view which your single view creator is responsible for (we suggestorder-history, the same name as the Single View we are going to create);SINGLE_VIEWS_PORTFOLIO_ORIGIN: a representative name used in debugging and metrics to identify the source of any Single View update request (we suggest to use the name of the System of Record,delivery);TYPE: identifies the type of projection changes that need to be read. It should be the same as the Single View name you want to update (also here we are going to call itorder-history);SINGLE_VIEWS_ERRORS_COLLECTION: a collection where the service will write errors that may happen during aggregation. (we suggestorder-history-errors, here you can read about record format that will be stored)
Also, based on the connection channel where the microservice reads the projection changes, additional environment variables needs to be set:
- Kafka
- MongoDB
PROJECTIONS_CHANGES_SOURCE: by using the valueKAFKA, it instructs the service to read projection changes from a Kafka connection;- kafka connection variables such as:
KAFKA_BROKERS: a comma-separated list of your Kafka brokers;KAFKA_SASL_USERNAME,KAFKA_SASL_PASSWORDandKAFKA_SASL_MECHANISMif authentication needs to be performedKAFKA_PROJECTION_CHANGES_TOPICS: name of the topic that will receive projection changes in the shape of trigger messages, you can choosedemo.development.delivery.order-history.trigger;KAFKA_GROUP_ID: name of the consumer group that will be used to subscribe to and read messages from the topic from theKAFKA_PROJECTION_CHANGES_TOPICvariable (we can choosedemo.development.delivery.order-history.single-view-creator).
PROJECTIONS_CHANGES_COLLECTION: it is the name of the collection that includes the Projection Changes generated by the Real-Time Updater, and it must have the same value set in that microservice (we previously suggestedfd-pc-delivery);SCHEDULING_TIME: tells how many milliseconds the microservice needs to wait before polling new projection changes from thePROJECTION_CHANGES_SCHEMA_COLLECTION. We set it to5000, meaning that 5 seconds will pass between each polling.
The Single View Creator includes more optional parameters that might be included via Environment Variables. If you need to know more about them, you can refer to the related documentation section.
The marketplace will also ask you to define a name for the following configurations:
- Single View Key: this is the key that will be used to store the Single View (you can choose
delivery-configurationas name); - ER-Schema: the relationship between projections (you can choose
delivery-erschemaas name); - Aggregation: the aggregation that will be used to generate the Single View (you can choose
delivery-aggregationas name).
This configurations will be in read-only mode, since they can be edited inside the Single View section.
Attach Microservice
The last configuration that you need to do is to attach the newly created Single View Creator microservice to our order-history Single View.
Inside the Single View page, go to the Single View Creators tab. A placeholder will inform the user that a Single View Creator must be attached.
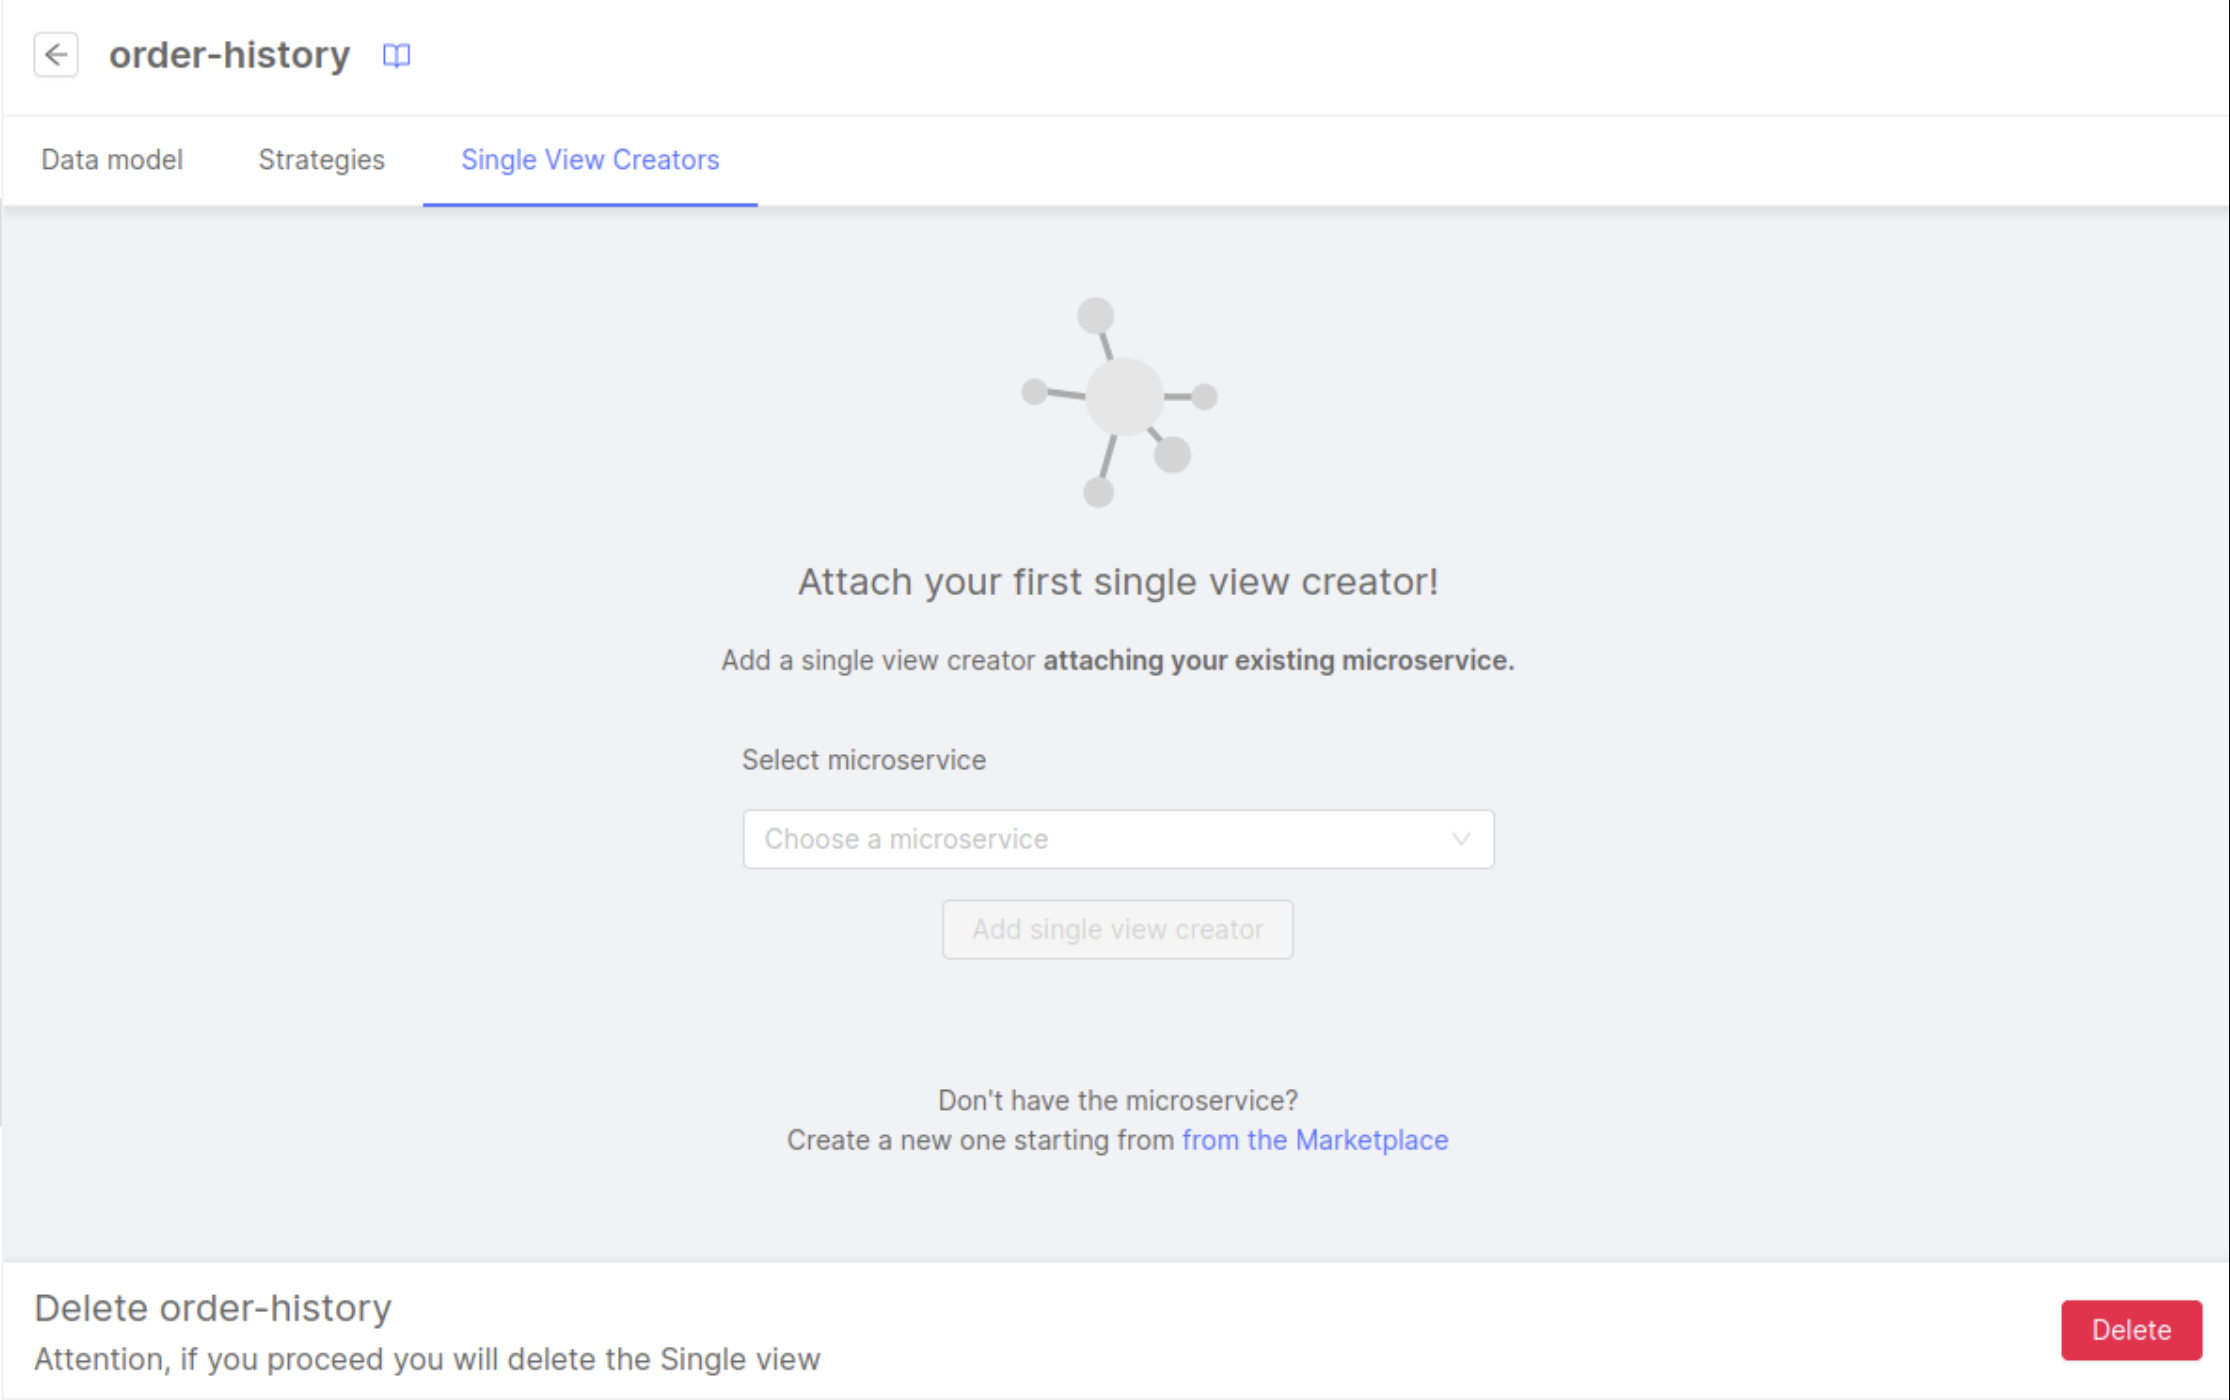
From there, select the single-view-creator-delivery microservice, then click the Add single view creator button.
Single View Aggregation
After linking a microservice to the Single View page, click the Edit Configurations button (the one with → arrow) at the right side of the table. It will open a new page, where it's possible to configure all the aspects regarding the Single View aggregation and generation.
ER Schema
The ER Schema is a configuration used by Fast Data to infer into the microservices the relationships among projections. In the case of order-history, we have to define a relationship where one Customer (stored in the registry Projection) can have multiple Orders (stored in the orders Projection).

The following explains how to configure an ER Schema using the "Er Schema" section of Fast Data. To do so, please make sure that this feature is enabled in your project. You might need to ask your Project Administrator for it.
You can configure the ER Schema in both No Code and Low Code mode.
- No Code
- Low Code
To configure the ER Schema with the No Code, you need to return to the Projections section, and then select the ER Schemas tab.
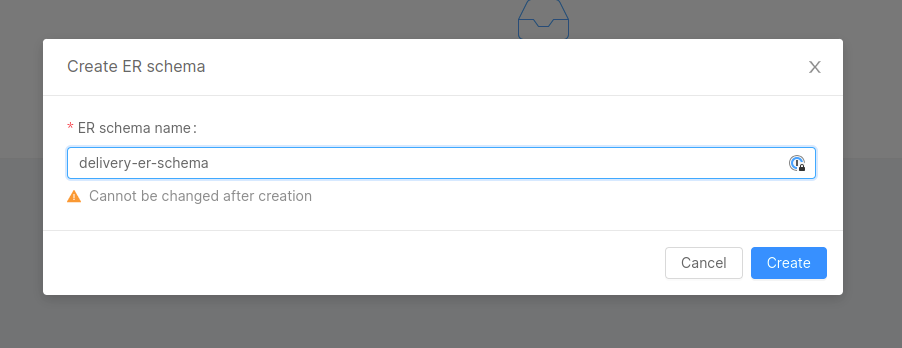
From there, you can create a new ER Schema, by clicking the Create new ER Schema button:
you'll be asked to choose a name for your ER Schema (we suggest: delivery-er-schema). After that, you will be redirected to the ER Schema canvas.
The configuration of the ER Schema with the "No Code" is explained in the dedicated section, but we include here a quick guide on how to create the ER Schema with the needed relationships:
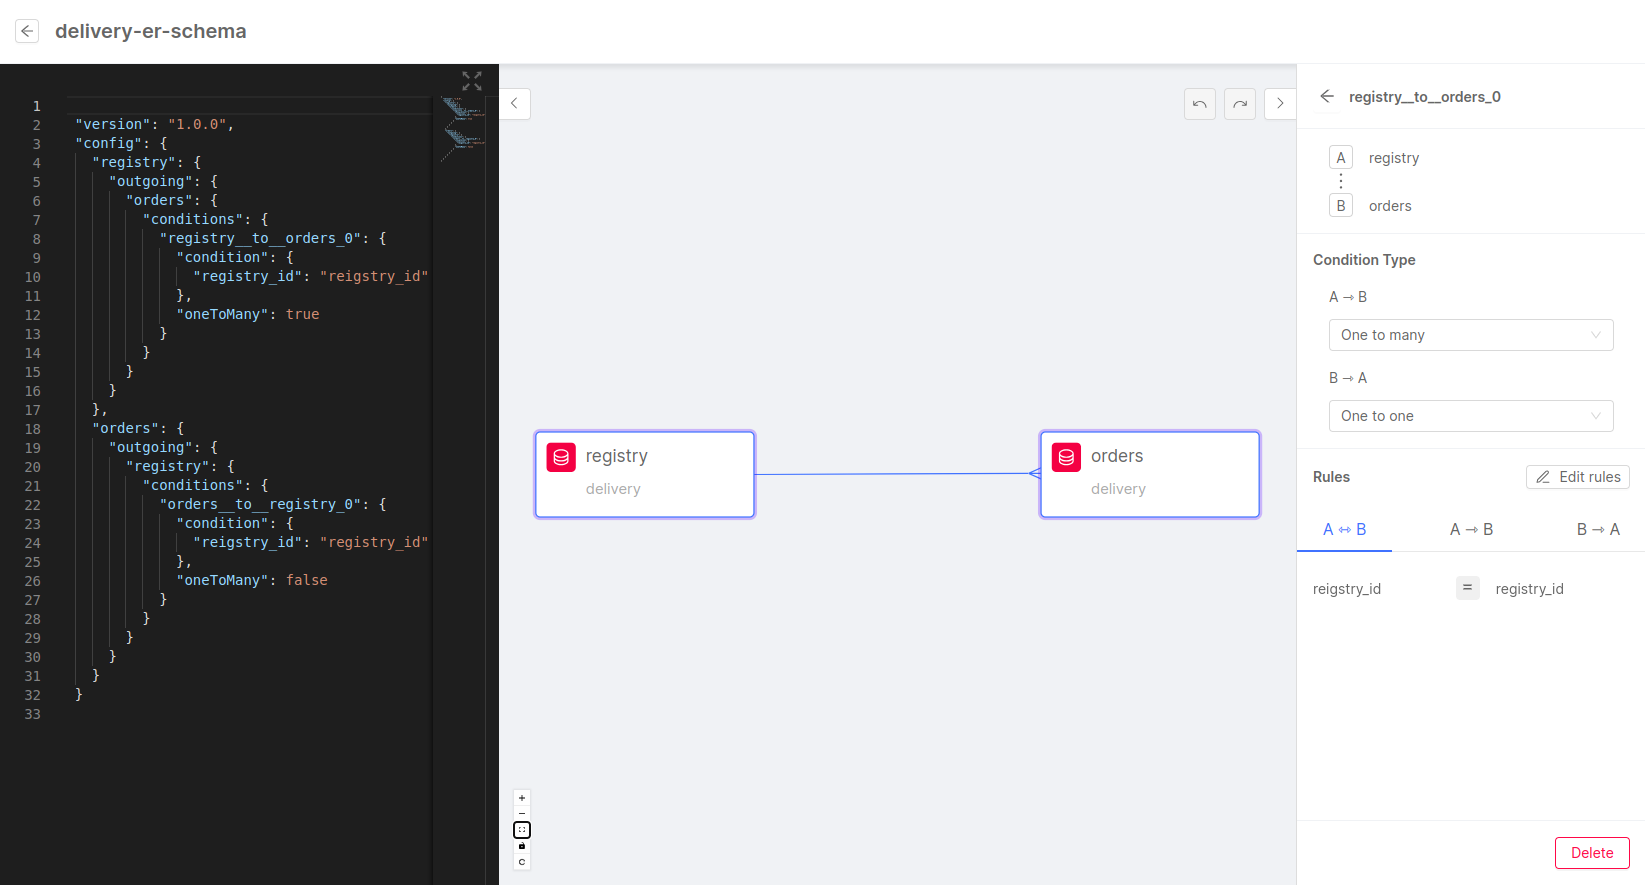
- In the right side panel you can see the list of Projections inside the System of Record
delivery: drag the collectionsregistryandorderto the canvas in the middle of the screen. - Inside the canvas, draw a line from the dot at the right of the
registryProjection to theordersProjection: you'll see that the line remains visible with a small warning icon in the middle, which means that the relationship has been created without any condition. - the right side panel should show the details of the relationship. From here you'll need to:
- change the Condition Type value of
A -> BtoOne to many. - click on the Edit Rules button to open the Rules Modal: click on + Rule button and then fill the input fields with
registry_idboth for theregistryand theordersProjection. Finally, click the Save button.
- change the Condition Type value of
The final result should resemble the following image:
This is the ER Schema that can be seen in the Advanced Section of the canvas:
{
  "version": "1.0.0",
  "config": {
    "registry": {
      "outgoing": {
        "order": {
          "conditions": {
            "registry_to_order": {
              "condition": {
                "registry_id": "registry_id"
              },
              "oneToMany": true
            }
          }
        }
      },
      "order": {
        "outgoing": {
          "registry": {
            "conditions": {
              "order_to_registry": {
                "condition": {
                  "registry_id": "registry_id"
                },
                "oneToMany": false
              }
            }
          }
        }
      }
    }
  }
}
In this example, we can see that the relationship goes from registry to order (from line 4 to line 16) and vice versa.
The relationship is represented by the following two conditions:
registry_id(fromorders):registry_id(from the updated registry). The condition isOne to One, meaning that one order can be related to one and only one registry item.registry_id(fromregistry):registry_id(from the updated order). The condition isOne to Many, meaning that one registry might have a relation with multiple orders.
The conditions will be interpolated into the find operation of a MongoDB query. In this case, the condition can be translated as:
registry_to_order:find({ registry_id: "value of registry_id from registry projection"})order_to_registry:findOne({ registry_id: "value of registry_id from orders projection"})
Set the Base Projection
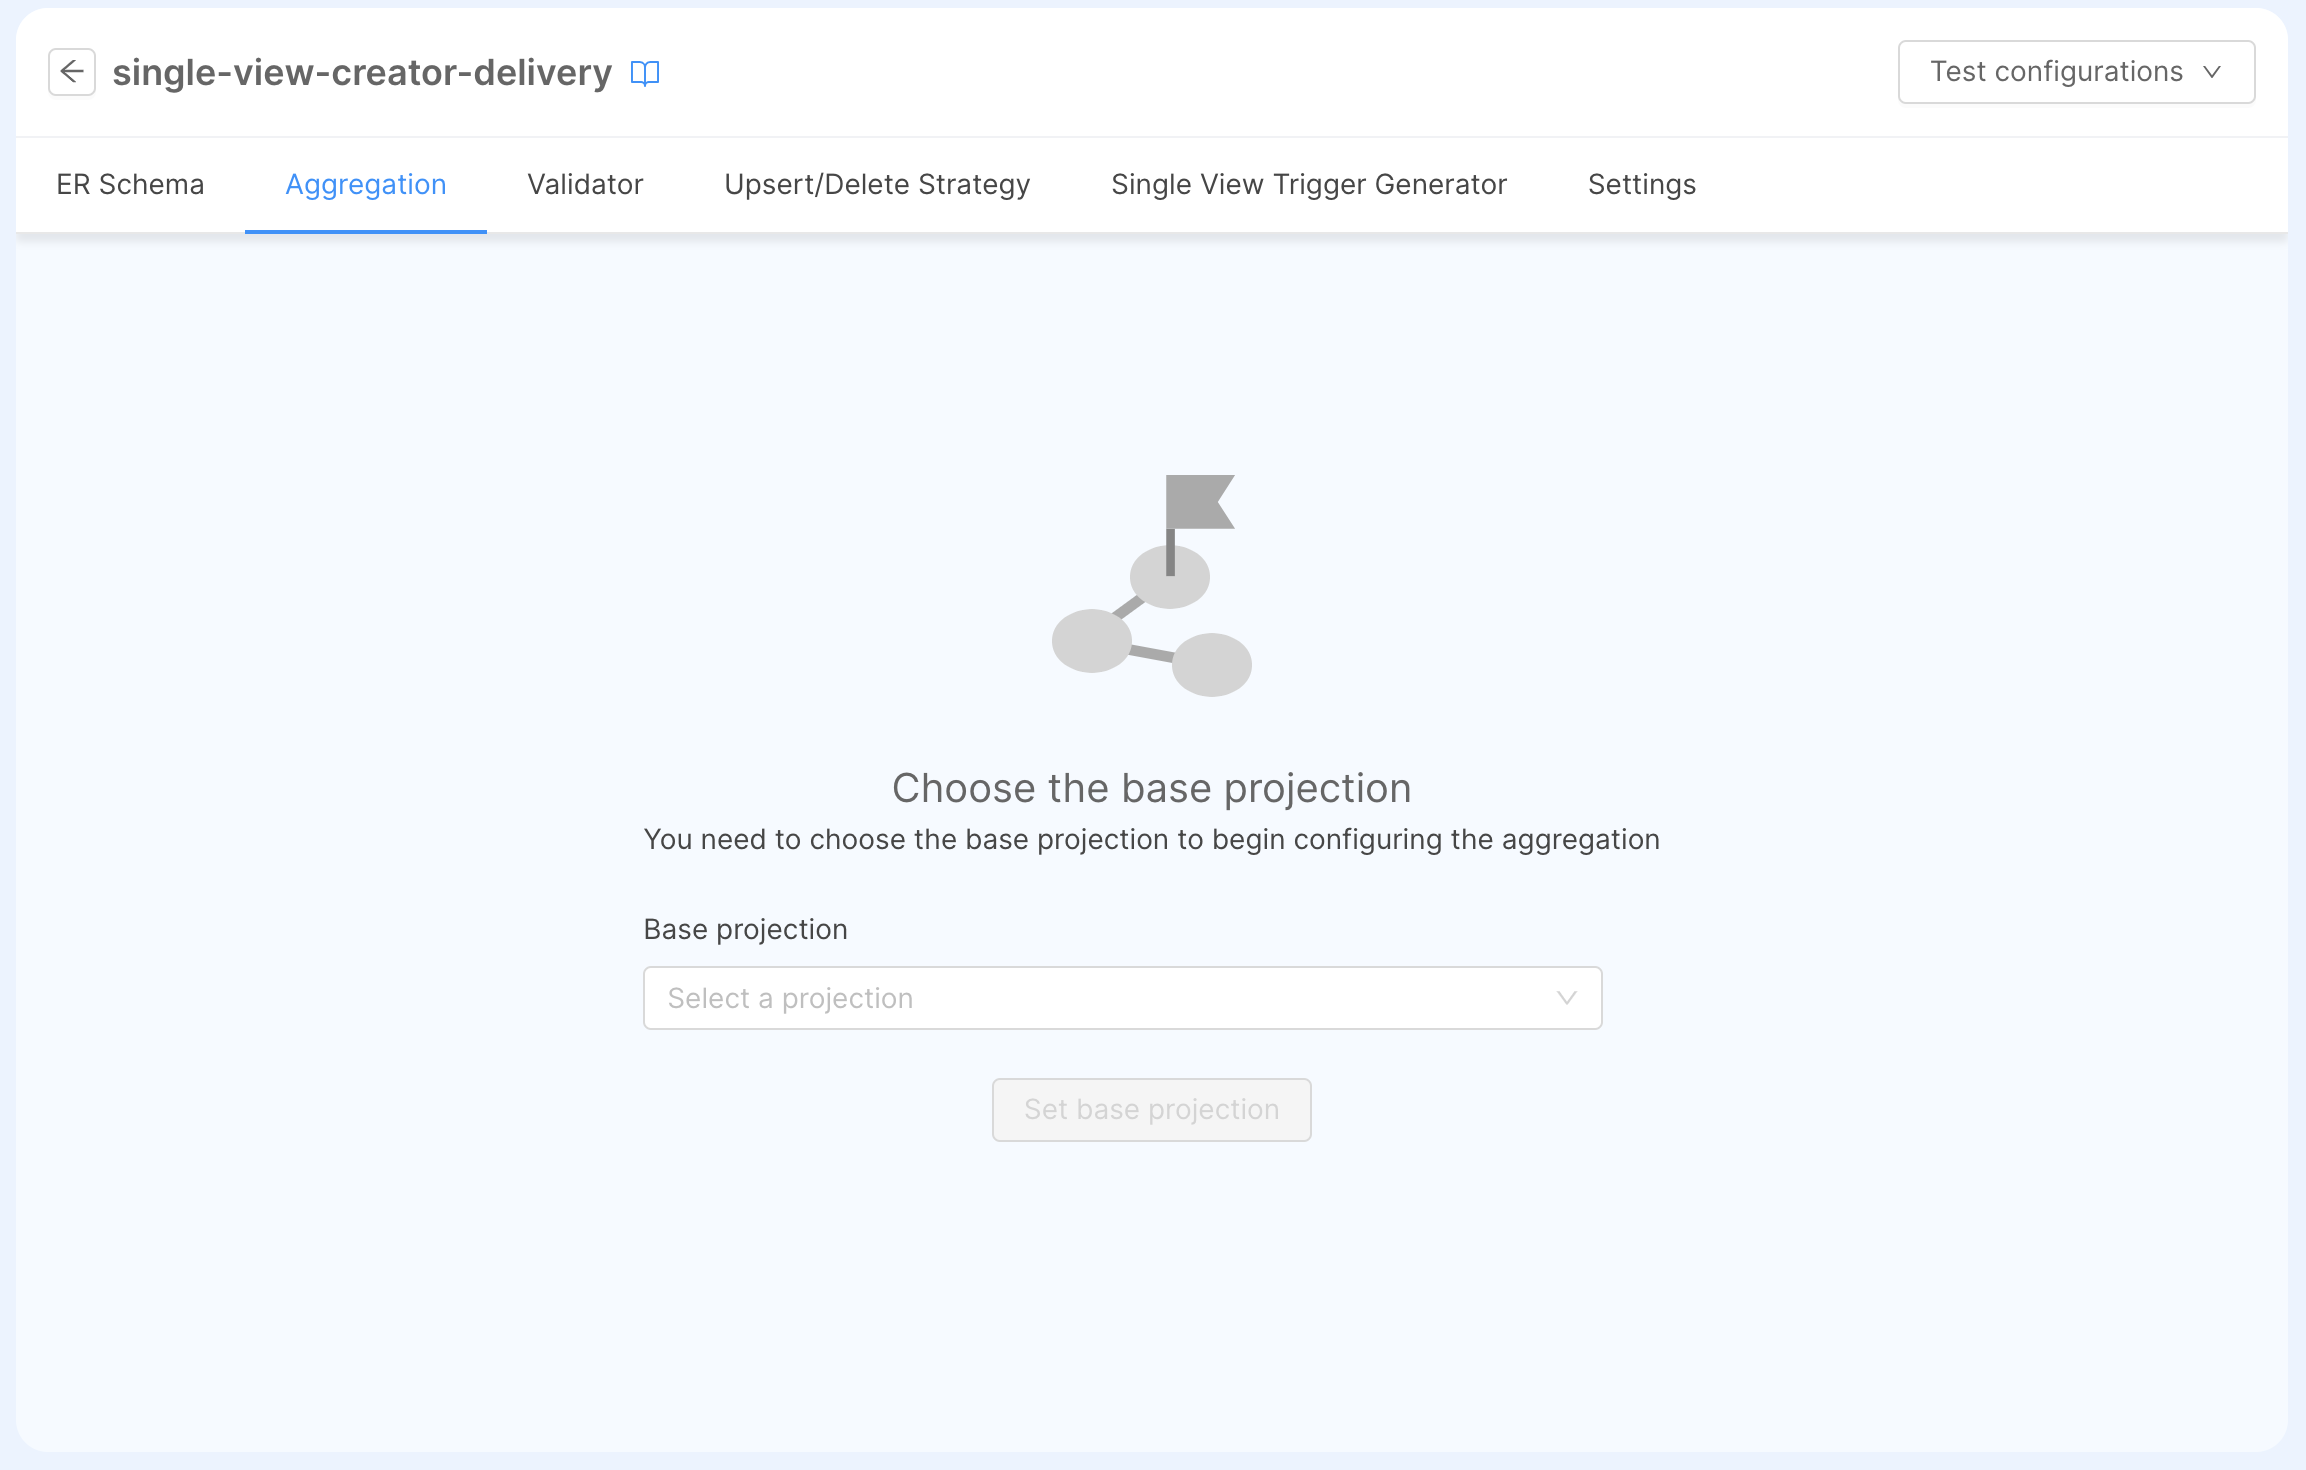
Once the ER Schema has been set, we have to define what is the root from where we want to start the aggregation: we will refer to it as Base Projection, which represents the collection where the aggregation will start.
By going back to the Aggregation tab, you'll be required to select a Base Projection which is the Projection from where the mapping will begin: in our tutorial, we select the Projection registry and click on Set base projection. After this, the Single View Data Model will show up to the left, ready for the configuration.
Before configuring it, we have to specify what is the identifier of our single view records.
Single View Key
The Single View Key represents the link between the identifier of the projection change and the Single View fields: this mapping will be executed at the beginning of the aggregation, to retrieve the base projection that will be used as a starting point to compute the single view. to get a query that, executed in the Single View collection, retrieves the Single View document to be updated.
- No Code
- Low Code
The following explains how to configure a Single View Key using the "No Code" feature, available from version 11.3.0 of the Mia-Platform Console.
Please make sure that your project has activated this feature. You might need to ask your Project Administrator for it.
To configure the Single View Key with the "No Code" feature, you can refer to the specific documentation page.
Here is a quick list of operations to execute to configure correctly the Single View Key:
- move to the Settings page and go to the Single View Key card.
- click on the Configure button to open a modal to start configuring the Single View Key.
- click the Add Single View Key: a new line will appear with two input fields.
- as
Single View Primary Field, which is a field of the Single View, selectregistryId. - as
Projection Identifier, which contains the value inside theidentifierfield of the Projection Changes Schema, selectregistry_id(which is, for our example, the same name of the Base Projectionregistry). - you can review the updates by clicking the toggle Advanced Mode and, when you are sure everything is fine, click on Save.
By clicking the Advanced Mode toggle, we can edit directly the configuration:
{
  "version": "1.0.0",
  "config": {
    "registryId": "registry_id"
  }
}
The condition inside the config object is represented by:
registryId(from the Single View document):registry_id(obtained from theidentifierfield of the Projection Change document)
To have an exhaustive explanation of how to configure the Single View Key configuration with the Low Code feature, you can refer to the specific documentation page.
Aggregation
The aggregation is the configMap that will be used to define the rules on how the Single View will be calculated. In this configuration, we will get our dependencies from the projection and the description of how we want to map the dependencies to the Single View Data Model.
In our case, we will map registryId, name, city and state from the Projection registry, and the order list from the Projection orders.
- No Code
- Low Code
The following explains how to configure an Aggregation using the No Code feature, available from version 11.3.0 of the Mia-Platform Console.
Please make sure that your project has activated this feature. You might need to ask your Project Administrator for it.
Assuming that the ER Schema and the base projection have already been selected (see previous paragraphs), here is a list of steps to be executed to configure the Aggregation:
- Select the field
registryId: a panel will open to the right where we can select the dependencyregistryand the fieldregistry_id. - Select the field
name: a panel will open to the right where we can select the dependencyregistryand the fieldname. - Select the field
city: a panel will open to the right where we can select the dependencyregistryand the fieldcity. - Select the field
state: a panel will open to the right where we can select the dependencyregistryand the fieldstate. - Select the field
orders: it will open a panel with the list of fields inside the Array of Objects orders defined in the Data Model. - Click on the Edit dependencies (0) button to create the dependency between
registryandordersin the Aggregation: inside the modal click first on the Add dependency button to start configuring the dependency.- select the Source Projection
registry: the rest of the form should fill automatically and a click on the Add dependency button will generate the dependency. - click on Save to update the Aggregation with the new dependency. You will see the
ordersfield having an additional panel with the mapping of the fields for each element:- select the field
id: a panel will open to the right where we can select the dependencyordersand the fieldorder_id. - select the field
price: a panel will open to the right where we can select the dependencyordersand the fieldprice. - select the field
name: a panel will open to the right where we can select the dependencyordersand the fieldname. - select the field
date: a panel will open to the right where we can select the dependencyordersand the fielddate.
- select the field
- select the Source Projection
In case you want to reset the aggregation by changing the Base Projection, you have to go to the Settings tab and click the Edit button inside the General card.
After the following steps, the Aggregation is completely configured and, on configuration saving, it will be applied to the aggregation ConfigMap of the microservice. You can click on the toggle Advanced Mode at the bottom-left of the page to review your configuration in a JSON format.
To have an exhaustive explanation of how to configure an Aggregation with the No Code feature, you can refer to the specific documentation page.
Here's the Low-Code representation of the aggregation:
{
  "version": "1.0.0",
  "config": {
    "SV_CONFIG": {
      "dependencies": {
        "registry": {
          "type": "projection",
          "on": "_identifier"
        },
        "ORDERS": {
          "type": "config"
        }
      },
      "mapping": {
        "registryId": "registry.registry_id",
        "name": "registry.name",
        "city": "registry.city",
        "state": "registry.state",
        "orders": "ORDERS"
      }
    },
    "ORDERS": {
      "joinDependency": "order",
      "dependencies": {
        "order": {
          "type": "projection",
          "on": "registry_to_order"
        }
      },
      "mapping": {
        "id": "order.order_id",
        "price": "order.price",
        "name": "order.name",
        "date": "order.date"
      }
    }
  }
}
SV_CONFIGis the starting point of the configuration of the Single View, made of two fields:dependencies: represents the set of collections that will be used to compute the aggregation of the Single View. In this case:registryis the dependency that will be used to get the base projectionregistry, referencing the_identifierkeyword to use the Projection Change record in the query to obtain the record.ORDERSis a dependency that has its own configuration, described later.
mapping: defines the relation between single view fields and projection fields, using thedependenciesdefined before:registryIdis mapped to the fieldregistry_idfrom theregistryprojection.nameis mapped to the fieldnamefrom theRegistryprojection.cityis mapped to the fieldcityfrom theregistryprojection.stateis mapped to the fieldstatefrom theregistryprojection.ordersis mapped to referred to the dedicatedORDERSconfiguration, where:joinDependencyis used to define that this dependency is the result of a 1:N relation (1 registry to N orders), so to define that each element oforderswill have its ownorderdependencydependenciesare the dependencies that will be used to calculate the order list:orderis the dependency that will be used to get the order information directly from the Projection, where the conditionregistry_to_orderis contained in the ER Schema and will be used as a query to the get theordersdocuments.
mappingdefines the relation between single view fields and projection fields, using thedependencydefined beforeidis mapped to the fieldidfrom theordersprojection.priceis mapped to the fieldpricefrom theordersprojection.nameis mapped to the fieldnamefrom theordersprojection.dateis mapped to the fielddatefrom theordersprojection.
To have an exhaustive explanation of how to configure an Aggregation with the Low Code feature, you can refer to the specific documentation page.
After setting the single view, we can save the configuration.
Strategies
Once we have defined how the projections should be aggregated into a single view, we have to define the logic on how to update single view records after a projection has been created/updated/deleted.
This is possible by defining strategies that will:
- receive a projection document as input;
- find the base projection linked to the document, based on the relations made on our ER Schema;
- generate a Projection Change, that will be used in the aggregation process to define the Single View Key and query the base projection.
Strategies can have different definitions, based on the architecture employed during this tutorial:
-
if you have defined a RTU having the following environment variables:
PROJECTION_CHANGES_ENABLED:true
then you are using a Standard Architecture where strategies are executed within the Real Time Updater;
-
if you have defined a RTU having the following environment variables:
KAFKA_PROJECTION_UPDATES_ENABLED:truePROJECTION_CHANGES_ENABLED:false
or you have configured a PS, then you are using a Event Driven Architecture, where strategies are executed by an additional microservice, the Single View Trigger Generator (SVTG).
We will see, for each architecture, what are the steps needed to enable strategies.
- Standard Architecture
- Event Driven Architecture
Going into the fast-data-delivery-realtime-updater microservice page, we have to configure the following resources:
- The ER Schema, to understand how the records across several projections are linked with paths.
- The Projection Changes Schema, which is a configuration that explains how to traverse this paths in order to obtain a Projection Change identifier, the one that we have linked to the Single View Key
(in this tutorial it was named
registry_id).
ER Schema
If we consider the ER Schema that we have done during the Single View ER Schema step, we can notice that is bi-directional, i.e. it has a link that can be traversed both from registry and orders.
This means that it can be useful not only for the aggregation process (retrieve projections from base projection), but also to retrieve the base projection given other projections.
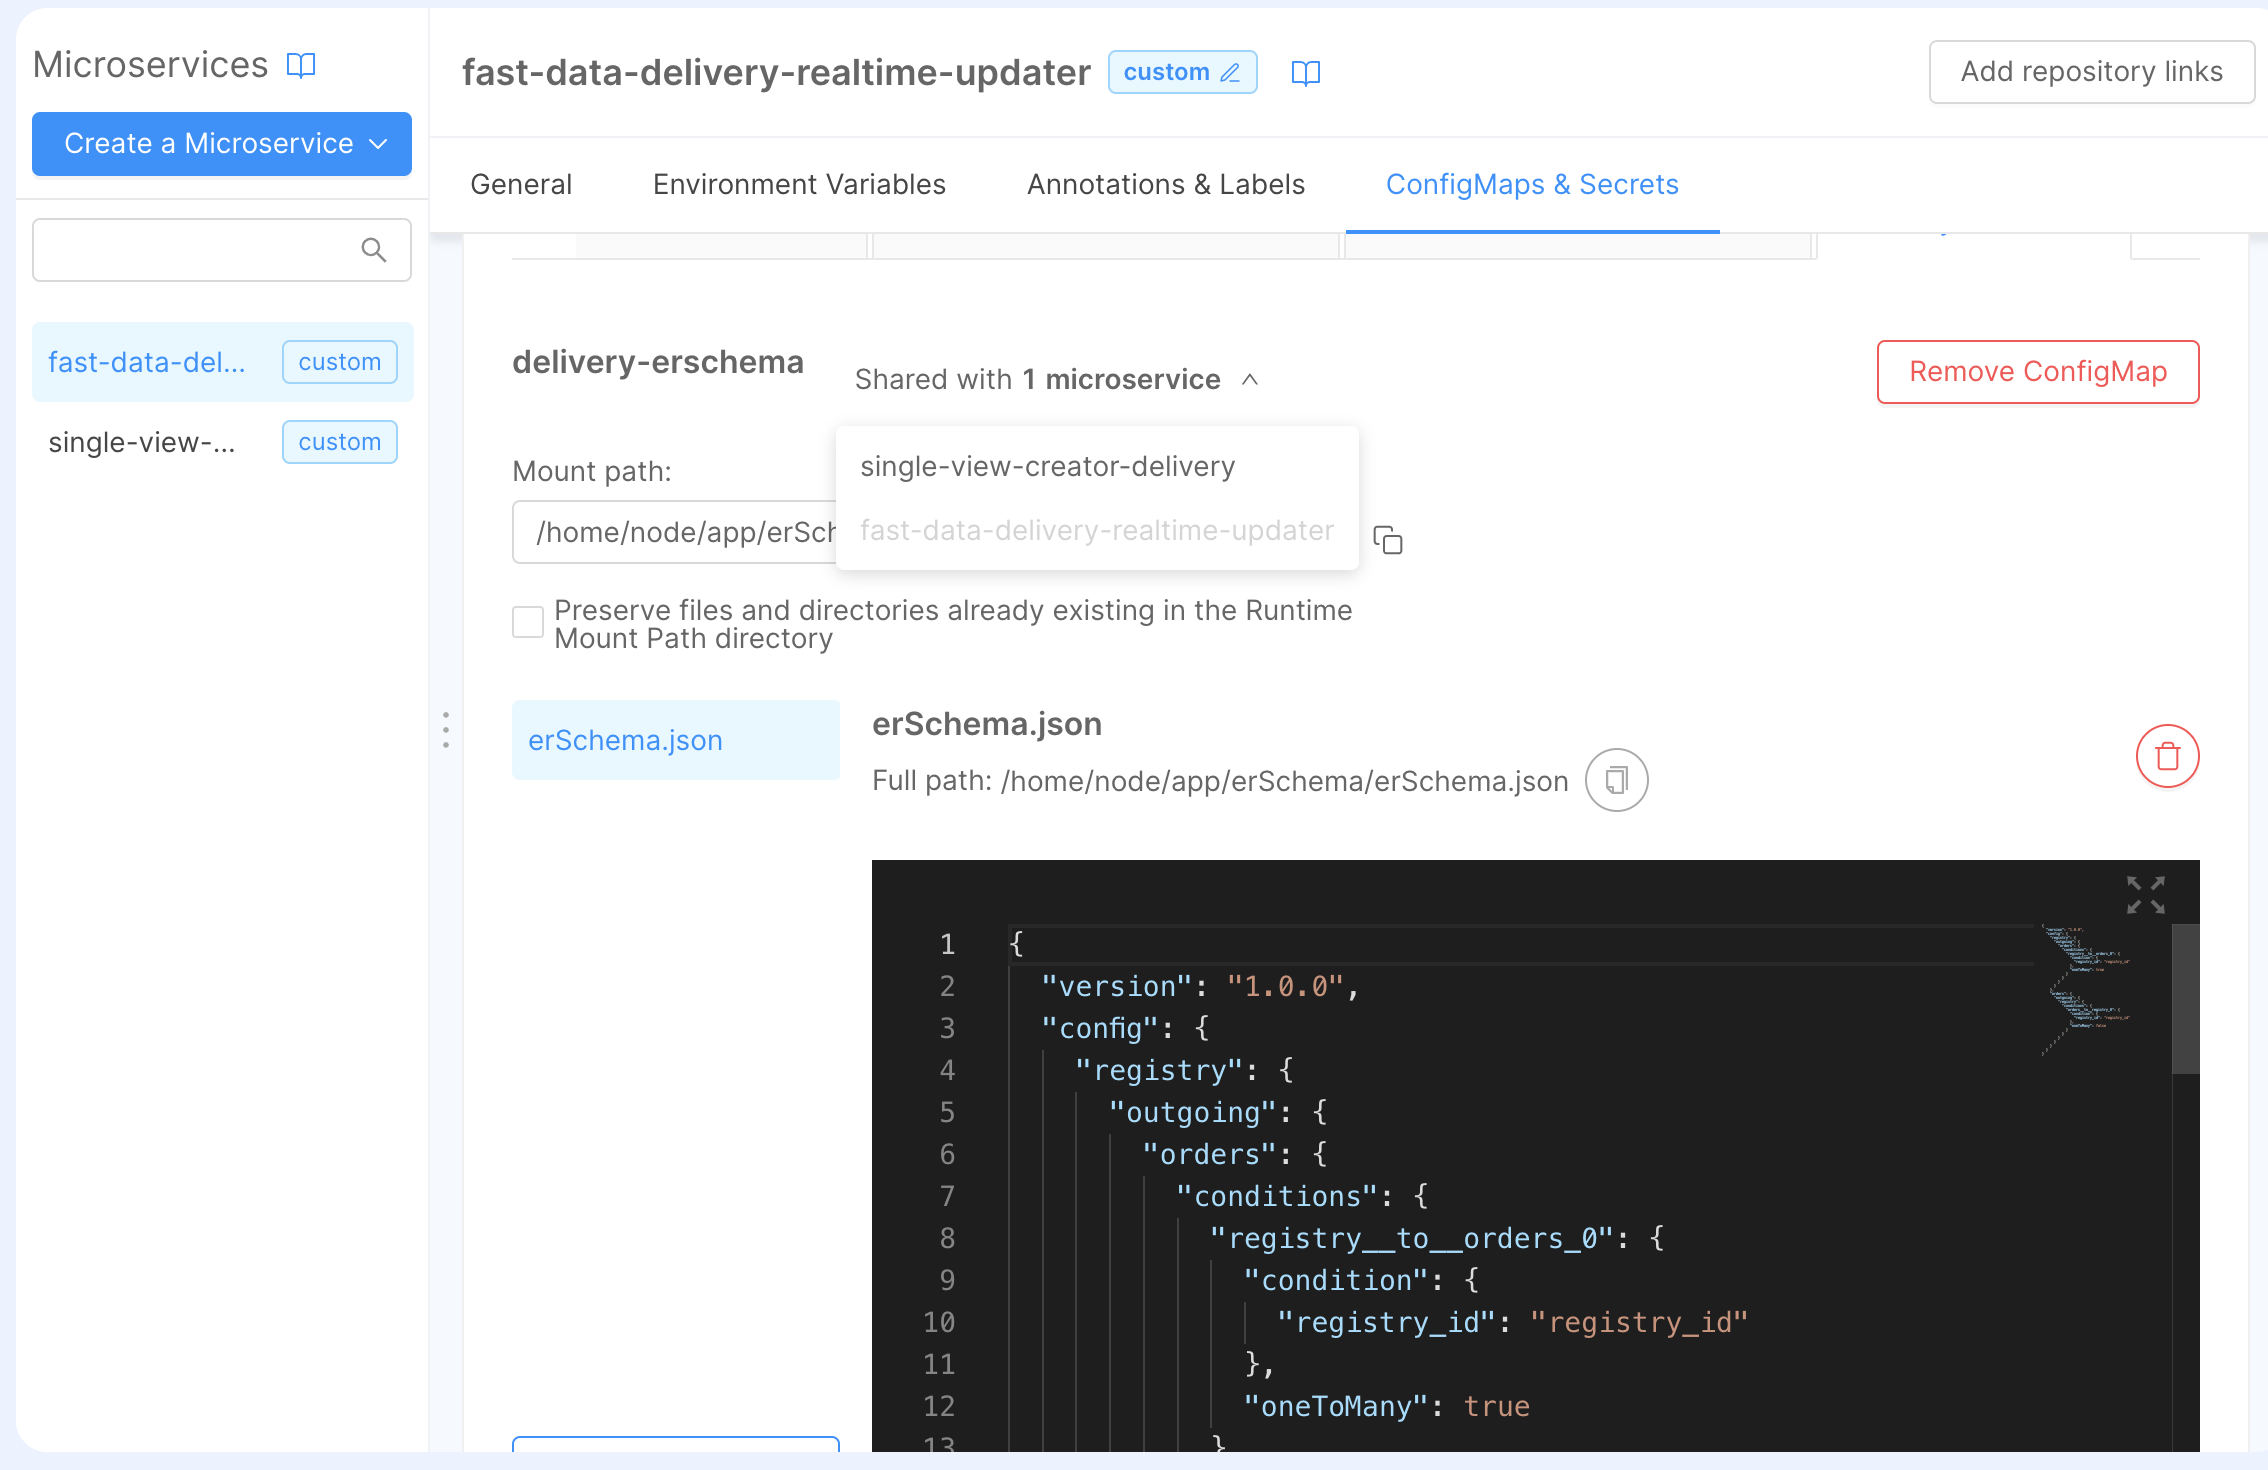
To re-use it in the RTU, we have to do the following steps in the fast-data-delivery-realtime-updater, more precisely in the Config Map & Secrets sections:
- delete the existing, empty config map finishing with the suffix
-er-schema; - create a new config map:
- when choose the name, pick the name
delivery-erschemathat will be suggested by the autocomplete prompt; - choose
/home/node/app/erSchemaas mount path
- when choose the name, pick the name
- once created the config map, you will see that it's shared among the RTU and the SVC.
Projection Changes Schema
The Projection Changes Schema is a configuration that, for one or more single view, tells the RTU the possible paths that can be traversed in the ERSchema to obtain a base projection and generate a Projection Change identifier.
Since there is only one link between registry and orders, we have to provide only one path using the following JSON object:
{
  "version": "1.0.0",
  "config": {
    "order-history": {
      "paths": [
        {
          "path": [
            "order",
            "registry"
          ],
          "identifier": {
            "registry_id": "registry_id"
          }
        }
      ]
    }
  }
}
With this configuration, the Single View that we are going to create can be updated with both of the following ways:
- if we update the Projection
registry, then we can read theregistry_iddirectly from there. - if we update the Projection
orders, we will search the related document inside the Projectionregistry, then we can read theregistry_id.
Finally, the identifier will map object will map a subset of fields into the identifier of the Projection Change record: in this case, we will map the field registry_id to the registry_id value of the base projection.
You can find a detailed explanation of the Projection Changes Schema configuration on the dedicated page of the documentation.
Strategies
Once the strategy has been configured, we have to instruct the RTU on what projections strategies needs to be enabled.
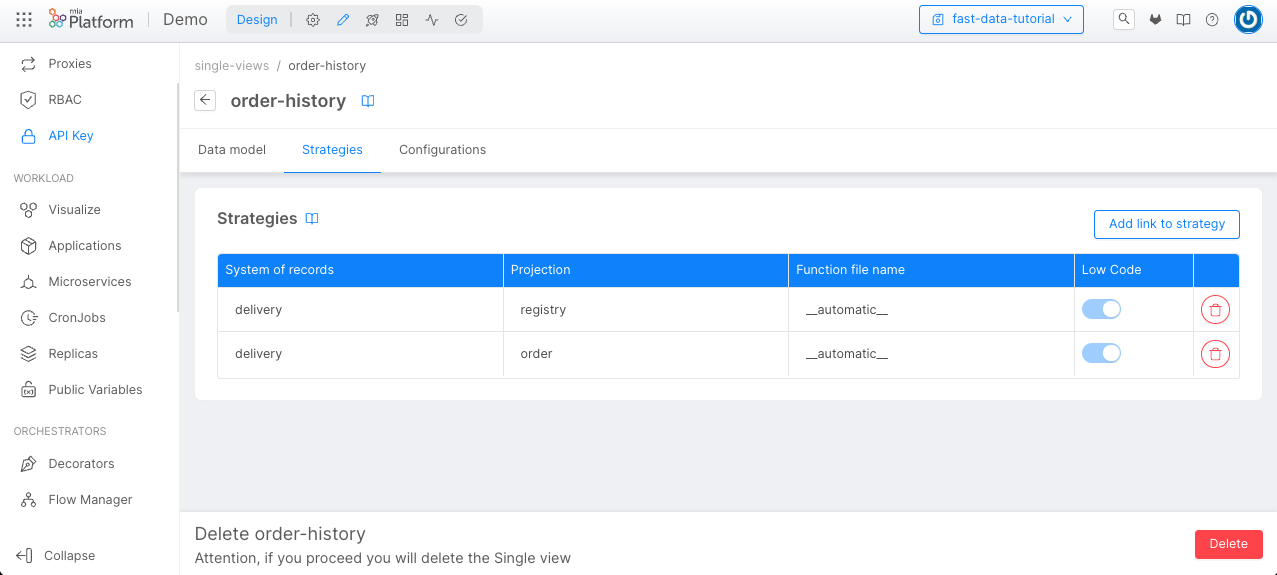
We can do this step by linking the strategies to the Single View. Go to the Single View section, and inside the order-history, click on the Add link to strategy button in the Strategies tab.
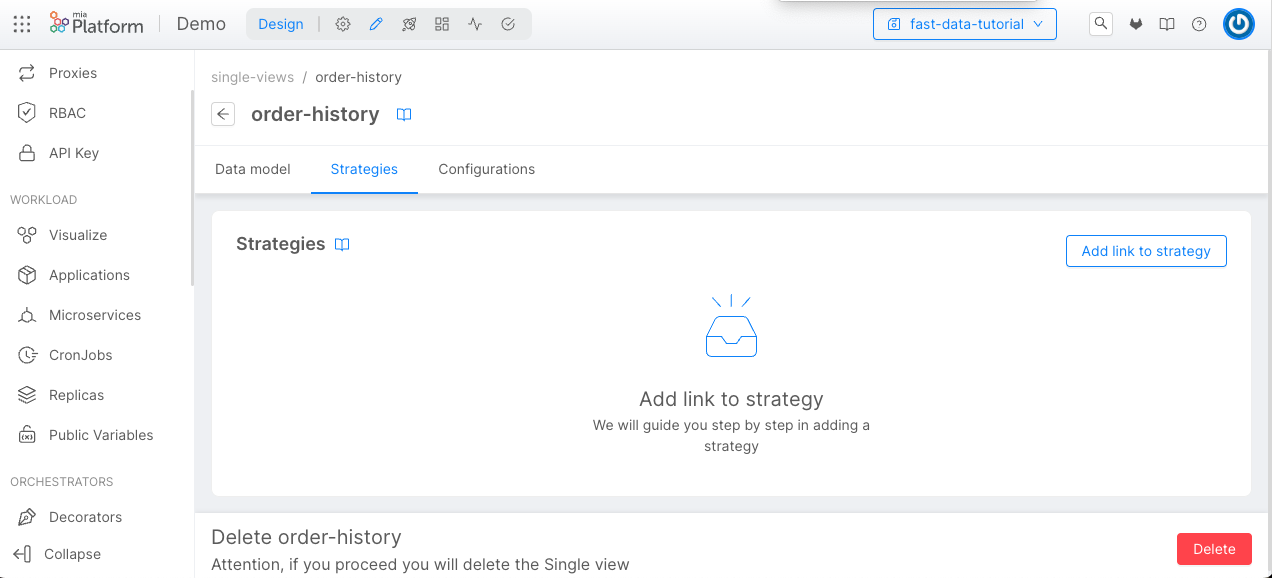
Now, we will choose the System of Record delivery and the registry Projection.
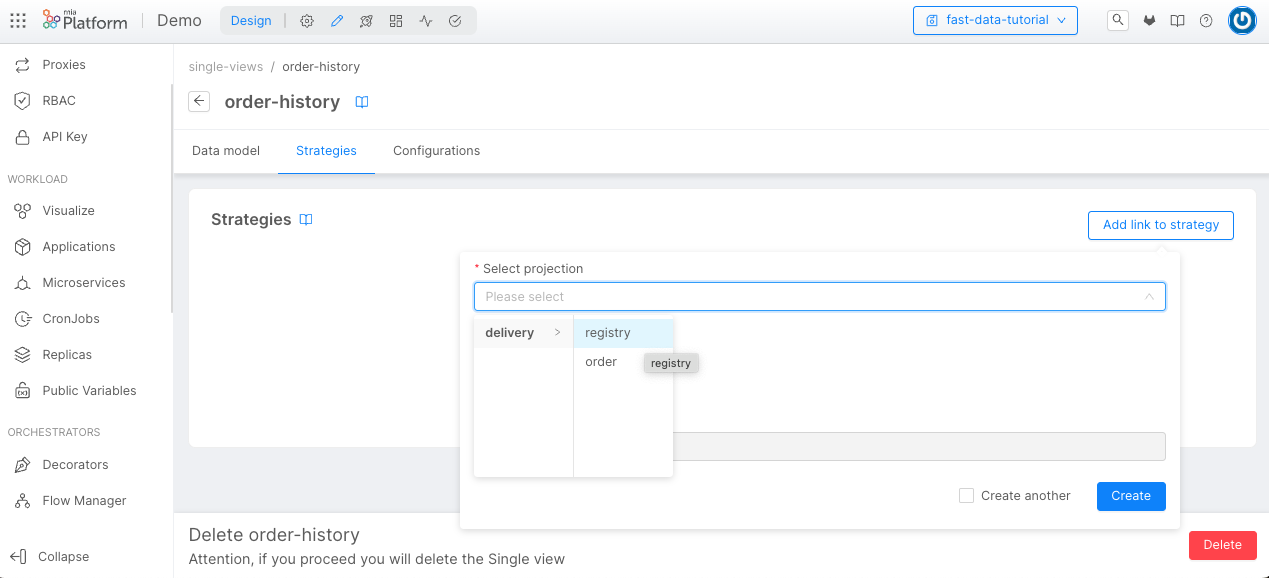
We need to choose the Strategy Source. In this case, we will use the Low Code strategy, then we can click on the Create button.
We have to link the strategy also for the orders Projection, repeating the same process.
With the Event Driven Architecture, strategies are executed after a pr-update message by a dedicated microservice, the Single View Trigger Generator. (SVTG)
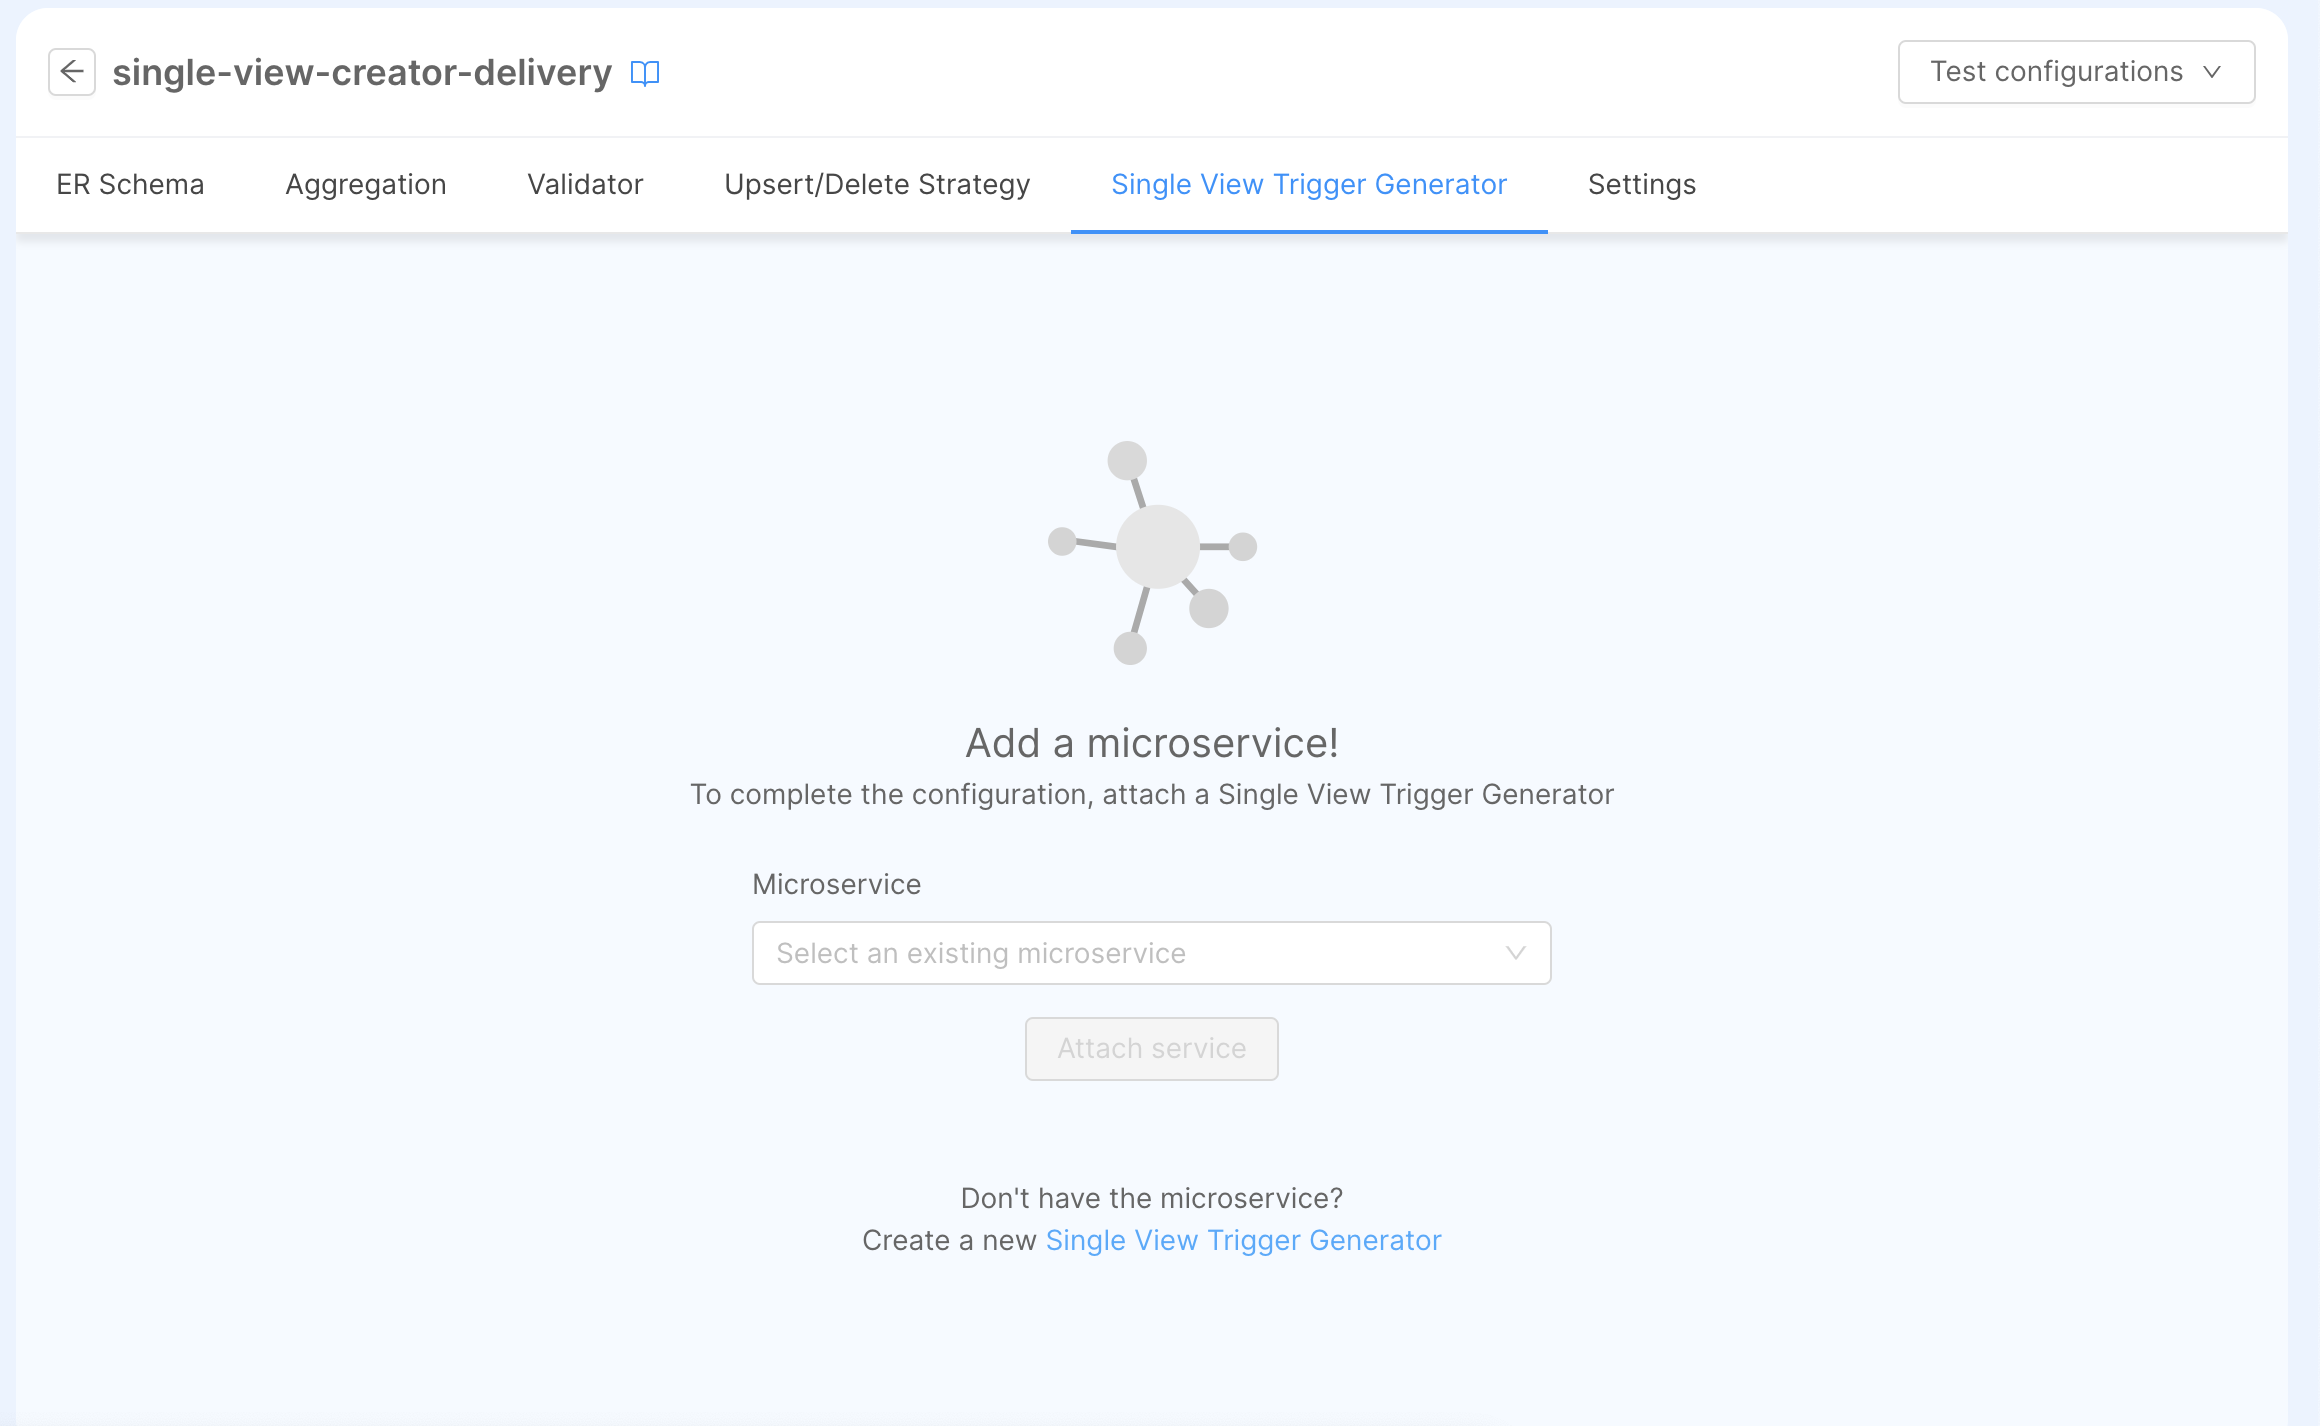
Going into the Single View Creator Section of the single view order-history, you can go the Single View Trigger Generator tab, where you can find a link that will redirect you to the Marketplace to choose the SVTG item.
There, we can pick a name, in our case will be single-view-trigger-generator-delivery, and also choose the name of the Event Store Config: is a configuration that will contain the connection options of the microservice, in our case will be named delivery.
Once the microservice has been, you can go to ConfigMaps & Secrets of the microservice and edit the configuration accordingly to the producer configuration, which can either be Kafka or MongoDB. For that, you can use as references the examples provided by its dedicated section and fill it with your connection parameters.
Also, you have to configure the required property EVENT_STORE_TARGET, which represents the target where the service will write the result of the strategies, which will be:
- if the SVC reads Projection Changes records from MongoDB, the projection changes collection, i.e.
fd-pc-delivery; - if the SVC reads Trigger Messages from Kafka, the trigger topic that has been already configured, i.e.
demo.development.delivery.order-history.trigger.
Then, you can go back to the single view section and attach the newly created SVTG in the Single View Trigger Generator section.
The page will show the two configurations that are needed to setup strategies
Kafka Projection Updates
This configuration instructs the microservice on which projections will be registered to the Kafka Consumer, and the type of strategies will be executed after receiving a pr-update message.
{
  "registry": {
    "updatesTopic": "demo.development.delivery.registry.pr-update",
    "strategy": "__automatic__"
  },
  "orders": {
    "updatesTopic": "demo.development.delivery.orders.pr-update",
    "strategy": "__automatic__"
  }
}
For each projection, registry and orders, we are defining their pr-update topic (demo.development.delivery.registry.pr-update and demo.development.delivery.orders.pr-update, respectively) using the updatesTopic.
Moreover, the strategy field is set to __automatic__, meaning that strategies defined in the next configuration, Projection Changes Schema, will be used.
You can find a detailed explanation of the Kafka Projection Updates configuration on the dedicated page of the documentation.
Projection Changes Schema
The Projection Changes Schema is a configuration that, for one or more single view, tells the RTU the possible paths that can be traversed in the ERSchema to obtain a base projection and generate a Projection Change identifier.
Since there is only one link between registry and orders, we have to provide only one path using the following JSON object:
{
  "version": "1.0.0",
  "config": {
    "order-history": {
      "paths": [
        {
          "path": [
            "order",
            "registry"
          ],
          "identifier": {
            "registry_id": "registry_id"
          }
        }
      ]
    }
  }
}
With this configuration, the Single View that we are going to create can be updated with both of the following ways:
- if we update the Projection
registry, then we can read theregistry_iddirectly from there. - if we update the Projection
orders, we will search the related document inside the Projectionregistry, then we can read theregistry_id.
Finally, the identifier will map object will map a subset of fields into the identifier of the Projection Change record: in this case, we will map the field registry_id to the registry_id value of the base projection.
You can find a detailed explanation of the Projection Changes Schema configuration on the dedicated page of the documentation.
Expose the Single View
Create Endpoint
Now we have the Projections, the Single View and each configuration ready to be used, we need to expose the Single View endpoints.
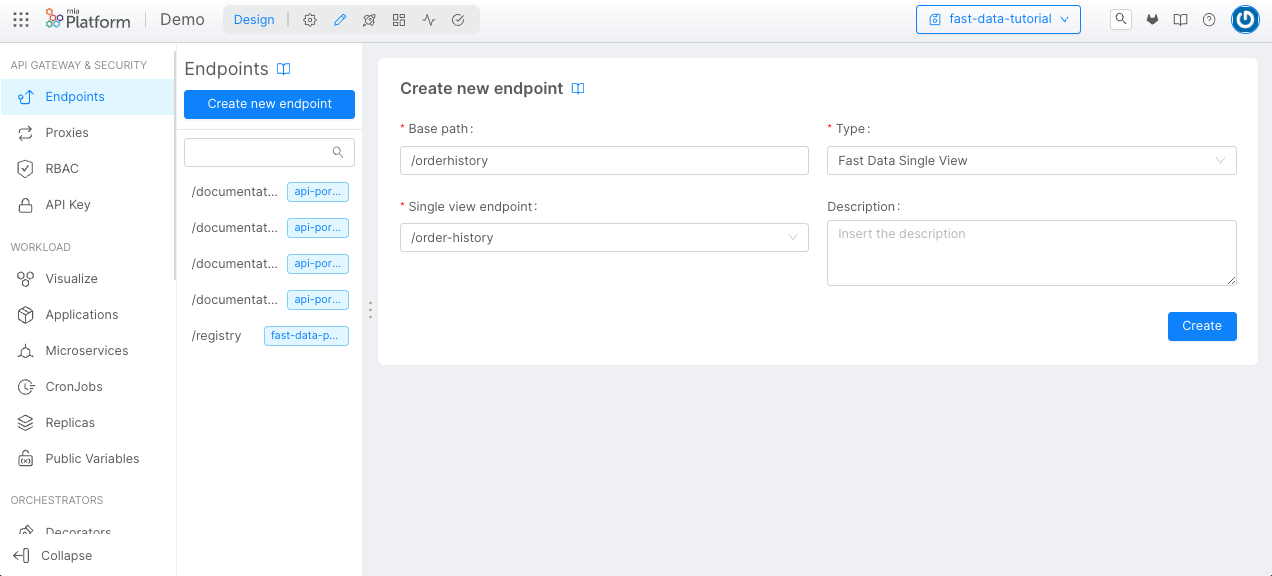
- Return to the Endpoints menu on the left;
- Select Create new endpoint;
- Choose the Base Path;
- Choose Single View as Type;
- Select from the list the name of our Single View, in this case: /order-history.
Now we can commit our changes, deploy, and try our Fast Data sending data from the Kafka Topic, and see the result in the Single View using the endpoints.
Test your Single View
You can now consume the order-history Single View using the APIs available in the API Documentations.
Lets try to update the price of the order from 123 to 124. First of all, you have to send an ingestion message to the orders projection.
{
  "key": {
    "order_id": "ord-1"
  },
  "value": {
    "op": "u",
    "before": {
      "date": "2024-02-16T11:13:48.322Z",
      "name": "order-1",
      "order_id": "ord-1",
      "price": 123,
      "registry_id": "reg-1"
    },
    "after": {
      "date": "2024-02-16T11:13:48.322Z",
      "name": "order-1",
      "order_id": "ord-1",
      "price": 124,
      "registry_id": "reg-1"
    }
  }
}
By making a GET request to the single view endpoint, we will see that the single view record related to reg-1 has been generated and updated with the order ord-1 having 124 as the current price.
[
  {
    "_id": "63ceb97fd6536c857e75a0f2",
    "__STATE__": "PUBLIC",
    "updatedAt": "2023-01-23T16:58:47.805Z",
    "registry_id": "reg-1",
    "name": "customer 1",
    "city": "customer city",
    "state": "customer state",
    "orders": [
      {
        "id": "ord-1",
        "price": 124,
        "name": "order-1",
        "date": "2024-02-16T11:13:48.322Z",
      }
    ]
  }
]
And here you can see the response with more customers and orders. The customer reg-1 has now more orders that are aggregated in the orders list.
[
  {
    "_id": "63ceb97f123123d6536c857e75a0f2",
    "__STATE__": "PUBLIC",
    "updatedAt": "2023-01-23T17:06:47.845Z",
    "registry_id": "reg-1",
    "name": "customer 1",
    "city": "customer city",
    "state": "customer state",
    "orders": [
      {
        "id": "ord-1",
        "price": "123",
        "name": "order-1",
        "date": "23/1/2023"
      },
      {
        "id": "ord-2",
        "price": "10",
        "name": "order-2",
        "date": "23/1/2023"
      }
    ]
  },
  {
    "_id": "63c123ebea7d6123123123536c857e775f93",
    "__STATE__": "PUBLIC",
    "updatedAt": "2023-01-23T17:06:47.859Z",
    "registry_id": "reg-2",
    "name": "customer 2",
    "city": null,
    "state": null,
    "orders": [
      {
        "id": "ord-3",
        "price": "25",
        "name": "order-3",
        "date": "23/1/2023"
      }
    ]
  }
]