Integrate an external Identity Provider
In order to provide a higher security level, you may need to protect your endpoints using an external Identity Provider (IdP) such as Okta, Keycloak, etc.
This page will guide you through the integration of an external IdP in your Mia-Platform project.
Definition
The involved microservice of the flow are:
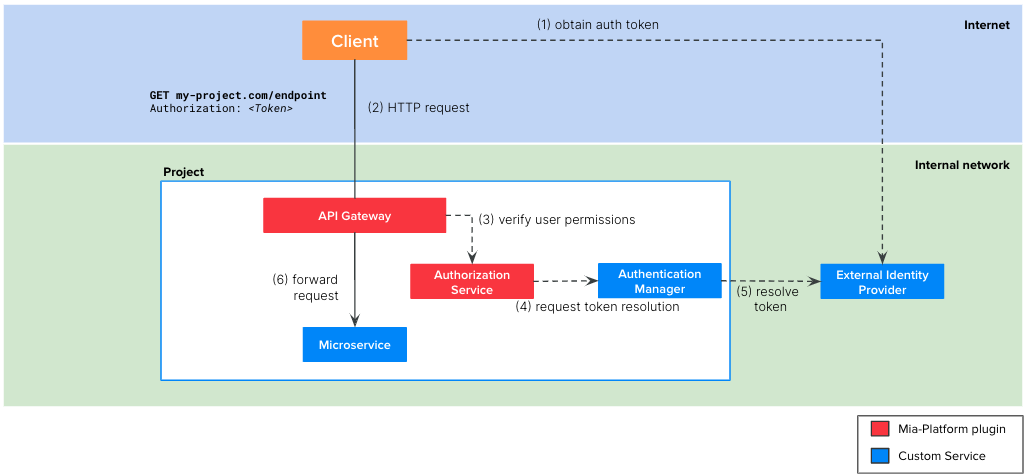
API Gateway: Mia-Platform plugin available in Nginx or EnvoyAuthorization Service: Mia-Platform pluginAuthentication Manager: a custom microservice that you need to implement. It must integrate with your external IdP to resolve the user token.- The microservice connected to the endpoint
The picture above illustrates the steps of the auth flow:
- The client, be it a web application or a backend software, needs to implement the authentication flow required by the IdP to obtain a valid token. With this token, the client will be able to call the endpoints of your project.
- The client calls the endpoint of your project, including the valid token in the request. Usually this token is placed in the
Authorizationheader but it can be placed in other headers or cookies. - The
API Gatewaycalls theAuthorization Servicewhich is in charge to verify if the user who made the request is authorized to access to the requested endpoint. - To do so, the
Authorization Servicerequests to theAuthentication Managerto resolve the token - The
Authentication Serviceresolves the token by contacting the external IdP and returns the user payload to theAuthorization Servicethat can now check if the user belongs to the authorized groups - If the verification performed by the
Authentication Serviceis successful, then theAPI Gatewayforwards the original HTTP request the right microservice of the project. Note that the target microservice will receive the following additional headers that could be useful for their business logic:
| Header | Description |
|---|---|
Miausergroups | comma separated list of the groups the user belongs to |
Miauserid | the ID of the user |
Miauserproperties | stringified JSON object containing the user payload returned by the Authentication Service |
Tutorial steps
We suppose that you have already created an API Gateway in your project and you already have some endpoints you want to secure.
In order to implement the flow depicted above, you can perform the following steps on Mia-Platform Console:
-
Create the
Authentication Managercustom microservice- Click on
Microservices - Click on
Create a Microserviceand selectFrom Markeplace - Choose your preferred template to start coding your custom Authentication Service
- Implement the
/userinfoendpoint. It must resolve the token on the external IdP and then return as response body a JSON object with at least theuserIDand thegroups. An example of response is:{"userID": "123","groups": ["admin", "users"]}
- Click on
-
Create the
Authorization Serviceplugin from Marketplace-
Click on
Microservices -
Click on
Create a Microserviceand selectFrom Markeplace -
Search
authorizationin the search bar -
Select
Authorization Service -
Click on
Create -
Update the values of the following environment variables:
Variable Value USERINFO_URL http://authentication-service/userinfo CUSTOM_USER_ID_KEY userID HEADERS_TO_PROXY <header of the client's request containing the token>(e.g.Authorization)AUTHORIZATION_HEADERS_TO_PROXY <header of the client's request containing the token>(e.g.Authorization)USER_PROPERTIES_TO_PROXY userID,groups
-
-
Secure the endpoint
- Select the endpoint you want to secure in the
Endpointssection of your project - Use the
User Group Permissiontextbox to choose the user groups authorized to call the endpoint. For example, if you want to allow access only toadminorusersyou should insert:groups.admin || groups.usersinfoScenario 1 and scenario 2 can be combined, and you could have complex group expressions like the following:
(clientType === 'A' || clientType === 'B') && (groups.admin || groups.users)
- Select the endpoint you want to secure in the