Mia-Platform Microfrontend Composer Tutorial
In this tutorial, we will install and configure the Mia-Platform Microfrontend Composer, customize its visual appearance, and create our first sample page with a table. This page will be connected to real data through the CRUD service. Consider this guide as your starting point to explore all the capabilities of the Mia-Platform Microfrontend Composer.
What We Will Build
Throughout this tutorial, we will:
- Set Up the Microservices
- Customize the Microfrontend Composer Appearance
- Create a Microfrontend Composer Table Page
- Connect the Page to the Microfrontend Composer Menu
- Save and Deploy the Microfrontend Composer
Prerequisites
Before starting, you should be familiar with the Mia-Platform Microfrontend Composer concepts and have the following:
- A CRUD microservice already created, follow the CRUD Tutorial if needed.
Setup the Microservices
You can install the Microfrontend Composer using either the Application or the individual microservices. For this tutorial, we will use the Application.
- Go to Applications and click on the
Create New Applicationbutton. - Search for
Microfrontend Composer Toolkitand click on the card.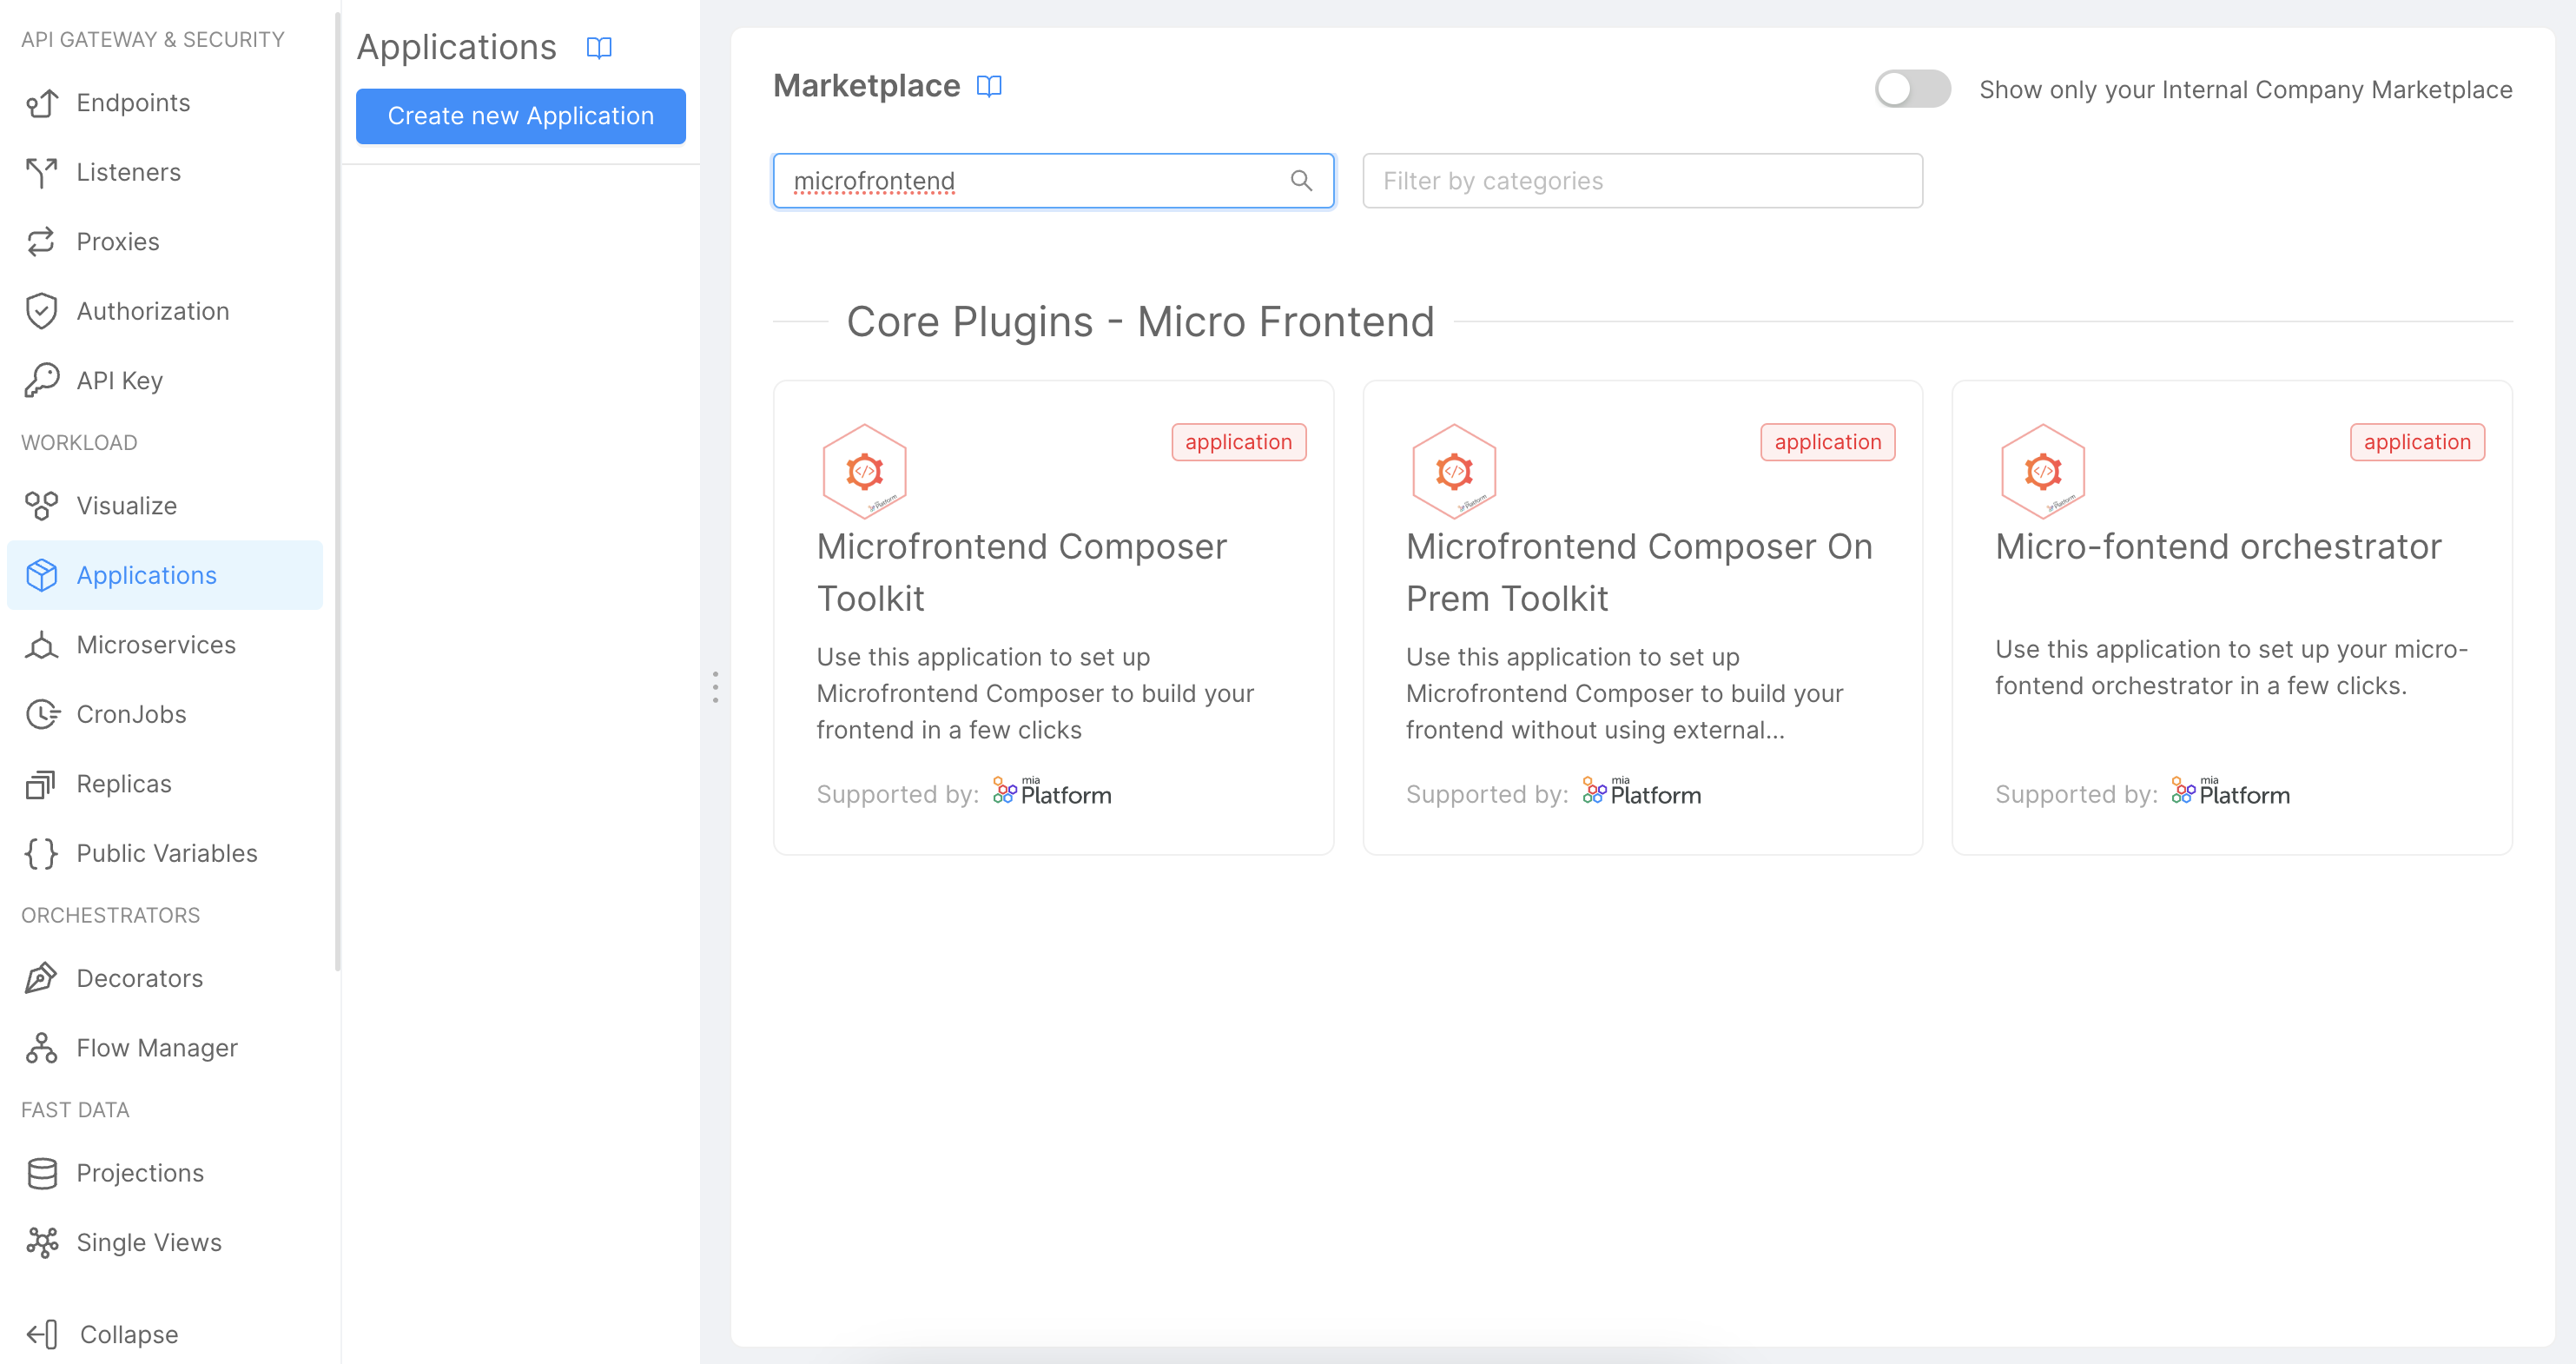
- Follow the wizard, selecting if you want to install new microservices or use existing ones.
- At the end, click the
Createbutton and then save the new Application.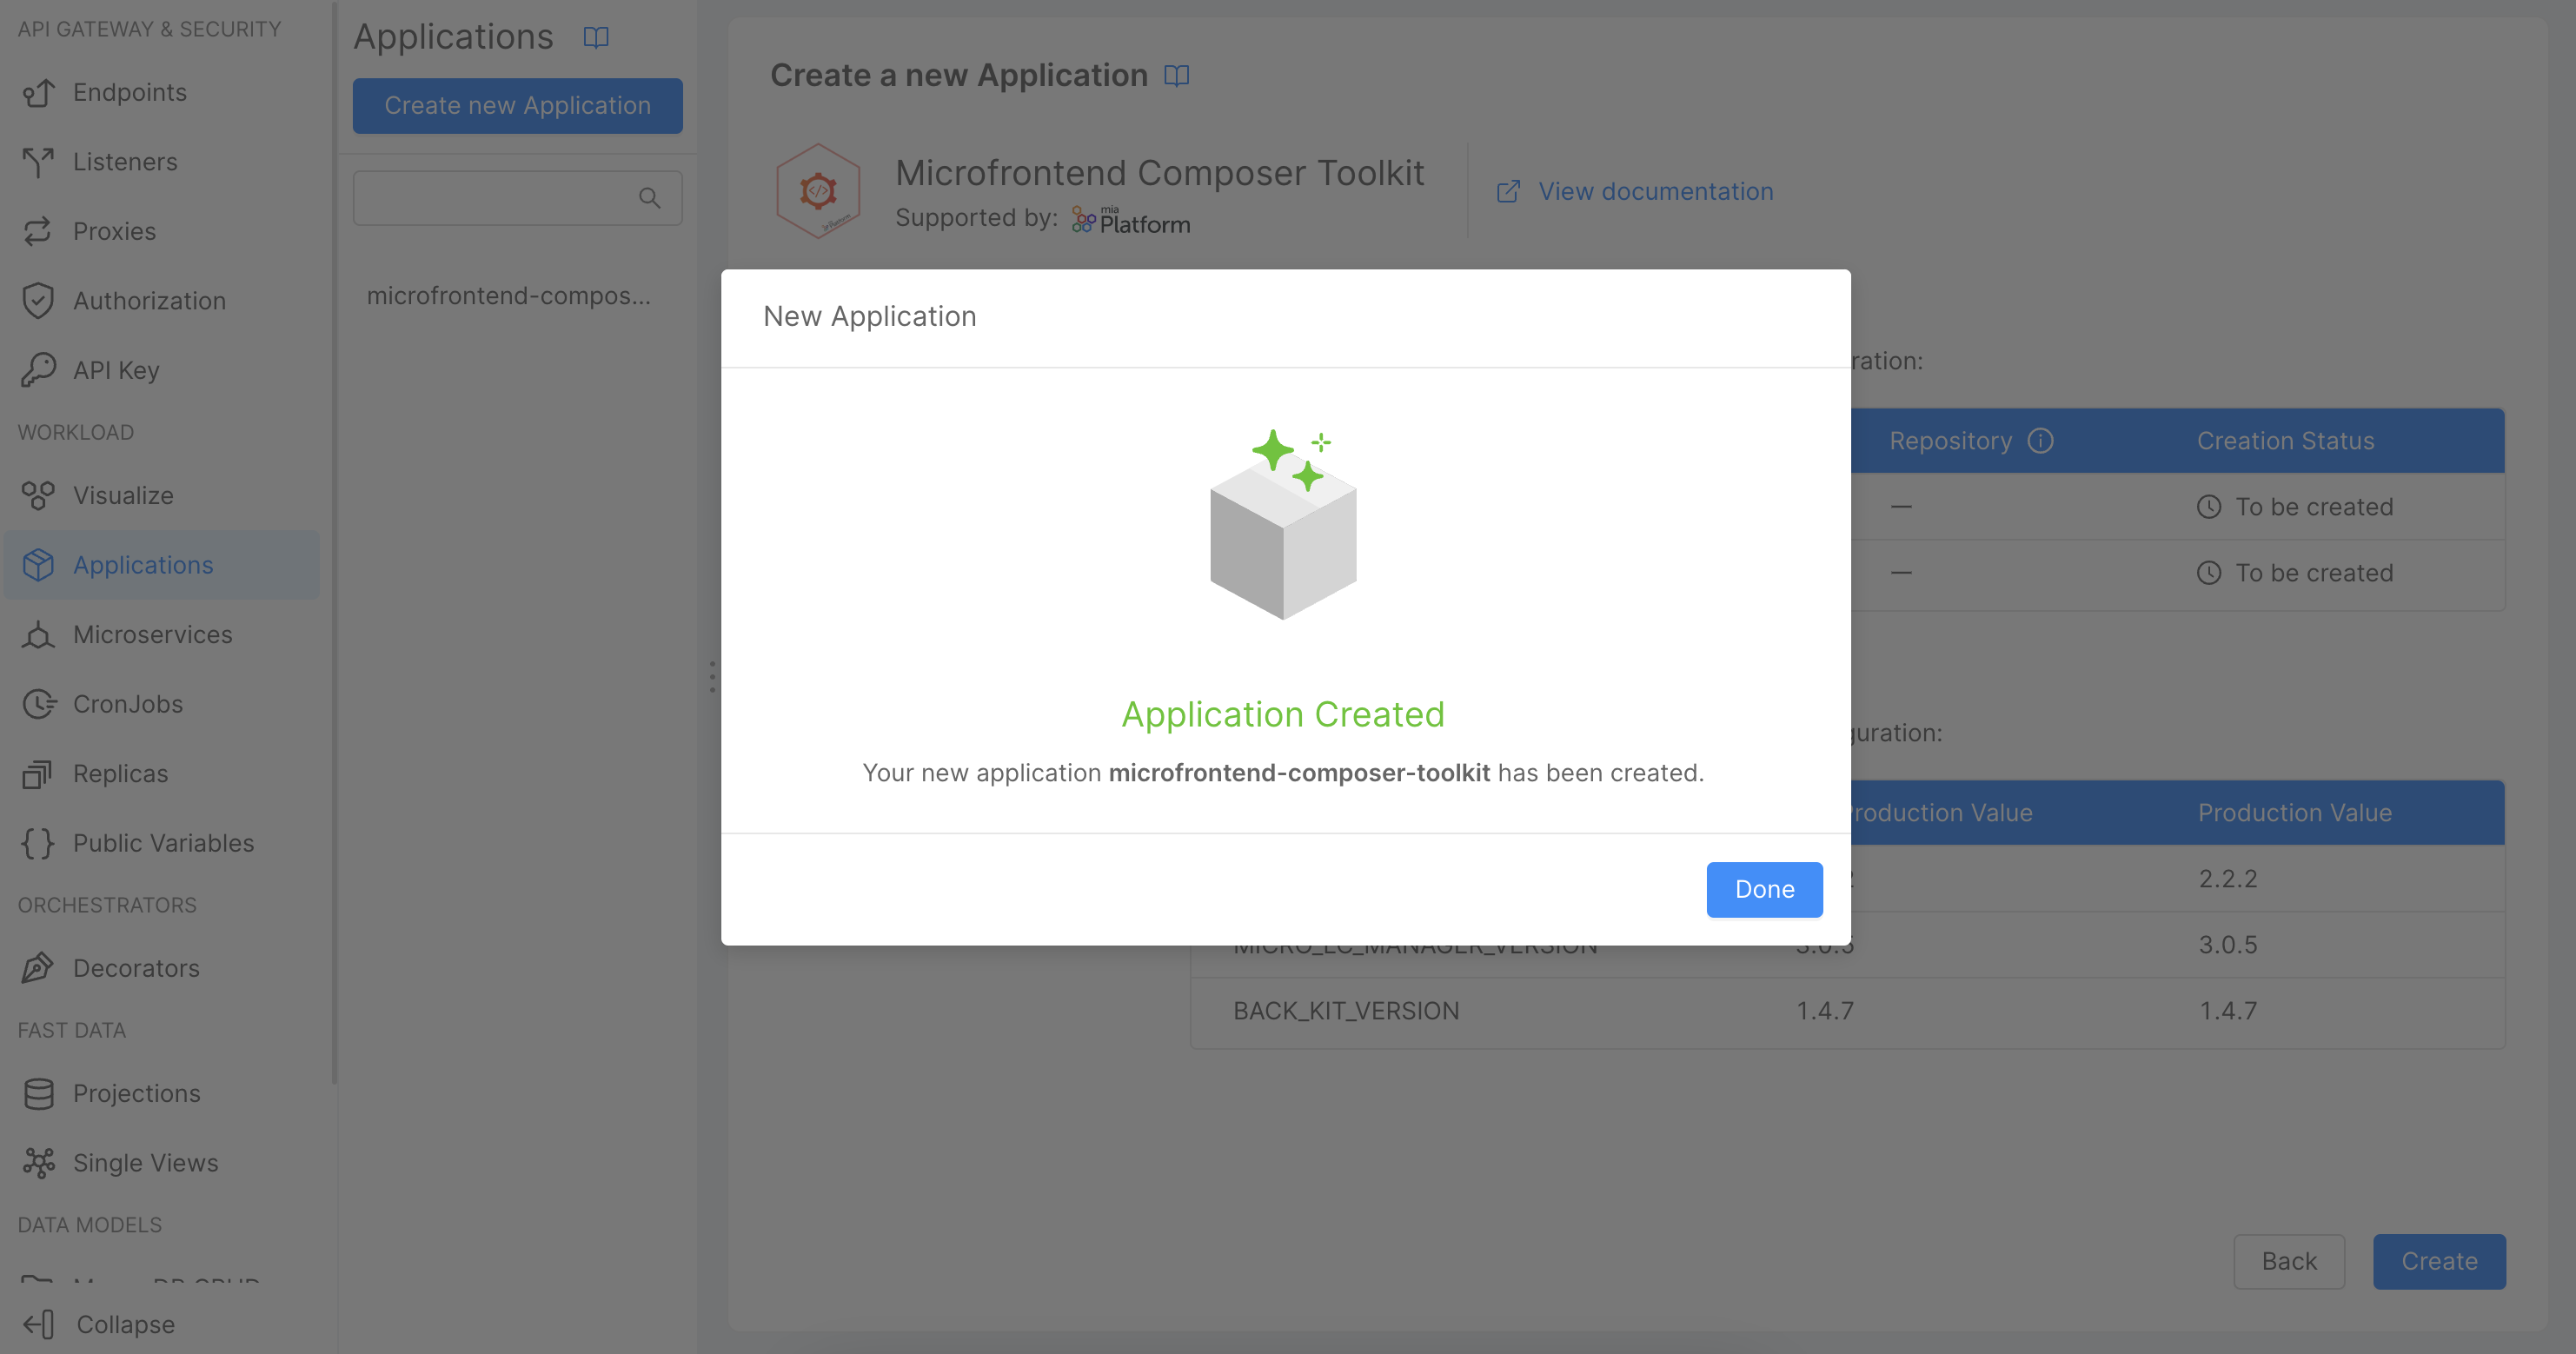
Customize the Microfrontend Composer Appearance
Next, navigate to the Microfrontend Composer Configuration to manage all settings. Here you can customize the appearance, navigation menu, add new pages, connect to APIs, and manage all configurations.
Customizing Appearance
- Click on the
Configurationsbutton in the left menu under theMicrofrontend Composersection.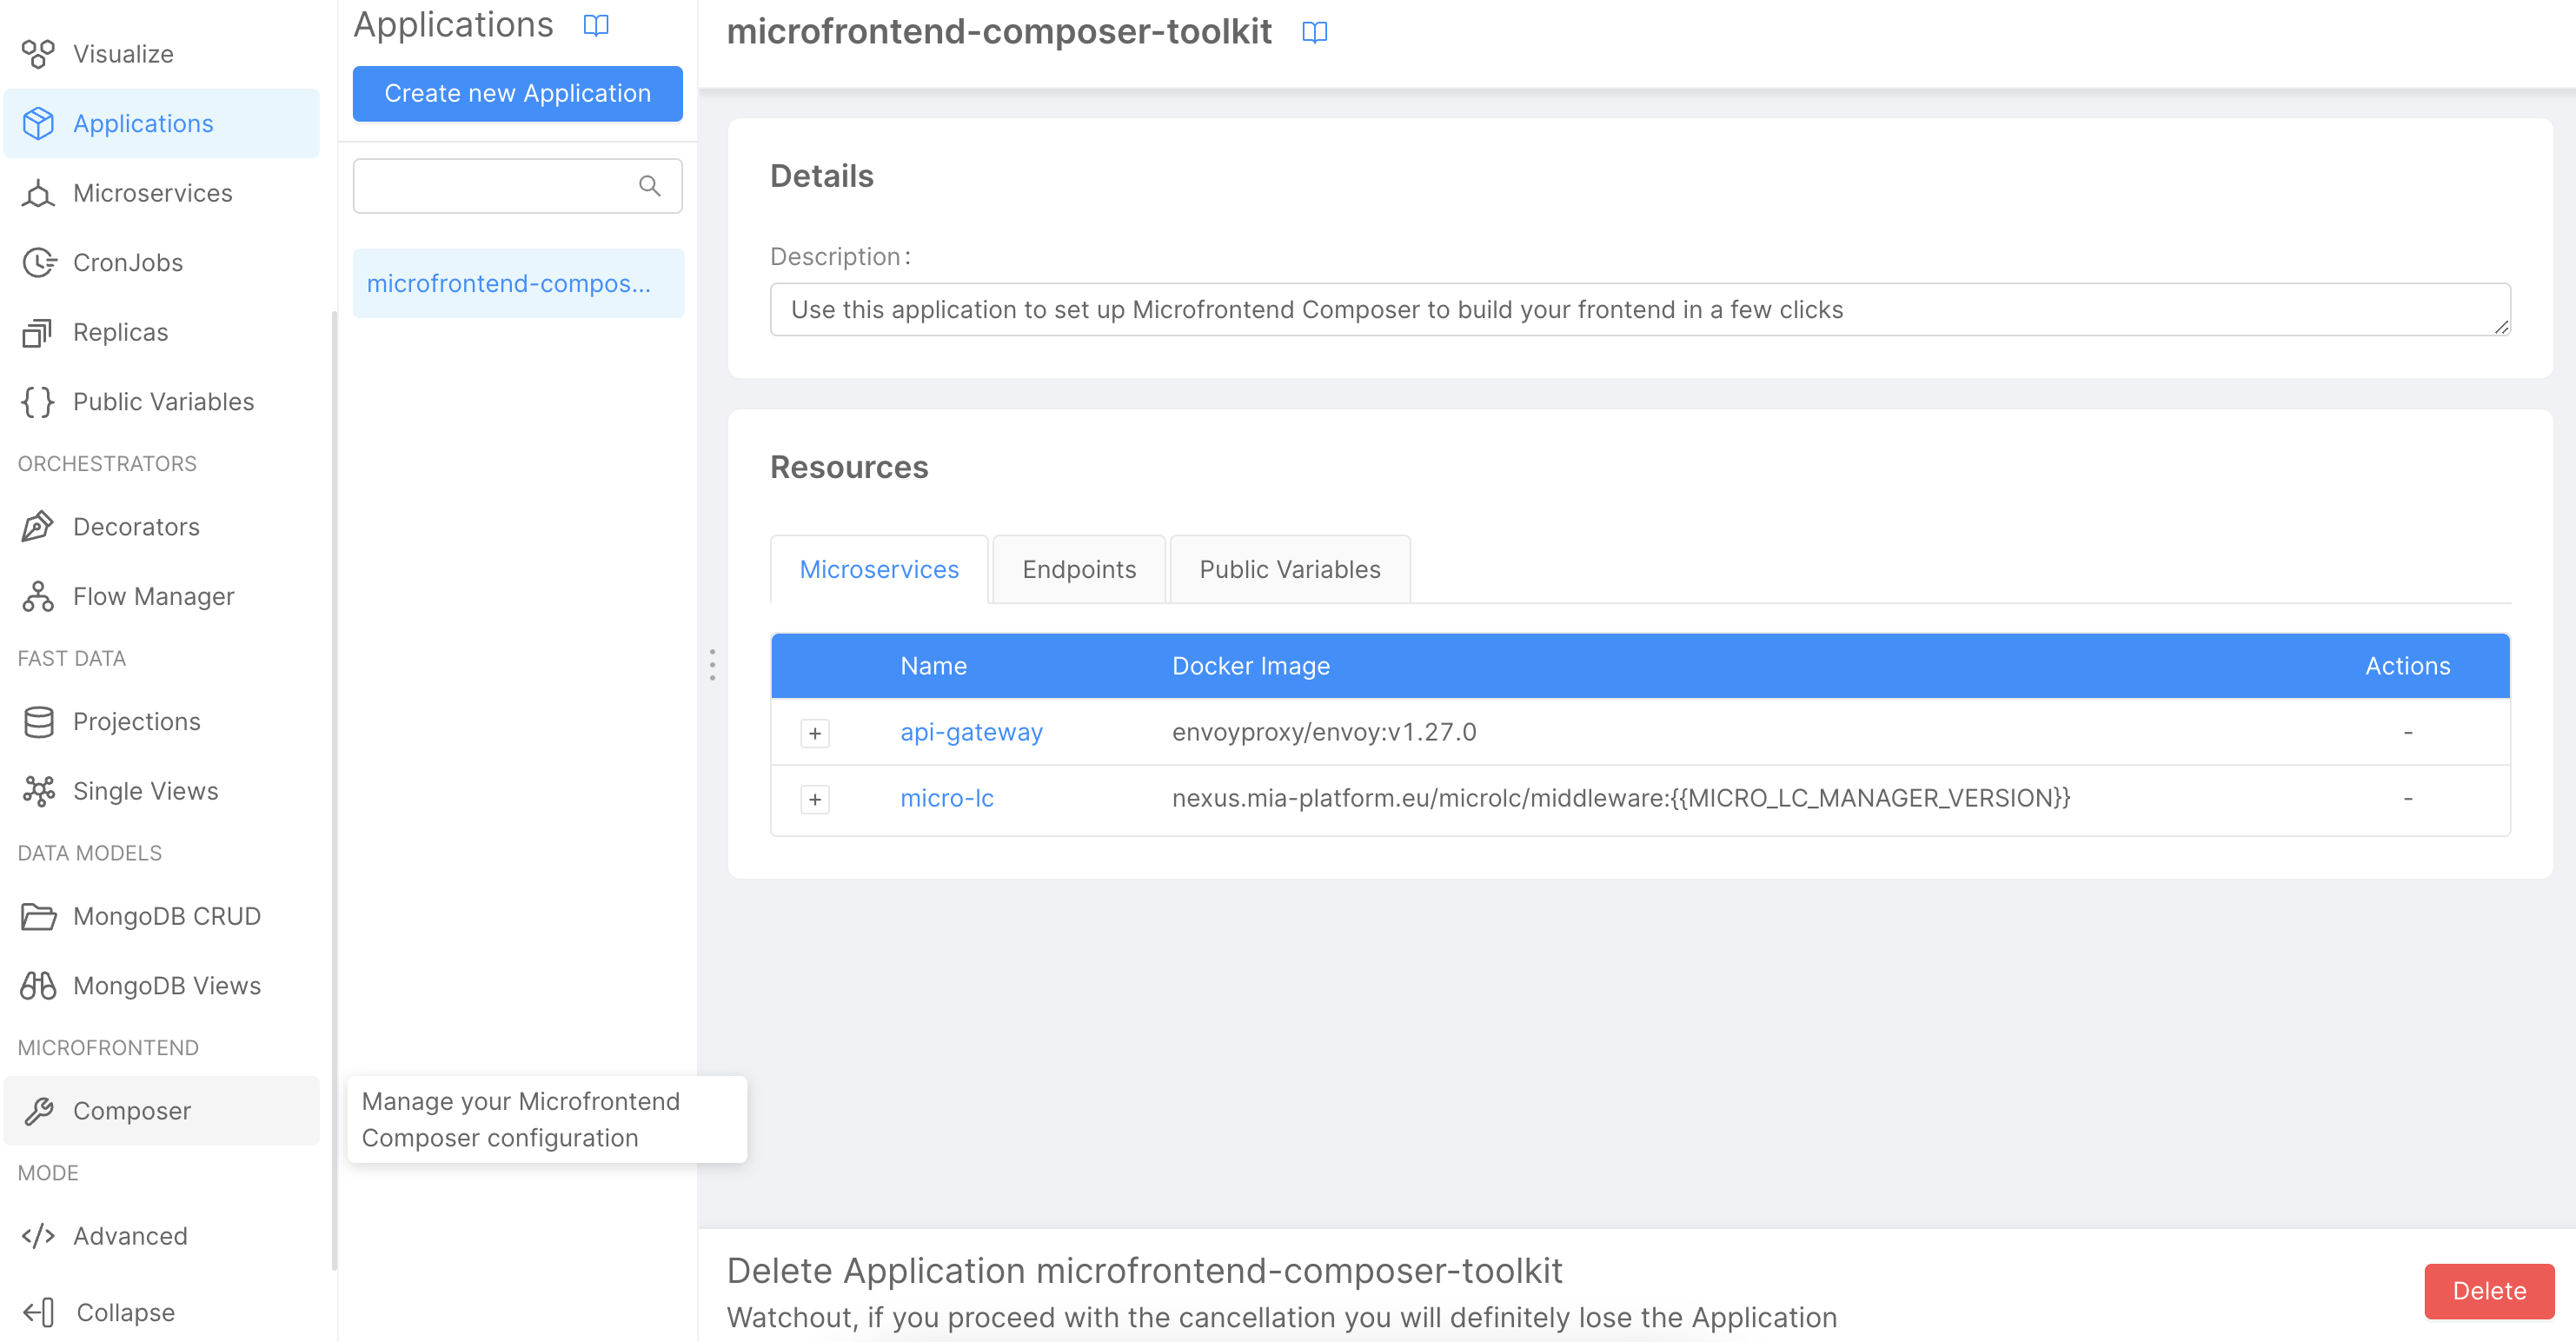
- Go to the
Layouttab, then click on theLayoutbutton to view the configuration.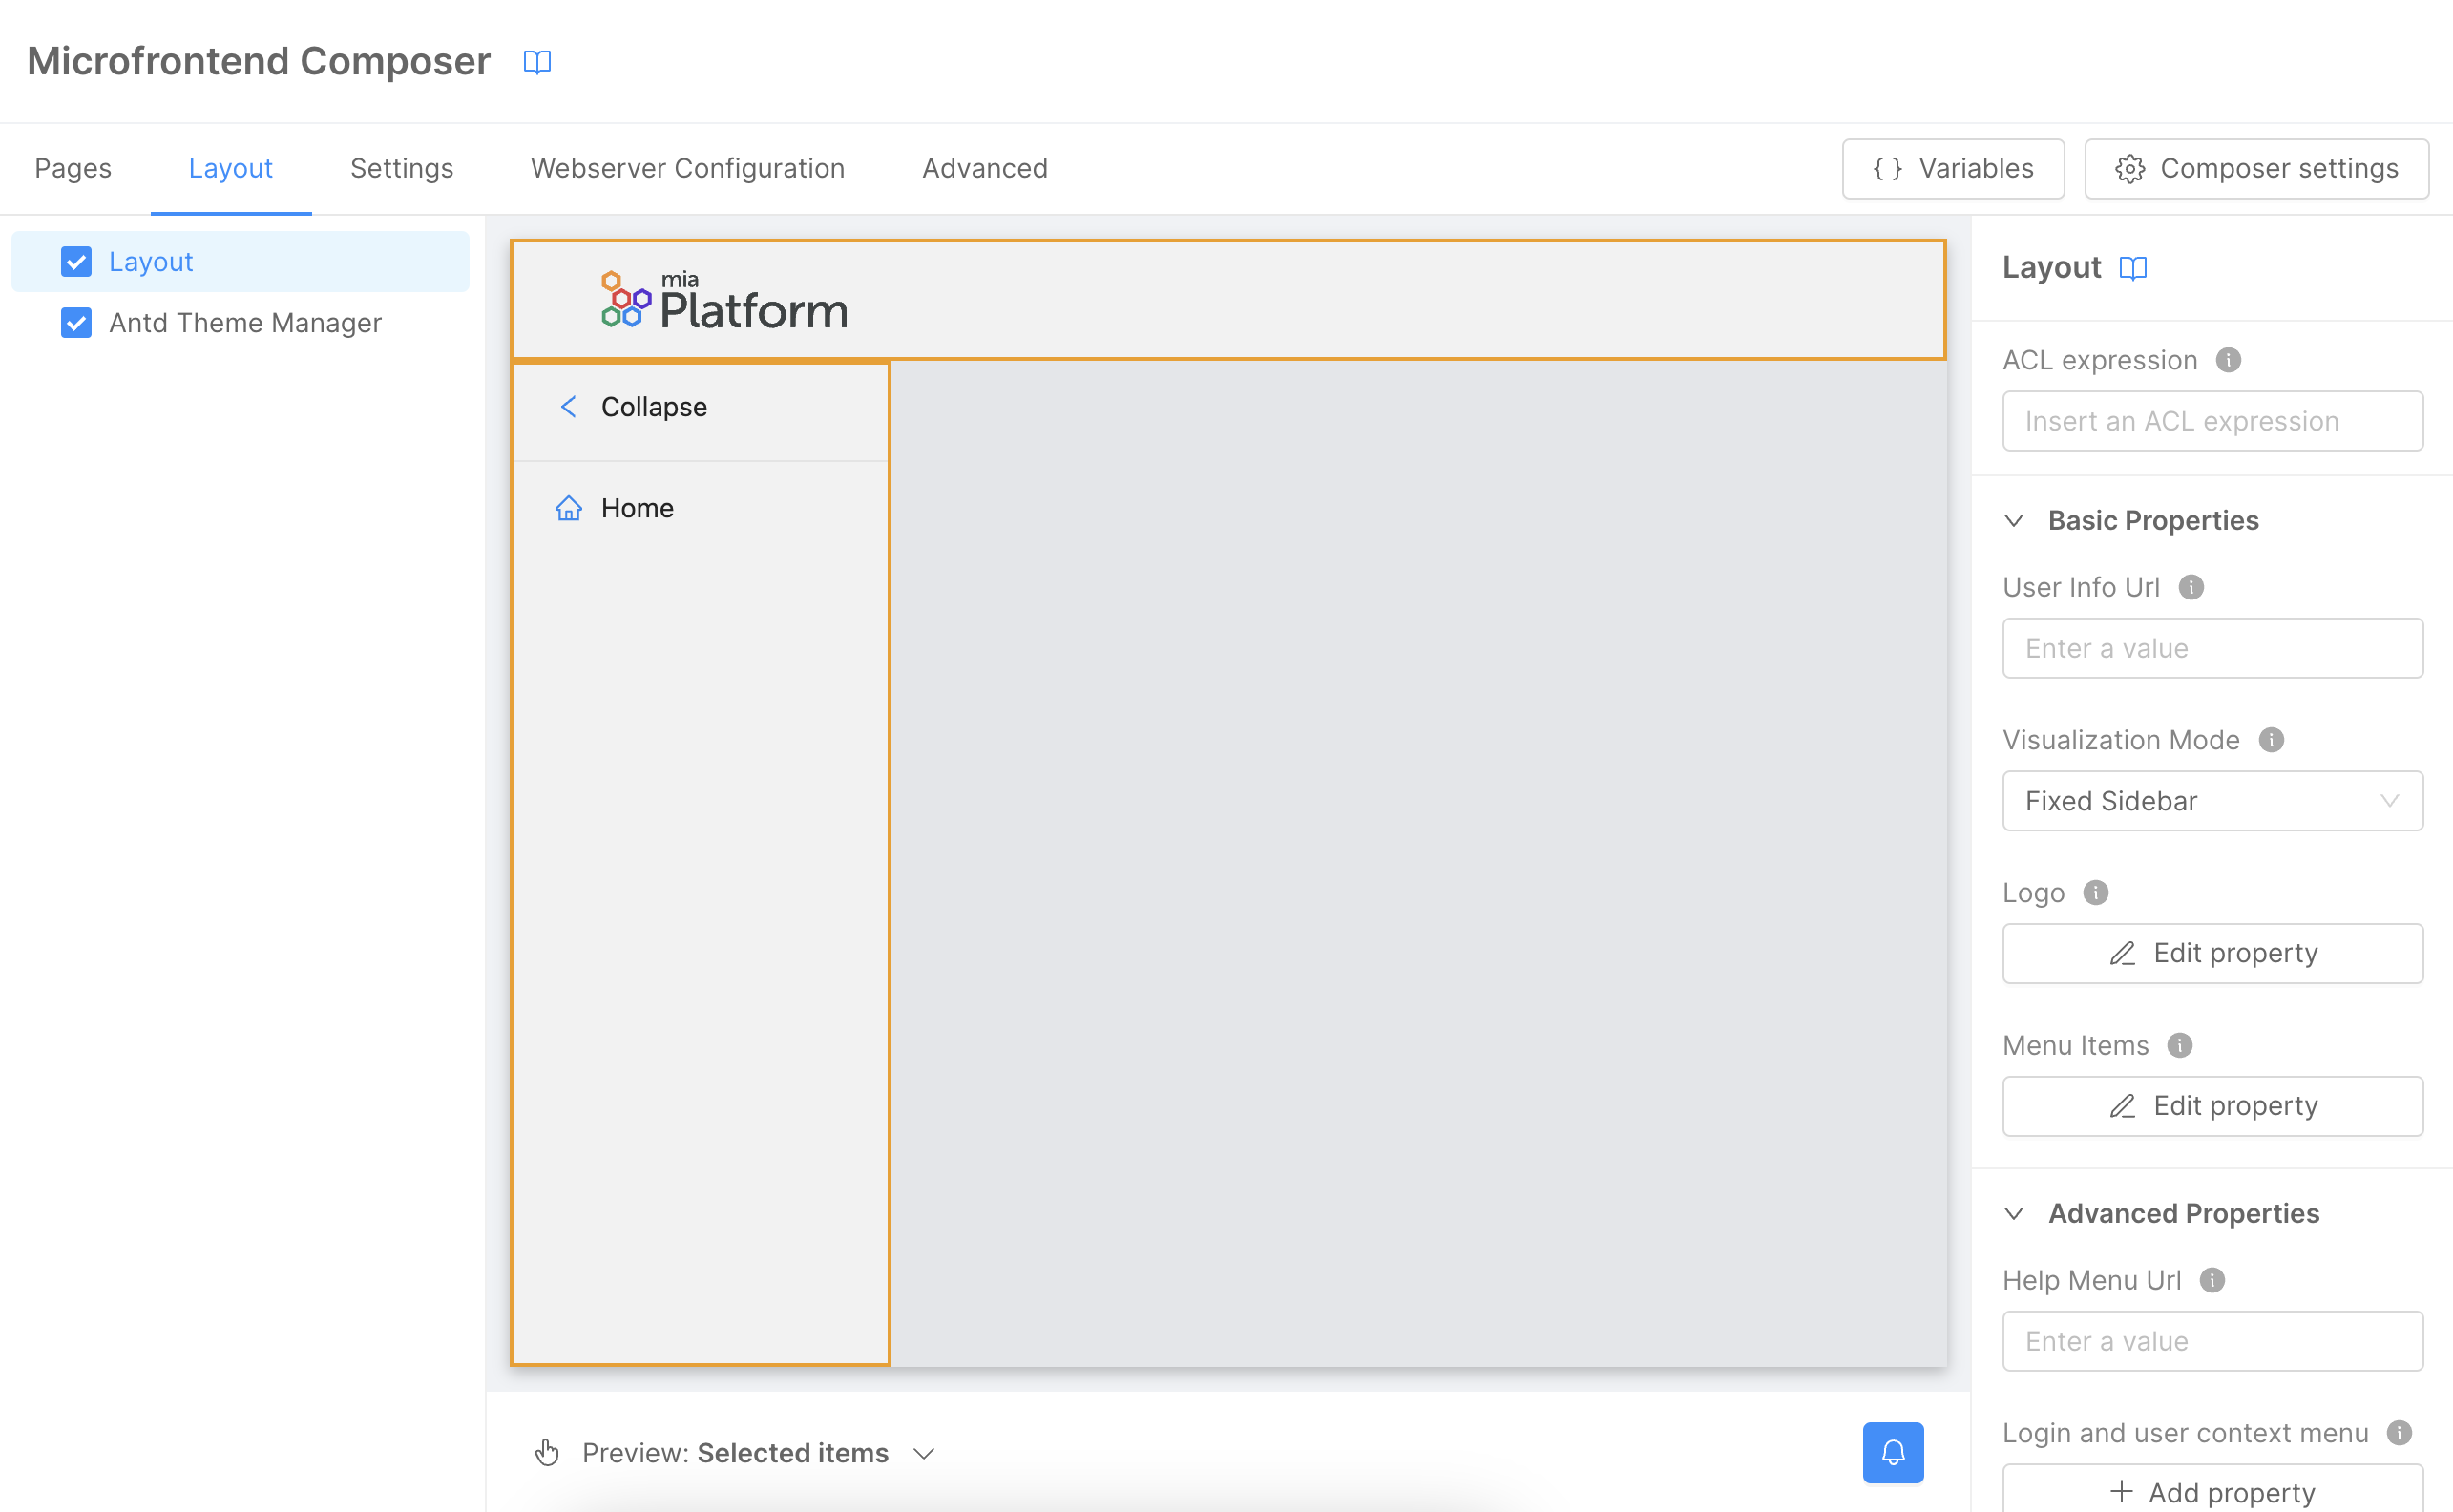
- Inside the
Layoutsection, use the no-code features to customize appearance. Preview your changes in the center of the page.
Specific Customizations
You can further customize the following settings:
- Visualization Mode: Use
Fixed Sidebarto show the menu on the left side. - Logo Settings:
- URL: Define the Microfrontend Composer logo with a URL.
- Alternative Text: Set
Mia-Platformas alternative text. - On Click Href: Use
./home/as the URL when clicked. - URL Configuration: Click to open a modal where you can specify the type (
string) and URL for the logo (https://www.mia-platform.eu/static/img/basics_logo.svg).
Under the Advanced Properties, you can customize additional settings:
- Help Menu URL: Define
https://www.docs.mia-platform.eu/as the URL for the help link, displaying a question mark icon in the header. - Head Configuration: Customize the Microfrontend Composer head configuration, setting
Mia-Platform Microfrontend Composeras title andhttps://www.mia-platform.eu/static/img/basics_favicon/apple-icon-60x60.pngas favicon.
Create a Microfrontend Composer Table Page
Now we can create a new page that will display data from the CRUD microservice. To initiate the creation, click on the Pages tab followed by the Create New Page button.
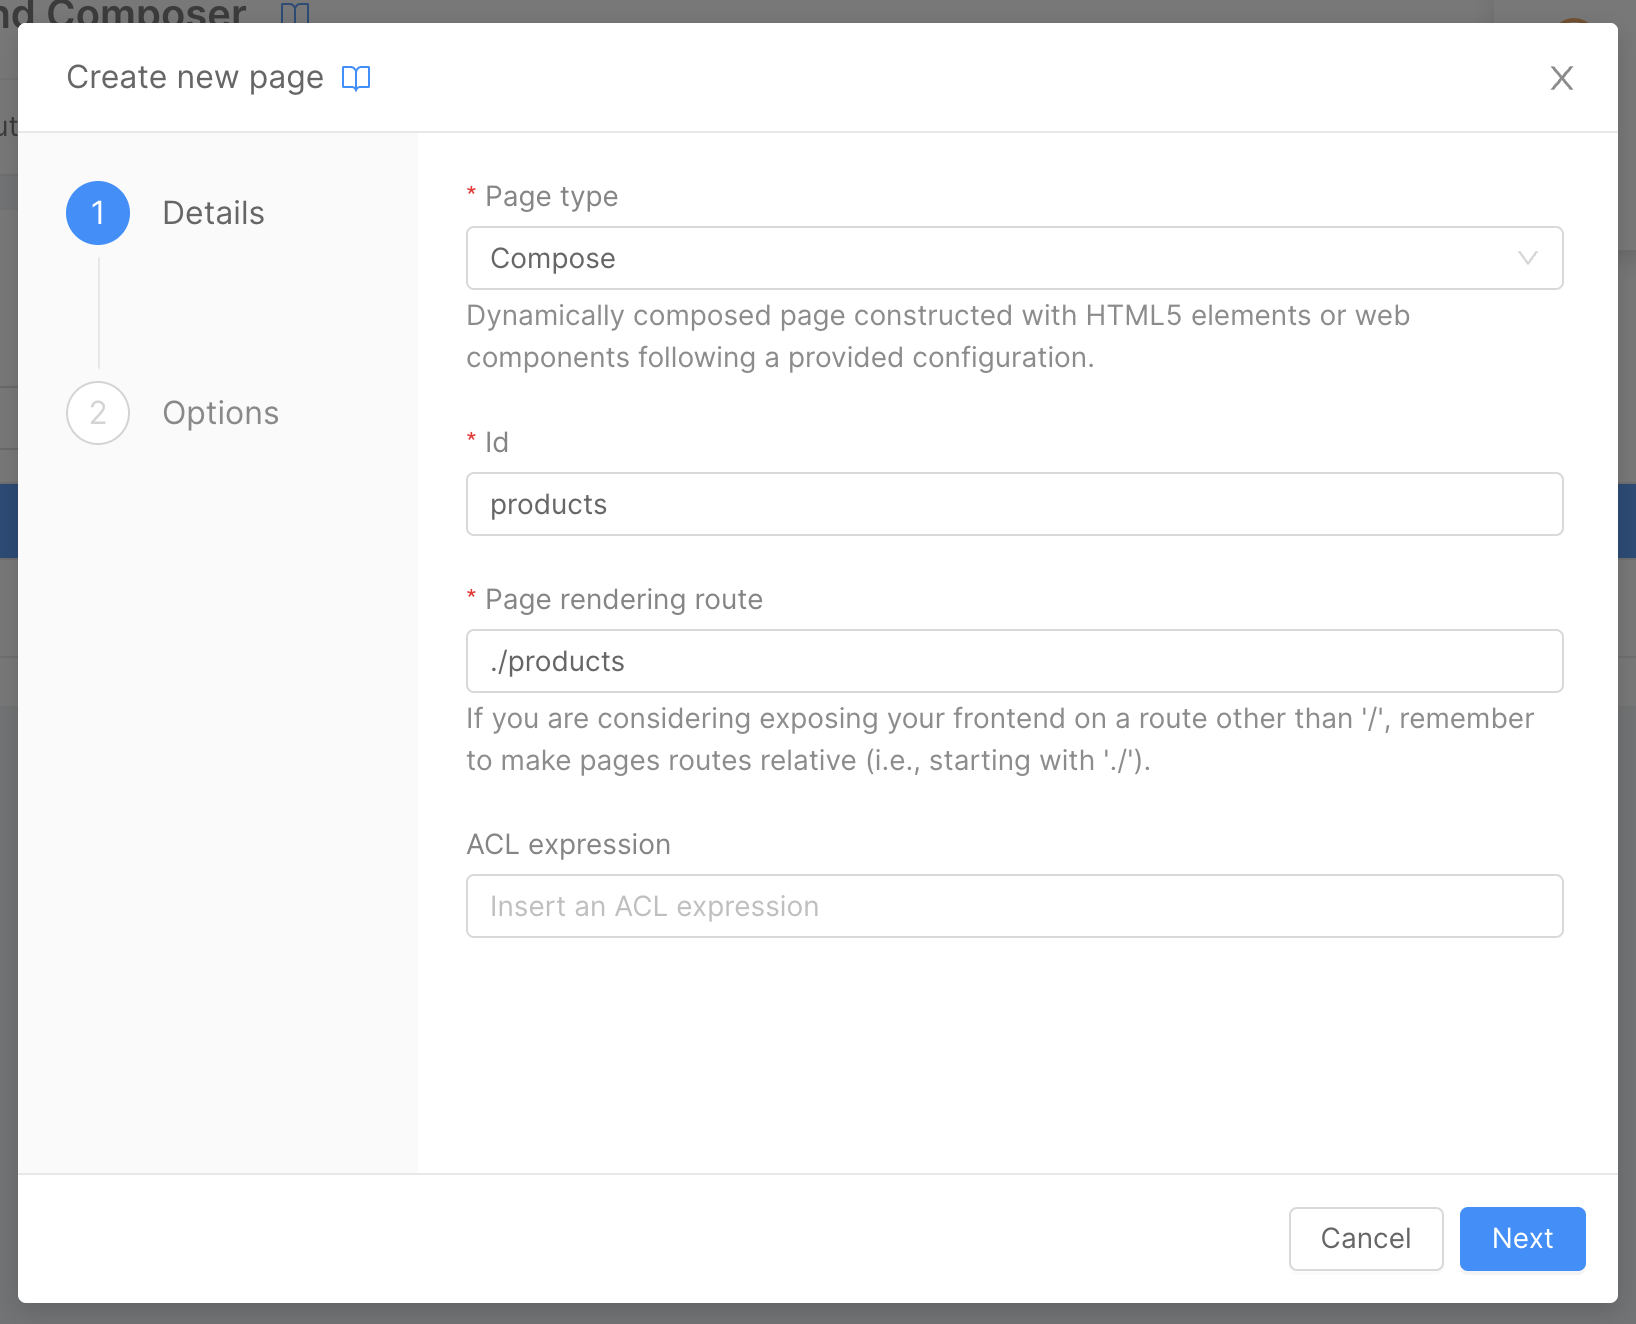
Within the modal, you'll have options to:
Page Type: Designate the type of the page. For this example, selectCompose.Id: Assign an ID to the page. This must be unique, and for our demonstration, we'll useproducts.Path: Define the path for the page. This too should be unique. We'll set it as./products.
Every URI in the Microfrontend Composer is linked to the Microfrontend Composer base path. For instance, the home page is represented by ./home/.
Upon navigating to the wizard's second step, you can outline additional page properties.
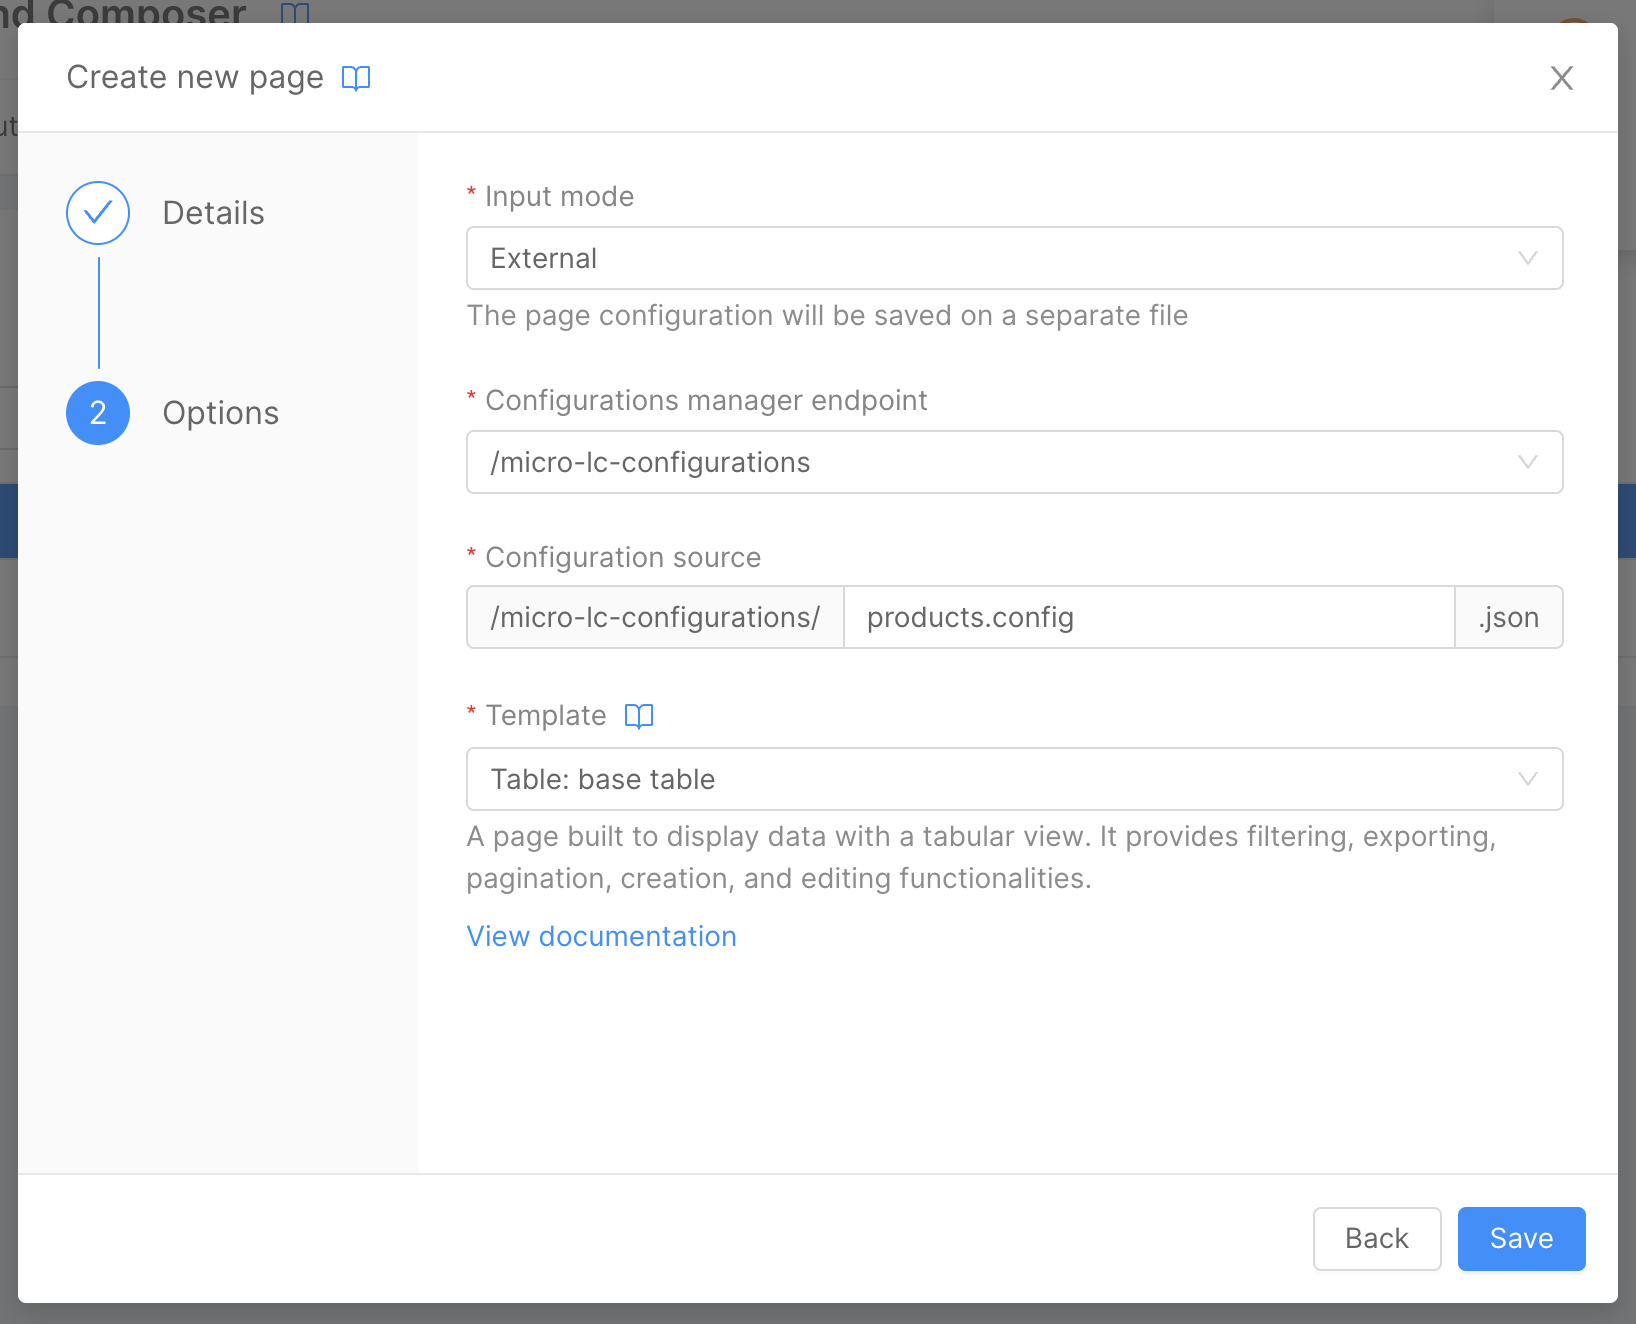
In this section:
Input mode: This determines the page's input model. We'll chooseExternal.Configuration Manager Endpoint: State the endpoint for the Configuration Manager. For our needs,(/micro-lc-configurations)is suitable.Configuration Source: Retain the default value as automatically provided by the wizard.Template: Select the desired template for the page. WhileTableis our choice now, subsequent tutorials will explore alternative options.
Once done, click on Save to preserve the new page and begin its customization.
Create CRUD to Read and Write Table Data
To evaluate the new page, it's essential to create a CRUD microservice and expose the relevant data through an endpoint, facilitating reading and writing operations on our table.
If you're unfamiliar with CRUD microservices, consider consulting the CRUD Tutorial.
For our example, let's employ a basic CRUD microservice featuring a Product entity endowed with the subsequent properties:
name: A mandatory string.description: An optional string.price: A mandatory number.
The data CRUD will be exposed via an endpoint named products.
Below is the CRUD schema, excluding the default CRUD attributes (_id, creatorId, createdAt, updaterId, updatedAt, and __STATE__):
[
   {
      "name":"name",
      "type":"string",
      "required":true,
      "nullable":false,
      "encryptionEnabled":false,
      "encryptionSearchable":false,
      "sensitivityValue":0
   },
   {
      "name":"price",
      "type":"number",
      "required":true,
      "nullable":false,
      "encryptionEnabled":false,
      "encryptionSearchable":false,
      "sensitivityValue":0
   },
   {
      "name":"description",
      "type":"string",
      "required":false,
      "nullable":false,
      "encryptionEnabled":false,
      "encryptionSearchable":false,
      "sensitivityValue":0
   }
]
Now, the CRUD data can be exposed using an endpoint named products.
Customize the Table Page
Within the Pages tab, located under the Microfrontend Composer section, you'll find the Products page we recently created. Click on the Compose button (placed on the left of the "Edit" button) to access the page composer.
CRUD connector
Before diving into table customization and its associated forms for insertion and updates, specify the CRUD connector for data reading and writing. Click on the Connectors & Adapters followed by CRUD Client on the left panel.
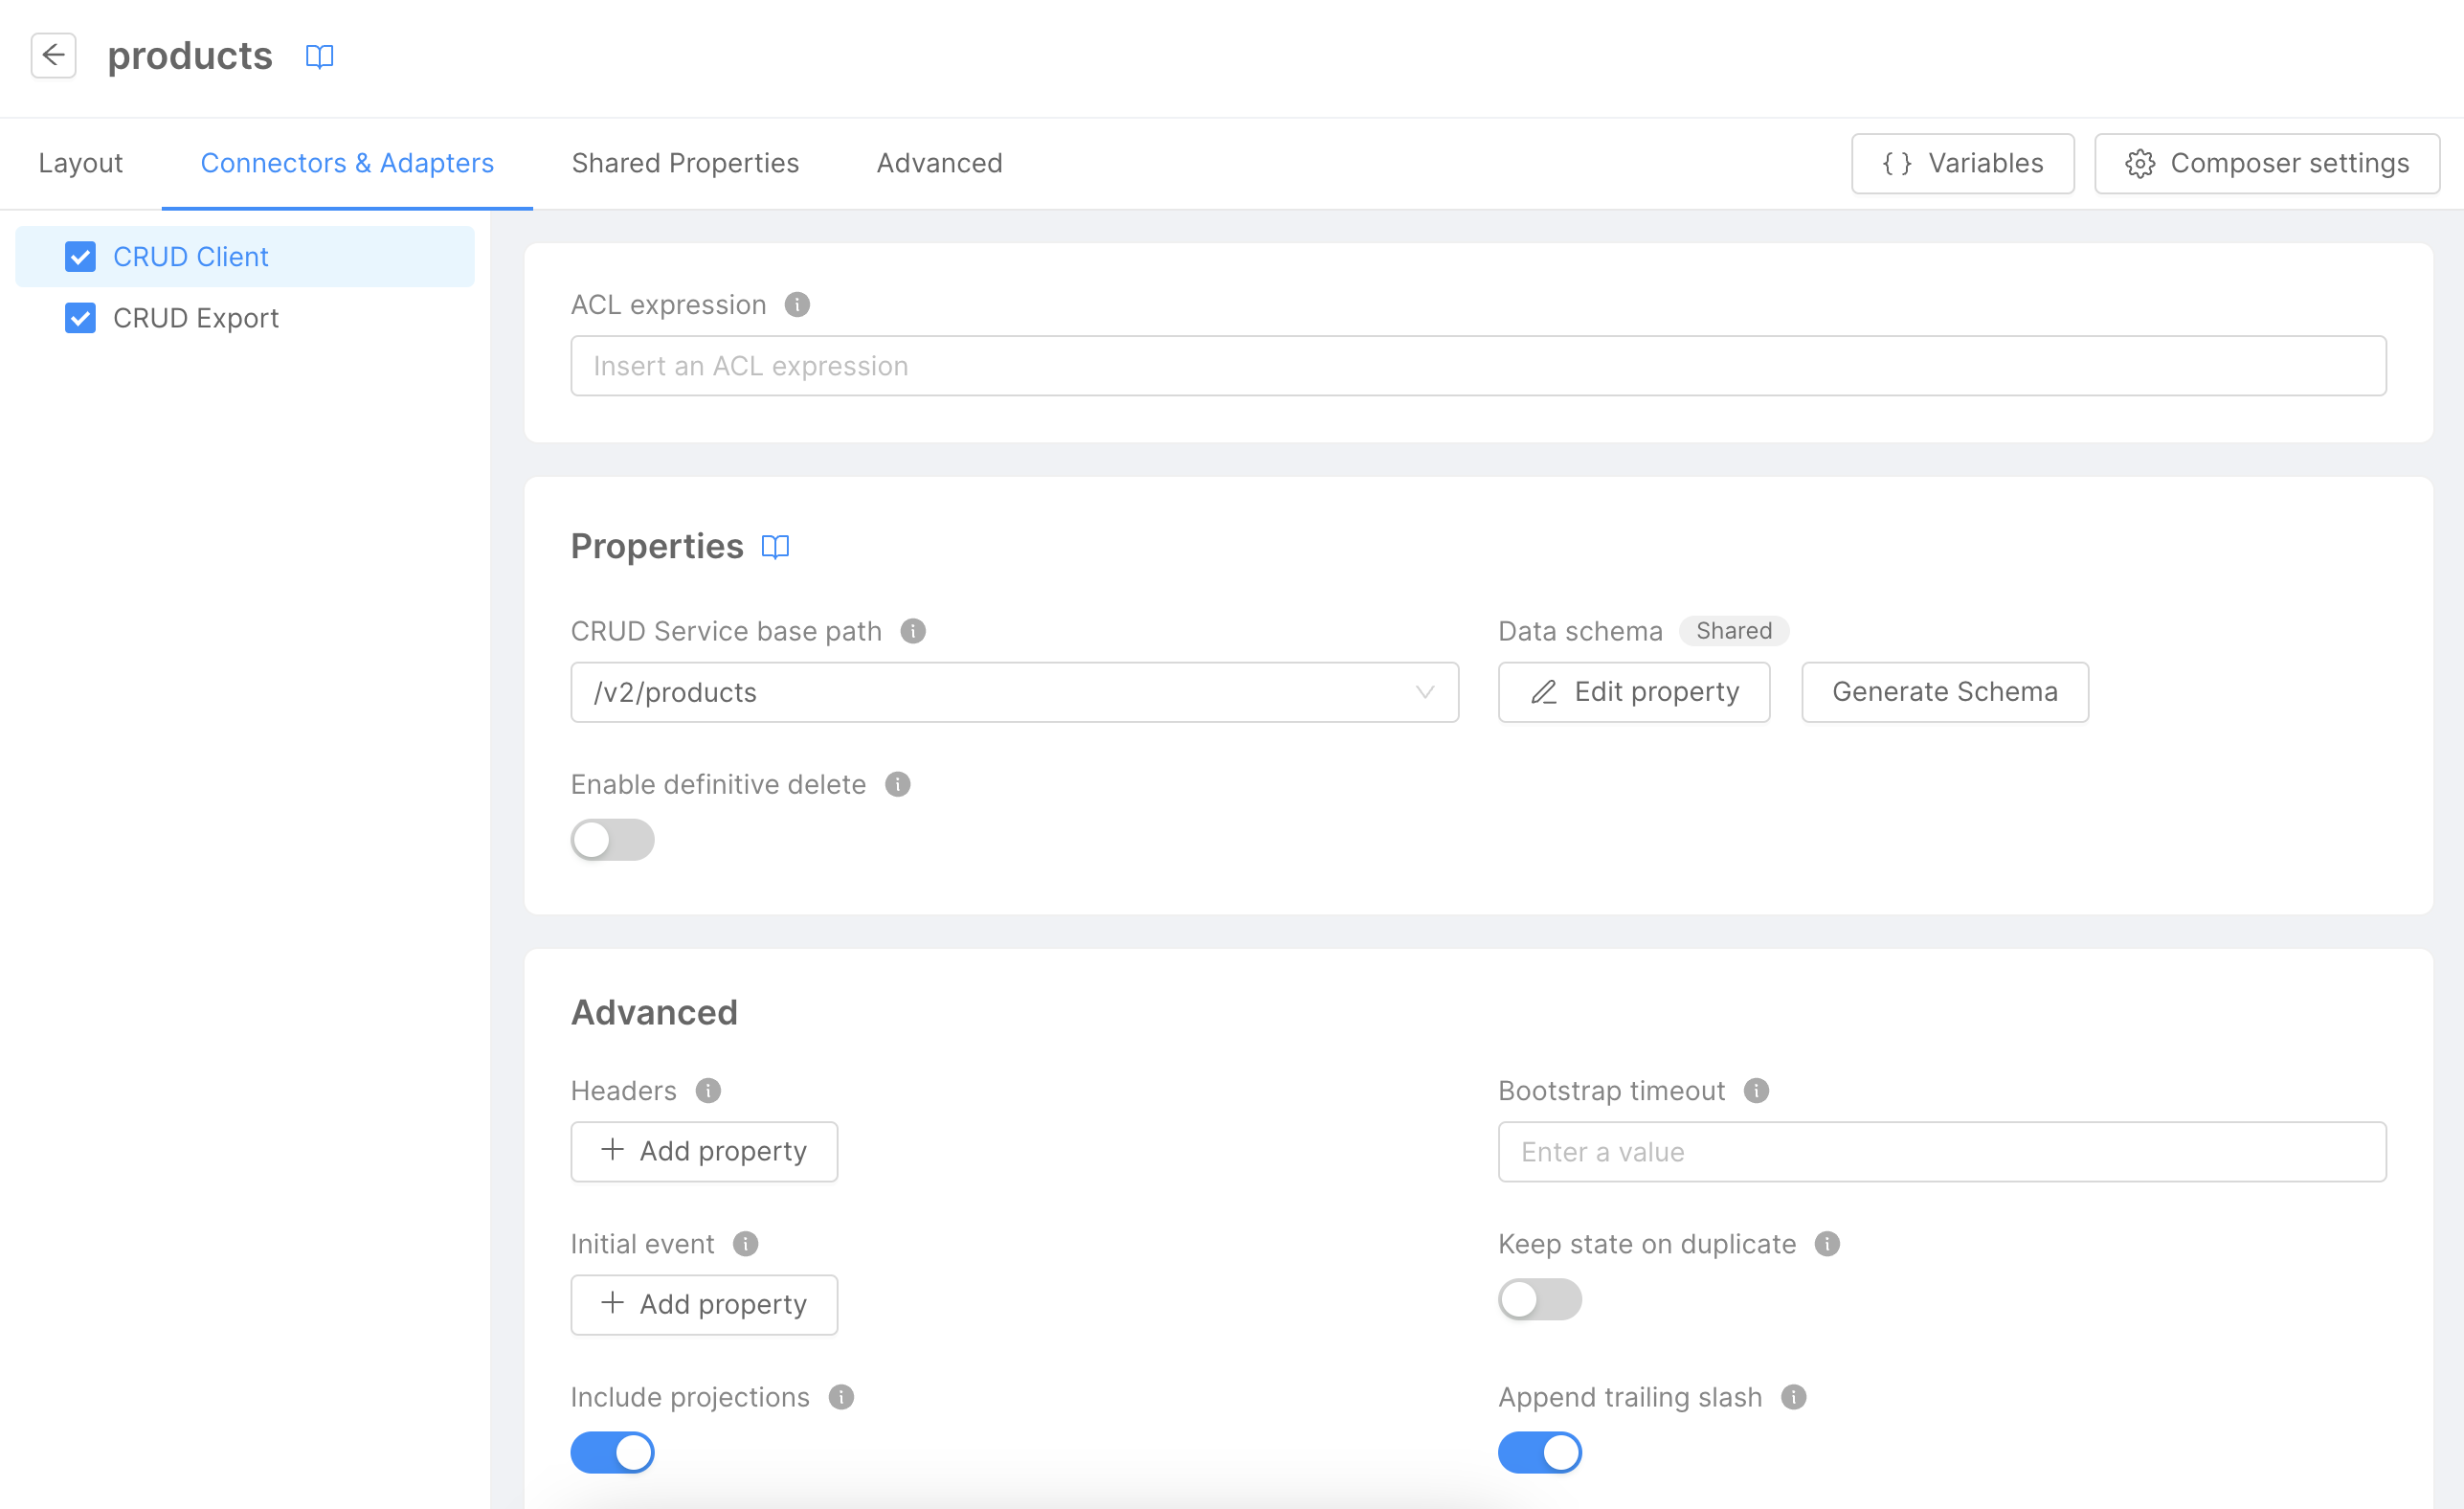
On the right, input the CRUD Service Base Path to set the CRUD microservice endpoint, opting for (/v2/products). Click Generate Schema to automatically construct the microservice's schema.
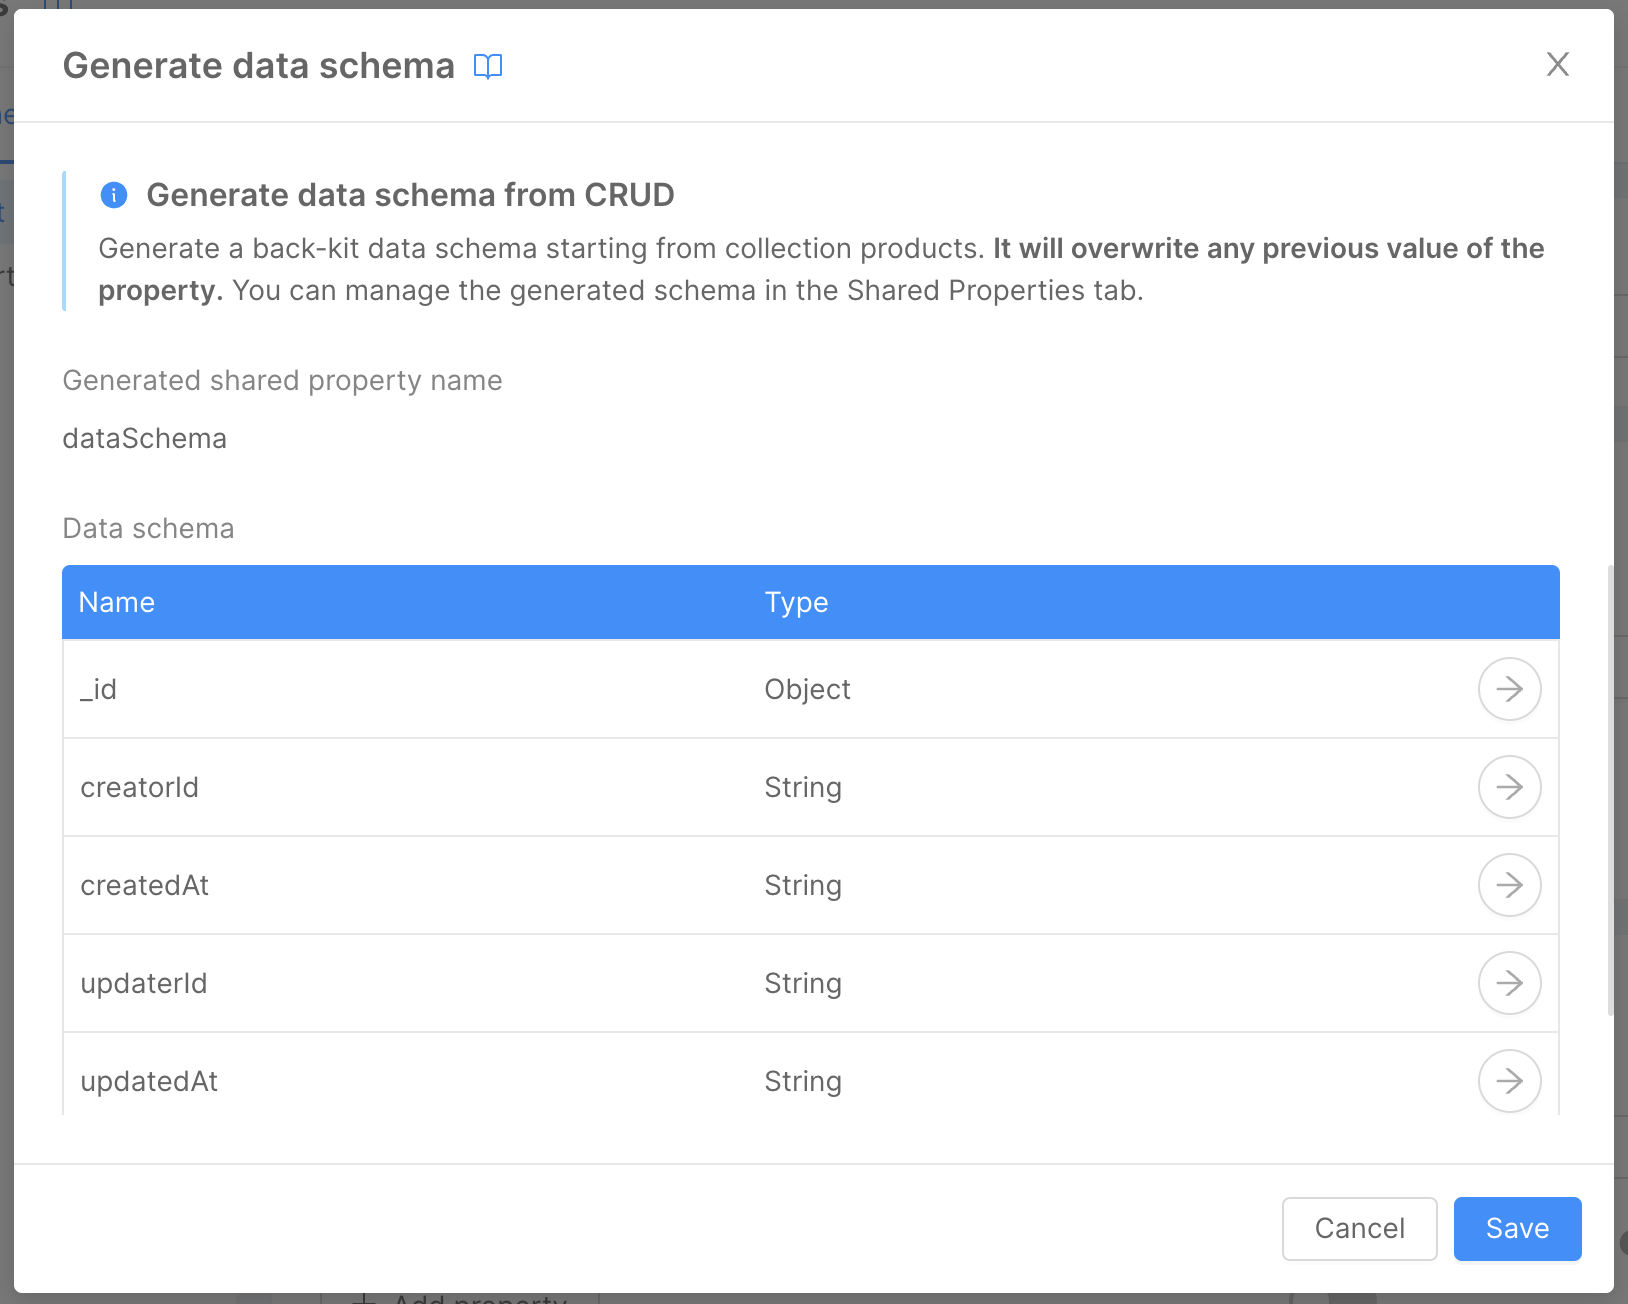
Given the CRUD Schema, this modal displays all CRUD fields. Generate the schema by clicking Save.
Edit the Table Schema
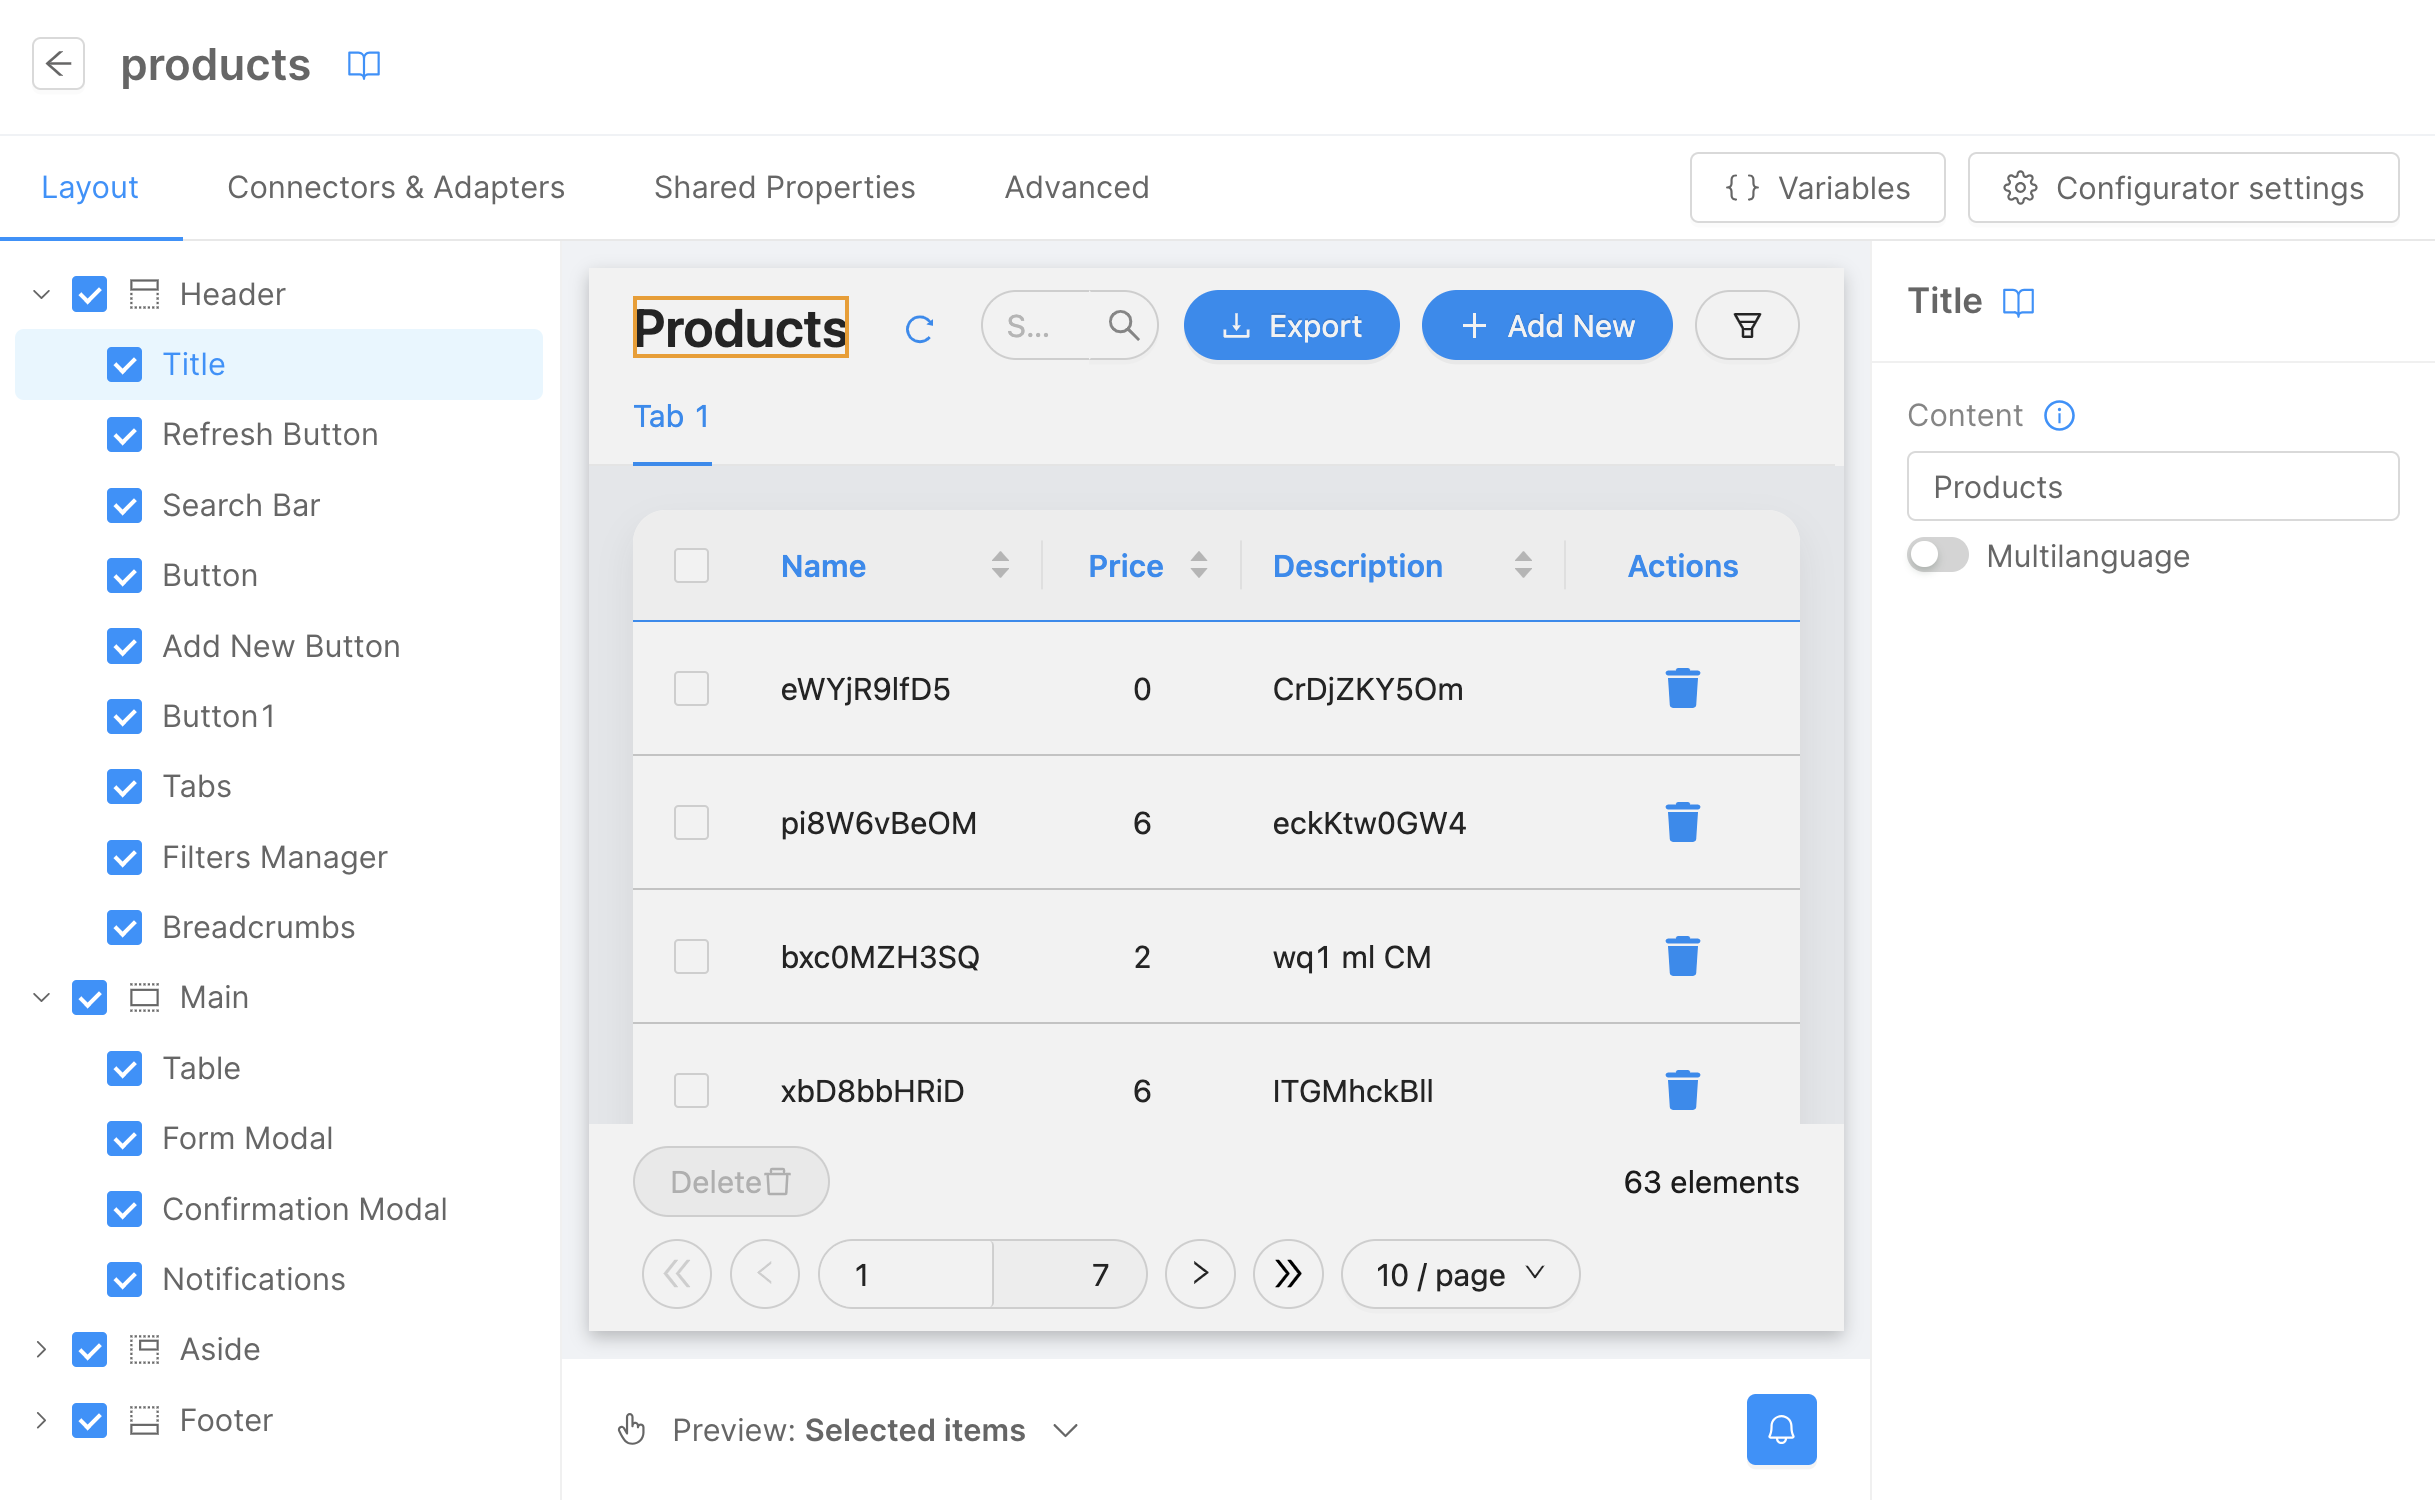
Navigate back to the layout page via the Layout tab to modify the table schema. The preview showcases a default schema generated earlier. This tutorial, however, will limit display to name, price, and description fields. Adjust the schema by clicking Main, then Table on the left panel.
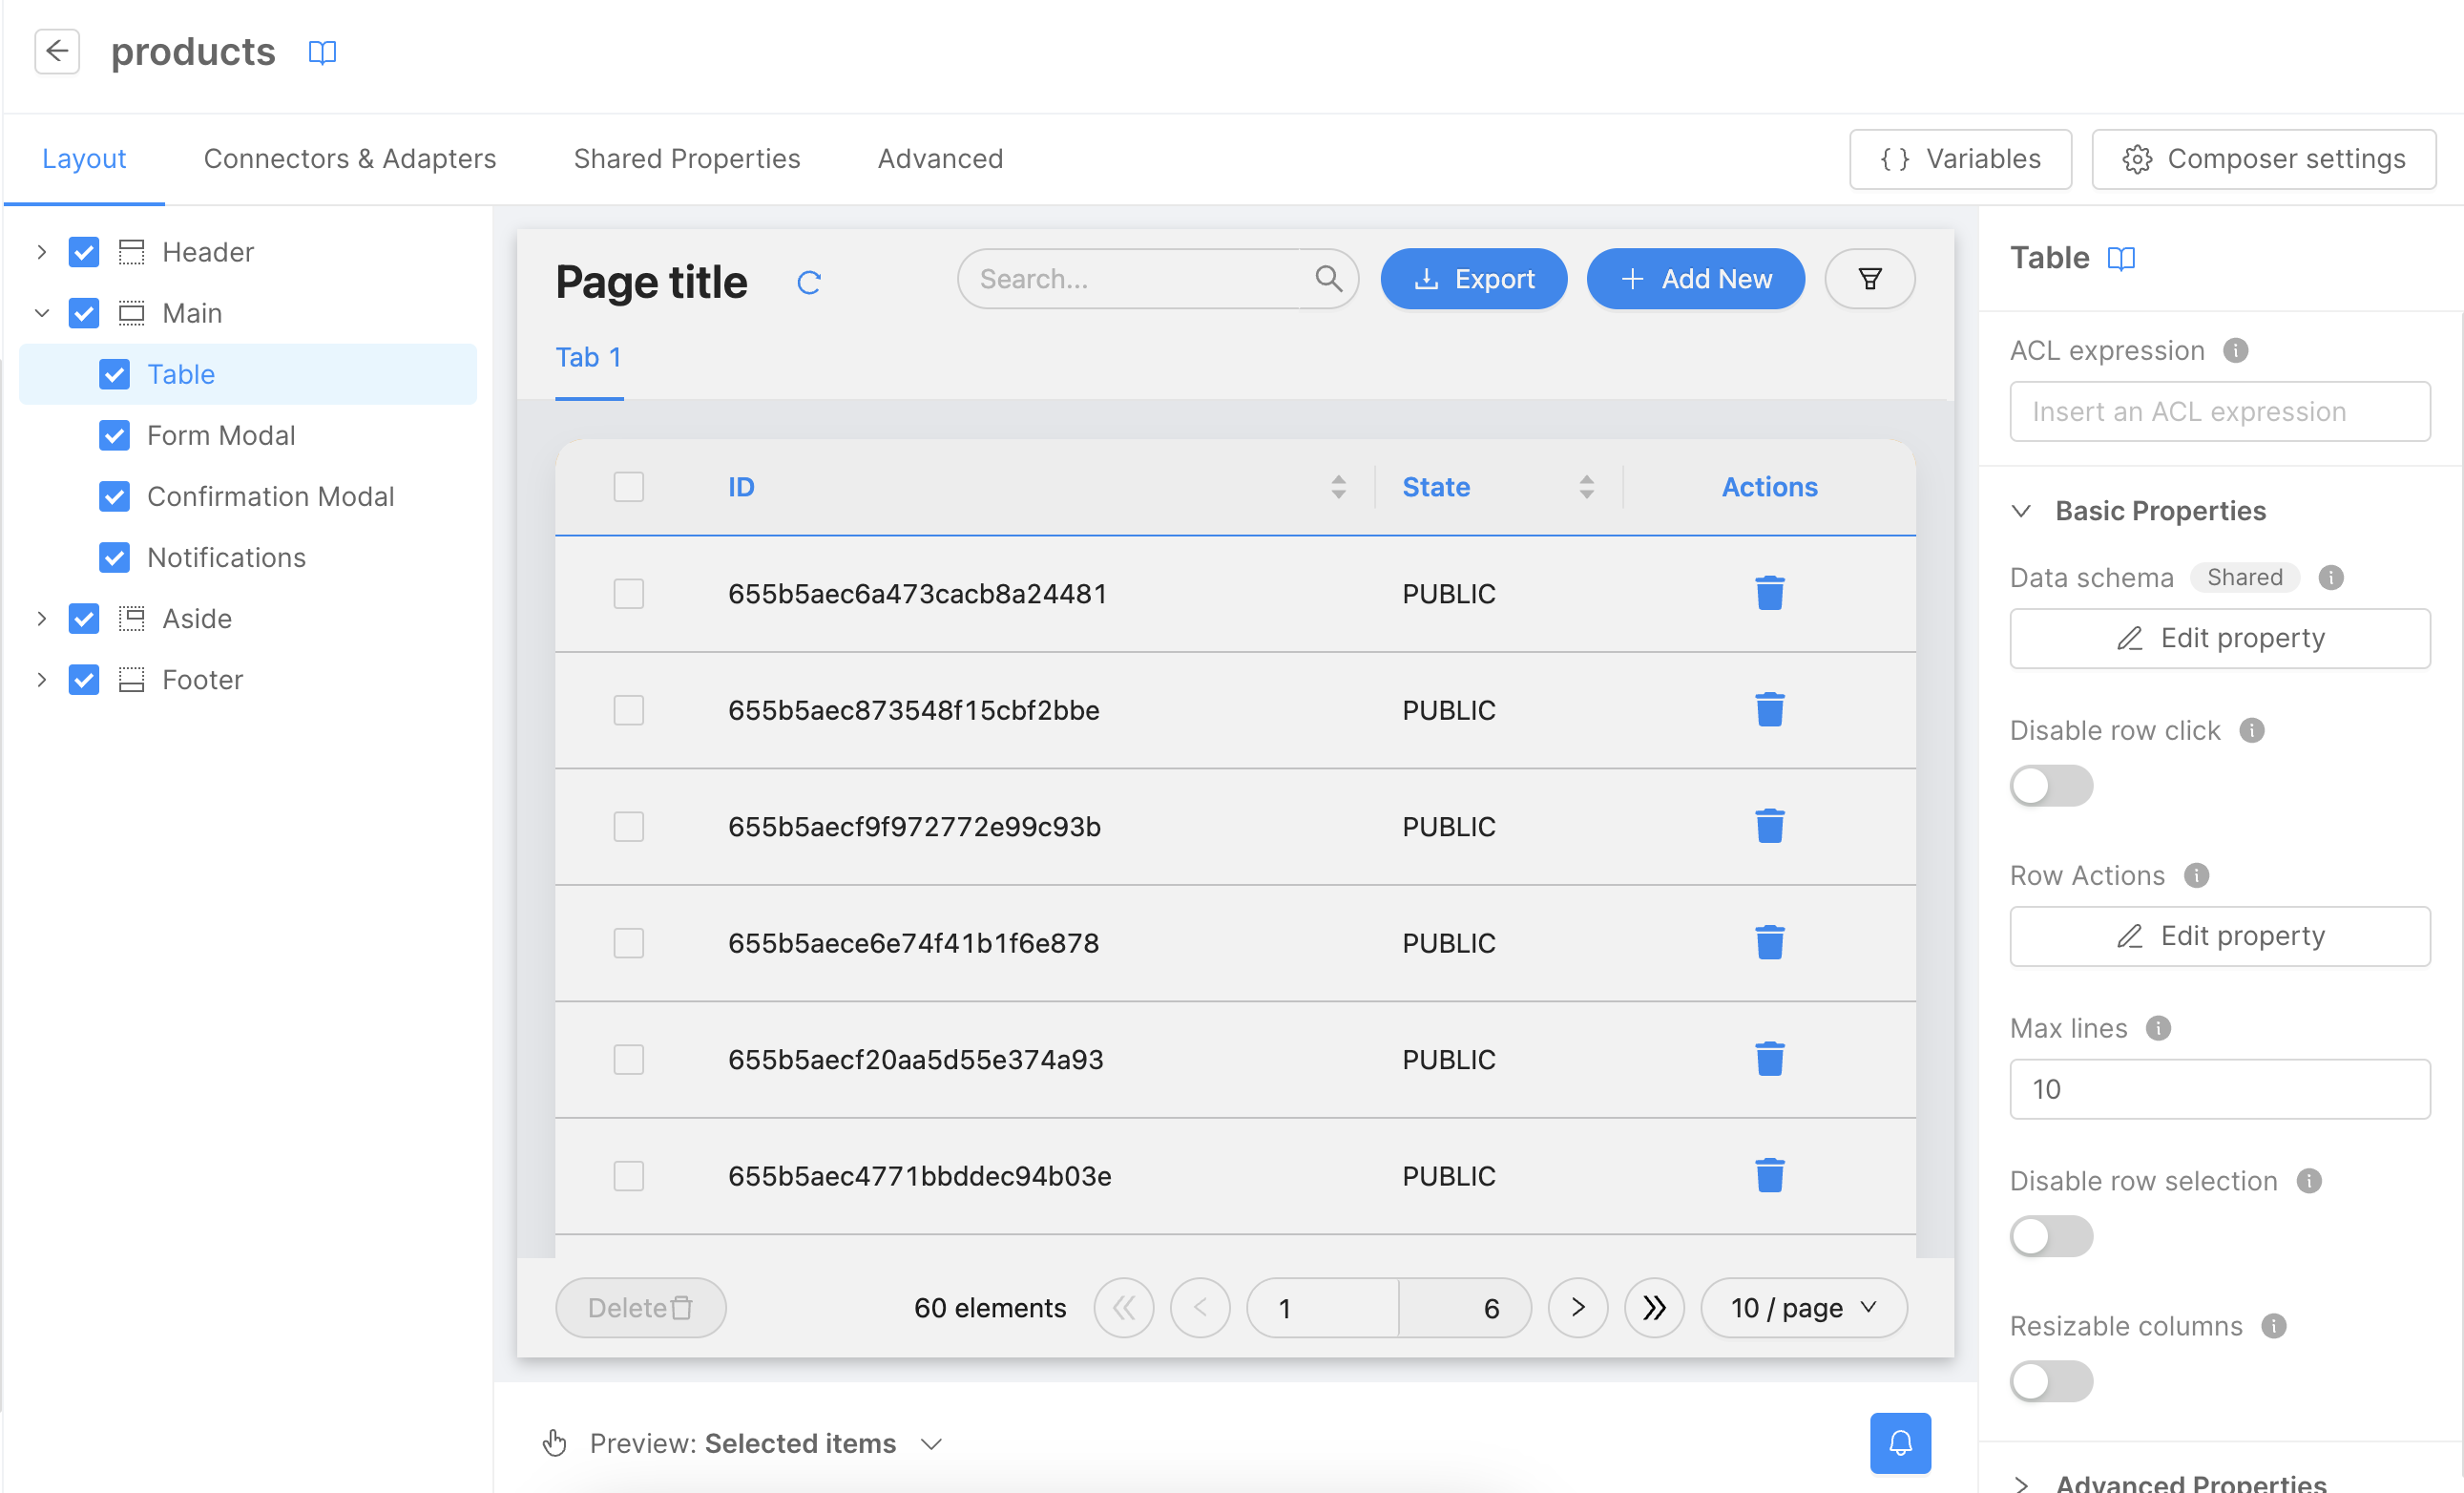
Within the right panel's Basic Properties, select Edit Property under the Data Schema label. Here, customize the data schema for the page. Since we're focusing on the name, price, and description fields, remove all extraneous ones like _id, creatorId, createdAt, updaterId, updatedAt, and __STATE__. Toggle on Use custom value to edit the schema.
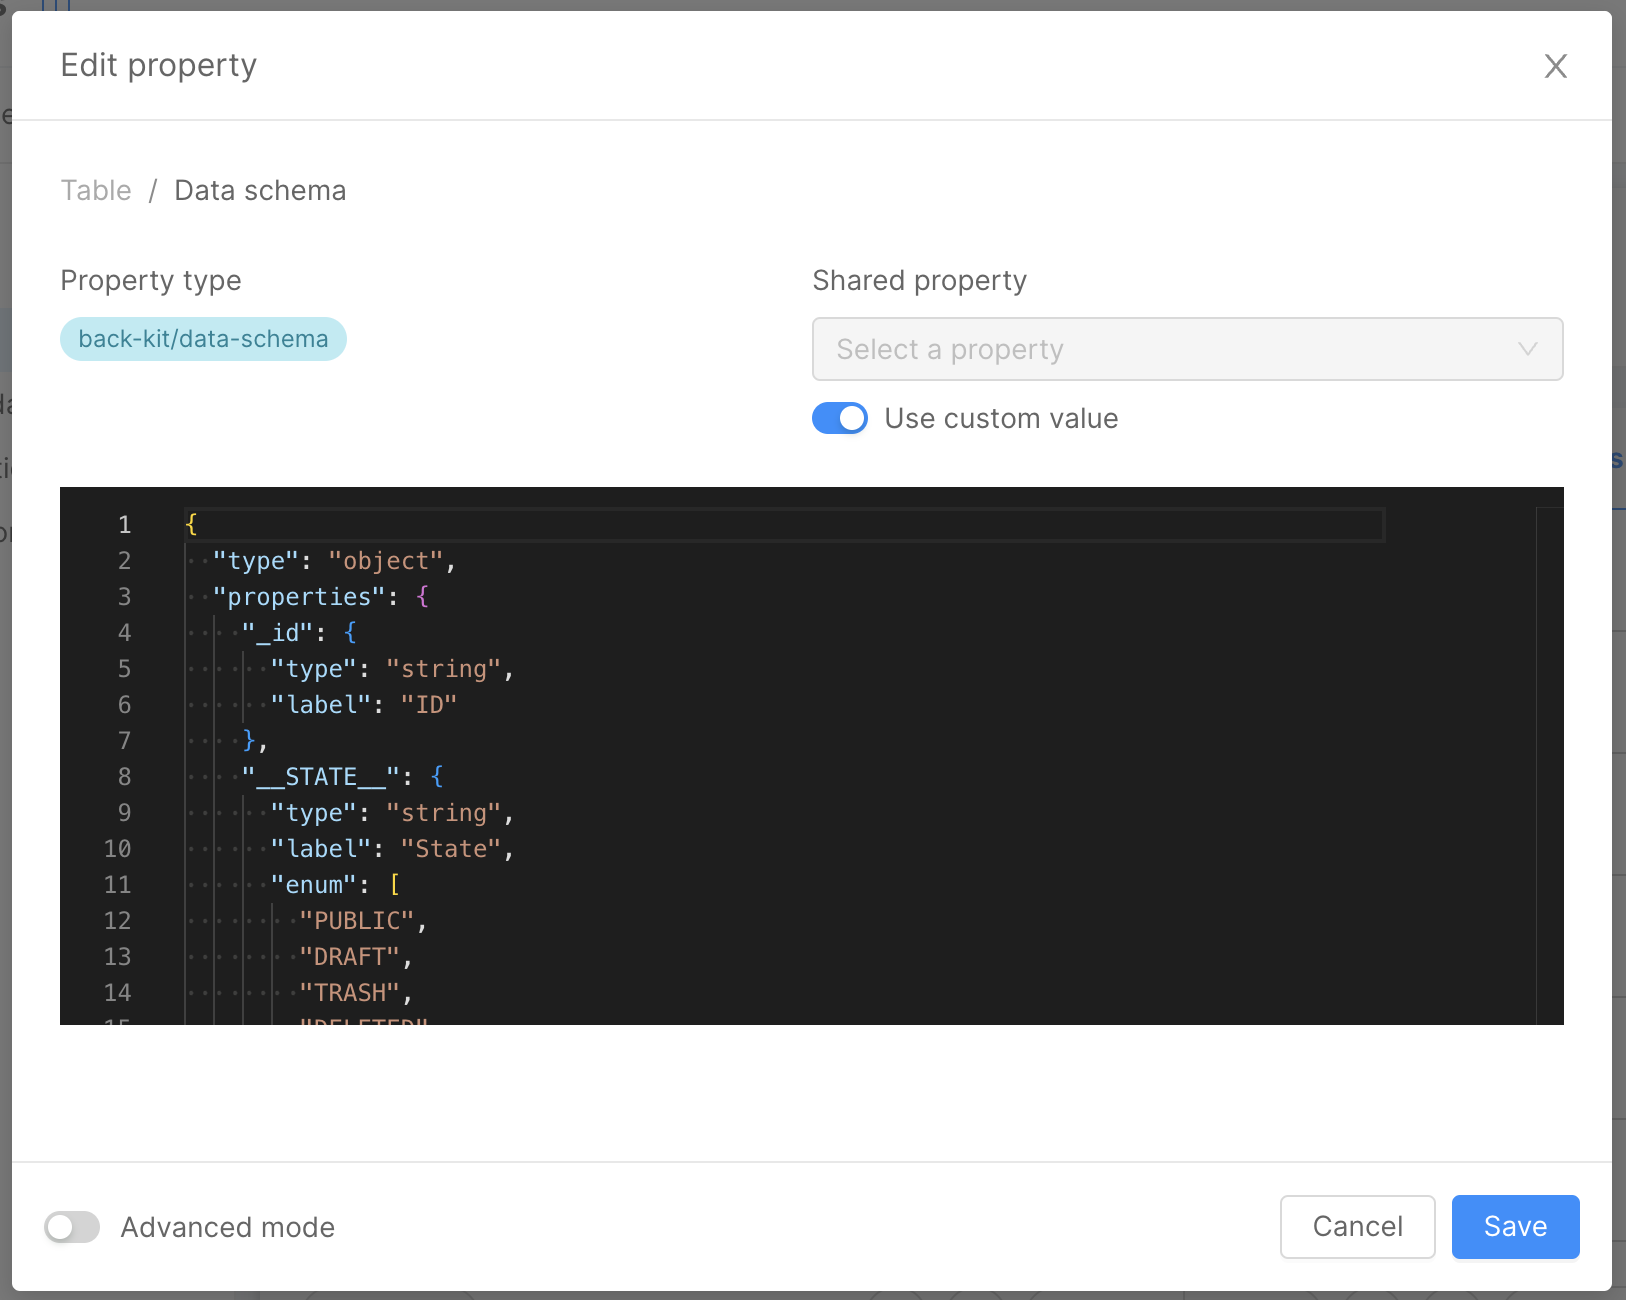
To exclusively display the name, price, and description fields, apply this schema:
{
  "type": "object",
  "properties": {
    "name": {
      "name": "name",
      "type": "string",
      "label": "Name"
    },
    "price": {
      "name": "price",
      "type": "number",
      "label": "Price"
    },
    "description": {
      "name": "description",
      "type": "string",
      "label": "Description"
    }
  }
}
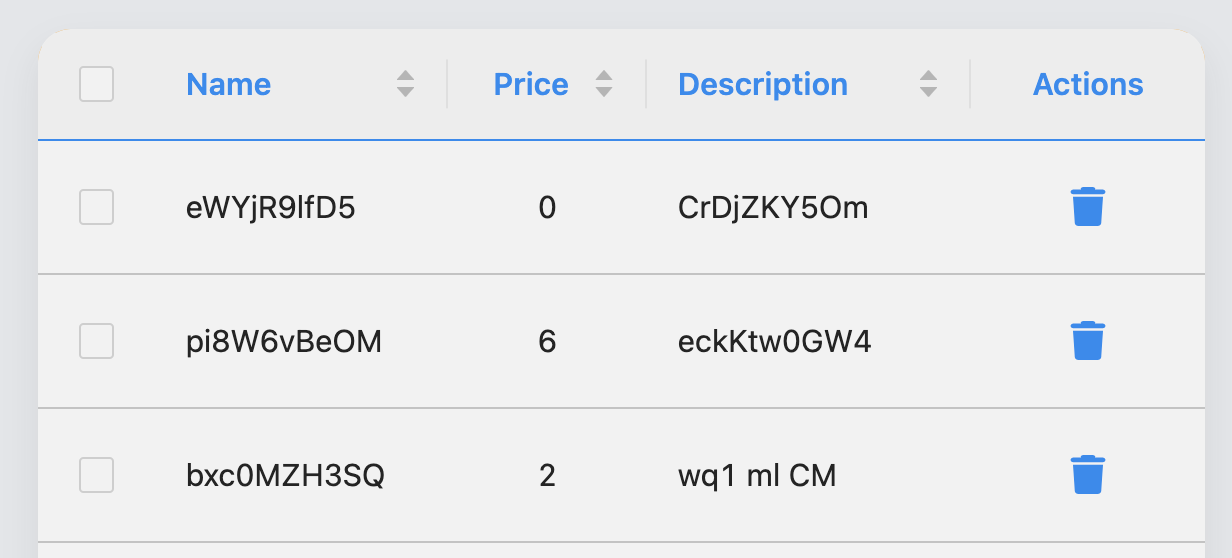
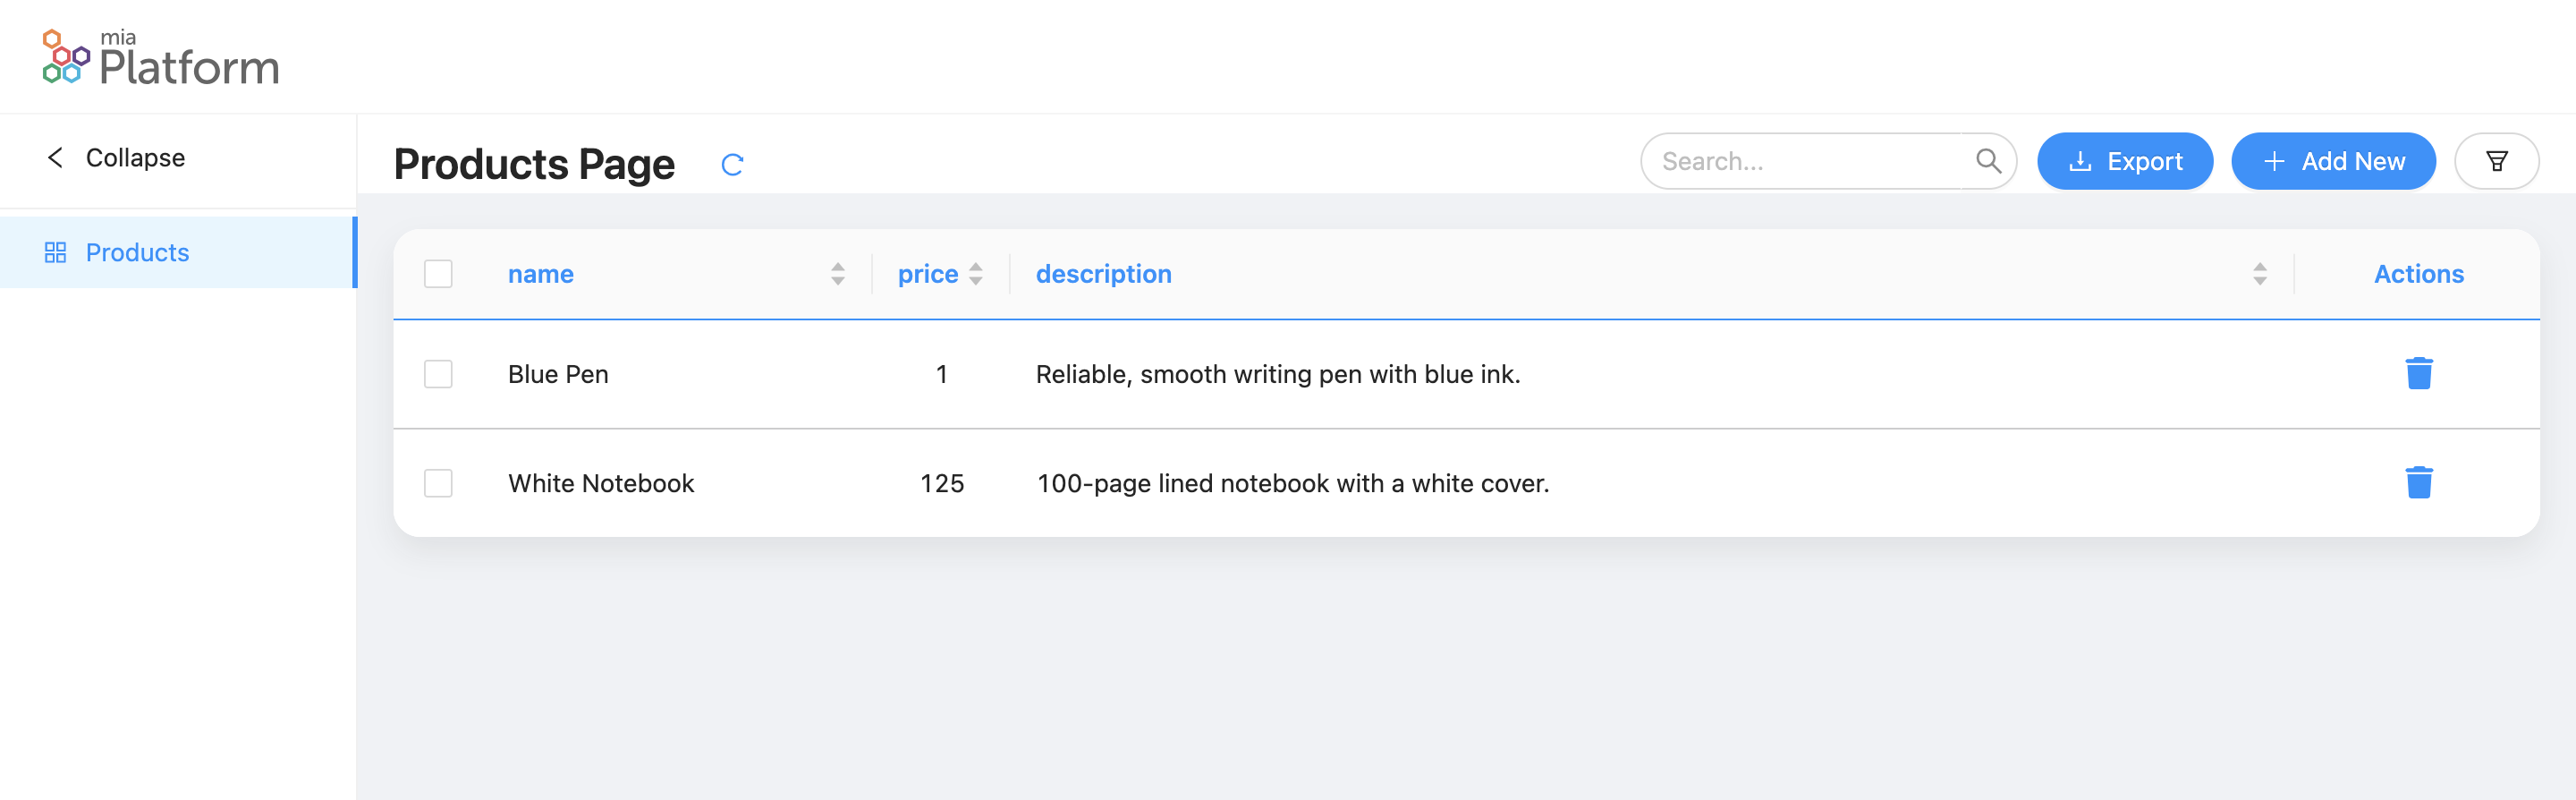
If all is ok, we can click on the Save button to save the schema and then check the table preview that now show only the name, price and description fields.
Edit the Forms Schema
Now we can edit the insert and update form schema to show only the name, price and description fields.
To modify the form schema in the Layout tab on the left panel we can click on the Main button and then on the Form Modal button.
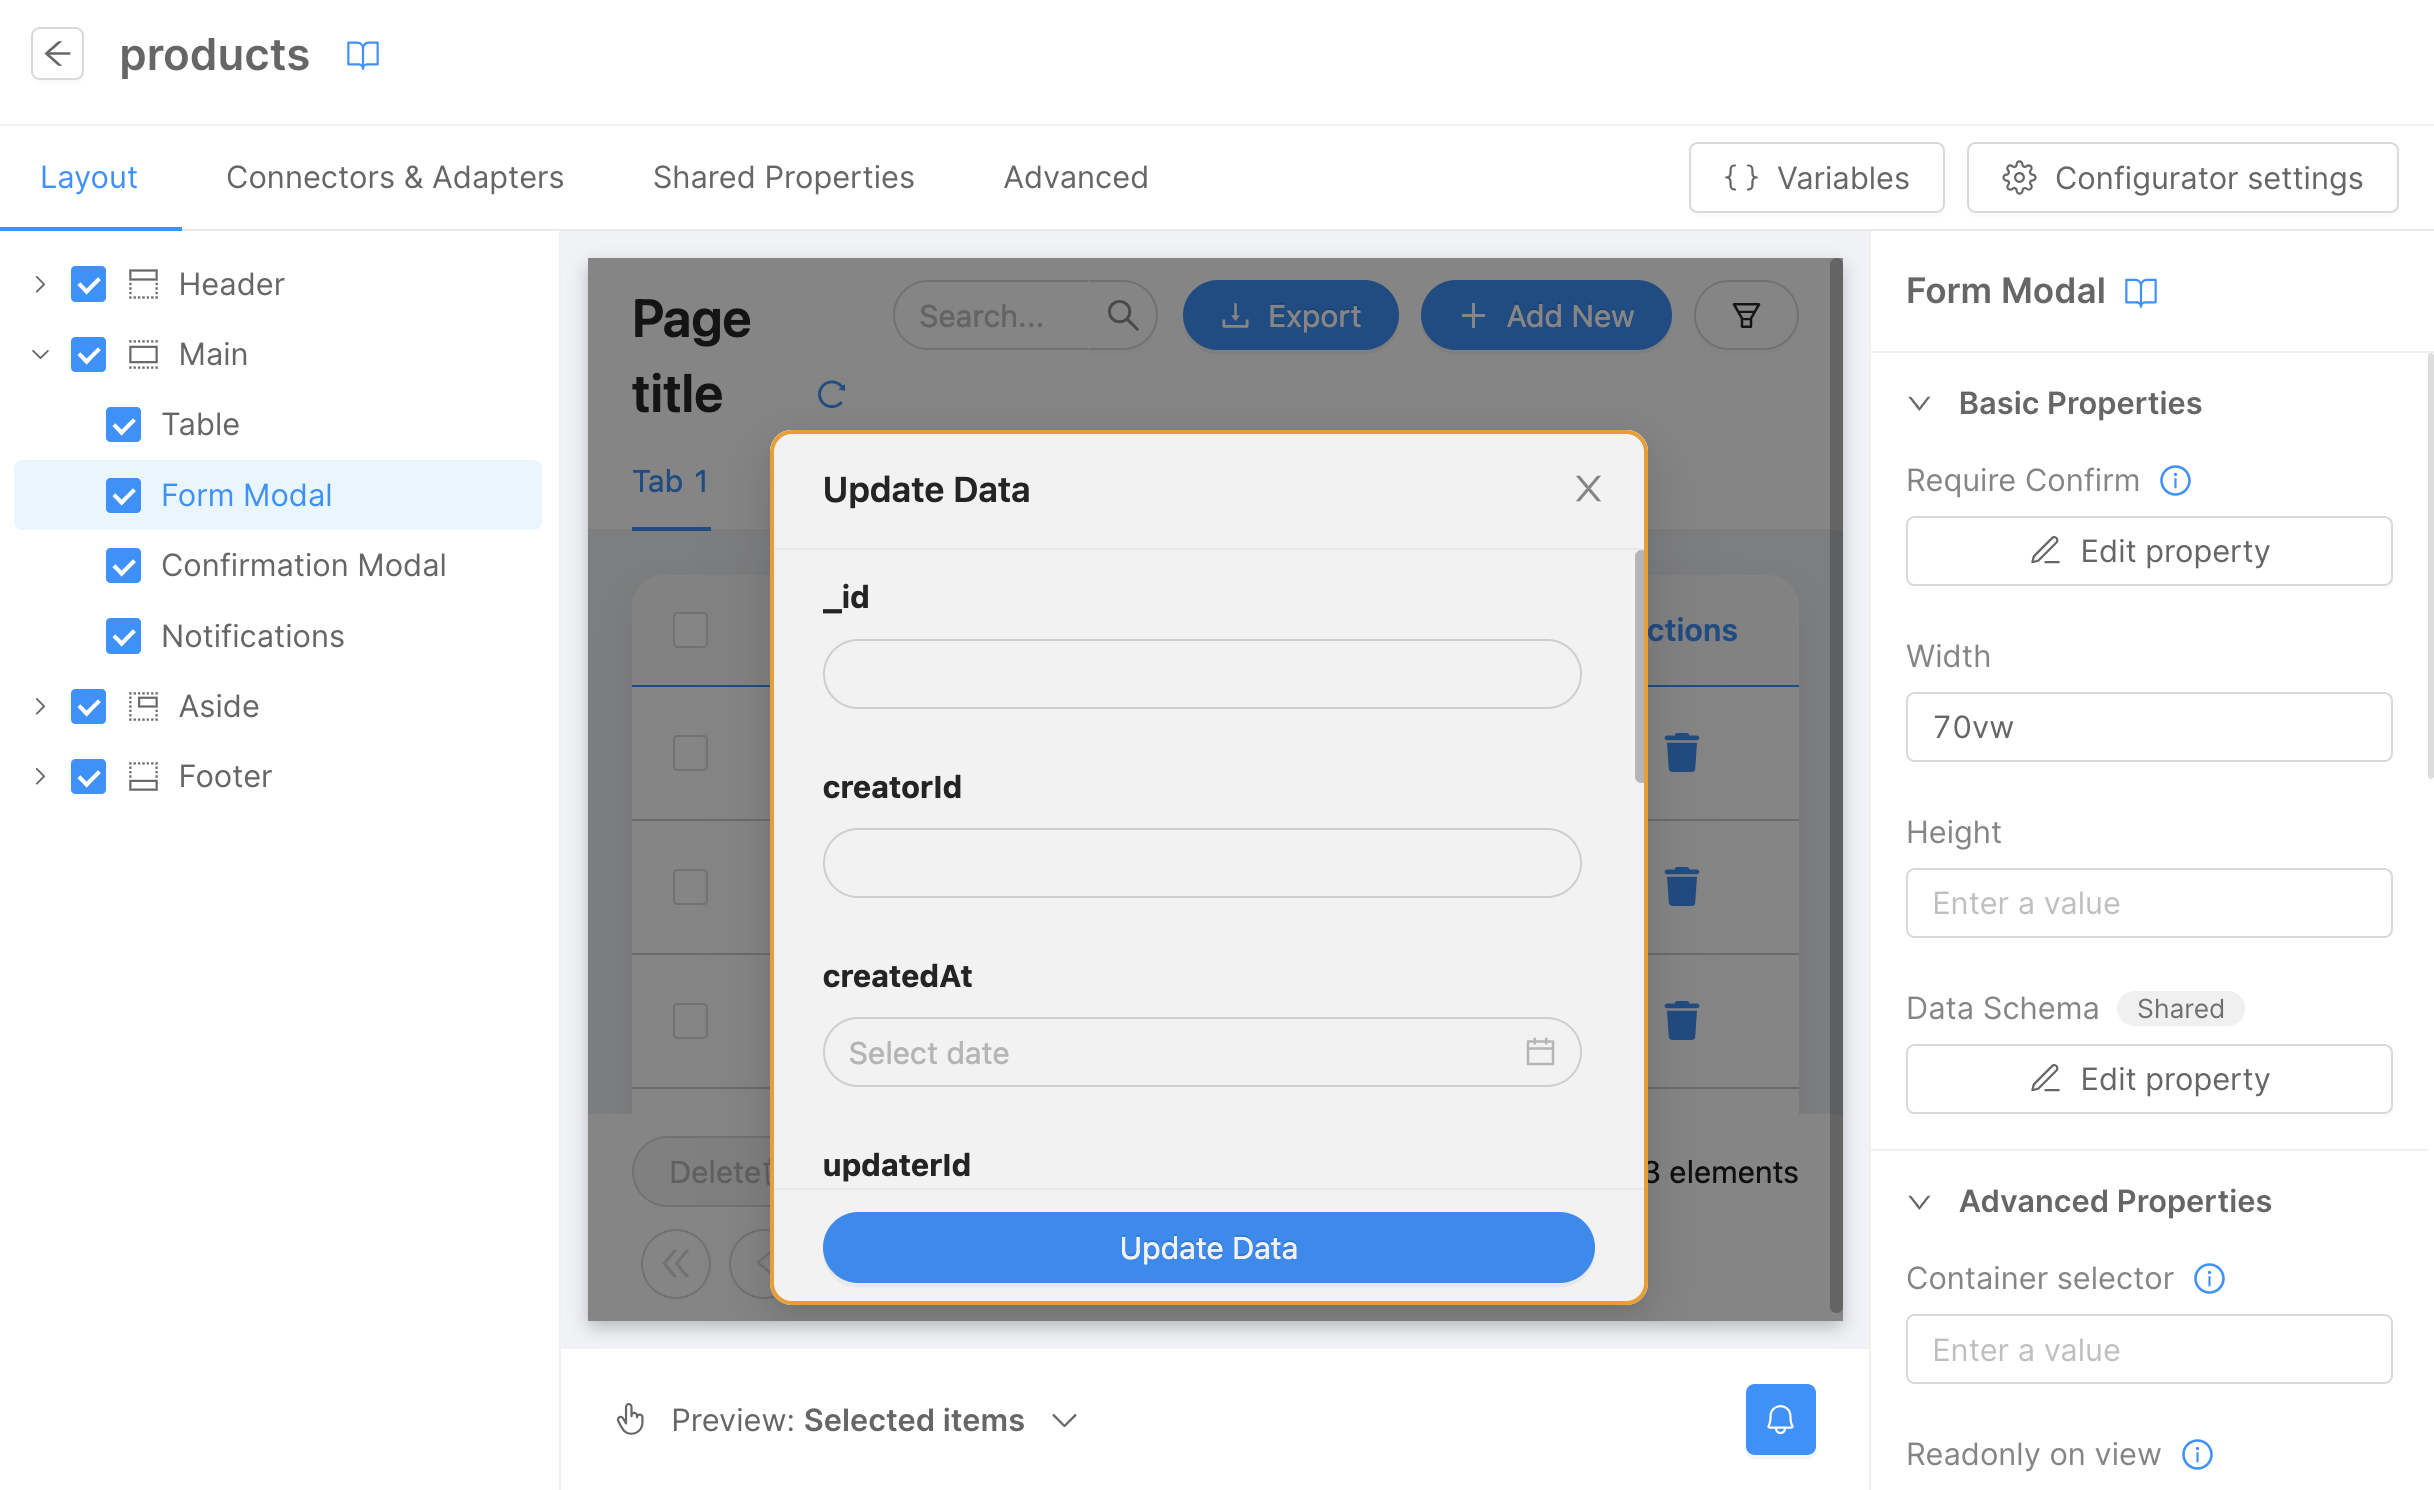
On the right panel, in the Basic Properties section, we can click on the Edit Property under the Data Schema label. To change the default schema, we can enable the Use custom value and then we can edit the schema.
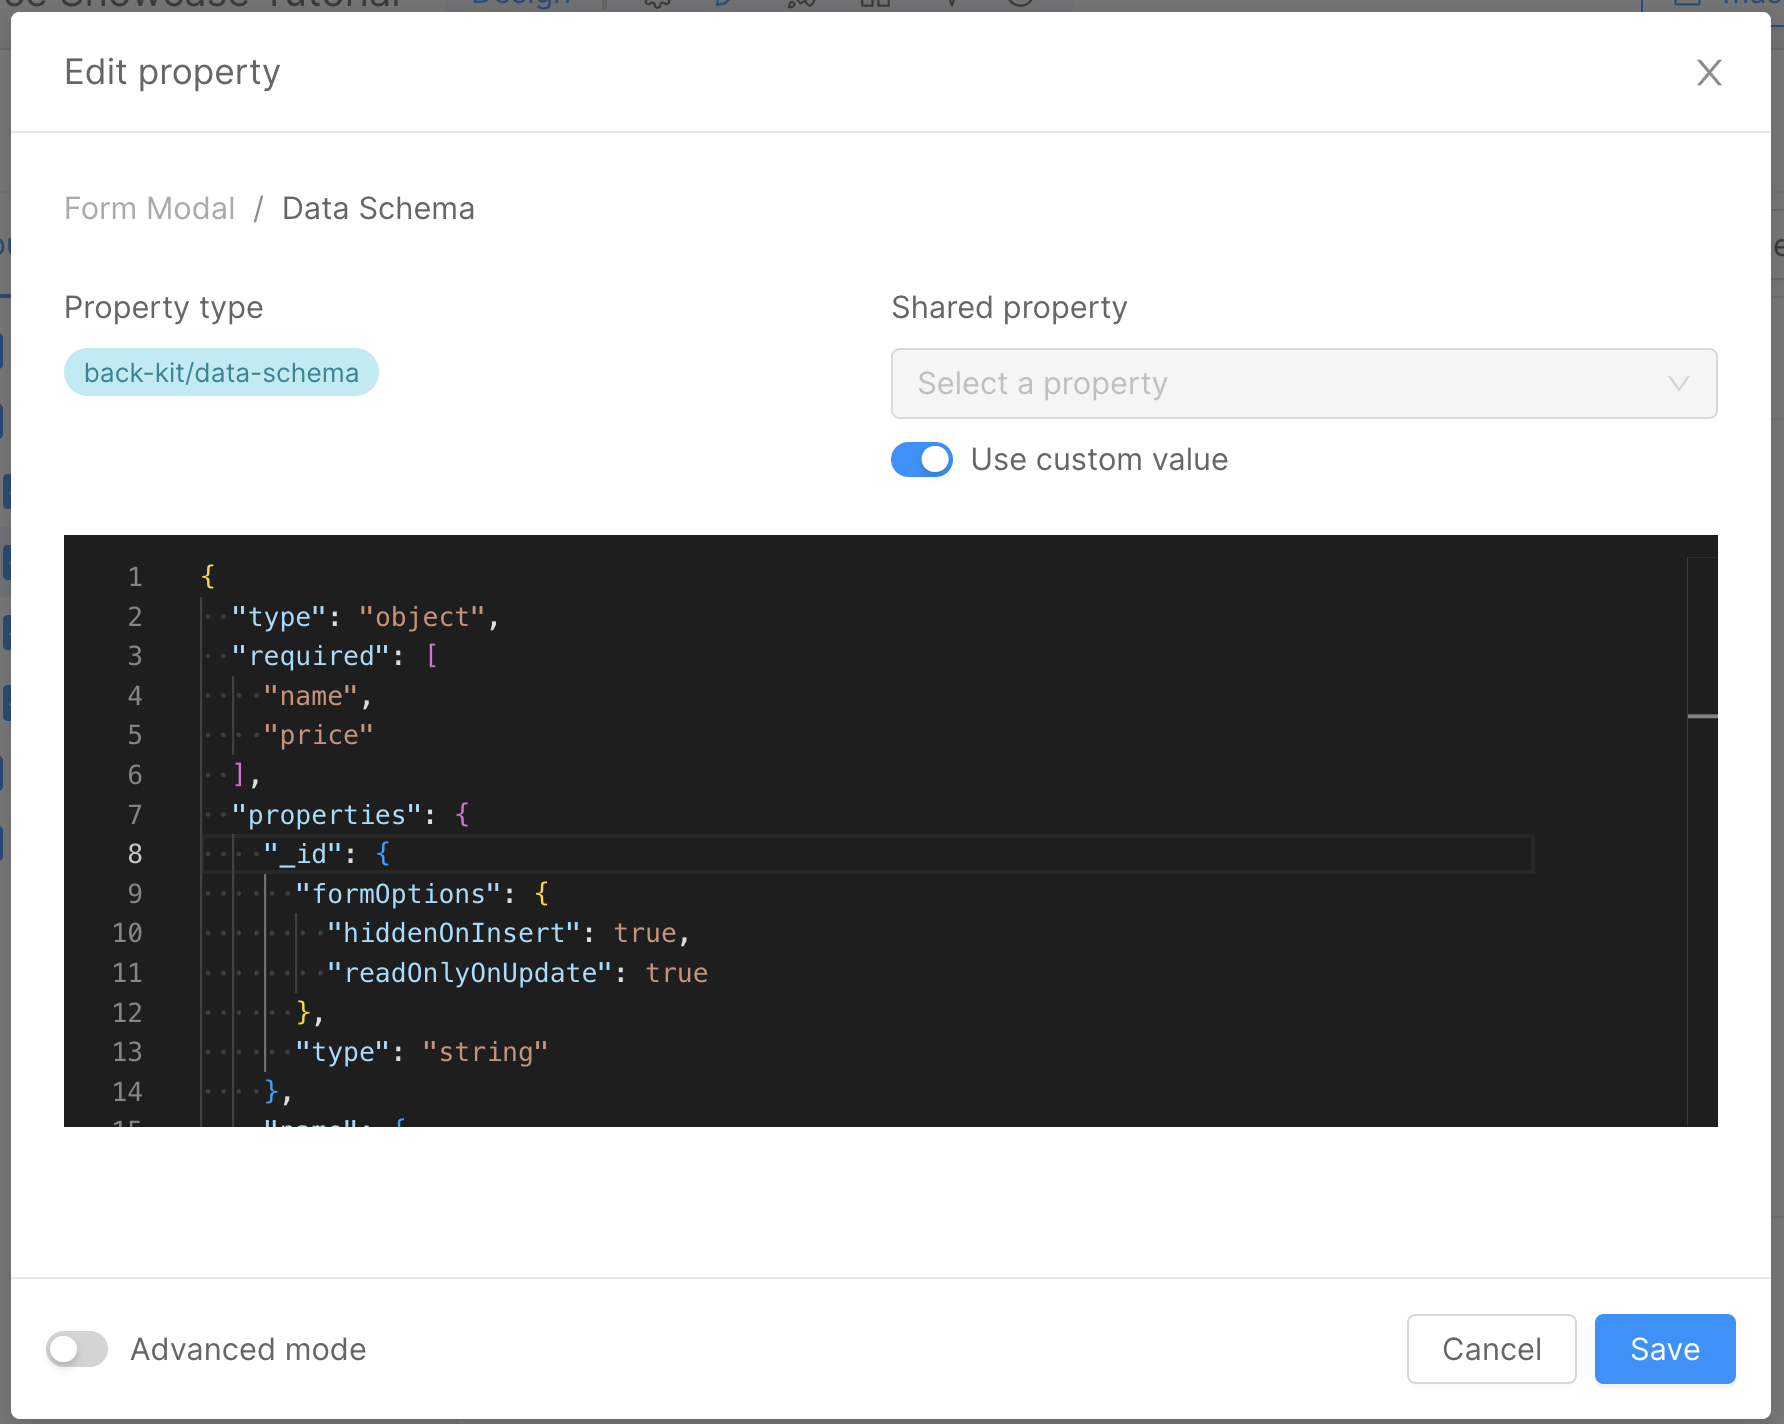
In this case, we want to show only the name, price and description fields in the insert and update form so we can remove all the other fields (creatorId, createdAt, updaterId, updatedAt and __STATE__). About the _id field, we can remove it from the insert form (using the hiddenOnInsert property in formOptions object) because it is an auto-generated field, but we can show it in the update form using the readOnlyOnUpdate property in formOptions object.
Below the schema that we can use for the insert and update form:
{
  "type": "object",
  "required": ["name", "price"],
  "properties": {
    "_id": {
      "formOptions": {
        "hiddenOnInsert": true,
        "readOnlyOnUpdate": true
      },
      "type": "string"
    },
    "name": {
      "type": "string"
    },
    "price": {
      "type": "number"
    },
    "description": {
      "type": "string"
    }
  }
}
If everything is set correctly, click on the Save button to save the schema. After that, you can check the form preview. It should now display only the name, price, and description fields in the insert form, along with the name, price, description, and _id (set as readOnly) fields in the update form.
Export functionality
To export the data in the table, you need to specify the export functionality in the page composer. First, navigate to the Connectors & Adapters tab and then click on the CRUD Export button on the left panel.
Specify the CRUD Service Base Path by using the same endpoint as the CRUD connector (/v2/products). Next, click on the Edit Property under the Data Schema label to specify the export schema. For this example, you would want to export only the _id, name, price, and description fields, so you can reuse the schema created for the form.
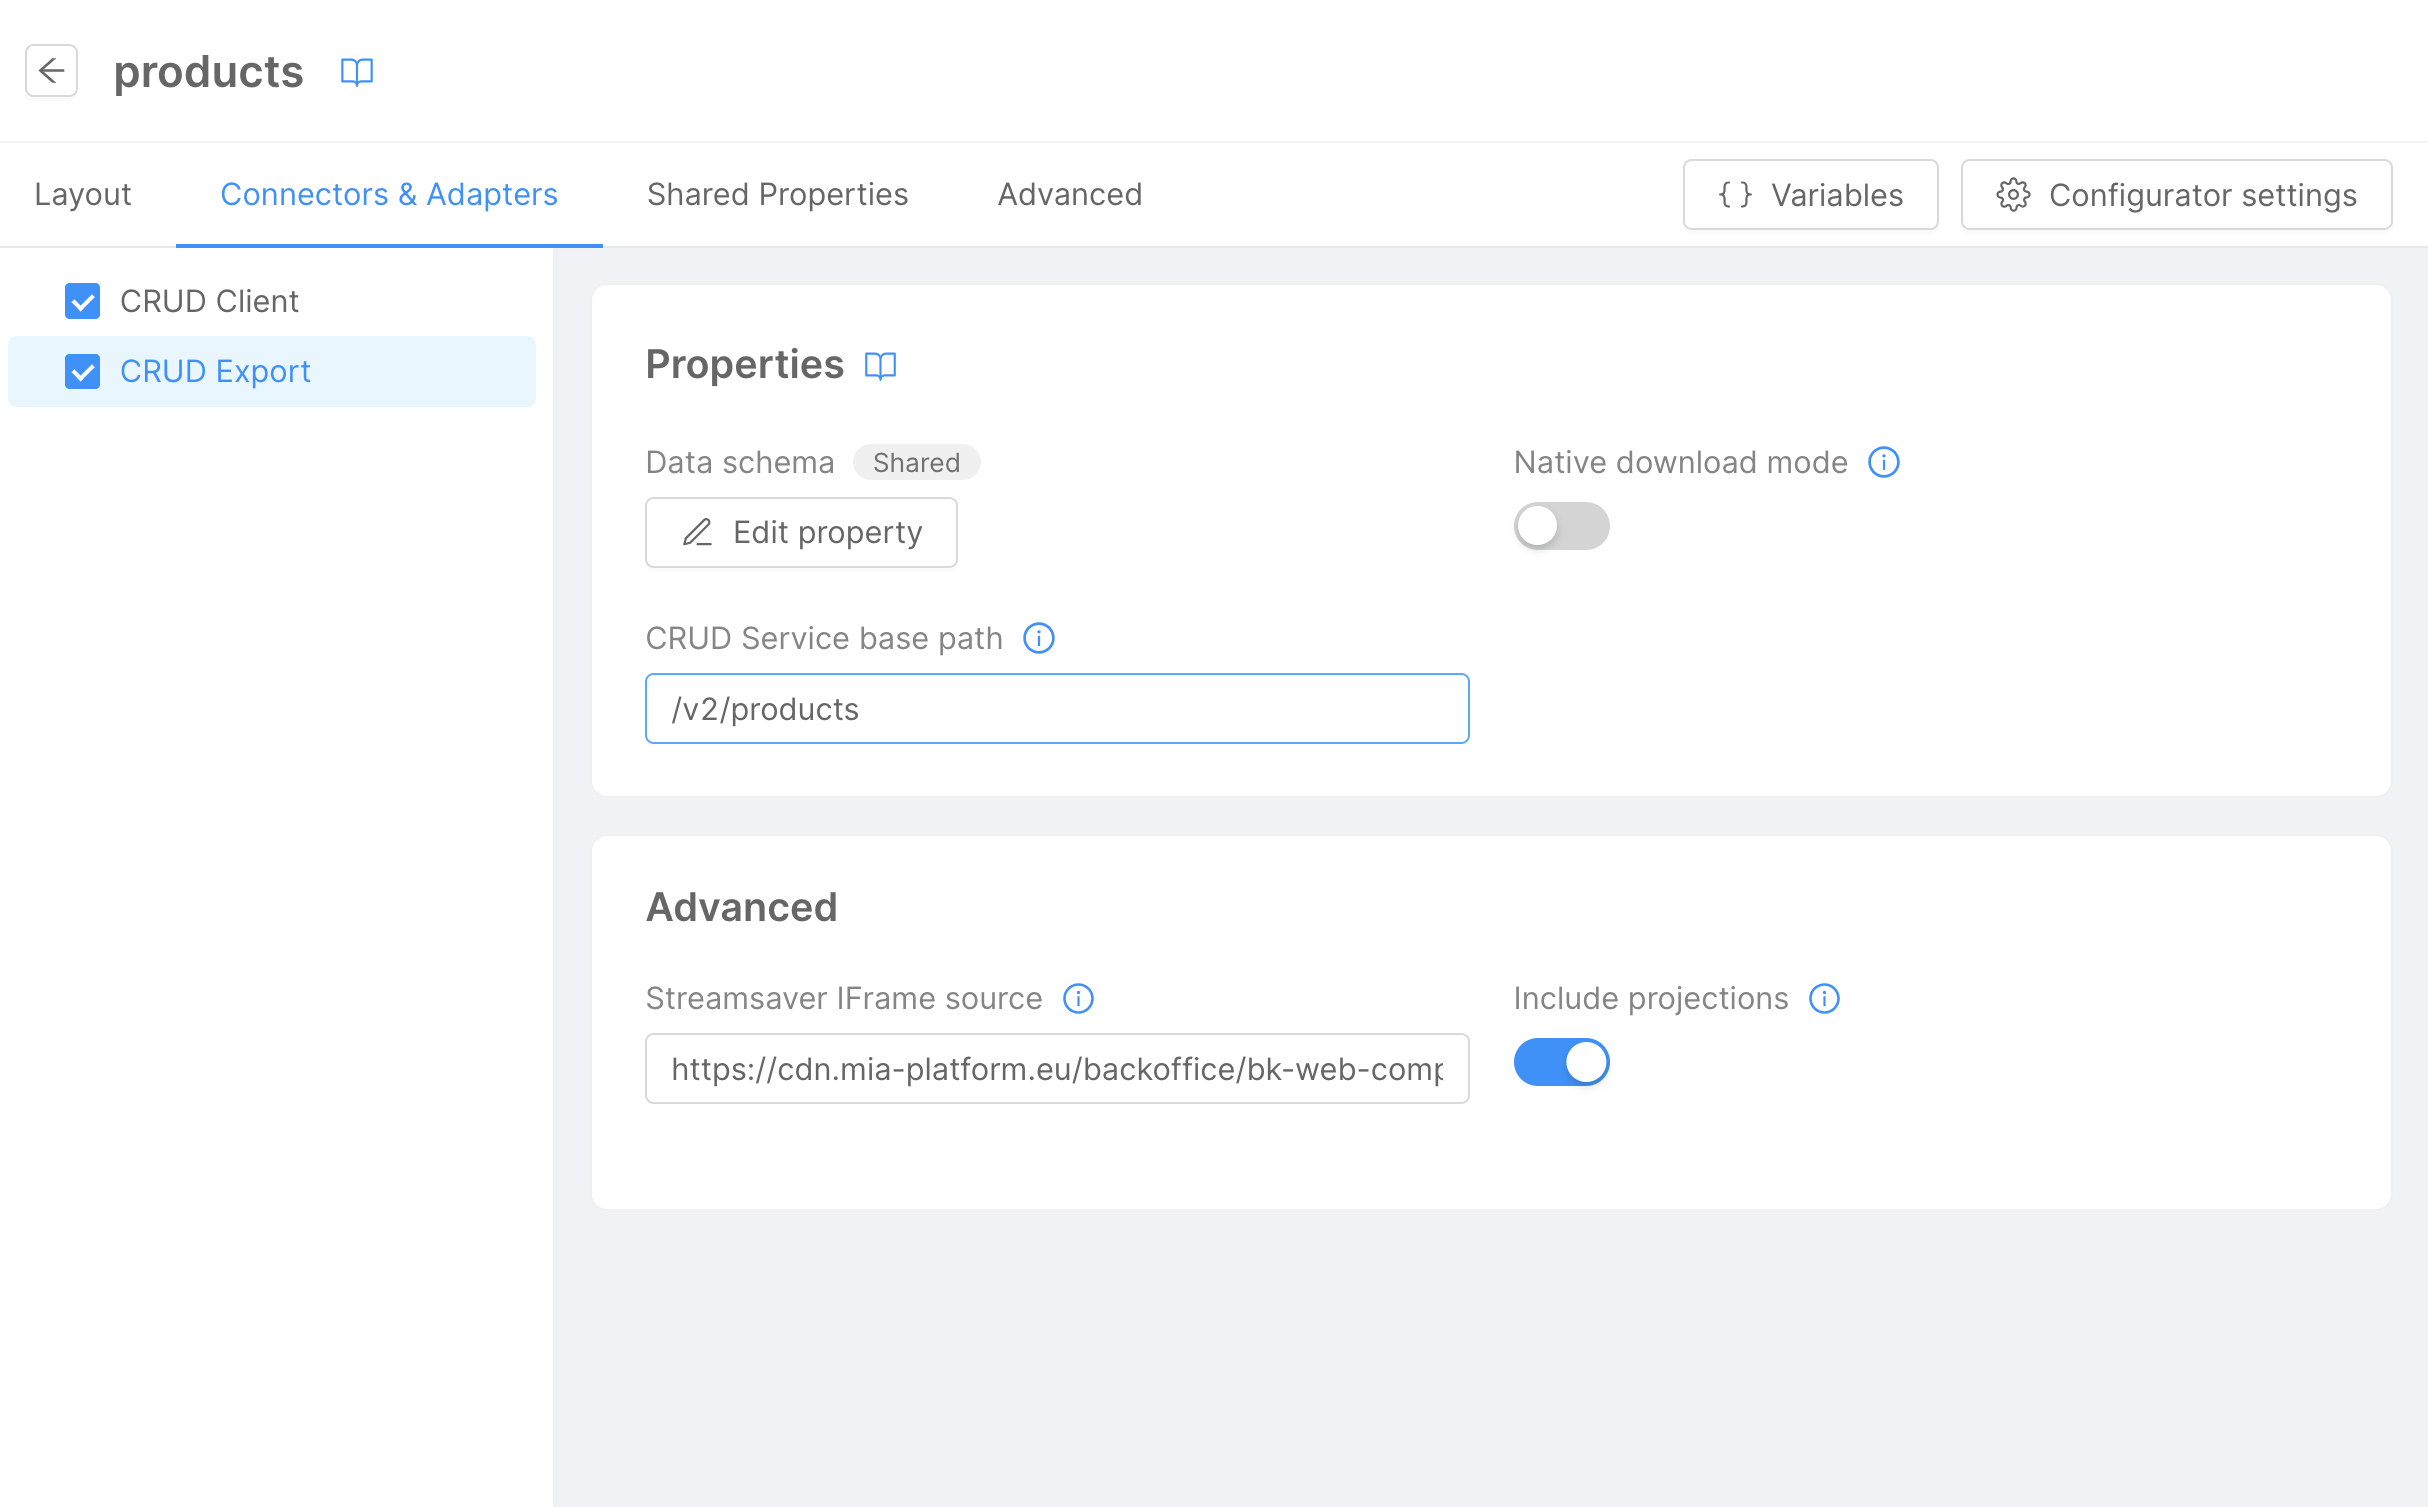
In this step, you'll also need to activate the Use custom value option to modify the schema.

Below is the schema suitable for the Export functionality:
{
  "type": "object",
  "required": [
    "name",
    "price"
  ],
  "properties": {
    "_id": {
      "formOptions": {
        "hiddenOnInsert": true,
        "readOnlyOnUpdate": true
      },
      "type": "string"
    },
    "name": {
      "type": "string"
    },
    "price": {
      "type": "number"
    },
    "description": {
      "type": "string"
    }
  }
}
Personalize the Page
It's now time to give the page a personal touch by modifying the title and tab label.
Go to the Layout tab on the left panel and click on the Header button, followed by the Title button. On the right panel, modify the title using the input box under the Content label. For this guide, we'll use Products as the title.
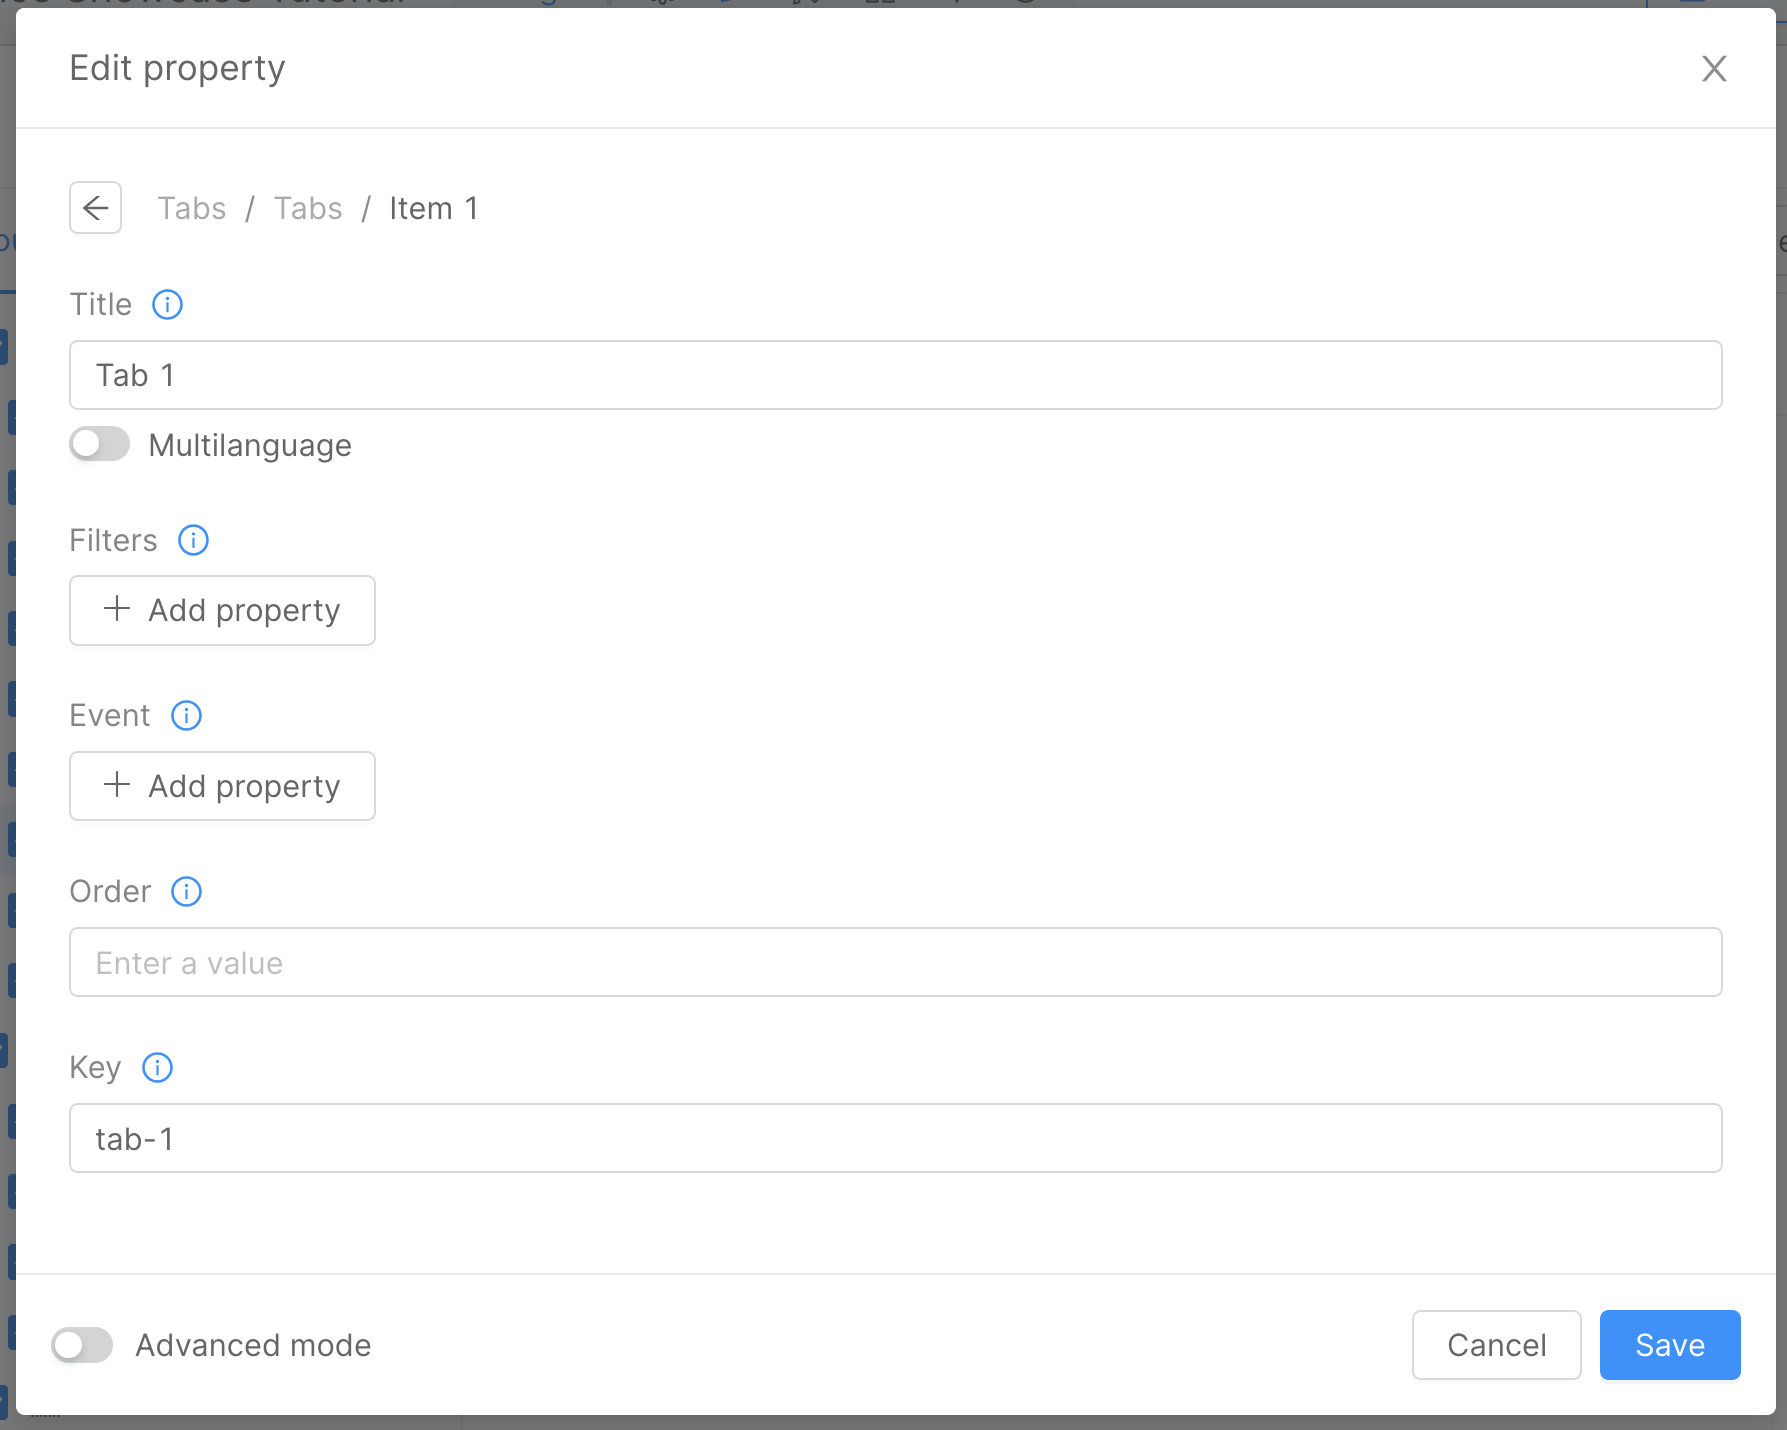
To update the tab label, click on the Tabs button located on the left panel under the Header button. Then, on the right panel, click Edit Property under the Tabs label. In the appearing modal, select the Edit option.
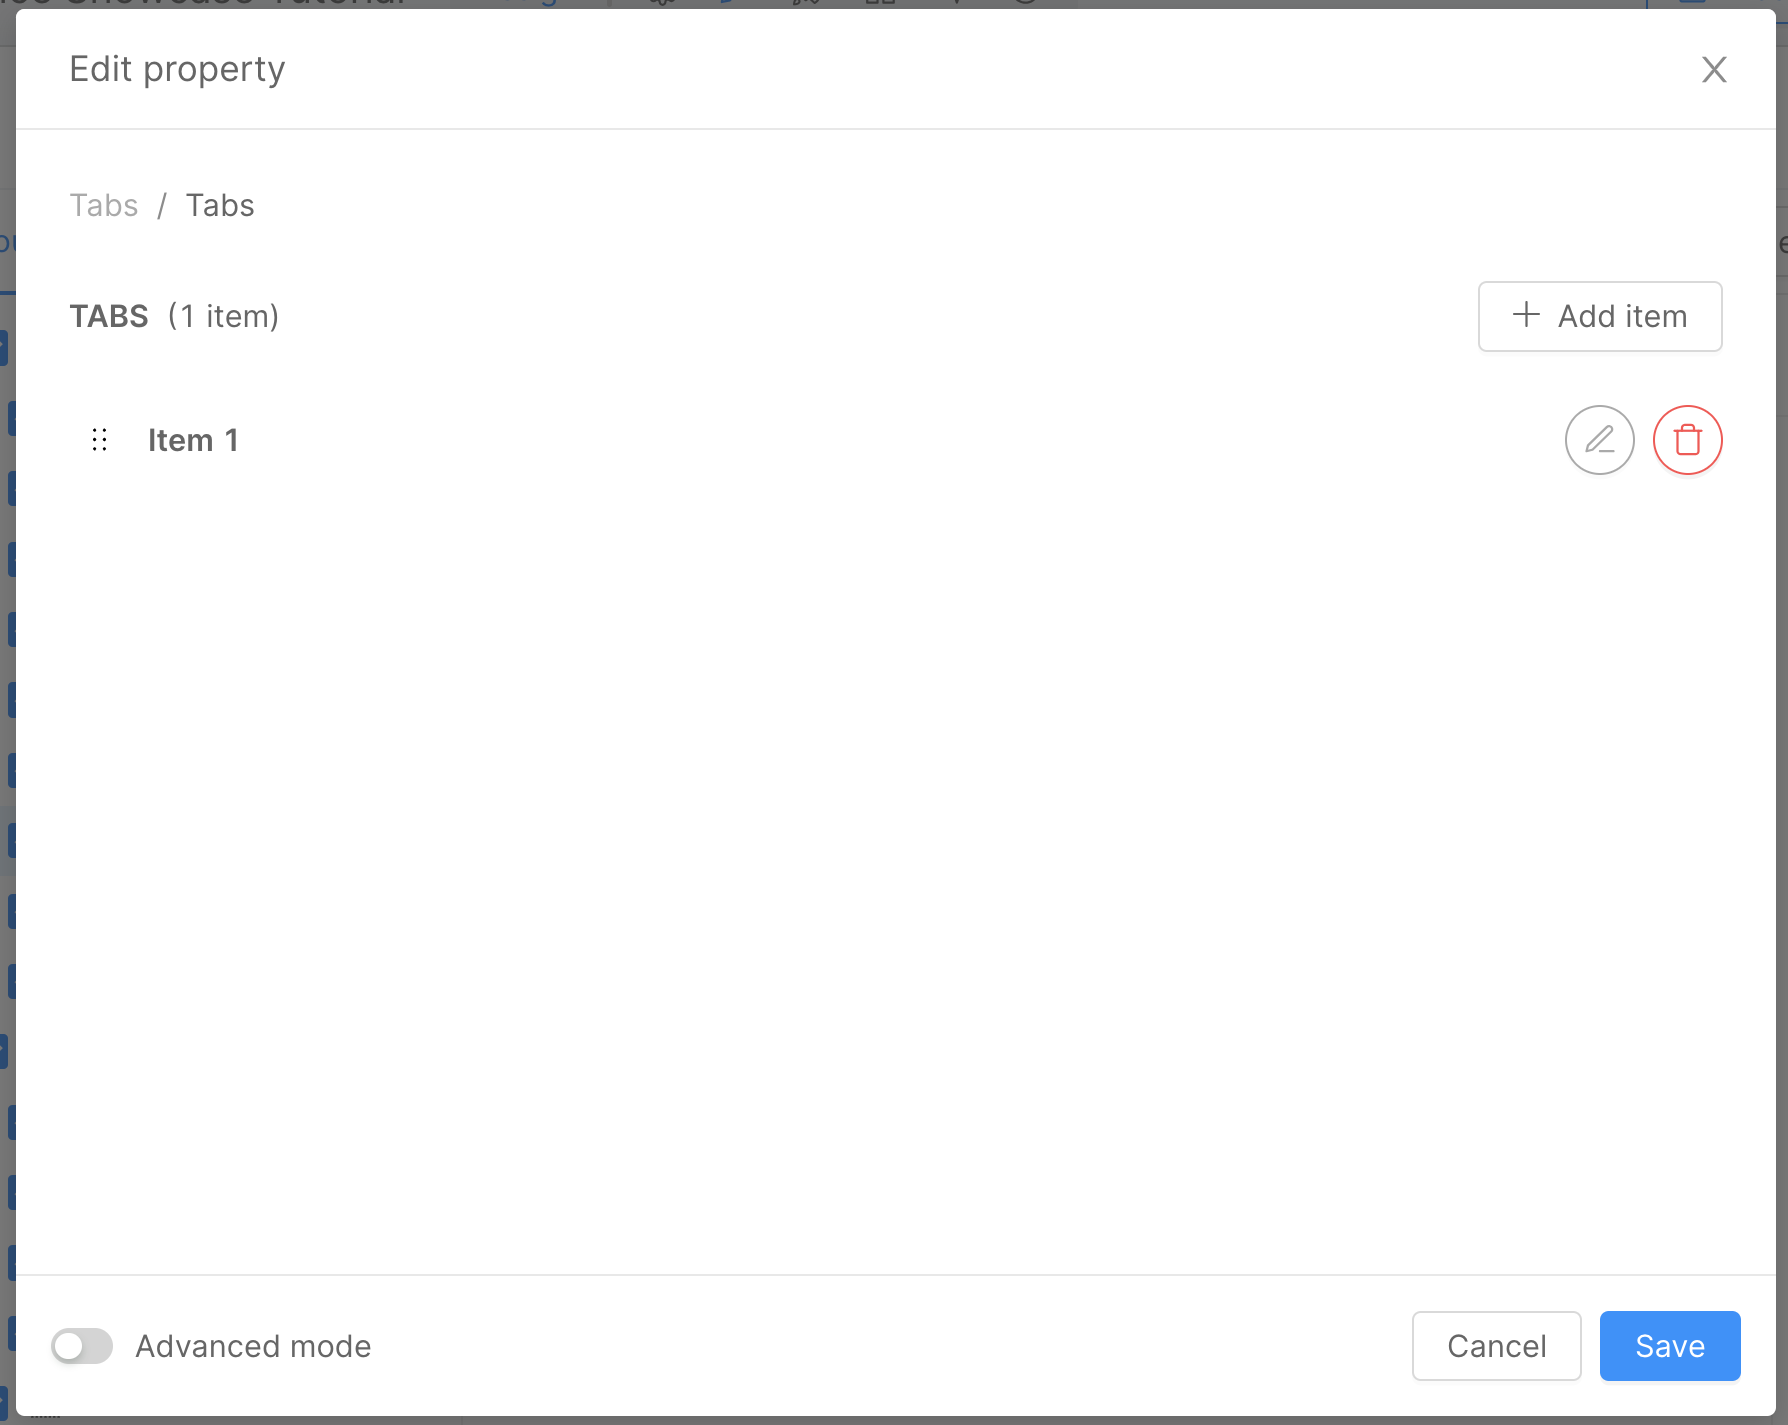
Now, you can modify the tab properties. For our example, change the Title input to All.
Connect the Page with the Microfrontend Composer Menu
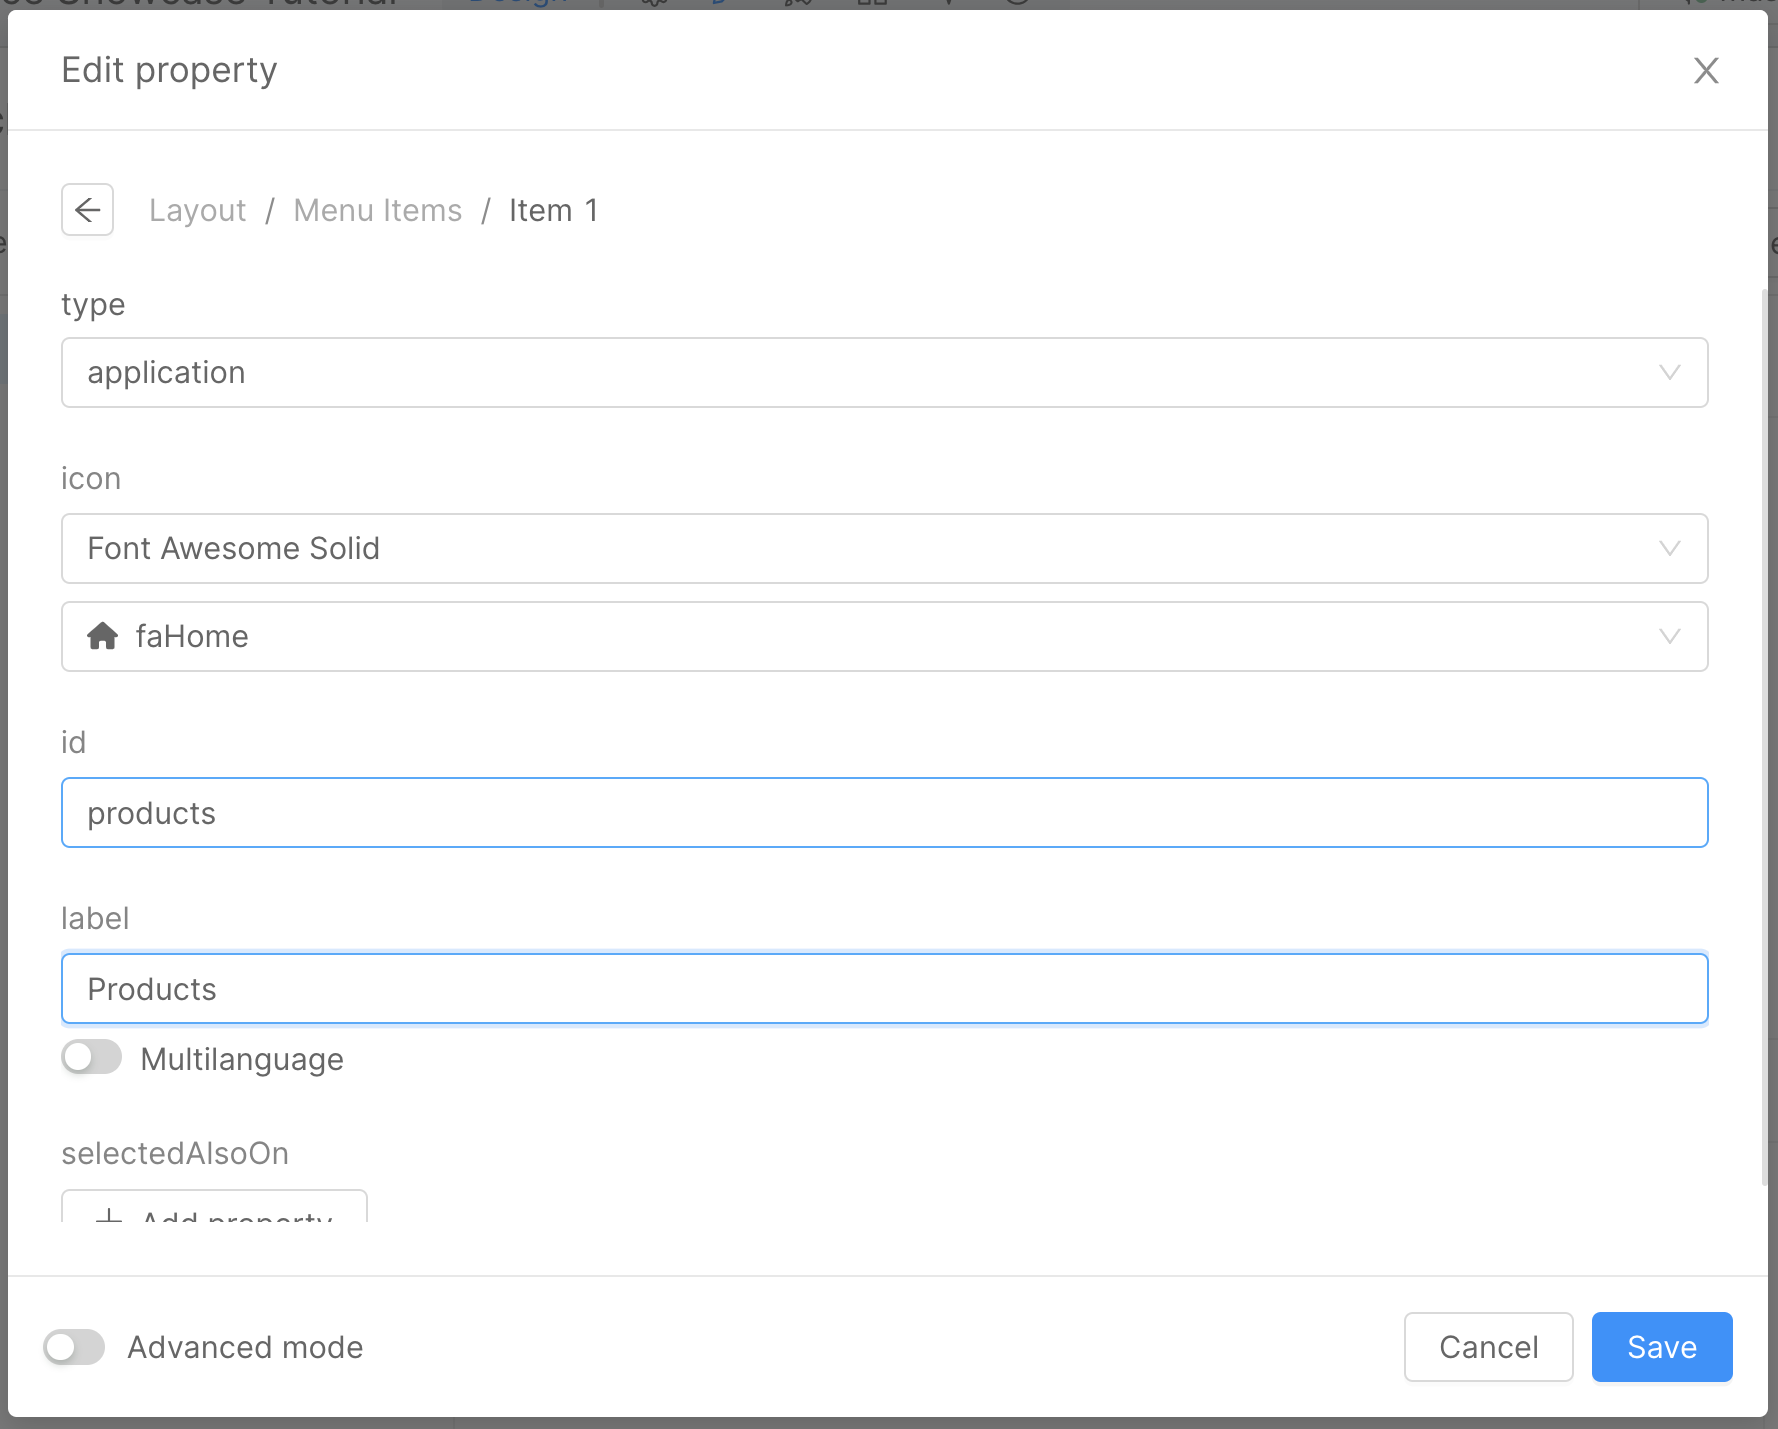
You're now ready to link the page to the menu. Go back to the Layout tab, click on the Layout button on the left, and then select Edit Property under the Menu Items label. In the modal that appears, choose Edit for the sole item in the list, and then modify:
idtoproductslabeltoProducts
To set the new page as the default, go to the Settings tab. In the left panel, click on the URIs button and then, in the Default URL, input the new page path (./products).
All the URLs in the configuration are relative to the page path. So, if you're referencing a page in the same directory, use ./ as a prefix. If it's a page in a subdirectory, the path should be ./subfolder/page.
Save and Deploy
With all the configurations in place, save your changes and then deploy. For further details on the deploy command, consult the Console Handbook.
Microfrontend Composer Tutorials
In this tutorial, you've learned how to set up the Microfrontend Composer and create a new Table Page using the Microfrontend Composer Page Composer.
Also, make sure to check out:
- In the Microfrontend Composer Templates Tutorial, explore how to configure various page types with the Microfrontend Composer Page Composer and an iFrame Page.
- The Microfrontend Composer Microfrontends Tutorial provides guidance on configuring a Microfrontend using Angular or React, and its integration into the Microfrontend Composer.