Secure Access
In order to ensure that only authorized people can access Fast Data Runtime Management system and consequently visualize or change its state, it is important to properly set up a security layer.
In the following page are described the requirements and a procedure that can be executed to achieve the goal of securing Fast Data Runtime Management application. This procedure is inspired by this guide which employs Mia-Platform Marketplace components and exploits Mia-Platform Console features.
Please, bear in mind that there are many ways for securing the access to an application and the one provided here is meant to be a streamlined guide which may be followed, adapted according to your needs or taken just as an inspiration for building your security layer.
Requirements
- access to Fast Data Control Plane application, which automatically scaffold the configurations regarding microservices, collections, endpoints and variables needed for controlling Fast Data Runtime Management solution and protecting its access. Generated resources need to be further customized depending on your needs and credentials.
- an introduction to Envoy, which is employed as API Gateway by the application. It is also possible to employ Nginx as API Gateway, though the focus of this guide is on the former.
- an Identity Provider, which manages users' identities. The one employed throughout this guide is Okta, although any other Identity Provider supported by the Mia-Platform Authentication Service can be adopted in place of Okta within this guide.
Authentication Flow
In this section are described which resources should be configured in order to properly protect the access to the Fast Data Runtime Management solution.
Services
Upon application instantiation, the following services should have been generated for handling the authentication flow:
api-gateway, which is the entrypoint of your project requestsauthentication-service, which is the service that interacts with your Identity Provider to verify your users identitycrud-service, which allows to query via HTTP requests the underlying database where users are storedlogin-site, a simple frontend employed for handling the authentication flow in user browser
Api Gateway
For the current use case no further configuration is needed for this service in Console Design area. However, if there is a need for updating any specific detail, please look for more information at the dedicated documentation page.
Authentication Service
In order to follow through this guide it is necessary to ensure that at least version v3.10.0 of Authentication Service has been configured.
Earlier versions do not fully support permissions key in /user-info details and therefore they would not be retrieved
when checking for user's authorization
The service configuration is created with a set of preconfigured variables, such as the connection to Redis (see the paragraph below), and a config map that lists the supported applications. Within the config map that contains the known applications it is already possible to find the definition of an application that uses Okta as Identity Provider.
In case you would prefer using another Identity Provider, please read the authentication-service documentation to learn which ones are supported and how to configure the desired one in place of Okta.
The configuration of included application only requires to set up few public and secret environment variables to be operational. These variables are summarized in the tables below, divided for location where they should be stored. In fact, the former ones should be added under the Variables tab of Project Overview area, while the latter can be configured in the Public Variables of the Design section.
| Secret Variable | Explanation |
|---|---|
| CP_OKTA_CLIENT_ID | client id obtained when registering this specific application on Okta |
| CP_OKTA_CLIENT_SECRET | client secret obtained when registering this specific application on Okta |
| Public Variable | Explanation |
|---|---|
| OKTA_BASE_URL | base url where your Identity Provider is exposed |
| CP_APP_ID | application identifier employed when registering this specific application on Okta (e.g. fast-data-control-plane) |
| CP_PROVIDER_ID | provider identifier employed when registering this specific application on Okta (e.g. okta-development) |
| CP_REDIS_SCOPE | redis scope in case of a multi-tenant architecture |
| CP_BASE_URL | base url where the project is exposed |
After the creation of the Control Plane application, the public variables specified above should already appear in the corresponding section, each of them with an empty value.
Filling the variables listed above allows to generate a complete configuration at deploy time. An example of such configuration for Okta can be fond in the panel below.
Authentication Service | Configuration Example (with variables to be interpolated)
{
  "apps": {
    "{{CP_APP_ID}}": {
      "providers": {
        "{{CP_PROVIDER_ID}}": {
          "order": 10,
          "type": "okta",
          "label": "Login with Okta",
          "clientId": "{{CP_OKTA_CLIENT_ID}}",
          "clientSecret": "{{CP_OKTA_CLIENT_SECRET}}",
          "baseUrl": "{{OKTA_BASE_URL}}",
          "authUrl": "{{OKTA_BASE_URL}}/oauth2/v1/authorize",
          "tokenUrl": "{{OKTA_BASE_URL}}/oauth2/v1/token",
          "userInfoUrl": "{{OKTA_BASE_URL}}/oauth2/v1/userinfo",
          "userSettingsURL": "{{OKTA_BASE_URL}}/enduser/settings",
          "logoutUrl": "{{OKTA_BASE_URL}}/oauth2/v1/logout",
          "scope": [
            "openid",
            "profile",
            "email",
            "offline_access"
          ]
        }
      },
      "redirectUrl": "{{CP_BASE_URL}}/web-login/oauth/callback",
      "defaultRedirectUrlOnSuccessfulLogin": "/",
      "authorizeStateRequired": true,
      "realm": "console",
      "isWebsiteApp": true,
      "issuer": "{{CP_APP_ID}}",
      "defaultGroups": []
    }
  }
}
In addition to previous configurations, the service needs to mount a private key as a secret. This key is employed to
sign JWTs that are set as session id for authenticated users. In case the service has been instantiated through the
Fast Data Control Plane application, a secret has already been associated (but not created) to the service, which is named authentication-service-secrets.
These instructions below assume that the tool employed for deploying Console projects is mlp.
Please, remember to adapt them according to your actual deployment tool and/or secret management configuration.
In order for the Console to automatically create the secret at deploy time it is then necessary to edit the file mlp.yaml,
that can be found within your project repository root folder, and extend it with the following entry under the secrets key:
secrets:
  # ...
  - name: "authentication-service-secrets"
    when: "always"
    data:
      - from: "literal"
        key: "private-key.pem"
        value: "{{CP_JWT_CLIENT_PRIVATE_KEY}}"
  # ...
This will create at deploy time a K8s secret named authentication-service-secrets, which will contains a property private-key.pem mapped
to the value of the interpolated variable CP_JWT_CLIENT_PRIVATE_KEY.
To provide the proper value, please generate a private key, for example as follows,
ssh-keygen -t rsa -b 4096 -m PEM -f private.key
and then create the corresponding environment variable CP_JWT_CLIENT_PRIVATE_KEY in the Variables tab of Console Project Overview area.
Finally, please ensure that on the authentication-service, located under the Microservices section in the Console Design area,
the environment MIA_JWT_TOKEN_PRIVATE_KEY_FILE_PATH is set to /secrets/private-key.pem (where the folder is driven
by the secret mount path and the file name corresponds to the key property set in the mlp.yaml configuration entry).
In case more details are needed on this latter part, please head over to the authentication-service documentation page.
Login Site
No further configuration is needed for this service.
In case it is needed to embed Fast Data Control Plane solution within Mia-Platform Console,
please ensure that login site version greater or equal to v8.1.2 which supports handling authentication both via redirect and as popup
when requested from an iFrame.
CRUD Service
No further configuration is needed for this service, other than ensuring that environment variable MONGODB_URL is correctly set,
that is either interpolated from a Project Secret Variable or loaded from a K8s secret.
Redis Configuration
In case you don't already have a Redis instance configured dedicated for authentication purposes, in the steps below it described how to configure your own in-memory only instance:
-
enter your project Design area and select Microservices section
-
click on the button Create a Microservice button and select From Docker image
-
in the form that is opened enter
redis-authas name andbitnami/redis:6.2.14and Docker image name and click theCreatebutton -
upon the service page opens, head over Container Ports card and edit the predefined one to use port
6379for port and target port -
in the Runtime card enable readiness and liveness probes on TCP port to ensure the service is working properly once released
-
additionally, in the Microservice card set the memory and cpu request/limits as follows:
- memory → 15m / 50m;
- cpu → 15m / 50m;
-
now, let's move to the environment variables tab and add the following variables:
REDIS_PASSWORDset to{{CP_REDIS_MASTER_PASSWORD}}
-
finally, switching to the Config Maps tab, let's create a config map named
cp-redis-auth-configurationthat should be mounted at/opt/bitnami/redis/mounted-etc/. In this config map a file namedredis.confshould be created. Within this file it is possible to insert the Redis configurations shown below.## GENERIC ##port 6379# listen on all the interfaces for incoming connectionsbind 0.0.0.0## NO DISK PERSISTENCE ##save ""appendonly no## SECURITY ##protected-mode yes# NOTE: +@connection is necessary to be placed after -@dangerous, otherwise the user won't have the permissions to connect to Redisuser {{CP_REDIS_USERNAME}} on +@all -@dangerous +@connection allkeys allchannels >{{CP_REDIS_PASSWORD}}# disable default useruser default off
The provided Redis configuration describes disk persistence management (in-memory only) and introduce a dedicated user with their ACLs. To complete the configuration it is necessary to create the following secret environment variables in the Project Overview area:
| Secret Variable | Explanation |
|---|---|
| CP_REDIS_MASTER_PASSWORD | root password to allow Redis start (not used by any service - it can be loaded from a secret when configured within the service environment variables) |
| CP_REDIS_USERNAME | username of the Redis account to be employed by the authentication-service for accessing Redis |
| CP_REDIS_PASSWORD | password of the Redis account to be employed by the authentication-service for accessing Redis |
Endpoints
Below is reported the list of endpoints related to the authentication flow that are created with the instantiation of Control Plane application. Please ensure that they are exposed with the proper security options.
| Endpoint | Service | Authentication Required | User Group Permission |
|---|---|---|---|
/web-login | login-site | - | true |
/authorize | authentication-service | - | true |
/oauth/token | authentication-service | - | true |
/logout | authentication-service | - | true |
/refreshtoken | authentication-service | ✅ | true |
/userinfo | authentication-service | ✅ | true |
/apps | authentication-service | - | true |
Knowing these endpoints are exposed, it is now possible to configure the redirect urls that some Identity Providers, such as Okta or Auth0, require to complete the application registration. These endpoints will be then employed during the authentication flow to constrain the redirects the Identity Provider can perform. In this case the endpoint that should be configured are the following ones:
- Sign-in redirect URIs →
<project-base-url>/web-login/oauth/callback - Sign-out redirect URIs →
<project-base-url>/logout
where <project-base-url> is the base url where the project of interest is exposed to.
Collections
The authentication flow via the authentication-service requires also the introduction of a CRUD Collection, where
users details are saved upon successful login. These user information can then be employed in the authorization flow, which is
described later.
By default the Fast Data Control Plane application creates the collection for you and instantiates the CRUD Service,
which is employed by the authentication service to access the collection. Additionally, below it is also provided the
collection definition ready for being imported, in case it may be necessary to move or replicate the collection in another Console project.
Control Plane Users Collection Definition (import ready)
{
  "data": {
    "collections": {
      "users": {
        "id": "users",
        "name": "users",
        "fields": [
          {
            "name": "_id",
            "type": "ObjectId",
            "required": true,
            "nullable": false,
            "description": "_id"
          },
          {
            "name": "creatorId",
            "type": "string",
            "required": true,
            "nullable": false,
            "description": "creatorId"
          },
          {
            "name": "createdAt",
            "type": "Date",
            "required": true,
            "nullable": false,
            "description": "createdAt"
          },
          {
            "name": "updaterId",
            "type": "string",
            "required": true,
            "nullable": false,
            "description": "updaterId"
          },
          {
            "name": "updatedAt",
            "type": "Date",
            "required": true,
            "nullable": false,
            "description": "updatedAt"
          },
          {
            "name": "__STATE__",
            "type": "string",
            "required": true,
            "nullable": false,
            "description": "__STATE__"
          },
          {
            "name": "name",
            "type": "string",
            "required": false,
            "nullable": false,
            "sensitivityValue": 0,
            "encryptionEnabled": false,
            "encryptionSearchable": false
          },
          {
            "name": "groups",
            "type": "Array_string",
            "required": false,
            "nullable": false,
            "sensitivityValue": 0,
            "encryptionEnabled": false,
            "encryptionSearchable": false
          },
          {
            "name": "username",
            "type": "string",
            "required": false,
            "nullable": false,
            "sensitivityValue": 0,
            "encryptionEnabled": false,
            "encryptionSearchable": false
          },
          {
            "name": "email",
            "type": "string",
            "required": false,
            "nullable": false,
            "sensitivityValue": 0,
            "encryptionEnabled": false,
            "encryptionSearchable": false
          },
          {
            "name": "providerId",
            "type": "string",
            "required": true,
            "nullable": false,
            "sensitivityValue": 0,
            "encryptionEnabled": false,
            "encryptionSearchable": false
          },
          {
            "name": "providerUserId",
            "type": "string",
            "required": true,
            "nullable": false,
            "sensitivityValue": 0,
            "encryptionEnabled": false,
            "encryptionSearchable": false
          },
          {
            "name": "realm",
            "type": "string",
            "required": false,
            "nullable": false,
            "sensitivityValue": 0,
            "encryptionEnabled": false,
            "encryptionSearchable": false
          },
          {
            "name": "metadata",
            "type": "RawObject",
            "required": false,
            "nullable": false,
            "sensitivityValue": 0,
            "encryptionEnabled": false,
            "encryptionSearchable": false
          },
          {
            "name": "permissions",
            "type": "Array_string",
            "required": false,
            "nullable": false,
            "sensitivityValue": 0,
            "encryptionEnabled": false,
            "encryptionSearchable": false
          }
        ],
        "internalEndpoints": [
          {
            "basePath": "/users",
            "defaultState": "PUBLIC"
          }
        ],
        "type": "collection",
        "indexes": [
          {
            "name": "_id",
            "type": "normal",
            "unique": true,
            "fields": [
              {
                "name": "_id",
                "order": 1
              }
            ]
          },
          {
            "name": "createdAt",
            "type": "normal",
            "unique": false,
            "fields": [
              {
                "name": "createdAt",
                "order": -1
              }
            ]
          },
          {
            "name": "stateIndex",
            "type": "normal",
            "unique": false,
            "fields": [
              {
                "name": "__STATE__",
                "order": 1
              }
            ]
          },
          {
            "name": "nameSearch",
            "type": "normal",
            "unique": false,
            "fields": [
              {
                "name": "email",
                "order": 1
              },
              {
                "name": "name",
                "order": 1
              },
              {
                "name": "__STATE__",
                "order": 1
              }
            ]
          },
          {
            "name": "upsertSupport",
            "type": "normal",
            "unique": false,
            "fields": [
              {
                "name": "providerId",
                "order": 1
              },
              {
                "name": "providerUserId",
                "order": 1
              },
              {
                "name": "realm",
                "order": 1
              }
            ]
          }
        ],
        "description": "Collection of users",
        "tags": [
          "collection"
        ]
      }
    }
  },
  "metadata": {
    "branchName": "master",
    "exportTimestamp": "2024-09-13T07:00:00.000Z",
    "isImported": false,
    "pathRefType": "revisions",
    "projectId": "",
    "projectName": ""
  }
}
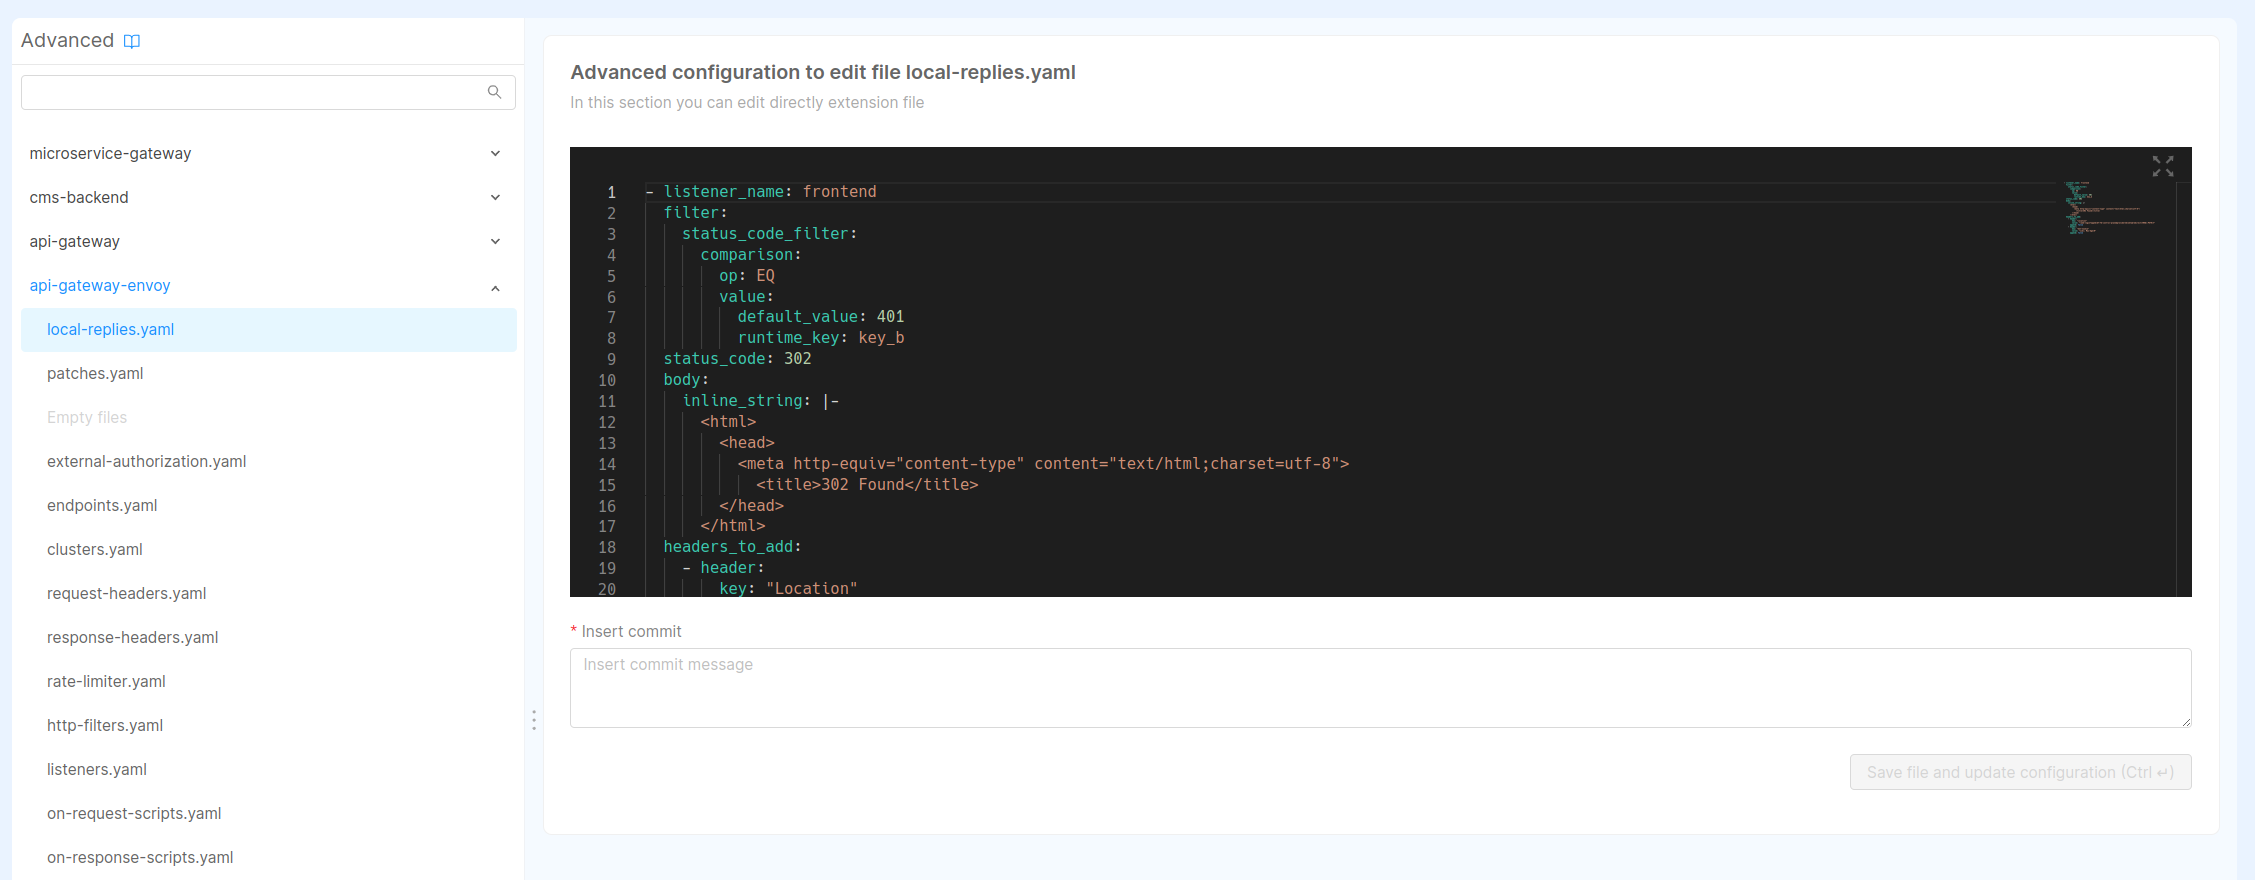
Advanced
In this section are described additional tweaks to be carried out on the API Gateway (Envoy), that enhance the interaction with the runtime system and allow this solution to support authentication.
These modifications should be inserted in the proper file in the Advanced section of the Console Design area, under
the key api-gateway-envoy.
Before proceeding, be sure to have configured Control Plane endpoints accordingly to their specific documentation.
Automatic redirect upon receiving 401 HTTP error
This configuration edit should be inserted in the file local-replies.yml and it enforces a redirect to the login
page every time a 401 HTTP error is encountered by the system. This ensures that the users authenticate before returning
to the page they were trying to browse.
- listener_name: frontend
  filter:
    status_code_filter:
      comparison:
        op: EQ
        value:
          default_value: 401
          runtime_key: key_b
  status_code: 302
  body:
    inline_string: |-
      <html>
        <head>
          <meta http-equiv="content-type" content="text/html;charset=utf-8">
            <title>302 Found</title>
        </head>
      </html>
  headers_to_add:
    - header:
        key: "Location"
        value: "/web-login?appId={{CP_APP_ID}}&providerId={{CP_PROVIDER_ID}}&redirect=%REQ(:PATH)%"
      append: false
    - header:
        key: "Set-Cookie"
        value: "sid=; Max-Age=0"
      append: false
If you're using API Gateway with Nginx, please consider using this approach for automatic redirects.
Authorization Flow
In this section are described which resources and permissions should be configured in order to properly grant the access to the Fast Data Runtime Management solution only to authorized users.
Services
Upon application instantiation, the following services should have been generated for handling the authorization flow within your project:
authentication-service, which is in charge of verifying whether an authenticated user has been granted the permissions to access the resource they are requesting. This service works in tandem withapi-gatewayandauthentication-serviceto fulfill its role;
Authorization Service
This service is introduced when creating the application and it is already preconfigured with all the necessary configurations. In case the service already exists in your project, please ensure the following environment variables on the service contain the these values below:
| Environment Variable | Value |
|---|---|
| HEADERS_TO_PROXY | connection,upgrade,sec-websocket-protocol,sec-websocket-version,x-request-id,request-id,cookie,authorization,client-type,host,x-forwarded-host |
| USERINFO_URL | http://authentication-service/userinfo |
| USER_PROPERTIES_TO_PROXY | provider,email,username,name,permissions,metadata |
In order to support real-time updates in the Fast Data Runtime Management system, it is important to allow proxying the following headers:
In addition, USER_PROPERTIES_TO_PROXY must be edited to include also permissions key, so that permissions property is loaded, checked
and then forwarded to the underlying components.
Endpoints
In addition to the endpoints described in the Authentication Flow section, here are described the ones that expose all the functionalities of Fast Data Runtime Management system, both the frontend and backend components.
| Endpoint | Service | Authentication Required | User Group Permission |
|---|---|---|---|
/fast-data | fabric-bff | ✅ | false |
/control-plane | control-plane-fe | ✅ | true |
Routes
In order to finely control which operations a user can carry out over Control Plane APIs, a set of permissions has been devised, which is listed here:
| Permission | Context |
|---|---|
read:pipelines | allows listing runtimes, their status and visualizing their pipelines list and structure |
control:pipelines | enables changing pipelines state (pause / resume) |
update:runtimes | enables creating, updating or deleting runtime views |
read:users | enables a user to access the user management application in read-only mode |
update:users | enables a user to edit users details in the user management application |
Please, beware that:
- these permissions are Company-wise, that is once a user gets the permissions to update a pipeline state, it can change it for all the pipelines. Currently, there is no filter mechanism that allows a user to manage only Fast Data Runtimes of projects they can access to;
- the default permissions configuration make them independent one from another. A users needs to obtain both
read and update permissions to use all the Control Plane UI features and fully manage Fast Data Runtimes.
For example, a user withcontrol:pipelinespermissions can effectively change the state of a pipeline, but only in case it knows the pipeline identifier beforehand, since it cannot list the existing pipelines;
The permissions described in the table above needs then to be applied to all the different routes exposed by Control Plane application, so that each operation is covered with the correct grant.
| Endpoint | Type | Method | User Group Permissions |
|---|---|---|---|
/fast-data/feedback | Websocket | HEAD | permissions["read:pipelines"] |
/fast-data/feedback | Websocket | GET | permissions["read:pipelines"] |
/fast-data/control | REST | HEAD | permissions["control:pipelines"] |
/fast-data/control | REST | POST | permissions["control:pipelines"] |
/fast-data/runtimes/items | REST | GET | permissions["read:pipelines"] |
/fast-data/runtimes/items | REST | POST | permissions["update:runtimes"] |
/fast-data/runtimes/items/:id | REST | GET | permissions["read:pipelines"] |
/fast-data/runtimes/items/:id | REST | PATCH | permissions["update:runtimes"] |
/fast-data/runtimes/items/:id | REST | DELETE | permissions["update:runtimes"] |
/fast-data/runtimes/items/:id/pipelines | REST | GET | permissions["read:pipelines"] |
/fast-data/runtimes/stats | REST | GET | permissions["read:pipelines"] |
Please ensure that all these endpoints and subsequent routes are set with Authentication Required in their security details tab.
Furthermore, when publicly exposing the gRPC services of main Control Plane instance, we recommend to introduce a security measure to prevent unwanted communications. This can be obtained by setting a Basic Authentication on your ingress controller or an API key to be verified by the Authorization Service.
Configuration of an API Key can be carried out directly in Console as explained here,
whereas in this documentation page is explained
how to protect an endpoint with it.
In the table below are listed which exposed endpoints should be protected by API Key,
assuming the name assigned to the clientType is control_plane_operator:
| Endpoint | Type | API Key required | User Group Permissions |
|---|---|---|---|
/grpc.reflection.v1.ServerReflection | gRPC | ✓ | clientType == "control_plane_operator" |
/grpc.reflection.v1alpha.ServerReflection | gRPC | ✓ | clientType == "control_plane_operator" |
/control_plane_fabric.RuntimeManagement | gRPC | ✓ | clientType == "control_plane_operator" |
/control_plane_fabric.ControlPlane | gRPC | ✓ | clientType == "control_plane_operator" |
/control_plane_fabric.FastDataControl | gRPC | ✓ | clientType == "control_plane_operator" |
Upon securing gRPC endpoints with an API Key, please remember to add the needed header
(secret) to the configuration of all your Control Plane Operators.
Users Management
Controlling which users can access the Fast Data Runtime Management system and their assigned permissions can be done either via directly editing database records or calling CRUD Service APIs. However, having a front-end to execute these actions would be a nice add-on to simplify these actions and to reduce errors related to possible mis-configurations.
This can be achieved thanks to the Microfrontend Composer tool, which allows crafting and configuring web pages and applications. In particular, it is possible to build the pages for listing the users,
An example of application that can be created is shown in the picture below:
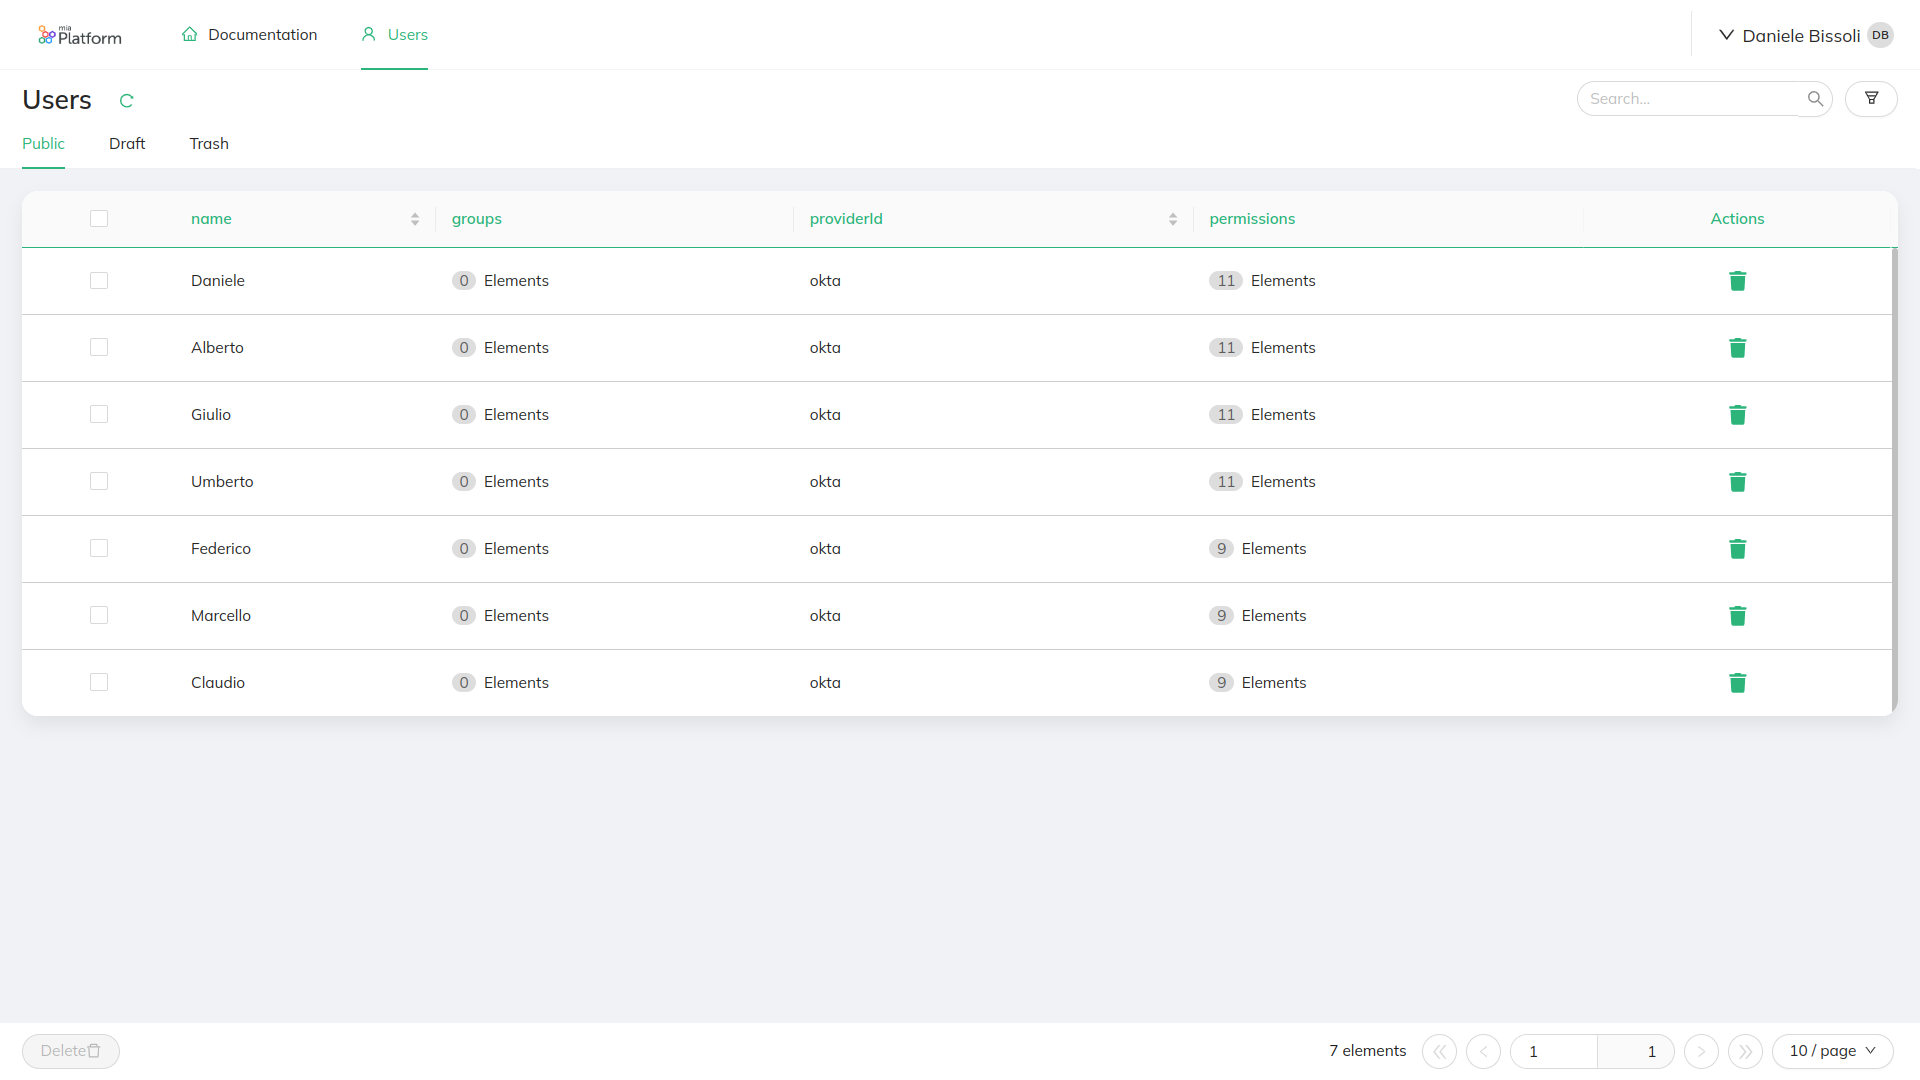
Example of Users Management UI that is generated by the Fast Data Control Plane application
Microfrontend Composer
In order to use Microfrontend Composer in Console it is necessary to purchase the dedicated license. For more information, please ask to your Mia-Platform referent. Nonetheless, the application will create tha user management pages, but those won't be easily editable from the Composer configurator.
Upon application instantiation, a predefined set of web pages are created and ready to be used once the project is deployed. In case you would like to customize those pages here are provided their configuration, one for control plane users, one for the roles and one for their bindings. These configuration can be loaded either as config map of micro-lc service or within the advanced tab of the corresponding page in the Composer.
Control Plane Users Page
{
"definitions": {
"dataSchema": {
"type": "object",
"required": [
"providerId",
"providerUserId"
],
"properties": {
"_id": {
"formOptions": {
"hiddenOnInsert": true,
"readOnlyOnUpdate": true
},
"type": "string",
"visualizationOptions": {
"hidden": true
}
},
"creatorId": {
"formOptions": {
"hiddenOnInsert": true,
"readOnlyOnUpdate": true,
"disabled": false,
"hidden": true
},
"type": "string",
"visualizationOptions": {
"hidden": true
}
},
"createdAt": {
"formOptions": {
"hiddenOnInsert": true,
"readOnlyOnUpdate": true,
"disabled": false,
"hidden": true
},
"dateOptions": {
"displayFormat": "YYYY-MM-DD hh:mm"
},
"format": "date-time",
"type": "string",
"visualizationOptions": {
"hidden": true
}
},
"updaterId": {
"formOptions": {
"hiddenOnInsert": true,
"readOnlyOnUpdate": true,
"hiddenOnUpdate": true
},
"type": "string",
"visualizationOptions": {
"hidden": true
}
},
"updatedAt": {
"formOptions": {
"hiddenOnInsert": true,
"readOnlyOnUpdate": true,
"hiddenOnUpdate": false,
"hidden": true
},
"dateOptions": {
"displayFormat": "YYYY-MM-DD hh:mm"
},
"format": "date-time",
"type": "string",
"visualizationOptions": {
"hidden": true
}
},
"__STATE__": {
"enum": [
"PUBLIC",
"DRAFT",
"TRASH",
"DELETED"
],
"formOptions": {
"readOnlyOnUpdate": true,
"readOnly": false,
"placeholder": "PUBLIC"
},
"type": "string",
"visualizationOptions": {
"hidden": true
}
},
"name": {
"type": "string",
"formOptions": {
"readOnly": true
}
},
"groups": {
"type": "array",
"items": {
"type": "string"
}
},
"username": {
"type": "string",
"formOptions": {
"readOnly": true
},
"visualizationOptions": {
"hidden": true
}
},
"email": {
"type": "string",
"formOptions": {
"readOnly": true
},
"visualizationOptions": {
"hidden": true
}
},
"providerId": {
"type": "string",
"formOptions": {
"readOnly": true
}
},
"providerUserId": {
"type": "string",
"formOptions": {
"readOnly": true
},
"visualizationOptions": {
"hidden": true
}
},
"realm": {
"type": "string",
"formOptions": {
"readOnlyOnInsert": false,
"readOnly": true
},
"visualizationOptions": {
"hidden": true
}
},
"permissions": {
"type": "array",
"items": {
"type": "string",
"enum": [
"read:pipelines",
"control:pipelines",
"update:runtimes",
"read:data-assets",
"update:metadata-assets",
"read:users",
"update:users"
]
},
"dataSchema": {
"type": "array",
"items": {
"type": "string",
"enum": [
"read:pipelines",
"control:pipelines",
"update:runtimes",
"read:data-assets",
"update:metadata-assets",
"read:users",
"update:users"
]
}
}
},
"metadata": {
"type": "object",
"visualizationOptions": {
"hidden": true
}
}
}
}
},
"content": {
"content": [
{
"content": [
{
"tag": "div",
"content": [
{
"properties": {
"content": "Users"
},
"tag": "bk-title"
},
{
"tag": "bk-refresh-button",
"attributes": {
"style": "margin-left: 14px; align-self: end;"
}
},
{
"tag": "div",
"attributes": {
"style": "flex-grow: 1;"
}
},
{
"properties": {
"placeholder": "Search..."
},
"tag": "bk-search-bar"
},
{
"properties": {
"content": "",
"clickConfig": {
"type": "event",
"actionConfig": {
"label": "filter",
"payload": {}
}
},
"type": "outlined",
"iconId": "FunnelPlotOutlined"
},
"tag": "bk-button"
}
],
"attributes": {
"style": "display: flex; flex-direction: row; gap: 10px; padding: 0 20px;"
}
},
{
"tag": "div",
"attributes": {
"style": "width: 100%; display: flex; justify-content: space-between;"
},
"content": [
{
"attributes": {
"style": "flex-grow: 1;"
},
"properties": {
"tabs": [
{
"key": "public",
"title": "Public",
"filters": [
{
"property": "__STATE__",
"operator": "equal",
"value": "PUBLIC"
}
],
"order": 0
},
{
"title": "Draft",
"key": "draft",
"order": 2,
"filters": [
{
"property": "__STATE__",
"operator": "equal",
"value": "DRAFT"
}
]
},
{
"title": "Trash",
"filters": [
{
"property": "__STATE__",
"operator": "equal",
"value": "TRASH"
}
],
"order": 3,
"key": "trash"
}
]
},
"tag": "bk-tabs"
},
{
"attributes": {
"style": "margin-right: 4px"
},
"properties": {
"dataSchema": {
"$ref": "#/definitions/dataSchema"
},
"filters": []
},
"tag": "bk-filters-manager"
}
]
},
{
"tag": "div",
"attributes": {
"style": "padding: 0 20px;"
},
"content": {
"tag": "bk-breadcrumbs",
"properties": {
"dataSchema": {
"$ref": "#/definitions/dataSchema"
}
}
}
}
],
"tag": "header",
"attributes": {
"style": "display: flex; flex-direction: column; padding-top: 10px; background-color: white;"
}
},
{
"content": [
{
"properties": {
"dataSchema": {
"$ref": "#/definitions/dataSchema"
},
"rowActions": {
"kind": "icons",
"actions": [
{
"label": "Delete",
"icon": "fas fa-trash",
"kind": "event",
"content": "delete-data",
"meta": {
"actionId": "delete-data"
},
"requireConfirm": true
}
]
},
"fitParentContainer": true
},
"tag": "bk-table"
},
{
"properties": {
"requireConfirm": {
"onClose": true,
"onSave": true
},
"dataSchema": {
"$ref": "#/definitions/dataSchema"
},
"width": "70vw",
"allowObjectAsTable": false,
"editorHeight": "30vh",
"allowNavigation": true
},
"tag": "bk-form-modal"
},
{
"tag": "bk-confirmation-modal"
},
{
"properties": {
"rootElementSelectors": "main.micro-lc-layout-content",
"successEventMap": {
"create-data": {
"title": "Success",
"content": "Data successfully created",
"type": "success"
},
"update-data": {
"title": "Success",
"content": "Data successfully updated",
"type": "success"
},
"delete-data": {
"title": "Success",
"content": "Data successfully deleted",
"type": "success"
}
},
"errorEventMap": {
"create-data": {
"title": "Error",
"content": "An error occurred during order creation",
"type": "error"
},
"update-data": {
"title": "Error",
"content": "An error occurred during order updated",
"type": "error"
},
"delete-data": {
"title": "Error",
"content": "An error occurred during order deletion",
"type": "error"
}
}
},
"tag": "bk-notifications",
"attributes": {}
}
],
"tag": "main",
"attributes": {
"style": "flex-grow: 1; background-color: #f0f2f5; padding: 20px; overflow-y: auto;"
}
},
{
"content": [
{
"properties": {
"dataSchema": {
"$ref": "#/definitions/dataSchema"
},
"width": "40vw"
},
"tag": "bk-filter-drawer"
}
],
"tag": "aside"
},
{
"content": [
{
"tag": "bk-bulk-delete"
},
{
"tag": "bk-bulk-actions",
"properties": {
"dataSchema": {
"$ref": "#/definitions/dataSchema"
}
}
},
{
"tag": "div",
"attributes": {
"style": "flex-grow: 1;"
}
},
{
"tag": "bk-footer",
"attributes": {
"style": "display: flex; justify-content: end; align-items: center;"
}
},
{
"tag": "bk-pagination",
"properties": {
"pageSize": 10
}
}
],
"tag": "footer",
"attributes": {
"style": "display: flex; flex-direction: row; flex-wrap: wrap; padding: 10px 20px; background-color: white; gap: 10px; position: sticky; bottom: 0; z-index: 10"
}
},
{
"properties": {
"basePath": "/v2/authz/users",
"dataSchema": {
"$ref": "#/definitions/dataSchema"
}
},
"tag": "bk-crud-client"
}
],
"tag": "div",
"attributes": {
"style": "width: 100%; height: 100%; display: flex; flex-direction: column; position: relative;"
}
},
"sources": [
"https://cdn.mia-platform.eu/backoffice/bk-web-components/{{BACK_KIT_VERSION}}/dist/bk-web-components.esm.js"
]
}
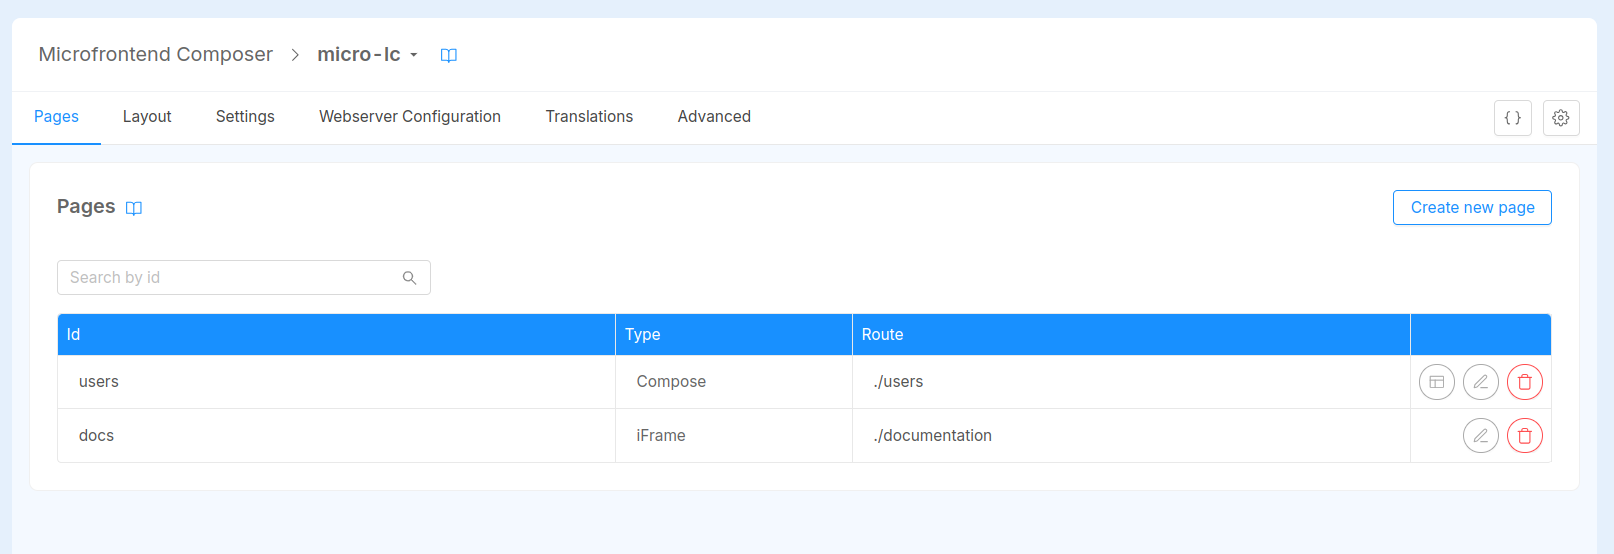
The screenshot above shows what the Composer tool should look like based on the application configuration. Before deploying, please verify that micro-lc public variables have been created, that are:
| Public Variable | Current Version Value | Minimum Version Value |
|---|---|---|
| MICRO_LC_VERSION | 2.4.0 | 2.4.0 |
| MICRO_LC_MANAGER_VERSION | 3.1.1 | 3.1.1 |
| BACK_KIT_VERSION | 1.5.6 | 1.5.6 |
These variables are employed by the Console to define the version of the service and libraries used by micro-lc at deploy time. They can be upgraded whenever an update is available.
Endpoints
Here are reported the endpoints that should be exposed from the project in order to enable users managements:
| Endpoint | Service | Authentication Required | User Group Permission |
|---|---|---|---|
/micro-lc-configurations | micro-lc | ✅ | true |
/mgmt | micro-lc | ✅ | true |
/authz/users | crud | ✅ | permissions["read:users"] || permissions["update:users"] |
Routes
In additions to endpoints definitions provided above, in order to further refine who can manage the users and their permissions for Fast Data Runtime Management system, each endpoint sub-route should define the specific permission grant that user require to own in order to successfully access the requested resource. The following table provides a recap of each route with the needed permissions.
| Endpoint | Type | Method | User Group Permissions |
|---|---|---|---|
/mgmt/users | REST | GET | permissions["read:users"] || permissions["update:users"] |
/authz/users/ | REST | GET | permissions["read:users"] |
/authz/users/export | REST | GET | permissions["read:users"] |
/authz/users/count | REST | GET | permissions["read:users"] |
/authz/users/:id | REST | GET | permissions["read:users"] |
/authz/users/ | REST | POST | permissions["update:users"] |
/authz/users/bulk | REST | POST | permissions["update:users"] |
/authz/users/upsert-one | REST | POST | permissions["update:users"] |
/authz/users/state | REST | POST | permissions["update:users"] |
/authz/users/:id/state | REST | POST | permissions["update:users"] |
/authz/users/ | REST | DELETE | permissions["update:users"] |
/authz/users/:id | REST | DELETE | permissions["update:users"] |
/authz/users/ | REST | PATCH | permissions["update:users"] |
/authz/users/ | REST | PATCH | permissions["update:users"] |
Please ensure that all these endpoints and routes are set with Authentication Required in their security details tab.
The First User
Upon releasing this user management solution, the users table will be empty. Consequently, nobody may enter
the application from frontend at the beginning. To grant the permissions to the admin user, that is the one that usually first
performs the login procedure, it is necessary to either edit the database record associated to such user and insert the needed permissions,
or to temporarily remove the permissions from /authz/users/ endpoint's routes till at least the first user
has been granted the read/edit users permissions.
Below is presented the procedure to grant the needed permissions for managing users of Fast Data Control Plane application.
Let's start by observing a record of users collection:
{
  "_id" : ObjectId("6606e94a0e85630ccda72486"),
  "__STATE__" : "PUBLIC",
  "providerId" : "okta",
  "providerUserId" : "user-id",
  "realm" : "my-kingdom",
  "createdAt" : ISODate("2024-03-29T16:00:00.000+0000"),
  "creatorId" : "public",
  "email" : "alice@platform.world",
  "groups" : [],
  "name" : "Alice",
  "updatedAt" : ISODate("2024-09-13T14:00:00.000+0000"),
  "updaterId" : "public",
  "username" : "",
  "permissions": [
    // add here the necessary permissions, such as "read:users", "update:users"
  ]
}
The above document is created the first time a user logs in through the configured Authentication Flow. As it can be seen,
the user does not belong to any groups nor it owns any permissions. In order to grant Alice the rank of user master (admin)
it is sufficient to add these permissions as strings to the permissions array:
read:usersupdate:users
Afterward, Alice user needs to log out of the application and login again to obtain such permissions
and be able to manage further application users.
We acknowledge this procedure of managing users does not provide a seamless experience. We are working to improve this and reduce configuration friction.
Managing User Permissions
Every time a user logs in for the first time in the Fast Data Control Plane application, the users collection is filled with the corresponding user record. Consequently, in order for them to be able to access Fast Data Control Plane features they need to receive the proper permissions, that can be granted through the dedicated UI.
Opening the users management frontend, which can be reached by default at the path /mgmt/users under the domain
exposed by your Mia-Platform Console project, the first thing that be observed is the users table. This
table lists all the users that ever logged in Fast Data Control Plane application, alongside their details and permissions.
To update a user's permissions, please search for such user and click on its entry in the table. It will open a modal window showing a set of user's details and scrolling it will be possible to access the list of permissions.
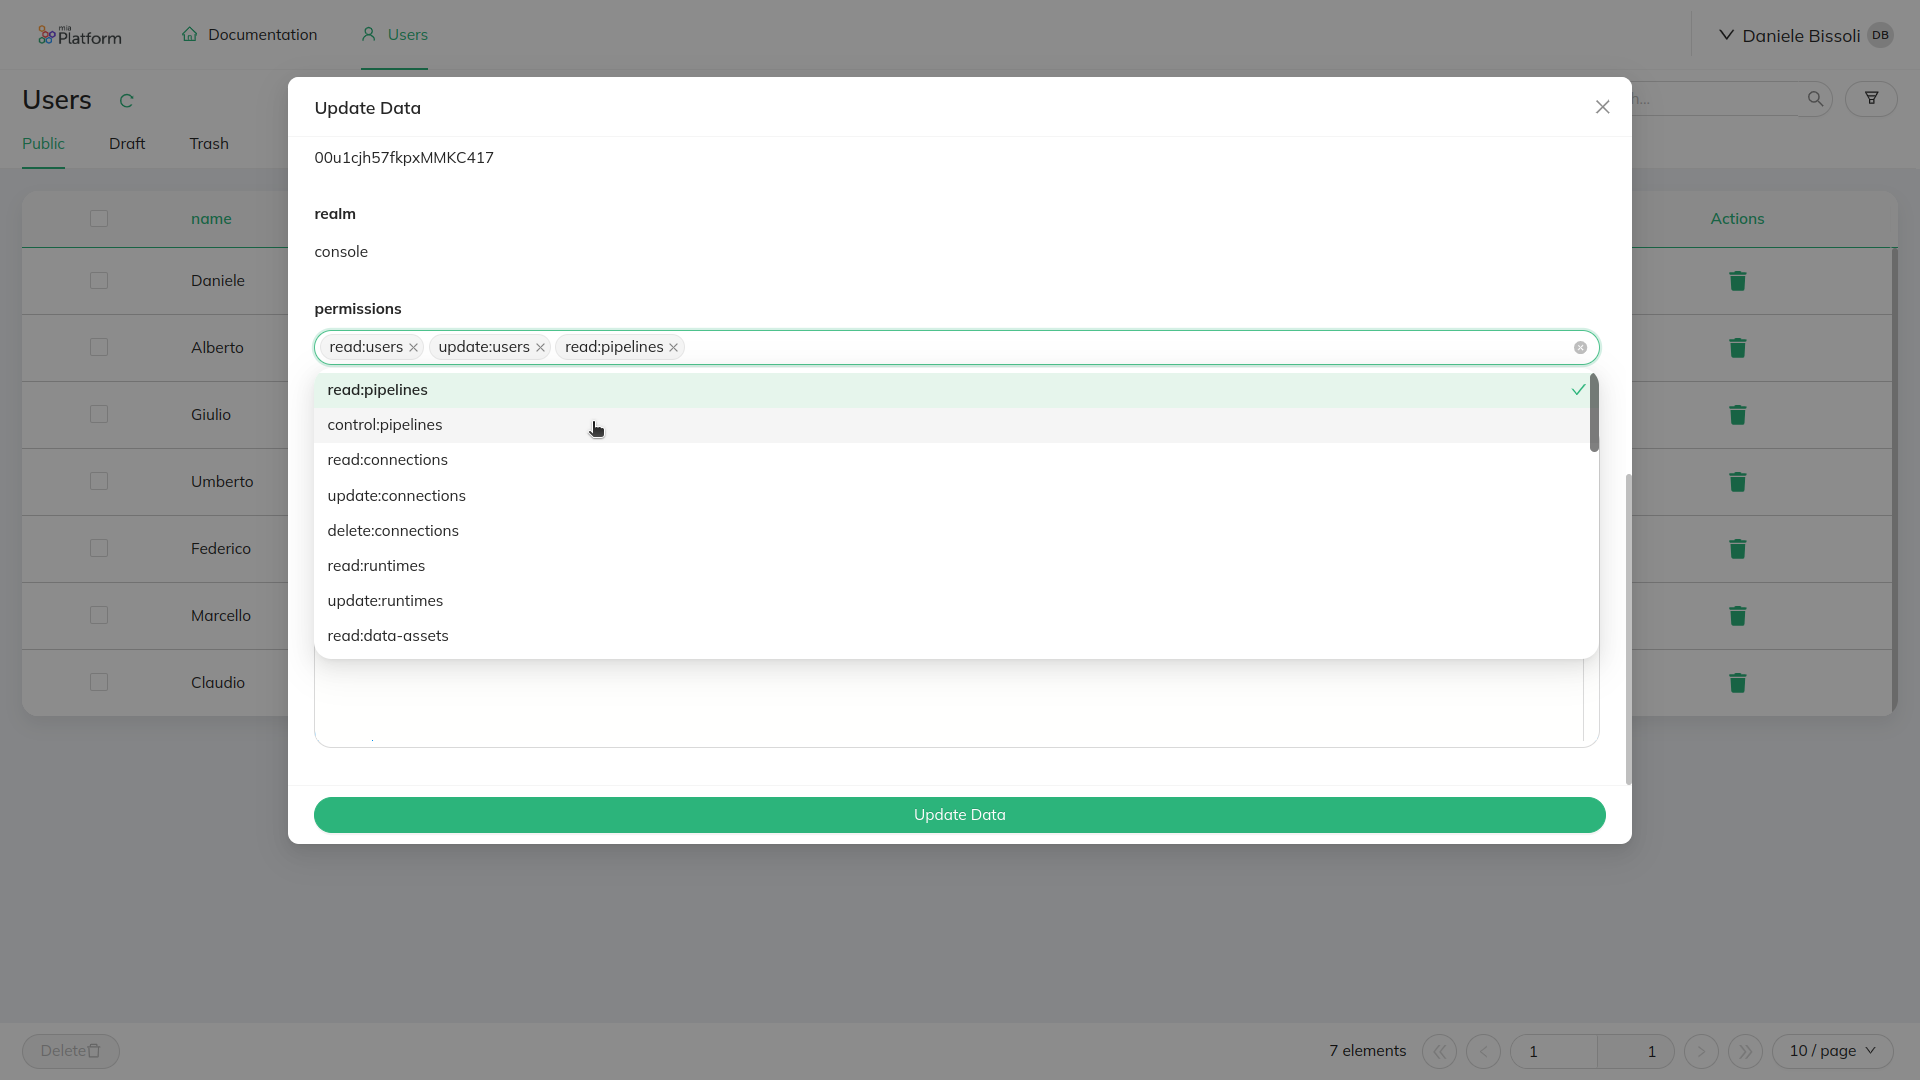
Modal window showing the
permissionsfield with the values that can be set in the array
Once the needed permissions are added to the permissions, click the Update Data button to store the changes.
Now, the user who has just received the new permissions must log out and login again to be able to access Fast Data
Control Plane UI with the new set of grants.